No edit summary |
No edit summary |
||
| Line 4: | Line 4: | ||
<table class="wikitable" style="width:100%; border-collapse:collapse; border:3px solid #4D4D4D; margin: 0;"> | <table class="wikitable" style="width:100%; border-collapse:collapse; border:3px solid #4D4D4D; margin: 0;"> | ||
<tr> | <tr> | ||
<th style="width:10%; min-width:80px; min-height:50px; padding:25px; margin:0px; border:3px solid #4D4D4D; text-align:center;">This page is simply for setting up controllers via | <th style="width:10%; min-width:80px; min-height:50px; padding:25px; margin:0px; border:3px solid #4D4D4D; text-align:center;"> | ||
This page is simply for setting up controllers via Dolphin. If you're here to see how the game works, head to [[Tatsunoko_vs_Capcom:_Ultimate_All_Stars/System|Game System Overview]]. If you're looking for notation and what the buttons do, head to [[Tatsunoko_vs_Capcom:_Ultimate_All_Stars/Notation|Notation]]. | |||
</th> | </th> | ||
</tr> | </tr> | ||
</table> | </table> | ||
| Line 14: | Line 13: | ||
|header=Quick Start | |header=Quick Start | ||
}} | }} | ||
<table class="wikitable" style="width:100%; border-collapse:collapse; border:3px solid #4D4D4D; margin: 0;"> | |||
<tr> | |||
<th style="width:10%; min-width:80px; min-height:50px; padding:25px; margin:0px; border:3px solid #4D4D4D; text-align:center;"> | |||
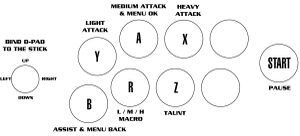
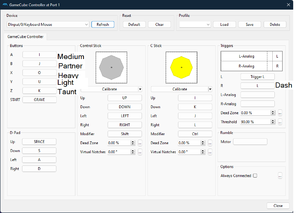
Using Gamecube controls, configure your stick/controller to match the image. For more specific information on mechanics or basic controls, please visit the [[Tatsunoko_vs_Capcom:_Ultimate_All_Stars/System|System Page]]. | |||
</th> | |||
</tr> | |||
<tr> | |||
<th style="text-align:center;"> | |||
[[File:F7PFRMW.jpg|thumb|center]] | |||
</th> | |||
</tr> | |||
</table> | |||
{{TvCComboHeader | {{TvCComboHeader | ||
|header=Not So Quick Start | |header=Not So Quick Start | ||
}} | }} | ||
<table class="wikitable" style="width:100%; border-collapse:collapse; border:3px solid #4D4D4D; margin: 0;"> | |||
<tr> | |||
<th style="width:10%; min-width:80px; min-height:50px; padding:25px; margin:0px; border:3px solid #4D4D4D; text-align:center;"> | |||
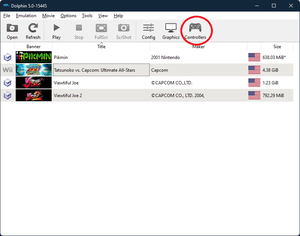
* On the main GUI, look in the top right for the controller settings. | |||
</th> | |||
</tr> | |||
<tr> | |||
<th style="text-align:center;"> | |||
[[File:Controls 1.png|thumb|center]] | |||
</th> | |||
</tr> | |||
<tr> | |||
<th style="width:10%; min-width:80px; min-height:50px; padding:25px; margin:0px; border:3px solid #4D4D4D; text-align:center;"> | |||
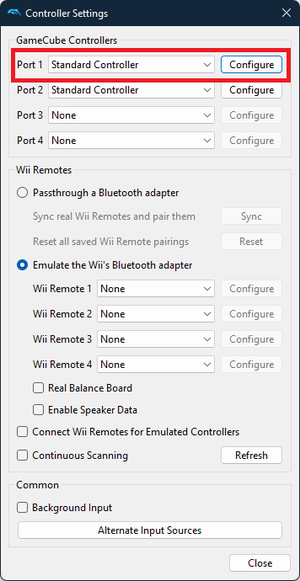
* Make sure '''Standard Controller''' is set under Gamecube controller. While you can use the classic controller, the CC will remain unresponsive if both the Gamecube and CC are active on port 1. Additionally, the CC has a different button layout than what this guide uses. For simplicity, it's best to set '''Wii Remote 1''' to '''None''' to avoid conflicts. If you use Dolphin for other Wii purposes, remember to enable this if needed. With that, go ahead and click configure. | |||
</th> | |||
</tr> | |||
<tr> | |||
<th style="text-align:center;"> | |||
[[File:Controls 2.png|thumb|center]] | |||
</th> | |||
</tr> | |||
<tr> | |||
<th style="width:10%; min-width:80px; min-height:50px; padding:25px; margin:0px; border:3px solid #4D4D4D; text-align:center;"> | |||
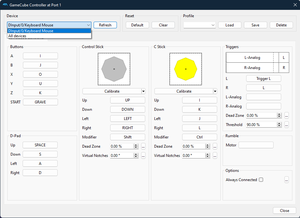
* Check that your input device is available under devices and also be sure to select it. Devices that are not selected will not respond. If you do not see your device, hit '''Refresh'''. If you still cannot see it, restart Dolphin. If even that doesn't work, check if your input device is functional with another game or listed under Device Manager. | |||
</th> | |||
</tr> | |||
<tr> | |||
<th style="text-align:center;"> | |||
[[File:Controls 3.png|thumb|center]] | |||
</th> | |||
</tr> | |||
<tr> | |||
<th style="width:10%; min-width:80px; min-height:50px; padding:25px; margin:0px; border:3px solid #4D4D4D; text-align:center;"> | |||
* Click on the input you wish to change and press the corresponding button. The inputs are listed in the image to the right (pic related uses keyboard, don’t copy it unless you want to try your keyboard in hitbox style). Use whatever is comfortable for you on your controller, just remember the '''A'''/'''Medium''' button is the menu confirmation and the '''B'''/'''Partner''' button is the back button. The directional inputs are valid on both D-pad and analog, so again, whatever works for you. If you wish to keep a profile for TvC, make a name for it in the '''Profile''' box and hit save. If you ever alter your controls and want to come back, click '''Load''', but be mindful it loads with the same device you used, so if you switch from stick to pad to hitbox or whatever, you may need multiple profiles. | |||
</th> | |||
</tr> | |||
<tr> | |||
<th style="text-align:center;"> | |||
[[File:Controls 4.png|thumb|center]] | |||
</th> | |||
</tr> | |||
<tr> | |||
<th style="width:10%; min-width:80px; min-height:50px; padding:25px; margin:0px; border:3px solid #4D4D4D; text-align:center;"> | |||
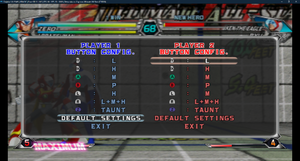
* If done correctly, you’re good to go, but as a precaution, run to controller setup and hit default controls anyway. If you have any special macros you want to alter or get rid of altogether (dash/burst/etc.), change them and go about your day. | |||
</th> | |||
</tr> | |||
<tr> | |||
<th style="text-align:center;"> | |||
[[File:Controls 5.png|thumb|center]] | |||
</th> | |||
</tr> | |||
</table> | |||
{{Navbox-TVC}} | {{Navbox-TVC}} | ||
Revision as of 10:28, 5 October 2024
Foreword
Foreword
|
This page is simply for setting up controllers via Dolphin. If you're here to see how the game works, head to Game System Overview. If you're looking for notation and what the buttons do, head to Notation. |
|---|
Quick Start
Quick Start
|
Using Gamecube controls, configure your stick/controller to match the image. For more specific information on mechanics or basic controls, please visit the System Page. |
|---|
Not So Quick Start
Not So Quick Start
|
|---|
|
|
|
|
