Marvel VS Capcom: Infinite/X

From SuperCombo Wiki

Mvci logo.png

Story

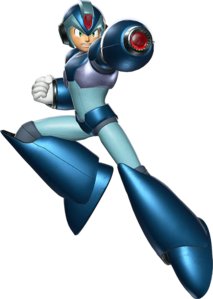
The long-awaited Maverick Hunter is here! Vs. series veteran and Mega Man X deuteragonist Zero may have gotten here first, but X is nonetheless ready to prove he's just as capable. Hailing from the futuristic era of 21XX, X is the creation of brilliant roboticist Dr. Light and the first robot in the world of Mega Man that can think for himself, and defends the world from evil robots known as Mavericks that have gone haywire. Much like his older brother, X gains new weapons from each Maverick he defeats, and is ready to bring his varied arsenal to bear in Marvel vs. Capcom Infinite.

Gameplay

X is a character that relies on his projectiles to keep the opponent at bay and create opportunities to cover his partners tag-in. His X Buster can be charged for a strong projectile that cannot be reflected and has additional follow ups, including a far reaching overhead attack. He also has the ability to chain his special attacks together twice in succession making it difficult for the opponent to approach him. If that's not enough, X can power himself up with the ever-strong Armor of Light, which grants X more powerful versions of his attacks. Pick X if you like a character who holds their own as a zoner and supports your team through heavy projectile use.

Strengths Weaknesses
  • Angles: X can cover a staggering array of angles, from the arcing curves of Boomerang Cutter, to the vertical column protected by Rising Fire, to the bouncing diagonal Sonic Blades, if there's a way an opponent can approach you, X can put projectiles in their path.
  • Armor of Light: A superb install that makes X take less damage and greatly improves his X Buster and Full-Power Charge Shot. His projectile game becomes truly oppressive in this mode.
  • Tag Options: Not only do X's projectile angles make him great for teaming up with another projectile partner and flooding the screen with hitboxes, but his Boomerang Cutter and Frost Shield also allow him to lock down and capture his opponents for a partner to get easy pressure or combo opportunities.
  • Slow to Start: It can be difficult to get X's projectiles out if he's getting rushed down intensely. His most potent ones have relatively high start-up, and he lacks any alternative ranged options that come out quickly.
  • Lack of Defensive Options: X has no invulnerable special moves and no invulnerable level 1 Hypers, and his level 3 Hyper has fewer invuln frames than some others do, and covers a small area, making it inferior compared to many other characters when X gets caught in a scramble. This can be an especially troubling weakness for a zoning-focused character when faced against more agile opponents.
  • Stubby Normals: While X may cover many angles with his specials, his normals are a bit on the shorter side, especially compared to his partner Zero. This can make picking up punishes or conversions at a slightly-further-than-point-blank range awkward.
MVC2 MVCI Mega Man X art.png

Players to Watch

Beast- plays X/Zero (Soul)
SCMike- plays X/Captain America (Power)
JBDahIslandMan- playss X/Zero (Soul)

Character Vitals

CHARACTER DATA
Health:
9,000
Double Jump:
No
Air Dash:
2-Way
Air Dash/Jump count:
1
Misc Movement:
-

Move List

Unique Trait

Maverick Weapon Rekka: X has the ability to chain Maverick weapon specials twice in succession to create unique zoning patterns. The second weapon fired, colloquially referred to as an "EX" version, will be a stronger version of that weapon.

Normals

Standing Light Punch
Mvci lp.png
Damage Guard Startup Active Recovery On Hit On Block Properties
300 Mid 5 2 11 -2 -1
X's shortest-ranged and fastest grounded normal. Can chain into itself and 2LP. Your go-to tool in a scramble situation to try to pick up a hit.
Standing Heavy Punch
Mvci hp.png
Damage Guard Startup Active Recovery On Hit On Block Properties
700 Mid 9 5 26 -5 -10
X takes a small step forward when using this move. Despite this, its reach is a little shorter than you'd want for a 5HP, and at the absolute tip of 5LK's range, or even just somewhat close to the tip of 2LK's range, it will whiff in a combo vs. a grounded opponent. In these circumstances, chain directly to 5HK or 2HK instead. However, it does have the advantage of granting noticeably more Hyper Combo gauge than X's other heavy attacks, even the higher-damaging 6HK. The forward step it takes also makes it suitable for OTGs, such as after Buster Combo: Slide, as this helps keep you in range for 6HK or 2HP after.
Standing Light Kick
Mvci lk.png
Damage Guard Startup Active Recovery On Hit On Block Properties
500 Mid 8 4 19 +1 -4
Has noticeably more reach than 5LP and 5HP, with speed between the two. X takes a small step forward when using this move. A good combo starter when you need some speed but don't want the harsher scaling your LPs incur.
Standing Heavy Kick
Mvci hk.png
Damage Guard Startup Active Recovery On Hit On Block Properties
700 Mid 14 4 21 0 -5
Has noticeably more reach than 5HP, but is also nearly twice as slow to start. X takes a large step forward when using this move.
Crouching Light Punch
Mvci down.pngMvci lp.png
Damage Guard Startup Active Recovery On Hit On Block Properties
300 Mid 6 3 9 0 -1
Can chain into itself and 5LP. Has somewhat more reach than 5LP.
Crouching Heavy Punch
Mvci down.pngMvci hp.png
Damage Guard Startup Active Recovery On Hit On Block Properties
700 Mid 10 8 23 +22 -10 Launch
X's launcher. X takes a large step forward when using this move.
Crouching Light Kick
Mvci down.pngMvci lk.png
Damage Guard Startup Active Recovery On Hit On Block Properties
500 Low 7 3 26 -5 -10
X's fastest low. Has noticeably more reach than 2LP, but can't chain into itself like the light punches can. Can also be useful for OTGs after Buster Combo: Slide, when you want the combo to be easier at the cost of damage compared to using other normals.
Crouching Heavy Kick
Mvci down.pngMvci hk.png
Damage Guard Startup Active Recovery On Hit On Block Properties
700 Low 14 4 21 +43 -16 Hard Knockdown
X's sweep. X takes a large step forward when using this move. This is X's longest-reaching grounded normal, and an important part of his combo game, as the combo possibilities on airborne opponents are quite different from grounded ones, so for certain Maverick Weapon combos, you'll want to be juggling your opponent rather than hitting them standing.
Jumping Light Punch
j.Mvci lp.png
Damage Guard Startup Active Recovery On Hit On Block Properties
300 High 5 8 7 - -
X's fastest air normal, but also the one with the poorest reach. Its hitbox is placed noticeably higher vertically than j.LK, which can help it fulfill its role as an air-to-air, especially when you're trying to perform a quick rising one to suddenly intercept an approaching opponent.
Jumping Heavy Punch
j.Mvci hp.png
Damage Guard Startup Active Recovery On Hit On Block Properties
700 High 9 8 21 - -
Is somewhat faster than j.HK, and has very slightly more horizontal reach, but moderately worse vertical reach.
Jumping Light Kick
j.Mvci lk.png
Damage Guard Startup Active Recovery On Hit On Block Properties
500 High 8 3 26 - -
This normal's combination of speed and angle makes it a suitable air-to-air attack when horizontal reach is your priority. It's also able to hit the tallest characters in the game crouching when done instantly from a short hop, creating instant overhead mix-ups.
Jumping Heavy Kick
j.Mvci hk.png
Damage Guard Startup Active Recovery On Hit On Block Properties
700 High 12 4 25 - - Ground Bounce & Hard Knockdown (Air Combo only)
This has the longest downward reach of any of X's air normals, making it perfect for using during air dash approaches vs. a grounded opponent.

Command Normals

Buster Blow
Mvci fwd.pngMvci hp.png
Damage Guard Startup Active Recovery On Hit On Block Properties
700 Mid 8 4 28 -8 -13 Jump-Cancellable
This move is jump-cancellable, leading to normal jump loops and other combos near ground level. Also X's fastest heavy attack.
Shoulder Tackle
Mvci fwd.pngMvci hk.png
Damage Guard Startup Active Recovery On Hit On Block Properties
750 Mid 19 3 27 -6 -11 Wall Bounce (vs. airborne)
A slow, solidly higher-damage normal to throw into grounded strings, as well as causing a wall bounce that can be used for certain corner combos and sometimes even mid-screen combo extensions utilizing charged X Busters and various Maverick Weapons (particularly Boomerang Cutter and Frost Shield).
Point Blank Buster
j.Mvci down.pngMvci hp.png
Damage Guard Startup Active Recovery On Hit On Block Properties
700 High 14 8 17 - -
Halts your aerial trajectory. Part of many of X's air combos, often followed up with either an aerial X Buster or an air dash forward into j.HK to end an air string.

Misc

Throw
Mvci fwd.png or Mvci back.pngMvci hp.png
Damage Guard Startup Active Recovery On Hit On Block Properties
1000 Throw 3 1 - - - Hard Knockdown
Additional damage scales by 50%. Forward throw can be combo'd off of solo when your opponent is cornered by dashing up and using a light attack to OTG. Back throw can be combo'd off of solo when your back is in the corner, though the follow-ups are highly restrictive. Tagging makes comboing off of either of these easier, though the window off of back throw is still fairly tight.
Air Throw
Mvci fwd.png or Mvci back.pngMvci hp.png
Damage Guard Startup Active Recovery On Hit On Block Properties
1000 Throw 3 1 - - - Hard Knockdown
Additional damage scales by 50%. Neither can be combo'd off of solo at all under practical circumstances, without prior set-up. Forward air throw can barely be combo'd off of with an immediate tag into a fast normal (the tag itself won't hit) in the corner. Back air throw, starting with your back to the corner, has a much more generous window to tag in and combo off of it, and this time the tag itself does connect.
Tag
Mvci tag.png
Damage Guard Startup Active Recovery On Hit On Block Properties
500 Mid 6 8 44 +33 +28 Wall Bounce (airborne hit only)
Hit/Block adv is dependent on when you Cancel.png your tag-in.

Specials

X Buster
Mvci qcf.pngMvci lp.png or Mvci hp.png
Damage Guard Startup Active Recovery On Hit On Block Properties
700
500*2 (1000)
450*3 (1305)
Mid 11/25~95/? - 31/36/? Projectile
Chargeable
Airok.png
Hard Knockdown (level 2 and 3)
Wall Bounce (near wall only, level 3)
Frame data is for level 1/2/3.
X fires a shot from his buster cannon. The charged versions have multiple hits, and so cannot be reflected by advancing guard. The level 2 version knocks down, allowing a confirm into Full-Power Charged Shot, and the level 3 version (only available in Armor of Light) sends them flying before knocking them down, allowing time for many follow-ups. Each level of the shot also makes the hitbox progressively larger. Although its recovery is shorter than some other fireball specials, it's almost always better to cancel it into one of X's follow-ups rather than letting the move complete on its own.
Buster Combo: Dash
(during ground X Buster)Mvci lp.png
Damage Guard Startup Active Recovery On Hit On Block Properties
- - - - 55 - -
X dashes forward after firing. Interruptible with other actions (such as movement, normals, specials) on frame 32.

Repeated X Busters followed by Buster Combo: Dashes can severely restrict your opponent's ability to move and allow you to easily approach behind a wall of projectiles to commence your offense. It also allows X to reposition, in case he misses his shot and is in danger of the opponent manuevering around the shot and trying to hit him where he fired from. X recovers faster from an X Buster by performing this than by doing nothing, so you almost always want to at least do either this or Buster Combo: Backstep, if nothing else.
Buster Combo: Buster Hammer
(during ground X Buster)Mvci hp.png
Damage Guard Startup Active Recovery On Hit On Block Properties
1200 High 33 11 16 +77 -6 Ground Bounce & Hard Knockdown
The overhead option from X Buster. You can tag into your partner to do a low around the same time as when it connects to create hard-to-blockable situations. The ground bounce allows for easy combo conversions, and the hitbox is fairly large. It can even cross up in rare situations.
Buster Combo: Backstep
(during ground X Buster)Mvci lk.png
Damage Guard Startup Active Recovery On Hit On Block Properties
- - - - 55 - -
X hops backwards after firing the X Buster. Although it cannot be interrupted quickly like Buster Combo: Dash, you can still buffer specials during the aerial portion of the move and they will be performed as soon as X lands (24 frames after the backstep begins).

In combination with Buster Combo: Dash, this helps make it harder to predict where X will be after firing an X Buster. In addition, if you see your opponent is open when you commence this, you can cancel into Full-Power Charge Shot, causing you to perform it inches off the ground, making you recover quickly upon landing. This allows you to follow up with a second Full-Power Charge Shot solo, causing serious damage from range with no difficulty. Note this technique only works outside of your install; the install version of Full-Power Charge Shot takes too long to take advantage of this since he fires two shots.
Buster Combo: Slide
(during ground X Buster)Mvci hk.png
Damage Guard Startup Active Recovery On Hit On Block Properties
900 Low 12 13 22 +42 -17 Hard Knockdown
The low option from X Buster. Can catch mashing opponents off guard in blockstrings, but its real use is for combos, where it leads to solid damage, provided you still have an OTG available.
Sonic Slicer
Mvci qcb.pngMvci lp.png or Mvci hp.png
Damage Guard Startup Active Recovery On Hit On Block Properties
600/400x2 (800) Mid 12/? - 33/? -15/? -8/? Projectile
Frame data and damage are for regular/EX.
An energy blade or blades fired at a 45 degree angle that bounce off of walls upon contact with them. This allows X to cover a lot of vertical space, especially at angles opponents typically want to approach from. It's also used in many Maverick Weapon juggle combos, generally in combination with Boomerang Cutter or Frost Shield (generally Sonic Slicer comes first). Firing these then tagging is a great way to persuade your opponent to stay on the ground while your partner takes advantage of the coverage.
Sonic Slicer (Armor of Light)
Mvci qcb.pngMvci lp.png or Mvci hp.png
Damage Guard Startup Active Recovery On Hit On Block Properties
660/440x2 (880) Mid - Projectile
Frame data is regular/EX.
Boomerang Cutter
Mvci qcb.pngMvci lk.png or Mvci hk.png
Version Damage Guard Startup Active Recovery On Hit On Block Properties
Mvci lk.png 250x3 (750)/350x5 (1410) Mid 24/? - 31/? -7/? -12/?
Mvci hk.png 250x3 (750)/350x5 (1410) Mid 30/? - 30/? -6/? -11/?
Frame data and damage are for regular/EX.
An arcing projectile that travels on a curved path up and over grounded opponents' heads, then after traveling part of the screen, comes back to X, dragging the opponent with it. Repeated perfectly-timed advancing guards nullify this dragging element, however.
Leaves grounded opponents grounded, allowing for some restands when paired with Frost Shield or possibly other ice attacks from your choice of partner. Goes away if X gets hit, but not if he's forced to block, potentially bolstering your reward for playing defensively vs. an impatient opponent.
Boomerang Cutter (Armor of Light)
Mvci qcb.pngMvci lk.png or Mvci hk.png
Version Damage Guard Startup Active Recovery On Hit On Block Properties
Mvci lk.png 300x4 (1140)/350x6 (1890) Mid
Mvci hk.png 300x4 (1140)/350x6 (1890) Mid
Frame data and damage are for regular/EX.
Frost Shield
Mvci qcf.pngMvci lk.png or Mvci hk.png
Version Damage Guard Startup Active Recovery On Hit On Block Properties
Mvci lk.png 800/750+500 (1200) Mid
Mvci hk.png 800/750+500 (1200) Mid
Frame data and damage are for regular/EX.
A projectile with strange behavior that first appears in an inactive state as it travels up to its maximum height, not interacting with other projectiles nor colliding with characters, then activating and interacting as normal on its way down. It freezes opponents it makes contact with, though for a bit less time than other similar freezes (i.e. Hawkeye's). LK version lands at about halfway across the screen, and the HK version lands at about 95% of the screen. The EX version is a touch thicker, allowing the EX HK version to just barely reach grounded opponents from full screen.

Notably, this projectile does not disappear if X gets hit, even once it becomes active.
Frost Shield (Armor of Light)
Mvci qcf.pngMvci lk.png or Mvci hk.png
Version Damage Guard Startup Active Recovery On Hit On Block Properties
Mvci lk.png 880/825+550 (1320) Mid
Mvci hk.png 880/825+550 (1320) Mid
Frame data and damage are for regular/EX.
Rising Fire
Mvci down.pngMvci down.pngMvci lp.png or Mvci hp.png
Version Damage Guard Startup Active Recovery On Hit On Block Properties
Mvci lp.png 1200/1300 Mid 12/? - 36/? +16/? -17/?
Mvci hp.png 1200/1300 Mid 12/? - 36/? +20/? -17/?
Frame data and damage are for regular/EX.
An anti-air fireball that travels in a purely vertical line. This is great for stopping superjump approaches, and can combo raw into Special Weapons Rush if cancelled quickly. Doesn't have dramatically different properties on its EX version compared to the other weapons. LP version travels at a middling speed, HP version travels faster, though neither is extremely fast or slow, and the speed difference isn't huge. Deals the highest damage in a single hit out of any of the Maverick Weapon specials.
Rising Fire (Armor of Light)
Mvci down.pngMvci down.pngMvci lp.png or Mvci hp.png
Version Damage Guard Startup Active Recovery On Hit On Block Properties
Mvci lp.png 1320/1430 Mid
Mvci hp.png 1320/1430 Mid
Frame data and damage are for regular/EX.

Hypers

Full-Power Charge Shot
Mvci qcf.pngMvci lp.pngMvci hp.png
Damage Guard Startup Active Recovery On Hit On Block Properties
750x5 (3000) Mid 12+1 (13 total) - 60/54 +32 -23 Airok.png
Projectile
Wall Bounce
Hard Knockdown
X fires a larger-than-normal fully-charged Buster Shot that travels across the screen quickly. Recovery is listed as ground/air.
Due to the air version's improved recovery, if you fire this hyper while airborne but close to the ground and still have OTG available, you can follow with another Full-Power Charge Shot. This becomes trivial to do by utilizing Buster Combo: Backstep after an X Buster. This hyper also sometimes misses one of its hits when performed as close to the corner as possible, resulting in it doing 2550 damage instead.
Double Charge Shot
(while equipped with Armor of Light) Mvci qcf.pngMvci lp.pngMvci hp.png
Damage Guard Startup Active Recovery On Hit On Block Properties
500x10 (3880) Mid 12+1 (13 total) - 72/? Airok.png
Projectile
Wall Bounce
Hard Knockdown
A doubled version of Full-Power Charge Shot. Recovery is listed as ground/air.
Much like Full-Power Charge Shot, you can use the same air recovery improvements to land two of these consecutively. X does spend more time performing the animation, since it's two separate shots, which makes whiffing this in neutral deadlier than the weaker version.
Special Weapons Rush
Mvci qcf.pngMvci lk.pngMvci hk.png
Damage Guard Startup Active Recovery On Hit On Block Properties
150x36 (3750) Mid 12+6 (18 total) 74 69 +41 -49 Projectile
Hard Knockdown
X fires waves of Boomerang Cutters and Sonic Slicers in a wide vertical cone above him. Active indicates the period where X continually shoots weapons, recovery begins from the first frame after he fires the last wave of weapons.

Does more damage the lower to the ground and closer to X you can keep the opponent throughout its duration, as the weapons spread out across their travel, causing opponents to be hit by fewer and fewer of them as they ascend. Has enough hitstun that, when used early in a combo before much hitstun decay has set in, the opponent will fall all the way to the ground in an OTG-able state even from beyond the top of the screen.

While it theoretically does more damage than Full-Power Charge Shot, it being ground-only makes it more restrictive to use in combos, and that damage really only meets its fullest potential when the aforementioned conditions are met.
Armor of Light
Mvci down.pngMvci down.pngMvci lk.pngMvci hk.png
Damage Guard Startup Active Recovery On Hit On Block Properties
- - 13+6 (19 total) - - - -
X equips the full suite of armor upgrades Dr. Light left for him in the first Mega Man X game, granting him several benefits for about 10 seconds:
  • 6HP (Buster Blow) becomes cancellable into 2HP, 5HK, 2HK, and 6HK.
  • Maverick Weapons become 10% more damaging, have larger hitboxes, and faster startup; some even gain additional properties.
  • X takes 10% less damage from enemy attacks.
  • X Buster gains a new maximum level of charge, which deals even more damage, has an even bigger hitbox, and cause a wall bounce.
  • X Buster charges to level 2 faster than before.
  • Full-Power Charge Shot becomes upgraded to the Double Charge Shot version, dealing more damage and covering more of the screen.
  • Special Weapons Rush deals slightly more damage but remains otherwise unchanged.
Ultimate Strike
Lvl 3

Mvci qcb.pngMvci lp.pngMvci hp.png
Damage Guard Startup Active Recovery On Hit On Block Properties
5686 (33 hits) Mid 6+1 (7 total) 9 54 +56 -44 Invuln frames 1-15
Hard Knockdown
(no further combos allowed)
X temporarily transforms into his Ultimate Armor from Mega Man X4. This move generates a brief hitbox all around X's body that triggers a cutscene upon hitting an opponent. The armor change is purely cosmetic, as X will return to whatever armor he had on before the hyper once it completes.

Hitboxes

Videos


Technology

Combos

Strategy

Partner Selection

Stone Selection

Power

Time

Reality

Soul

Space

Mind

Match ups

How to fight X

Top of Page

Game Navigation

General
Controls
Notation
HUD
Glossary
System
FAQ
Capcom Characters
Arthur
Chris
Chun-Li
Dante
Firebrand
Frank West
Haggar
Jedah
Monster Hunter
Morrigan
Nemesis
Ryu
Sigma
Spencer
Strider
X
Zero
Marvel Characters
Black Panther
Black Widow
Captain America
Captain Marvel
Doctor Strange
Dormammu
Gamora
Ghost Rider
Hawkeye
Hulk
Iron Man
Nova
Rocket Raccoon
Spider-Man
Thanos
Thor
Ultron
Venom
Winter Soldier