Setting up controls on FightCade
Buttons used (FightCade)
Heritage For The Future uses only 4 attack buttons (6 buttons if you include training/dev mode) which are:
Weak Punch - A
Medium Punch - B
Strong Punch - C
Stand - Stand/S
Not in use 1 - Used for training and debug mode
Not in use 2 - Used for training and debug mode
Other
Coin - Inserts a coin
Start - Taunt, Enables play for P1 or P2, Re-challenge and a color button in character select
Keyboard
The most common setup for keyboard is
W - Up
S - Down
A - Left
D - Right
I - Weak Punch (A)
O - Medium Punch (B)
P - Strong Punch (C)
J / Space - Weak Kick (S)
Pad
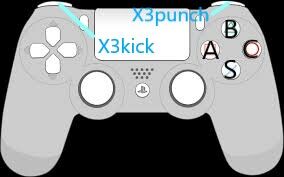
The most common setup for pad is
Square / X - Weak Punch (A)
Triangle / Y - Medium Punch (B)
Circle / B - Strong Punch (C)
X / A - OR - R1 / RB - Weak Kick (S)
Fightstick
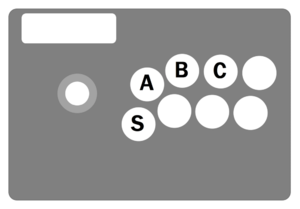
The most common setup for a Fightstick is
Top Row:
-Weak Punch (A)
-Medium Punch (B)
-Strong Punch (C)
Bottom Row:
-Weak Kick (S)
Notation
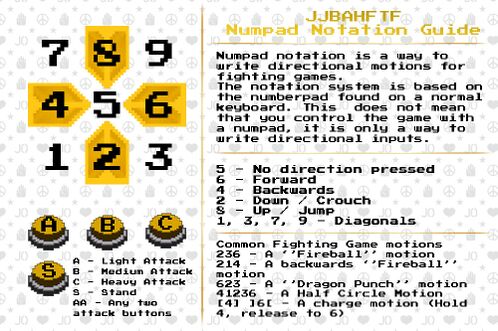
Number Notation
AA - Double button press. Simultaneously pressing two different strength buttons, like A+B.
6 - Forward - Tilt stick forward/towards the opponent. (X-axis)
4 - Back - Tilt stick backward/away from the opponent. (X-axis)
8 - Up - Tilt stick upwards. (Y-axis)
2 - Down - Tilt stick downwards. (Y-axis)
236 - Quarter circle forward/Hadouken/Fireball - Tilt stick downwards, then to downwards and forward, then forward.
214 - Quarter circle backward - Tilt stick downwards, then to downwards and backward, then backward.
41236 - Half circle forward - Tilt stick backwards, then to downwards and backward, then to downward, then to downwards and forward, then forward.
63214 - Half circle backward - Tilt stick forwards, then to downwards and forward, then to downward, then to downwards and backward, then backward.
623 - Dragon punch - Tilt stick forwards, then to downward, then to downward and forward.
"360°" / 8426 - Full circle - Unlike other games diagonals can be skipped for consistency, and only a 270° motion is needed.
720° / 84268426 - Double Full Circle - Complete a 720 degree rotation of the stick.
[4]]6[ / [2]]8[ - Charge - Hold 4 or 2 (Depending) then press 6 or 8 respectively.
Numpad notation refers to the use of numbers for directional inputs, meaning that movement inputs are listed down as numbers from the numpad on a keyboard.
Numpad notation is not hard to learn. It might be difficult to remember at first but once learned it is the fastest and easiest way to write down any combos, moves or techniques into text form.
Numpad notation applies for all control layouts. Stick, pad or keyboard. The actual buttons you use for movement do not matter, as long as they correspond to a direction.
All notations are written in a way that the character is facing right and on the left side of the screen, EVEN IF THE COMBO HAS THE CHARACTER SWITCH SIDES.
(Example: FORWARD (6) DOES NOT BECOME BACKWARDS (4) when on the right side of the screen and facing left)
Button Notation
- A - Light Attack/Jab
- B - Medium Attack
- C - Heavy Attack
- S - Stand button. This may be used for multiple things depending on character (see Character Types below)
- Start - Start/Taunt button
- Coin - Coin Button (FightCade)
Connectors
- s. - The following move is a Stand On move.
- rs. - Stand in Remote mode. Does not apply to Devo's doll as his remote mode acts like stand activation
- j. - The following move is an air move.
- m. - The following move is the magic series version of this move.
- +: Used between two other pieces of notation to signify that they should be performed at the same time. i.e. "S+5A".
- xx (Sometimes x): Used between two other pieces of notation to signify that the first should be cancelled (Interrupted earlier than it would finish otherwise) into the second.
- ,- Indicates a link. Press the attack button right after the first attack ends.
- > Indicates a follow-up. Input the next attack right after the first hit connected with the opponent.
- / and 'or' - Indicates an alternative move or an alternative button to press. Such attacks can be interchangeable in combos.
- sh. - Short Hop. Indicates that the move needs to be performed after a Short Hop. This is performed by tapping 7/8/9 briefly.
- hj. - Hyper jump. Requires you to perform a regular jump right after tapping 2 briefly.
- hh. - Hyper Hop. Same as above except you also need to tap the jump button briefly.
- d. - While dashing. You need to input 66 to dash forward or 44 to dash backward.
- d.j. - Dashing jump. Requires the player to dash before inputting the jump. While similar to Hyper jumps, Dash jumps have their own unique physics.
- d.sh. - Dashing short hop. Same as above, except tap the jump button instead of holding it.
- o. - Stand out. Used when you use a normal that requires your stand when it’s already out, i.e Jotaro o66c after oki.
Special Actions
- Dash: (66 or 44). Your character will make a short dash towards or away from your opponent. All dashes (including back dashes) are cancelable into attacks; some characters may instantly cancel their dash by pressing 4/6 during the dash; some characters may extend their dash by holding forwards/backwards on the second tap. Some dashes are also faster than others, and some may be hops or jumps as opposed to sliding motions.
- Stand On Double/Triple Jump: This allows your character to perform a second jump in the air. The double jump may be performed at any point during the initial airtime, and in any direction. Triple jumps are only possible during Remote Mode (see below). Weapon Stand users, even with Stand Mode on, cannot perform double jumps.
- Pushblock: (A+B+C while blocking an attack) This action pushes an attacking opponent back a short distance as you block their attacks. Can also be used on projectiles. Note that only one source can be Push Blocked at a time. This can greatly reduce the amount of blockstun from most attacks if done as early as possible.
- Guard Cancel: (623+any attack while blcoking) Your character will immediately break from their block animation and will perform a character specific attack with invincibility. All guard cancel techniques involve some invulnerable frames, though their usefulness depends on the character.
- Air-Teching: (any two attack buttons pressed at the same time while falling) This technique involves your character righting themselves in mid-air so they can subsequently block/perform attacks/move. Hold a direction while pressing two attacks to move in the held direction. Performing an air-tech while close to the ground will result in your character ground-teching, giving them full invincibility on their recovery. Air-teching normally also has some invincibility frames - both grounded and aerial teching are Stand On, special, and super cancelable.
- Grab: (6/4C while close to opponent) The character will perform an unblockable grab attack that throws the opponent. 6C activates a forwards throw, and 4C does a backwards one. Both forwards and backwards grabs are the same. The only way to break from an opponent's throw is via a Tech Hit (see below). Throw damage and launching effects depends on the character using them.
- Tech Hit: (4/6C when grabbed) Performing this action will result in your character and the opponent bouncing off each other instead of either throwing. Note that unlike in some other games, there is no means of escaping a throw when the throw has already been begun The tech window is extremely small at 2 frames - the frame the grab activates, and the frame after.
- Roll: (A+B+C In Stand Off) Your character will slide forwards a short distance, leaving a trail of shadows. All attacks excluding throws will go right through a character in this state, including projectiles and supers. The character can also go through their opponent. Old Joseph is an exception, in that he can roll while Stand On - at the cost of most of it's invincibility frames. You can't tech hit while rolling.
- Stand Activation Attack: (236S+S in Stand Off) This turns you Stand On and performs an attack at the same time. Effects of Stand Attacks vary greatly by character. Some characters' Stand Activation Attacks (Kakyoin, Abdul, Polnareff, Devo) immediately put them in Remote Mode.
- Remote Mode: (6+AA): Allows your Stand to be controlled independently to your character. You may perform attacks as normal controlling only the Stand, while your character is left completely defenseless. Stands in Remote Mode can triple jump, and may have access to the same Stand On moves, with some minor exceptions. Pressing the S button calls the Stand back, but your character is entirely vulnerable until the Stand returns. Only available to certain characters (Kakyoin, Abdul, Polnareff, Devo). Note: if the character (not the Stand) is hit during Remote Mode, they'll take far more damage than usual. Another note is that Devo is the only character who is permanently in Remote Mode whenever he turns on his Stand.
- Tandem Attack: (214+S) When used by Active Stand users, you have 80 frames to input commands (as you would when performing regular moves). When the superflash finishes, your character's Stand will rush forward and perform all of the techniques you performed during the input period. Your character is controllable separately to the Stand; you can perform your own basic attacks to buffer the attacks the Stand is performing. If the Stand is hit during a Tandem Attack, it will disappear. You can lengthen the time for input by holding the Stand button during superflash. While holding the Stand button it will drain your Stand bar. All Tandems count as supers, and every Tandem is invincible on frame 1.
- Custom Combo (214+S) When used by Weapon Stand Users, the character will rush forwards with blue afterimages in their wake, with their Stand Bar rapidly depleting. Moves performed during the Custom Combo are generally much faster, and always cancelable. If the Stand Bar completely runs out, the Custom Combo will end the moment the user finishes their magic series attacks (Example: Chaka's Custom Combo works like this: 6C 236C > 236C 5A >Bar depletes< 5AA 5B 5C 2B 236C > 236C, allowing Chaka to continue the majority of the combo even when the Stand bar is empty.)
- Walk Cancel (WC) Cancel the recovery of the last move by holding either 6 or 4. Mostly useful while linking into Stand On normals, as the previous attack's duration usually interrupts stand activation until interrupted by movement.
- Dash Cancel (DC) Forward dashes for most characters can be canceled by holding either 4 or 1, while backdashes can be canceled by holding 6 or 3.
- Crouch Cancel (CrC) Cancel the recovery of the last move by holding or tapping 2 at a very specific time. Crouch cancel links can be very hard to perform right. This mostly applies to some standing Light attacks.
- Instant Air Dash (IAD) It means you input 66 or 44 instantly after jumping into midair. Only some characters can perform Air Dashes.
- Stand Crash (!SC) Causes a special animation that pauses the game for a very brief moment, followed up by a huge hitstun caused by the last move. This is only used in combos that will cause a Stand Crash on opponents with Stand On. Note that some attacks will always cause a Stand Crash while some will instantly turn it off. If Stand Crash is not a part of the combo or the combo works without it, !SC will not be added to the combo notation.
- Stand Crush Stand Crash performed versus a blocking opponent. Breaks their guard and causes additional hitstun (usually performed during combo resets.)


