| Line 97: | Line 97: | ||
{{MoveData | {{MoveData | ||
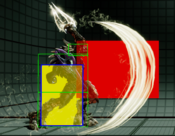
|image= | |image= Arbiter SLKhb.png|thumb | ||
|caption= | |caption= (Slayer) | ||
|name= Standing Light Kick | |name= Standing Light Kick | ||
|linkname= 5LK | |linkname= 5LK | ||
| Line 104: | Line 104: | ||
|data= | |data= | ||
{{AttackData-KI2013 | {{AttackData-KI2013 | ||
|damage= | |damage= 10 (2%) | ||
|counter-hit damage= | |counter-hit damage= 14 (3%) | ||
|potential damage= -- | |potential damage= -- | ||
|shadow on hit= | |shadow on hit= 1.6 | ||
|shadow on block= | |shadow on block= 2.4 | ||
|guard= | |guard= Mid | ||
|startup= | |startup= 5 | ||
|active= | |active= 4 | ||
|recovery= | |recovery= 16 | ||
|total duration= | |total duration= 24 | ||
|on hit= | |on hit= 0 | ||
|on counter-hit= | |on counter-hit= +2 | ||
|on block= | |on block= -1 | ||
|special properties= | |special properties= Flipout | ||
|description= | |description= To Do | ||
}} | }} | ||
}} | }} | ||
| Line 124: | Line 124: | ||
{{MoveData | {{MoveData | ||
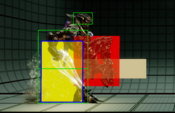
|image= | |image= Arbiter SMKhb.png|thumb | ||
|caption= Test Caption | |caption= Test Caption | ||
|name= Standing Medium Kick | |name= Standing Medium Kick | ||
| Line 131: | Line 131: | ||
|data= | |data= | ||
{{AttackData-KI2013 | {{AttackData-KI2013 | ||
|damage= | |damage= 18 (5%) | ||
|counter-hit damage= | |counter-hit damage= 22 (6%) | ||
|potential damage= -- | |potential damage= -- | ||
|shadow on hit= | |shadow on hit= 2.4 | ||
|shadow on block= | |shadow on block= 4 | ||
|guard= | |guard= Mid | ||
|startup= | |startup= 9 | ||
|active= | |active= 3 | ||
|recovery= | |recovery= 20 | ||
|total duration= | |total duration= 31 | ||
|on hit= | |on hit= +2 | ||
|on counter-hit= | |on counter-hit= +7 | ||
|on block= | |on block= 0 | ||
|special properties= | |special properties= | ||
|description= | |description= To Do | ||
}} | }} | ||
}} | }} | ||
| Line 151: | Line 151: | ||
{{MoveData | {{MoveData | ||
|image= | |image= Arbiter SHKhb.png|thumb | ||
|caption= | |caption= (Fire Weapon [Standing]) | ||
|name= Standing Heavy Kick | |name= Standing Heavy Kick | ||
|linkname= 5HK | |linkname= 5HK | ||
| Line 158: | Line 158: | ||
|data= | |data= | ||
{{AttackData-KI2013 | {{AttackData-KI2013 | ||
|damage= | |damage= 28 (7%) | ||
|counter-hit damage= | |counter-hit damage= 28 (7%) | ||
|potential damage= -- | |potential damage= -- | ||
|shadow on hit= | |shadow on hit= 2.4 | ||
|shadow on block= | |shadow on block= 4 | ||
|guard= | |guard= Mid | ||
|startup= | |startup= 12 | ||
|active= | |active= -- | ||
|recovery= | |recovery= 41 | ||
|total duration= | |total duration= 53 | ||
|on hit= | |on hit= -12 | ||
|on counter-hit= | |on counter-hit= -12 | ||
|on block= | |on block= -22 | ||
|special properties= | |special properties= | ||
|description= | |description= *2 bullet combo damage is 37.4 (10%) / 3.1 PD. | ||
**3 bullet combo damage is 46 (12%) / 6 PD. | |||
}} | }} | ||
}} | }} | ||
Revision as of 23:55, 2 February 2025
Introduction
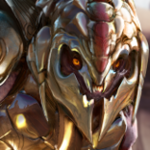
An Arbiter is is a ceremonial, religious, and political rank bestowed upon Covenant Elites. Thel ‘Vadam was given this rank by the Covenant leadership, the High Prophets, to atone for past failures. Having survived a mission that was meant to be his death, Arbiter learned of the plans of the High Prophets that would doom all sentient life in the galaxy, and subsequently allied himself with humanity, the Covenants enemies, to stop the High Prophets and save the galaxy.
GAMEPLAY
Arbiter is a character made to dominate the midrange with long range normals and specials, in addition to having specific tools taylor made for both close and long ranges to round out his toolkit. These tools let arbiter swap from a midrange gameplan to an effective setup game once he takes the lead, as well as play a hit and run strategy when the opponent is close to death. As a tradeoff for his varied toolkit, Arbiter struggles defensively, lacking a meterless reversal, as well as lacking solid buttons for abare. With all this in mind, Arbiter is able to effeciently bully his opponent and keep his lead going with setups, while unfortunatley needing to gamble a bit more then others may when put on the backfoot.
| Strengths | Weaknesses |
|---|---|
|
|
Normal Moves
Standing Moves
| Damage | Counter-Hit Damage | Potential Damage | Shadow On Hit | Shadow On Block | Guard | Startup | Active | Recovery | Total Duration | On Hit | On Counter-Hit | On Block | Special Properties |
|---|---|---|---|---|---|---|---|---|---|---|---|---|---|
| 8 (2%) | 12 (3%) | -- | 1.6 | 2.4 | Mid | 6 | 2 | 9 | 16 | +2 | +5 | 0 | Chain |
To Do | |||||||||||||
| Damage | Counter-Hit Damage | Potential Damage | Shadow On Hit | Shadow On Block | Guard | Startup | Active | Recovery | Total Duration | On Hit | On Counter-Hit | On Block | Special Properties |
|---|---|---|---|---|---|---|---|---|---|---|---|---|---|
| 18 (5%) | 22 (6%) | -- | 2.4 | 4 | Mid | 11 | 3 | 18 | 31 | +4 | +7 | 0 | - |
To Do | |||||||||||||
| Damage | Counter-Hit Damage | Potential Damage | Shadow On Hit | Shadow On Block | Guard | Startup | Active | Recovery | Total Duration | On Hit | On Counter-Hit | On Block | Special Properties |
|---|---|---|---|---|---|---|---|---|---|---|---|---|---|
| 28 (7%) | 32 (8%) | -- | 4 | 4.5 | Mid | 15 | 4 | 17 | 35 | +4 | +8 | +4 | - |
To Do | |||||||||||||
| Damage | Counter-Hit Damage | Potential Damage | Shadow On Hit | Shadow On Block | Guard | Startup | Active | Recovery | Total Duration | On Hit | On Counter-Hit | On Block | Special Properties |
|---|---|---|---|---|---|---|---|---|---|---|---|---|---|
| 10 (2%) | 14 (3%) | -- | 1.6 | 2.4 | Mid | 5 | 4 | 16 | 24 | 0 | +2 | -1 | Flipout |
To Do | |||||||||||||
| Damage | Counter-Hit Damage | Potential Damage | Shadow On Hit | Shadow On Block | Guard | Startup | Active | Recovery | Total Duration | On Hit | On Counter-Hit | On Block | Special Properties |
|---|---|---|---|---|---|---|---|---|---|---|---|---|---|
| 18 (5%) | 22 (6%) | -- | 2.4 | 4 | Mid | 9 | 3 | 20 | 31 | +2 | +7 | 0 | - |
To Do | |||||||||||||
| Damage | Counter-Hit Damage | Potential Damage | Shadow On Hit | Shadow On Block | Guard | Startup | Active | Recovery | Total Duration | On Hit | On Counter-Hit | On Block | Special Properties |
|---|---|---|---|---|---|---|---|---|---|---|---|---|---|
| 28 (7%) | 28 (7%) | -- | 2.4 | 4 | Mid | 12 | -- | 41 | 53 | -12 | -12 | -22 | - |
| |||||||||||||
Crouching Moves
| Damage | Counter-Hit Damage | Potential Damage | Shadow On Hit | Shadow On Block | Guard | Startup | Active | Recovery | Total Duration | On Hit | On Counter-Hit | On Block | Special Properties |
|---|---|---|---|---|---|---|---|---|---|---|---|---|---|
| - | - | -- | - | - | - | - | - | - | - | - | - | - | Chain |
Air Normals
| Damage | Counter-Hit Damage | Potential Damage | Shadow On Hit | Shadow On Block | Guard | Startup | Active | Recovery | Total Duration | On Hit | On Counter-Hit | On Block | Special Properties |
|---|---|---|---|---|---|---|---|---|---|---|---|---|---|
| - | - | -- | - | - | - | - | - | - | - | - | - | - | Chain |
Command Normals
| Damage | Counter-Hit Damage | Potential Damage | Shadow On Hit | Shadow On Block | Guard | Startup | Active | Recovery | Total Duration | On Hit | On Counter-Hit | On Block | Special Properties |
|---|---|---|---|---|---|---|---|---|---|---|---|---|---|
| - | - | -- | - | - | - | - | - | - | - | - | - | - | Chain |


