Introduction
Why pick Old Honda? Old Honda loses ST Honda's Oicho mixups, but gains important things as well:
- Regains his standing sweep kicks
- Has better ground fierce attacks
- Retains moving handslap
So the basics are HF-style grabby-into-slappy mixups.
O.Honda (sometimes called S-Honda, for 'Super') must be played with a fundamental understanding of SF2 mechanics and basic gameplay since he loses the ability to negative-edge oicho throw out many pressure situations and setups. O.Honda's general style will be more reliant on an understanding of proper usage of normals, throws, sweeps and footsies (stuffing attacks, baiting attacks, and continually applying safe pressure).
"Without further ado, it's time to start ... RUNNING!!!" - Killian
Competitive Overview
O.Honda (S-Honda) does very well against non-fireball characters, but keep in mind that many of his worst matchups (DeeJay, Chun, Guile, Shotos) are generally made even more difficult without the ability to quickly advance with Fierce HHS or continuously lock down your opponent with oicho setups in the corner. Shotos present a very difficult fight, especially O.Ken (S-Ken, 'Red Gouki') as he limits your ability to pressure with HHS due to his excellent SRK hitbox. As such, in a competitive environment you will ultimately end up facing many disadvantaged matchups and must learn to play perfectly in order to succeed. On the plus side, Honda vs. Claw is a very even matchup and perfectly winnable as long as you do not get knocked down midscreen. The matchups where O.Honda is superior to X-Honda are all already favorable matchups anyway, like Zangief, Blanka and arguably T. Hawk.
Important to understand if you are coming from X-Honda, S-Honda is almost a different character. Far more so than many old/new pairings, he isn't strictly worse but might be the most different old/new in the game. A large portion of your game play will revolve around normals, his HHS game is very different than the buffer-mash of X-Honda, and you have to block very differently without the ability to negative edge Ochio.
"If it bleeds, we can kill it." - Dutch
Picking Old E.Honda
To select O.E.Honda, choose E.Honda and then press ↑ ↑ ↑ ↓ Jab/Fierce, pressing Short simultaneously with the punch button for the alternate color.
| Normal | Secondary |
 |

|
--Born2SPD
Strengths And Weaknesses
Strengths
- Has the ability to land an incredible amount of non-combo damage and dizzy in a very short amount of time.
- Hundred Hand Slap pressure does great damage (hit and chip) and is very difficult for most of the cast to deal with.
- Has two good reversals that have invincible startup (jab headbutt, and lk/mk buttslam).
- Jump RH is hard for a lot of the cast to deal with if spaced in a certain way.
- Great crossup (splash) that pretty much can't miss.
- Some high priority/powerful ground normals.
- Pretty good combo ability thanks to hands and normals with good frames.
- Good set of frame traps that can confuse opponents not used to S-Honda
- Has the most sweeps in the game with 5, this can be combined with his good safe wakeup pressure
"Steel isn't strong boy, flesh is stronger!" - Thulsa Doom
Weaknesses
- Being a fat hurtbox character with a slow jump arc makes it very difficult to navigate a competent zoning fireball game.
- Slow/low recovery fireballs are a nightmare since he lacks the moving neutral jump hp new Honda has, and he can't use hands to dash forwards.
- MP and HP HHS require very quick button mashing, which can be an undesired variable when considering to main Honda since they are so vital to his game.
- Can be easily safe jumped, his reversals have very good invuln but long startup (similar to Boxer)
- Being a grappling in close character that can't tech throws can be rough in some matches (Chun Li)
"Why do you cry?" - Model 101
New & Old Versions Comparison
Here is the list of differences:
- Obvious stuff: O.E.Honda can not tech throws, does not have the Oicho Throw and Super;
- O.E.Honda has some differences in some of his normals:
- Close Standing Jab is exactly like the Far version. N.E.Honda received a new Close punch that combos into itself;
- Far Standing Jab has faster startup/recovery and can be special canceled;
- Crouching Jab can be special canceled;
- Close Standing Strong is exactly like the Far version. N.E.Honda received a new Close punch that can be used in ticking;
- Far Standing Strong has faster recovery;
- Crouching Strong has better range and priority and can be used as anti air;
- Close Standing Fierce first active part has less active frames and the other active part has more active frames and better priority/range. The total of active frames is the same though;
- Far Standing Fierce is exactly like the Far version. N.E.Honda has a different version of O.E.Honda's Crouching Fierce with worse priority, worse startup, no knockdown, less damage potential, and no special cancel, but with a lot better recovery;
- Crouching Fierce is his classic sweep punch. N.E.Honda received a new Crouching punch that hits twice;
- Close Standing Short is a low hitting kick. N.E.Honda received a new Close knee that can be used in ticking;
- Far Standing Short is a fast hitting sweep. N.E.Honda has a different version of O.E.Honda's Crouching Short with bigger hurtbox and worse priority;
- Crouching Short is his classic spear kick. N.E.Honda received a near identical version of O.E.Honda Close Standing Short instead;
- Close Standing Forward is a low hitting kick. N.E.Honda received a new Close knee that can be used in ticking;
- Far Standing Forward is a fast hitting sweep. N.E.Honda has a different version of O.E.Honda's Crouching Forward with bigger hurtbox, less damage on the first hit and worse priority;
- Crouching Forward is his classic 2-hit spear kick. N.E.Honda received a near identical version of O.E.Honda Close Standing Forward;
- Far Standing Roundhouse is his classic long range sweep. For N.E.Honda it's the same as the Close version and that long range sweep became a Command Normal;
- Neutral Jumping Jab is basically the same but with bigger hurtbox during the active frames. The horizontal priority is the same though;
- Diagonal Jumping Jab has faster startup and a lot more active frames but with bigger hurtbox during the active frames. The horizontal priority is the same though;
- Neutral Jumping Strong second active part has bigger hurtbox. The horizontal priority is the same though;
- Diagonal Jumping Strong has 2 active parts and more active frames, but the first hitting part has less active frames if compared with N.E.Honda's version;
- Neutral Jumping Fierce can not be steered and has bigger hurtbox during the active frames and some frames later. The horizontal priority is the same though;
- Diagonal Jumping Fierce has bigger hurtbox during the active frames and some frames later. The horizontal priority is the same though;
- Neutral Jumping Short has better horizontal priority;
- Both Jumping Forwards have better horizontal priority but worse vertical priority. All in all N.E.Honda's version is better;
- Neutral Jumping Roundhouse has a lot better priority and twice as many active frames;
- Diagonal Jumping Roundhouse has a lot better priority but can not be used as a crossup attack;
- O.E.Honda's HHS behaves differently: has a little faster startup, a lot faster recovery, less minimal attacking duration and steerable properties. N.E.Honda's version is slower and can not be steered but Strong and Fierce versions create a fast impulse once activated;
- O.E.Honda's Headbutts do less knockback on block/hit;
- O.E.Honda's Jab Headbutt has slower startup and Strong headbutt has twice as much active frames;
- O.E.Honda's Butt Drop has smaller hitbox on the second active part (when he's falling) which gives him worse crossup ability;
In general, O.E.Honda has a better normal set (has a awesome Standing Jab, can use his Fierce Chop from any range, has all his knockdown normals from HF and most of his other normals have little benefits). But because his HHS is so different he is played in a different way (like HF Honda). Both versions have pretty much the same strength though, they are just played differently. Choose whichever version suits your style better.
"You are not you, you're me." - Carl Hauser
Moves Analysis
"Run! Get to tha Choppa!" - Dutch
Disclaimer: To better understand the diagrams, read this.
Normal Moves
Ground Normals
- Close/Far Standing Jab:
| Damage | 20[1] |  |
 |
 |
 |

|
| Stun | 0~5 | |||||
| Stun Timer | 40 | |||||
| Chain Cancel | No | |||||
| Special Cancel | Yes* | |||||
| Frame Advantage | +6 | |||||
| Frame Count | 2 | 2 | 4 | 2 | 1 | |
| Simplified | 1 + 4 | 4 | 3 | |||
O.Honda's single most important normal due to the fast speed, great range, and invincible hitbox along the length of arm. This move will hit standing and crouching characters. Constantly poke with this move to apply safe pressure at max range, stuff your opponent's normals and specials, and bait reversals. This move is also special-cancellable, often used to cancel into jab HHS for combos, pressure and punishing. This move also makes a good anti-air.
- Crouching Jab:
| Damage | 20[1] |  |
 |
 |
 |

|
| Stun | 0~5 | |||||
| Stun Timer | 40 | |||||
| Chain Cancel | No | |||||
| Special Cancel | Yes* | |||||
| Frame Advantage | +2 | |||||
| Frame Count | 2 | 2 | 8 | 2 | 1 | |
| Simplified | 1 + 4 | 8 | 3 | |||
Due to the range of this attack, it can be used as a good neutral poke/counter-poke to stuff opponent's moves that would go under st.jab, and is often used to continue pressure after a blocked jump-in. It is also special-cancellable, for example into HHS. cr.jab can be a surprisingly good FAR anti-air when you are not close enough to properly use st.fierce. This usage shines against Ken/Ryu and even their S versions as it will beat their jump roundhouse clean.
- Close/Far Standing Strong:
| Damage | 24[1] |  |
 |
 |
 |
 |
 |

|
| Stun | 5~11 | |||||||
| Stun Timer | 60 | |||||||
| Chain Cancel | No | |||||||
| Special Cancel | No | |||||||
| Frame Advantage | +9 | |||||||
| Frame Count | 2 | 2 | 2 | 4 | 2 | 2 | 1 | |
| Simplified | 1 + 6 | 4 | 5 | |||||
Not an awful punisher when you need a quick button to use. This can serve you well getting some damage from a blocked or whiffed SRK or flash kick that you otherwise may be unable to punish. Grounded combo starter if you don't wish to use a jump-in, as you can link cr.jab xx HHS after a hit as long as it's close enough. Can link to itself if done meaty for a ton of stun.
- Crouching Strong:
| Damage | 24[1] |  |
 |
 |
 |
 |
 |

|
| Stun | 5~11 | |||||||
| Stun Timer | 60 | |||||||
| Chain Cancel | No | |||||||
| Special Cancel | No | |||||||
| Frame Advantage | -1 | |||||||
| Frame Count | 2 | 2 | 2 | 8 | 6 | 4 | 1 | |
| Simplified | 1 + 6 | 8 | 11 | |||||
Can serve as a decent damage counter-poke due to its range. This move works well vs. Guile's cr.forward, it's also a far anti-air against any Guile jump in. This move is also a brick wall against Zangief and T. Hawk, it's an anti-air and can out poke most of their normals. At round start this will stuff all shoto fireballs safely if timed correctly. It does have a slow recovery and can't link to or from basically anything.
- Close/Far Standing Fierce:
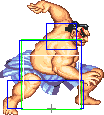
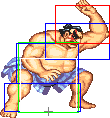
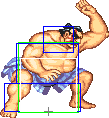
| Damage | 30[2] |  |
 |
 |

|
| Stun | 10~16 | ||||
| Stun Timer | 80 | ||||
| Chain Cancel | No | ||||
| Special Cancel | No | ||||
| Frame Advantage | -3 / +0 | ||||
| Frame Count | 3 | 3 | 3 | 4 | |
| Simplified | 1 + 6 | 7 | |||
 |
 |
 |
 |

| |
| Frame Count | 7 | 5 | 3 | 2 | 1 |
| Simplified | 18 | ||||
Excellent attack that N.Honda players wish they had. The first part of this move makes for an excellent late anti-air/trade, just wait for the opponent to almost reach you before throwing out. This move can also be used on cross-ups, situations where you'll lose charge or don't have it will often trade. Cammy and Blanka LK in particular. This is also a pretty good range poke/punish, that can be used to punish SRK recovery and fireball startup, for example, if you have nothing else to attack with.
- Crouching Fierce:
| Damage | 32[2] |  |
 |

|
| Stun | 5~11 | |||
| Stun Timer | 130 | |||
| Chain Cancel | No | |||
| Special Cancel | Yes* | |||
| Frame Advantage | -10 | |||
| Frame Count | 2 | 3 | 4 | |
| Simplified | 1 + 5 | 4 | ||
 |
 |
 |
 |
 |

| |
| Frame Count | 6 | 8 | 6 | 4 | 3 | 1 |
| Simplified | 28 | |||||
This attack is crucial to O.Honda's throw mixup game. Since throwing is done with back or forward plus an attack, opponents must STAND to throw or counter-throw, so the most basic ST throw mixup is throw or low attack. Use this normal in situations where you expect your opponent to throw or counter-throw, or just throw this move out to condition players to expect this attack and habitually block low. Grants a sweep knockdown so you can continue forward with pressure. This move has pretty bad recovery, so you are best to cancel to fierce HHS every time you use cr.fierce. If you have down charge you can cancel short buttslam for a deceptively fast mixup. This is also a good attack to link into if you see your opponent stand-blocking your st.jab pokes.
- Close Standing Short: (Base max activation range: 57)
| Damage | 18[1] |  |
 |
 |
 |

|
| Stun | 0~5 | |||||
| Stun Timer | 40 | |||||
| Chain Cancel | No | |||||
| Special Cancel | Yes | |||||
| Frame Advantage | +6 | |||||
| Frame Count | 1 | 2 | 3 | 3 | 1 | |
| Simplified | 1 + 3 | 3 | 4 | |||
Fast low hitting normal that can be combo'ed off of with some practice. This move is useful in mixing up O.Honda's tick-throw game. Depending on the distance you can also link to stand jab, then cancel into hands. The kick press will give you a little extra time to buffer the punch presses for the jab into cancel.
- Far Standing Short:
| Damage | 20[1] |  |
 |
 |
 |
 |
 |

|
| Stun | 5~11 | |||||||
| Stun Timer | 130 | |||||||
| Chain Cancel | No | |||||||
| Special Cancel | No | |||||||
| Frame Advantage | +2 | |||||||
| Frame Count | 3 | 3 | 3 | 4 | 3 | 3 | 1 | |
| Simplified | 1 + 9 | 4 | 7 | |||||
Fast standing normal that grants a sweep knockdown if it hits. Generally if you are close enough to use this attack you have other options available, but keep it in mind. This move is also a frame trap with other standing sweeps, so if they block this follow up with another and catch them standing up.
- Crouching Short:
| Damage | 18[1] |  |
 |
 |
 |
 |
 |

|
| Stun | 0~5 | |||||||
| Stun Timer | 40 | |||||||
| Chain Cancel | No | |||||||
| Special Cancel | No | |||||||
| Frame Advantage | +3 | |||||||
| Frame Count | 3 | 3 | 3 | 3 | 3 | 3 | 1 | |
| Simplified | 1 + 9 | 3 | 7 | |||||
While this move has a good hitbox, it is rarely used when st.jab could be used in its stead. Some additional experimentation may yield some good uses for this normal.
- Close Standing Forward: (Base max activation range: 70)
| Damage | 22[1] |  |
 |
 |
 |

|
| Stun | 5~11 | |||||
| Stun Timer | 60 | |||||
| Chain Cancel | No | |||||
| Special Cancel | No | |||||
| Frame Advantage | +5 | |||||
| Frame Count | 3 | 3 | 5 | 7 | 1 | |
| Simplified | 1 + 6 | 5 | 8 | |||
A lot like close stand lk, but not cancellable, mainly used as tick into throw.
- Far Standing Forward:
| Damage | 24[1] |  |
 |
 |
 |
 |
 |

|
| Stun | 5~11 | |||||||
| Stun Timer | 130 | |||||||
| Chain Cancel | No | |||||||
| Special Cancel | No | |||||||
| Frame Advantage | +2 | |||||||
| Frame Count | 3 | 3 | 3 | 4 | 5 | 6 | 1 | |
| Simplified | 1 + 9 | 4 | 12 | |||||
Sweep knockdown low hitting attack, great to interrupt the startup or recovery of certain attacks. To be used in conjunction with far standing RH, depending on distance.
- Crouching Forward:
| Damage | 14[1] + 24[1] |  |
 |
 |
 |
 |
 |

|
| Stun | 5~11 + 5~11 | |||||||
| Stun Timer | 60 + 60 | |||||||
| Chain Cancel | No | |||||||
| Special Cancel | No | |||||||
| Frame Advantage | -1 / +2(+1) | |||||||
| Frame Count | 3 | 3 | 3 | 6 | 5 | 4 | 1 | |
| Simplified | 1 + 6 | 3 | 6 | 10 | ||||
A beefy hitbox and large active time make this a great normal to whiff in front of you if expecting the opponent to throw something out, or to stuff attacks already on-screen. Funnily enough, this is a great normal to use in a Honda mirror match as it beats HHS and headbutt.
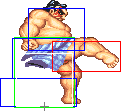
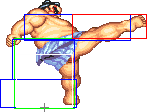
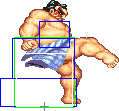
- Close Standing Roundhouse: (Base max activation range: 70)
| Damage | 4[2] + 30[0] |  |
 |
 |
 |
|
| Stun | 3~9 + 10~16 | |||||
| Stun Timer | 40 + 80 | |||||
| Chain Cancel | No | |||||
| Special Cancel | No | |||||
| Frame Advantage | -4 / -1(-2) | |||||
| Frame Count | 2 | 2 | 3 | 3 | 5 | |
| Simplified | 1 + 7 | 3 | 5 | |||
 |
 |
 |

| |
| Frame Count | 8 | 6 | 3 | 1 |
| Simplified | 18 | |||
Good damage and stun but no followups. Has use as an O/S between throw/opponent jumping out of your throw attempt.
- Far Standing Roundhouse:
| Damage | 28[2] |  |
 |
 |
 |
 |
 |

|
| Stun | 5~11 | |||||||
| Stun Timer | 130 | |||||||
| Chain Cancel | No | |||||||
| Special Cancel | No | |||||||
| Frame Advantage | -3 | |||||||
| Frame Count | 3 | 3 | 3 | 6 | 8 | 10 | 1 | |
| Simplified | 1 + 9 | 6 | 19 | |||||
This is your other go-to normal aside from st.jab. Excellent long-range poke that knocks down on hit. It can beat or trade with fireball startup, can punish the recovery of whiffed normals and specials, and is an all-around annoying attack to use. Presents a safe-jump opportunity after knockdown if you can perfect your jump timing. At max hit range of this normal, once you jump in you are in perfect range for st.jab and throw attempts (walk forward a few pixels to be in throw range, therefore safe from every other character's normal throw range).
- Crouching Roundhouse:
| Damage | 32[2] |  |
 |
 |
 |
 |
 |

|
| Stun | 5~11 | |||||||
| Stun Timer | 130 | |||||||
| Chain Cancel | No | |||||||
| Special Cancel | No | |||||||
| Frame Advantage | -3 / +7 | |||||||
| Frame Count | 3 | 4 | 6 | 4 | 8 | 6 | 1 | |
| Simplified | 1 + 7 | 6 | 4 | 8 | 7 | |||
Due to the length of active frames, this move has great use as an 'early' counter-poke, a move to throw out and beat your opponent's attack and sweep him in the process. This is especially good in the Guile matchup when expecting Guile to poke with cr.forward or a sweep of his own. This move is also ripe for wake-up shenanigans, as your opponent will often have to block the wrong way if this is used as a meaty on their wakeup or landing from the air.
Aerial Normals
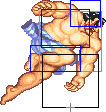
- Neutral Jumping Jab:
| Damage | 20[1] |  |
 |
 |
 |
|
| Stun | 1~7(-2) | |||||
| Stun Timer | 40 | |||||
| Frame Count | 2 | 3 | 3 | 30 | ∞ | |
| Simplified | 8 | 30 | ∞ | |||
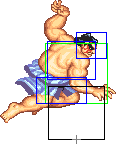
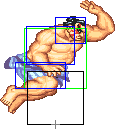
This move is able to stuff some attacks, e.g. if Chun-Li is trying to tripguard with cr.RH while you land, but you most likely won't be using this move very much.
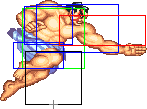
- Diagonal Jumping Jab:
| Damage | 16[1] |  |
 |
 |
 |

|
| Stun | 1~7(-2) | |||||
| Stun Timer | 40 | |||||
| Frame Count | 2 | 3 | 3 | 30 | ∞ | |
| Simplified | 8 | 30 | ∞ | |||
Great 'priority' so to speak. Good reactive anti-air to swat opponents out of the air, or pressed early if expecting opponent to meet you in the air. This is also a good move to use for safe-jump setups since it has very little hit and blockstun.
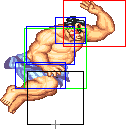
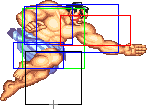
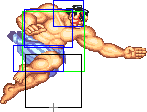
- Neutral Jumping Strong:
| Damage | 22[1] |  |
 |
 |
|
| Stun | 5~11 | ||||
| Stun Timer | 50(+10) | ||||
| Frame Count | 3 | 4 | 4 | 12 | |
| Simplified | 7 | 16 | |||
 |
 |
 |

| |
| Frame Count | 8 | 4 | 4 | ∞ |
| Simplified | ∞ | |||
Same as diagonal jump strong, good to defend yourself if they jump at you, or from walldives/headstomps.
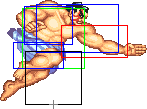
- Diagonal Jumping Strong:
| Damage | 22[1] |  |
 |
 |
|
| Stun | 5~11 | ||||
| Stun Timer | 50(+10) | ||||
| Frame Count | 3 | 4 | 4 | 12 | |
| Simplified | 7 | 16 | |||
 |
 |
 |

| |
| Frame Count | 8 | 4 | 4 | ∞ |
| Simplified | ∞ | |||
This move may be useful in hitting opponents above you in the air due to its hitbox arrangement.
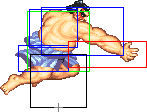
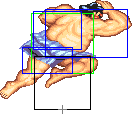
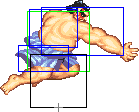
- Neutral Jumping Fierce:
| Damage | 32[2] |  |
 |
 |
 |
 |
 |

|
| Stun | 11~17(-1) | |||||||
| Stun Timer | 60(+20) | |||||||
| Frame Count | 3 | 4 | 6 | 8 | 4 | 4 | ∞ | |
| Simplified | 7 | 6 | ∞ | |||||
This move may be useful in a neutral-jump counter attack attempt for opponents jumping in at you, but nj.RH is usually better for this.
- Diagonal Jumping Fierce:
| Damage | 30[2] |  |
 |
 |
 |
 |
 |

|
| Stun | 3~9 | |||||||
| Stun Timer | 40 | |||||||
| Frame Count | 3 | 4 | 8 | 8 | 4 | 4 | ∞ | |
| Simplified | 7 | 8 | ∞ | |||||
Hits above and further than RH and can be a good attack to use when jumping on on crouching characters or trying to stuff certain moves, e.g. Dhalsim's slide. It can beat or trade with many normals that dj.RH is unable to, so if you find your dj.RH losing, this is a good attack to try for the next time the situation presents itself.
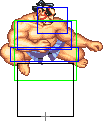
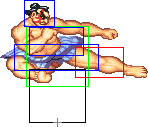
- Neutral Jumping Short:
| Damage | 16[1] |  |
 |
 |
 |

|
| Stun | 1~7(-2) | |||||
| Stun Timer | 40 | |||||
| Frame Count | 3 | 4 | 30 | 4 | ∞ | |
| Simplified | 7 | 30 | ∞ | |||
Great normal to use along with nj.RH for fireball evasion as it shrinks Honda's hurtbox enough. Depending on the opponent and strength of fireball, you can experiment with either jumping early over the fireball and using this move on your way down from the jump, or jumping at the last minute and throwing this move out to go through the early part of the fireball.
- Diagonal Jumping Short:
| Damage | 16[1] | 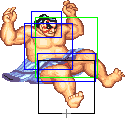 |
 |

|
| Stun | 1~7(-2) | |||
| Stun Timer | 40 | |||
| Frame Count | 3 | 4 | ∞ | |
| Simplified | 7 | ∞ | ||
Great for Honda's tick-throw game and an essential followup for tick-grab loops on some characters after a fierce grab. Low hitstun and blockstun means you can easily go into another throw or grab, or instead go for the cr.RH if opponent is expecting your throw and attempting to counter your throw. This move can beat some sweeps, but not all and it is very dependent on range. It will beat Guile's rh. sweep consistently, Dhalsim's rh and mk but rarely short, DeeJay rh will mostly trade unfavorably unless it hits early (before the up poke). Notably it can't challenge shoto or Sagat sweeps. If you are used to the HF version, note this one is heavily nerfed. This can also be used as a jumping-forward instant overhead to finish off your opponent. The move itself lowers Honda's jump arc and can make for a surprising option at sweep range, but being pretty slow in that sense, it is best used sparingly. This technique can be used to get over a fireball from far a few frames quicker as you'll land faster from the low jump arc. The result is sometimes getting a whiffed sweep (from Guile, DeeJay, Sagat and Shotos), which if you've buffered HHS can make for a nice punish. However the fireball jump itself has little room for error because the arc is lower, it is easier on characters with smaller fireballs (Guile). Also can be used as a crossup, but at the height that it hits, the opponent will recover by the time you reach the ground. Lastly there are characters for which after grab in the corner this is a safe jump and splash is not.
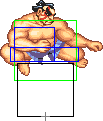
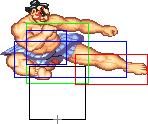
- Neutral Jumping Forward:
| Damage | 22[1] |  |
 |
 |
 |
 |
 |
 |
 |

|
| Stun | 5~11 | |||||||||
| Stun Timer | 50(+10) | |||||||||
| Frame Count | 3 | 4 | 12 | 4 | 4 | 4 | 4 | 4 | ∞ | |
| Simplified | 7 | 12 | ∞ | |||||||
No use at all really, doesn't shrink your hurtbox for nj'ing fireballs. Far worse priority for air to air defense. Rh comes out just as fast.
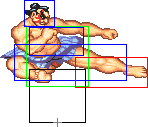
- Diagonal Jumping Forward:
| Damage | 22[1] |  |
 |
 |
 |
 |
 |
 |
 |

|
| Stun | 5~11 | |||||||||
| Stun Timer | 50(+10) | |||||||||
| Frame Count | 3 | 4 | 12 | 4 | 4 | 4 | 4 | 4 | ∞ | |
| Simplified | 7 | 12 | ∞ | |||||||
While it has worse priority than diagonal jump hk, it hits earlier, making it useful for punishment, and when jumping fireballs. Specifically this normal is useful hit from far out and go into HHS. It won't combo but is very difficult to interrupt. You'll also need to practice jumping without immediately charging down back as you'll get splash. This is also a good aerial to whiff to shrink your hurtbox as you land.
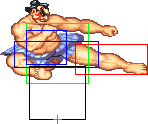
- Neutral Jumping Roundhouse:
| Damage | 30[2] |  |
 |
 |
 |
 |
 |
 |
 |

|
| Stun | 11~17(-1) | |||||||||
| Stun Timer | 60(+20) | |||||||||
| Frame Count | 3 | 4 | 12 | 4 | 4 | 4 | 4 | 4 | ∞ | |
| Simplified | 7 | 12 | ∞ | |||||||
Great normal to use along with nj.short for fireball evasion as it shrinks Honda's hurtbox. Depending on the opponent and strength of fireball, you can experiment with either jumping early over the fireball and using this move on your way down from the jump, or jumping at the last minute and throwing this move out to go through the early part of the fireball.
- Diagonal Jumping Roundhouse:
| Damage | 30[2] |  |
 |
 |
 |
 |
 |
 |
 |

|
| Stun | 3~9 | |||||||||
| Stun Timer | 40 | |||||||||
| Frame Count | 3 | 4 | 10 | 4 | 4 | 4 | 4 | 4 | ∞ | |
| Simplified | 7 | 10 | ∞ | |||||||
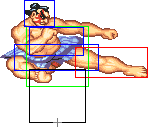
Your main jump-in attack that can stuff a surprising amount of moves. Don't be afraid to throw this move out as it can bully many characters. Just bear in mind if you are jumping in with no chance of this move hitting, it can extend Honda's hurtbox, letting opponents hit you where otherwise an empty jump would've been safe. For example, jumping at a shoto and having them walk forward and sweep. In general, you're safer off being pretty sure this move will hit something if you're going to use it.
Command Normals
- Double Knee Attack: (On ground and close, ←/↖/↑/↗/→ + Forward. Base max activation range: 11)
| Damage | 26[1] + 16[1] |  |
 |
 |
 |
|
| Stun | 5~11 + 5~11 | |||||
| Stun Timer | 60 + 60 | |||||
| Chain Cancel | No | |||||
| Special Cancel | No | |||||
| Frame Advantage | +5 / +8(+7) | |||||
| Frame Count | 3 | 3 | 3 | 3 | 3 | |
| Simplified | 1 + 9 | 3 | 3 | |||
 |
 |
 |

| |
| Frame Count | 2 | 2 | 2 | 1 |
| Simplified | 7 | |||
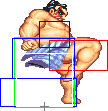
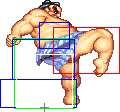
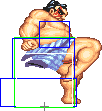
Slow startup means you won't be linking this off a jump-in (normally), but at or near point-blank you can link a cr.jab xx HHS for solid damage and stun. After hitting with this attack you are in perfect range to mix up between throw and sweep, so the move does have situational uses.
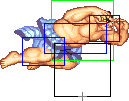
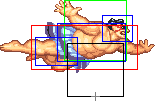
- Flying Sumo Press: (Jump diagonally, ↙/↓/↘ + Forward)
| Damage | 24[2] | 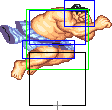 |
 |
|
| Stun | 5~11 | |||
| Stun Timer | 50 | |||
| Frame Count | 3 | 4 | ∞ | |
| Simplified | 7 | ∞ | ||
Beefy hitbox that can be great to use to counter an opponent's anti-air normals or air-to-air normals and also makes for a fairly braindead crossup. When using as a crossup, keep in mind that Honda's hurtbox will be wide enough that a proper reversal can still knock him out of this move. You will need to ensure your timing is correct such that Honda will reach the ground and recover from this move before the active frames of your opponent's reversal, otherwise you'll be smacked out of it regardless of what side of the opponent you are on.
Throws
"See you at the party Richtah!" - Douglas Quaid
E.Honda can throw using Strong, Fierce and Roundhouse. All his throws have the same range, which happens to be the best normal throw range in the game.
- Grabs Throwboxes:
| Throw | Holds |  |
 |

| |||
| Damage | 32 | Damage | 24 + 4*n | ||||
| Stun | 7~13 | Set amount of hits | 8 / 7 | ||||
| Stun Timer | 100 | Holds do no stun | |||||
| Range | (from axis) | 64 | (from throwable box) | 36 | |||
- Tawara Nage: (←/↖/↑/↗/→ + Strong)
E.Honda tosses the opponent. The direction of the joystick determines the direction the enemy gets tossed at. Useful to throw characters at a corner and due to the advantage Honda gets as a result of sending many opponents to the corner, it is often best to use this throw in place of a grab mixup until you have your opponent near the corner. This is also a great throw to use when your opponent is low on life due to the way ST calculates throw damage and recovery. The end result is if your opponent would die from taking full throw damage, they will and will be unable to throw-tech. Keep this in mind when performing your throw mixups and your opponent is low on life.
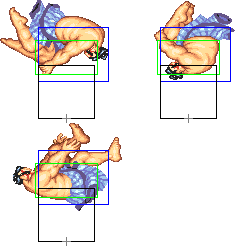
There is a glitch with this move as Old Honda, if you throw them toward the corner, and they tech out at a specific range, Honda will be stuck in his throw stance, and he cannot cancel out of it. He cannot be hit, or thrown, the timer will run out, and the game essentially softlocks. If this happens in a tournament it is consensus in Japan that the Old Honda player loses that game. You may also owe your opponent a couple of coins.
- Saba Ori: (←/↖/↑/↗/→ + Fierce)
This is the throw you will be using the most. It's untechable, does nice damage, and sets up crossup / walk under / tick shenanigans. You can even crossup / walk under when in the corner after a fierce grab (you can walk under, cr. RH for a crossup, or go for a crossup d + Forward, cr.Jab, Oicho, etc). Note that some characters (Balrog, Cammy, DeeJay, Vega, Fei Long) cannot be walked under outside of the corner.
This grab is essential to O.Honda's mixup and provides some very dirty pressure opportunities depending on the character which will be written up in further detail in the strategy section. In general, it is best to remain on the ground and walk forward to pressure shoto characters following this grab, and you are free to hold up-forward when the grab is ending and jump in pressure against the rest of the cast (Guile, DeeJay, Chun, Cammy, Dhalsim, Boxer, etc.)
- Sekkan Kyaku: (←/↖/↑/↗/→ + Roundhouse)
You can start a loop against any character with this grab (unless they recover against the corner). After a successful HK grab, hold up-forward to jump in with an air attack (such as j.MK) while the character is still recovering in the air, and you'll get to repeat the tick again. This usually does one hit less than the Fierce Grab. Note that following up with a jump-in attack after this grab is completely unsafe and can be reversed by pretty much every character.
Special Moves
"A man is defined by his actions, not his memories." - Kuato
- Hyakuretsu Harite a.k.a. Hundred Hands Slap: (Press P four times in quick succession)
Detailed Input: (The maximum time between each input is 15/12/9f (Jab/Strong/Fierce). Every P input of the same strenght is added to the input counter and everytime the counter is updated the timer is also reseted to its maximum value. The timer is decremented each frame. If the timer reaches 0, the counter is reseted to 0. To get the move out, first you need 4+ inputs within the required frequency, then the move will come out on the 4th or later P input that is within that frequency and is also entered during a moment in which a special move can come out i.e. with no move out or during a normal move startup frames so it can come out as a kara cancel)
- Startup:
 |

| |
| Frame Count (Jab) | 1 | 3 |
| Simplified (Jab) | 4 | |
| Frame Count (Strong) | 3 | 4 |
| Simplified (Strong) | 7 | |
| Frame Count (Fierce) | 4 | 6 |
| Simplified (Fierce) | 10 | |
- Active:
| Jab | Strong | Fierce |  |
 |

| |
| Damage | 24[1] / 22[1] | 26[2] / 24[2] | 28[3] / 26[3] | |||
| Stun | 5~11 | |||||
| Stun Timer | 100 | |||||
| Frame Count (Jab) | 4 | 4 | 4 | |||
| Frame Count (Strong) | 2 | 2 | 2 | |||
| Frame Count (Fierce) | 1 | 1 | 1 | |||
 |
 |

| |
| Frame Count (Jab) | 4 | 4 | 4 |
| Frame Count (Strong) | 2 | 2 | 2 |
| Frame Count (Fierce) | 1 | 1 | 1 |
NOTE: The low hitting frames (i.e. 3rd and 6th active parts on the "cycle") do slightly less damage.
NOTE: That frame data only provides the frame data for one "cycle" of the HHS animation, but does not present the minimal durations of the move. So, in case you only do the 4 punch presses needed you will get the minimal duration. Note that O.E.Honda can slap forever unlike N.E.Honda which has a limit. That detailed frame data can be found here:
| Cycles | 1 | 2 | 3 | Total | ||||||||||||||||
| Jab | MIN | 4 | 4 | 4 | 3 | X | X | 15 | ||||||||||||
| Strong | MIN | 2 | 2 | 2 | 2 | 2 | 2 | 2 | 1 | X | X | X | X | 15 | ||||||
| Fierce | MIN | 1 | 1 | 1 | 1 | 1 | 1 | 1 | 1 | 1 | 1 | 1 | 1 | 1 | 1 | 1 | X | X | X | 15 |
| Cycles | 1 | 2 | 3 | Total | ||||||||||||||||
- Recovery:
 |

| |
| Frame Count (Jab) | 1 | 1 |
| Simplified (Jab) | 2 | |
| Frame Count (Strong) | 3 | 1 |
| Simplified (Strong) | 4 | |
| Frame Count (Fierce) | 5 | 1 |
| Simplified (Fierce) | 6 | |
Honda delivers several open-hand strikes. You can (slowly) steer Honda horizontally while attacking, but you will not be able to maintain a down charge. Jab comes out faster and recovers faster, but does less damage and cycles slowly. The Fierce version, however, has longer start-up and recovery, but does more damage and cycles much faster.
HHS will often be your go-to poke and special-move stuffer outside of st.jab range, within or just outside of sweep range. This attack will beat or trade with fireball startup and is essential to your pressure game with Honda. The best position of this move is where Honda's hands are about 1.5 character head distances from your opponent's head, if that makes sense. That will allow you to whiff the attack and beat out many special attacks. This range, however, is character dependent. You will primarily be cancelling jab or cr.jab into jab HHS, and using fierce HHS when cancelling cr.fierce to make it safe.
The HHS has a special property in the sense that it will never combo into itself. This is to say that, regardless of one of the attacks hitting the opponent (read "not blocked"), further hits will simply whiff, and as he recovers from hitstun, he will always be able to block the remaining attacks. However, if blocked, further attacks will not whiff. This means this move does relatively more damage than other attacks on block.
The above special property also means technically any character with a proper invincible reversal can reversal "in between" hits. In practice this will never stop you from cycling the hands. But if you try training mode for example against Ken, and set auto-reversal to SRK, then hit him with HHS he'll reversal out after the first hands hit. This does occasionally happen against human opponents but there isn't much you can do about it, normally they've buffered a SRK/flame kick/razor kick. So if you notice this in practice mode don't get discouraged.
This move looks like the Hyakuretsu Kyaku (Lightning Legs) from Chun Li, but its properties are different. First, the HHS has more range, but is littered with hurt boxes, however by pressing forward or back he can move. Importantly you can't move forward or backward with the diagonals, however you can maintain the hands with the direction held. More on hands in the cancelling hands section. Almost all of S-Honda's game play revolves around this special, pressuring with it, cancelling into it, bluffing with it and chipping with it.
- Super Zutsuki a.k.a. Headbutt: (Charge ←, → P)
Detailed Input: (Charge ←/↙/↖ for at least 60f, [7~14f] → [10/9/7f] Jab/Strong/Fierce. It is needed to wait at least 1 frame after leaving the charge direction to enter with the P button)
- Startup + Active:
NOTE: The last damage value is for the advancing/flying part of the move.
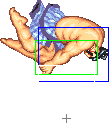
- Recovery/Knockback: (If it hits during the airbone part, the knockback will be airbone till the 4º hitbox image)
 |
 |
 |
 |
 |
 |

| |
| Frame Count | 4 | 4 | 4 | 8/9 | 2 | 2 | 1 |
| Simplified | 25/26 | ||||||
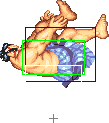
Jab headbutt will be your main defensive tool. It has invincibility on startup and has excellent vertical and horizontal range, which makes jumping in or getting in-close Honda a nearly impossible task. It is an excellent tool to use as an anti-air or reversal or anti-super against some characters Learn to time your Jab headbutt and matches against non-fireballers will become way easier. You should practice reversal timing using your jab headbutt as the other strength versions are far worse when used as a reversal. S-Honda's jab headbutt has longer startup than X-Honda's. This means a couple of things, first S-Honda is extremely easy to safe jump, 13 frame startup to be exact. Compare with Boxer 11/13/15 who is considered the easiest character to safejump. That being said, the move has real invulnerability and is generally safe. Next look above at the jab headbutt hit/hurtbox, you effectively have 3 frames of truly invulnerable headbutt which will come after a long start up of 13 frames. This means the timing of this move may take some practice. The second part also lasts 3 frames and is far more vulnerable, specifically it loses to anything on top of your shoulder. The hitbox also doesn't extend very far, strong and fierce extend far further.
Strong headbutt is a good change up headbutt that can cause a neutral or back jumping opponent to whiff, and cutting the distance across the screen for you. It can stuff some jump-in's and other moves as the hitbox (same as fierce) extends out a bit in the front. The invulnerable portion of strong and fierce headbutts have no hitbox however, which make them mediocre as reversals and as anti-air moves.
Fierce version is very fast and can be used to safely pressure and punish mistakes (whiffs or people coming down from a jumping attack for example) at mid range. Avoid using it from full-screen especially if out opponent is near the corner as he can jump it on reaction and punish you afterwards. Fierce headbutt is also a great move to use to interrupt fireball startup and knock down your opponent.
- Super Hyakkan Otoshi a.k.a. Butt Drop: (Charge ↓, ↑ K)
Detailed Input: (Charge ↓/↙/↘ for at least 60f, [7~14f] ↑/↖/↗ [10/9/7/5f] Short/Forward/Roundhouse/any K if you are at a jumpable state. It is needed to wait at least 1 frame after leaving the charge direction to enter with the K button)
- Startup:
 |
 |
 |
 |
 |
| |
| Frame Count (Short) | 1 | 4 | 5 | 2 | 5 | 4 |
| Simplified (Short) | 21 | |||||
| Frame Count (Forward) | 1 | 3 | 4 | 2 | 5 | 4 |
| Simplified (Forward) | 19 | |||||
| Frame Count (Rh) | 1 | 3 | 4 | 2 | 4 | 4 |
| Simplified (Rh) | 18... (42) | |||||
- Active + Recovery:
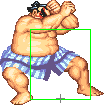
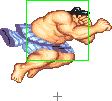
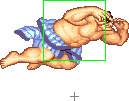
Short version hits on the way up (so it's a decent anti-air and is useful to get over projectiles from far away. Forward hits on the way up too, can be used to stuff projectile attempts at the right distance, and is a risky way to get over projectiles because it takes longer to land and goes further (can be punished by sweeps from shotos and Sagat and jumping attacks from Guile, DeeJay and Chun Li). Short also can't typically get through jab shoto fireballs and certainly not S-Ken's. Full screen for Guile and DeeJay it is pretty reliable and safe, sometimes you can bait them into thinking they can jump toward punishing and cut the distance. At round start forward and short buttslam will beat shoto fireball clean and provide a knock down, sometimes a decent set play in a bad matchup, it won't hit DeeJay, Guile, Chun or Sim. The lower stun value is for the downward active part of the Short version only.
Roundhouse should be used mainly for crossups, mixups and setting ticks rather than as a way to avoid projectiles, as it is extremely easy to punish in those situations. It hits only on the way down unlike the other versions. There are some built-in crossups that are matchup specific with rh. buttslam that will land and crossup an opponent on wakeup.
Also note the hitbox configuration on S-Honda's buttslam compared to X-Honda. Pretty bad. So many strategies that work and beat certain moves don't work for S-Honda. Specifically, it'll almost never beat a sweep, it'll very rarely get over flash kick and win clean.
To use buttslams as a pressure / mixup tool, it's a good idea to do cl.Short/cr.Jab xx Smash, varying strengths to make the opponent guess if you are going to cross-up or not, and mixing up ticks in-between.
Short and forward versions of this move make for an excellent anti-super reversal. If you have charge, after the super-freeze this move can beat Chun's, Boxer's and Deejay's supers clean. Forward will pass through Shinku.
Misc Animations
Jump Animations
- Prejump:
 |
 |

| |
| Frame Count | 2 | 2 | 1 |
| Simplified | 5 | ||
- Neutral/Back Jump, Airborne + Landing:
 |
 |
 |
 |
 |
 |
 |
 |
 |

| |
| Frame Count (Neutral) | 1 | 10 | 5 | 5 | 5 | 5 | 5 | 8 | 1 | 7* |
| Simplified (Neutral) | 1 | 43 | 1 | 7* | ||||||
| Frame Count (Back) | 1 | 10 | 5 | 5 | 5 | 5 | 5 | 8 | 1 | 7* |
| Simplified (Back) | 1 | 43 | 1 | 7* | ||||||
- Forward Jump, Airborne + Landing:
 |
 |
 |
 |
 |
 |
 |
 |

| |
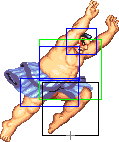
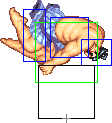
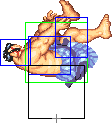
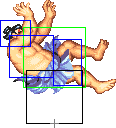
| Frame Count | 1 | 10 | 6 | 4 | 4 | 6 | 12 | 1 | 7* |
| Simplified | 1 | 42 | 1 | 7* | |||||
O.Honda has the slowest prejump animation on the game, he is however 1 frame faster (8 vs. 7) on neutral pre-jump, this hardly makes up for the loss of steerable Fierce. This is part of the reason why he suffers so much to get in vs projectile zoners. With that said, knowing how to jump correctly can make these matchups less annoying.
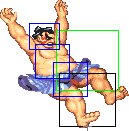
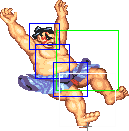
First of all, you'll be jumping neutrally frequently, it will not always be possible to jump forward safely. Looking at Honda's Neutral Jump hurtboxes, it's easy to notice that the last 9 frames of the jump animation has the leg hurtbox positioned very low, which will make jumping over projectiles extra hard. To deal with that, it's wise to do a move that reduces Honda's hurtboxes during that time, so you can avoid having big vulnerable hurtboxes. A good option is to press Rh as soon as you hit the apex of the jump, that way you'll not only have very small "lower-back" hurtboxes through out the entirety of the jump, but also may trigger the opponents proximity block. This is extra effective with O.Honda, as his Neutral Jumping Roundhouse have amazing priority at the front.
It's also important to understand the ranges where even a well timed neutral jump is unsafe, either because you'll be swept on landing or because the opposing character has a special or air to air that will blow you up. Your opponent will have ample time to react given how ponderous your pre-jump is.
As for forward jumps, an important thing to be aware of is how his hurtboxes are positioned on the last 13 frames of the jump. Take a look at the hitbox images above, did you noticed how Honda's hurtboxes are way less vulnerable at his front than if he did a move? Just compare the forward edge of the pushbox (green box) which is the same on all jumping animations, with the edge of the closest hurtbox (blue box) on all diagonal jumping animations (empty jump + diagonal jumping normals). A well spaced empty jump can be usefull if the opponent defaults to non sweep anti airs, as this can make these anti airs simply whiff (e.g. vs a DeeJay that defaults to Upkick anti air when he has charge). This trick can be just what Honda needs to finally get in and apply his extremelly strong close range pressure. Of course, if the opponent is aware of this, he may counter it appropriately, but then Honda can just jump with one of his good anti-anti-air normals instead, creating a mix-up situation.
The landing recovery has a special property which allows it to be canceled into certain actions. At the first landing frame, you can perform throws (including command throws), and on the second landing frame, you can start another jump, attack with a normal or special move, or block. Blocking not being until the second landing frame, as well as hitbox-hurtbox interactions having priority over throwbox-throw hurtbox is why sweeps work as anti airs in this game.
Things are different when jumping over your opponent, however. In that situation it's possible to walk back/forward, to jump again or to even block on the first landing frame! Strangely, if a throw is timed on the first landing frame of a jump that crosses over, a throwbox will never come out, even though that input will result in a normal coming out 2 frames later (like it normally would). Anyway, being able to block on the first landing frame can help a little bit on some safe jump crossup setups, or maybe in other situations as well if your character has a huge jump arc.
The Basics
Your basic gameplay will be heavily dependent on the type of character you are facing. With fireball characters, you want to get within far st.RH range to knock them down with a sweep, immediately jump in and then pressure. Continue this pressure until dead. If you get knocked down, the situation is reset and you need to try to get in again. Ultimately you will want to get within st.jab range for pressure and then proceed to mixup as described below.
Against non-fireball characters you will be playing keepout with a mix of st/cr.jab, far st.RH, cr.forward and headbutts. Headbutt is a very good reversal since it's difficult to whiff and has good block pushback. Opponents will need to work hard to beat your defensive options. Try to keep your opponents in sweep/HHS range to maintain pressure and headbutt them if they get closer.
Keep in mind that you will generally want to be using all of Honda's options at their max possible range. If you are using HHS in an opponent's face, don't be surprised to get hit by a reversal.
Basic Mixup/Pressure Options
Within sweep/HHS max range, pressure between these two options and consider the possibility of jumping in on your opponent to keep them on their toes. At this range, if they stand up to throw an attack, you can get a knockdown with sweep, if they throw something out you can probably hit them out of it or trade with HHS. Use the threat of this pressure to walk closer to your opponent.
Once you manage to get within st.jab range, you can whiff st.jab in your opponent's face or get him to block the tip - this move will stuff most other normals and specials, and at max range, most reversals from the opponent will miss. From here, you can mix between st.jab xx HHS, st.jab, walk in throw or grab, st.jab to cr.fierce to sweep them, far st.short, st.jab and wait. You can omit the standing jab altogether and go into these options as well, just be aware of the range you are playing in. In general, you can keep poking with st.jab if you expect the opponent to counter attack, wait and do nothing if you expect them to reversal and then punish the reversal, walk forward and throw or grab if you expect them to block, and go into cr.fierce/far st.short sweep if you expect them to stand up to throw or counter-throw you.
And while I say 'expect,' a key element of Honda's gameplay is conditioning the opponent to do what you want them to do. For example, if you start throwing your opponent repeatedly, they may start focusing on either a reversal attempt or counter-throw. If you stay at max jab range you can avoid and punish both, or walk in and out of this range to bait reversal attempts. When they have been punished enough by these options, go back to throwing. Just an example.
Basic Combos
For jump-in combos, you will primarily be using dj.RH, but dj.fierce or dj.down+medium kick can be substituted as well
- dj.RH, cr.fierce xx HHS - standard jumping attack to sweep, good basic 2-hit combo, canceling into fierce HHS is only to make the cr.fierce safe. The HHS will whiff
- dj.RH, cr.jab xx HHS - easy to use jump-in that can hit all of the cast regardless of spacing
- dj.RH, st.short xx fierce HB - must be close to opponent, grants knockdown
- st/cr.jab xx HHS - not much of a combo but the damage adds up when you are constantly poking an opponent
Advanced Strategy
General Anti-Shoto Strategy
I felt this portion of Old Honda's gameplan required its own section as its integral to being able stand toe-to-toe with shoto characters, and the match-ups themselves differ little in how you approach them.
Proper spacing is an integral part of this match-up. Understand that shoto characters in general WANT you to jump over their fireball so they can punish. With that in mind, you need to ensure that you do not diagonal jump when close to one of these characters unless you want to bank on guessing that they'll throw a fireball, in which case you can punish them nicely if you guessed right.
A good approach is to consider 4 ranges.
- Full screen (the range which you can generally forward empty jump a fireball safely)
- Outside jab/hhs/st. rh range (the range where you can generally neutral jump a shoto fireball safely but jumping forward outside of a guess is unsafe)
- Hands (the range where one of your core normals or HHS can stuff fireballs but not get hit by a dp)
- Close (basically adjacent, and typically not safe, but there are times where bluffing this can be useful)
There are certain things S-Honda just simply can't do when at certain ranges against shotos, and having the discipline to not do those things is a key to being competitive with him. This includes, forward jump, neutral jump, headbutt, forward empty jump.
The following applies at outside and full screen ranges. If you do manage to get knocked down, don't get frustrated, and most of all, do NOT block one fireball on wakeup just to try and jump over the second one - a fireball after a meaty fireball is known as a fireball trap, and you will probably just get hit by the second one. If you are knocked down against a Ryu or Ken pressuring you with fireballs, the single best option is to block the fireballs, get pushed back to near full screen, then jump over the third or fourth fireball to put you back IN or NEAR sweep/max HHS range, from there using grounded attacks to get yourself back in. Blocking fireballs is part of this characters life. You'll block more fireballs than you ever have.
'Full Screen'
You need to train yourself not to diagonal jump over fireballs unless you are full-screen away. So mentally focus on the distance and practice recognizing when you aren't quite full screen. Any closer, and if you jump late, giving the opponent time to recover, will ultimately lead to you getting punished and the situation being reset. When full screen jumping against shotos there is no world where even your beefy roundhouse will hit, so as above you'll want to shrink your hurt box by either whiffing a normal (mk, rh) or empty jumping. Goes without saying but you will want at least back charge, so get into the habit of circling to back ASAP. As you land from full screen jump you need to read the shoto reaction. If they misjudge your arc they may try sweep and you'll land as they whiff. This is a chance to punish with fierce hb, HHS or st.rh. If you land and block a sweep and they cancel into fireball you'll be in Outside range. If they don't cancel the sweep you can safely move into hands range or punish with st.rh. Shoto sweeps have insane startup (3 frames!) but an uncancelled sweep is not always safe. You absolutely should not fierce headbutt from this range. Shotos can jump for free and beat headbutt with rh or fierce (Ken) and go into a round ender. They'll also have plenty of time to throw out crouch strong, jab or even a dp. From this range if the shoto is doing lots of button pressing and bluffing instead of a steady stream of plasma you can use jab or medium headbutt as transportation. This takes practice and a good sense of distance and is risky but it can cut the screen down quickly and sometimes bait a dp.
'Outside'
It's counter intuitive but this is the least effective range for S-Honda. You can't connect with any normals or HHS, but can't safely jump barring a straight read/guess. Ken and Ryu's most valuable tool from this range is sweep. Honda has no air normal that hits low enough to ever bother the sweep. Additionally, and especially with Ryu who has a faster total recovery on his fireball the shoto can walk a bit forward and sweep you out of your jump. This is the range where you are doing 1 of 3 things, neutral jumping fireballs, blocking fireballs or guessing. Neutral jumping shoto fireballs inside full screen is generally safe and it's something you will have to master to have any hope in these hopeless matchups. Blocking fireballs here isn't all bad and especially needed against Kens jab fb. You still may want to whiff jab here depending on the shoto being crouching or not and whether or not they tend to voluntarily walk into the corner. One technique that can be useful at this range is fierce hb to blow up fireball start up or even trade. Shotos will whiff and bluff with strong and jab, but eventually they'll throw a fireball. Stand jab or crouch strong will beat your hb but it's less likely they'll have time to jump and beat your hb with a fierce or rh -- which will generally end the round. You'll often not have back charge here as you slowly walk down the shoto. Understanding the positions and normals that your st. fierce beats is critical here. Jab hb will generally beat anything. But st. fierce won't beat Ken jump fierce. Nor will it beat a far S-Shoto rh. So if a Ken player catches you with out charge they can generally get a free jump in on you, something they'd never do vs. X-Honda. You'll likely have to block fierce into sweep/cancel or fierce into cancel tatsu into mixup.
'Hands'
From match start, if you step inside just a few pixels is where you'll get to the "Hands" range you want to be in vs a shoto character. Within this range, you should have HHS whiffing in front of your opponent, with approx 1-1.5 character heads in between the opponent's head and your hands. This is a safe distance to apply HHS pressure as it will beat characters out of their fireball startup, and is generally far enough away to avoid eating a SRK (watch for Ken medium dp, however). Learn this range well, as with O.Honda you can move back and forward with HHS, this is a great range to play with to bait SRK reversal attempts. You can HHS at this range on an opponent's wakeup to bait an uppercut, and move closer to punish, or move closer than this range to bait and move back in time to avoid the SRK and punish. It's a very confusing range for shoto characters to deal with. Note that some characters do have options to beat HHS, notably Ryu and Ken's cr.strong, however if you stagger your HHS and mix it up with sweep, you can punish your opponent for throwing out these normals. This is also perfect sweep range, where all you really need is one landed sweep to get in to the ultimate spot you want to be in, which is st.jab range. You should have a normal or HHS out at all times in this range, as it will trigger proximity block and keep your opponent close. Important here, You don't always need to keep charge. You'll be massaging your distance left and right to stay in 'Hands' range. This is a difficult habit to break for some charge players, and if you are coming from X-Honda.
Whiffing st.jab right in front of the opponent's face is the perfect st.jab range you want to be in. From here you can force the opponent to block and move in for a throw or grab attempt, stay at this range to bait a reversal attempt and punish, or go for a cr.fierce or st.short, forward, or roundhouse as your low options if your opponent is planning to stand up to throw or counter-throw. At this range you will knock your opponent out of the startup of most or all of his normals. If they try and jump out or at you, you can use either st.fierce, jab headbutt, st.jab or neutral jump RH as anti-air options.
'Close'
Being right up on a shotos wakeup isn't normally safe or needed but there are some situations where you want to go for it. If they've been baited repeatedly they may be conditioned to block. Some tricks upclose are cr. rh while buffering hands. This looks like you are in dp range but the weird box config of cr. rh can pull your box behind you. This requires timing the safe part with their wake up. If they are blocking you are buffering hands. If they reversal you'll recover in time to do just about anything as you'll have charge and/or can buffer fiere
Getting in to either of these positions can be difficult, after all you are dealing with projectile characters.
Grab Setups
Honda has a plethora of setups following his fierce grab (bearhug) that can be used to mixup your opponent until death, many of which are character specific or specific to a group of characters. Understanding what works with which character is essential in maintaining momentum with Honda and grants you the ability to decimate your opponent after getting that first grab in. The content of this section still requires some character-specific research and its accuracy is not 100% guaranteed, but I have tested it to the best of my ability.
Vs. Shotos
Against shoto characters, following a fierce grab you will want to stay on the ground and walk forward. From here you can:
- walk forward just within far st.jab range and continue your basic mixup pressure
- walk forward and under your opponent to crossup with an attack of your choosing (I recommend cl.st.short, good low combo starter and low block stun for tick-attempts)
- walk forward and stop just short of crossing up your opponent and pressuring with st.jab or cl.st.short (fake crossup)
- walk forward and cr.RH, opponent will need to block this attack backwards due to cr.RH's weird active hitbox
As you can see, these options can be tricky if your opponent is reversal happy. The safest option is to stay within max st.jab range and continue pressure again, but these are great options if you can prove to your opponent that you can consistently punish them for their reversal attempts.
Vs. Non-Shotos
Against non-shoto characters, you can hold up-forward following the fierce grab to jump with the opponent escaping, and pressure them on their landing with safe options.
- vs Boxer, Deejay - dj.short and dj.RH are safejumps (dj.short is inconsistent with Deejay)
- vs Chun-Li, Guile, Dhalsim - crossup dj.down+forward(mk) is a safejump
With a possible dj.short mixup, you can perform the following
- dj.short, grab/throw or cr.fierce
- dj.short. cl.st.short, grab or cr.fierce
- dj.short, cl.st.short, nothing to bait out possible reversal attack (should be safe from reversal throw range, your opponent will need to walk in a bit to get a throw)
- dj.short, cl.st.short xx HHS - if you see dj.short hit, can go for decent damage combo
- dj.RH, cr.jab xx HHS - solid damage
- dj.RH plus any combination of the above
- empty jump, cl.st.short, cl.st.short xx HHS - if your opponent is expecting the overhead dj.short, mix it up with a low attack
- empty jump, cr.fierce - easier low option than above
Against opponents who you can mixup with a Flying Sumo Press
- dj.down+forward(mk) into combo of your choice
- dj.down+forward, stop at any point in the combo to grab, sweep, or bait reversal
Option-Selects
As your throw game is essential to Honda and your Headbutt and buttslam reversals are actually pretty good, if you can get the charge time down, e.g. off a jump in or while the opponent is waking up, you have some good throw/reversal option-selects available to you
- charge down-back, press back+fierce (hold fierce), forward+jab - will fierce grab opponent if they are grabbable, and will kara-cancel st.fierce into jab headbutt if opponent cannot be thrown. The timing on this one is tricky but is probably the best of both (jab headbutt plus fierce grab)
- charge down-back, press back+fierce, up-back+short or forward - cancel your fierce grab into buttslam
- charge down-back, press forward+RH, then jab a split second later - RH grab into jab headbutt - RH grab presents fewer mixup opportunities, but you can still walk forward and continue pressure
Anti-Super
I will re-iterate these options in the matchup-specific notes, but it's important to remember that as a charge character you do have the option to use reversals against opponent's super attacks. ST is known for 'eating inputs' during the super freeze, and as such it is difficult if not impossible to counter a super with something like a SRK. However, as long as there is a startup time and the super is not ridiculously invincible, Honda will be able to counter the super if you reversal immediately when you see the super freeze. Typically short and forward buttslam work best, however if you only have headbutt charge, it will often work as well - it just may trade a hit in the process.
Advanced Combos
- crossup dj.down+forward(mk)/Flying Sumo Press, st.strong, cr.jab xx HHS - excellent damage or chip on block
- crossup dj.down+forward(mk)/Flying Sumo Press, st.strong, cr.fierce xx (cancel) HHS - excellent damage and a knockdown
- dj.RH, st.strong, cr.jab xx HHS - works on Guile, DeeJay, Dhalsim, perhaps others but is character specific (doesn't hit on shotos).
- st.strong, cr.jab xx HHS - useful if you don't want to jump in on an opponent's dizzy
- dj.short, cl.st.short xx HHS - good damage off a short, opponent needs to be crouching or getting up from a knockdown/recovering from a grab for this one to work, i.e. must be a late hit dj.short
- cl.st.short, cl.st.short xx HHS - great combo from a low. Double cl.st.short is a 2f-link so it will take some practice, as will being able to cancel immediately from a short to HHS. Just try tapping short and jab at almost the same time as you start inputting the HHS, making sure short is done that split-second earlier.
- crossup dj.down+forward(mk), toward or away + forward (double knee attack) OR cr.forward - the Sumo press must be done VERY deep for this to work. A sweep or strong throw is almost guaranteed to dizzy the opponent after this, allowing you to combo again. In this setup, remember to use your THROW (strong punch), not grab, as grabs do no stun damage. Between the two setups, the double-knee is harder to time but places you in perfect mixup range. cr.forward does about the same amount of dizzy damage, is far easier to hit, but pushes your opponent a little further away.
- meaty st.strong, st.strong cancel into HHS - works in the corner on everyone and does more damage than strong into cr.jab into HHS and the 2x strong does a ton of stun
Match Analysis
Players to look out for and analyze match videos:
- Shougatsu 正月 (Japan)
- kuroppi (USA)
- Kusa クサ (Japan)
Match-ups
Old or S characters are generally excluded from most match-up charts (S-Sagat the exception) so match-up numbers here are based on X-Honda and where possible informed by the diety of S-Honda play Japan's Shogatsu.
Serious Advantage Matchups
Vs. Zangief
- 8.5 - 1.5
If there's one matchup in the whole game that will make you feel bad, this is it.
Stay between jab and HHS range pressuring him constantly and poking him out of his normals. Zangief will be primarily using cr.jab and his very beefy cr.rh. You should be using the max range of st.jab, cr.jab, cr.strong, st.rh and HHS. Use far st.RH to keep Zangief in check and to punish any lariat attempts and the recovery of his cr.rh. If he is mashing cr.jab you can slowly approach with HHS and then st.rh to sweep him. Be prepared for Zangief to jump if you move forward and be ready (since you won't have charge) with cr.strong, st.jab or st.fierce.
In this lopsided match there is an anti-air normal for every single thing Zangief can do with the exception of a xup chest press. Between st.jab, cr.forward, cr.strong, st.fierce and jump back fierce. With the proper spacing you can win this matchup using only st.jab, cr.jab, cr.strong, HHS and sweep, as st.jab will beat all of Zangief's jumping attacks at max range.
There is no reason to ever jump forward, no reason to headbutt as anything other than an anti-air. If you have a life lead there is really no reason to move your joystick towards Jeff. Lame is the game here, be lame. You don't have ochio to get you out of certain situations.
If you do get knocked down and Zangief can get a chest press cross-up you are in danger of experiencing the 1.5 part of the matchup. In this case headbutt won't get you out but rh. buttslam can, depending on how it hits other buttslams might work also but Gief can punish with a sweep and go back into it. If it's hitting front j.headbutt can win if timed right.
Advantage Matchups
Vs. Cammy
- 7 - 3
This matchup is slightly better for Cammy than X-Honda in that she can actually jump at you, O.Honda has better keep out tools, but less safety valves if she does get in. Maintain your distance and switch up st.jab, cr.mk and HHS. Drill will beat HHS from a distance, so you want to use only jab HHS to be able to quickly recover and block or stuff a drill. You can punish drill attempts with standing kicks to sweep, HB or HHS. However, there are safe distances and elite Cammy players know them well. You can also grab a drill blocked deep and go into a safe jump loop as described above.
Never full screen headbutt against Cammy, especially if she is jumping as she has multiple air normals that stay out and will beat headbutt clean every time. Notably, lk, mp and lp all stay out a while and never lose to HB. Good Cammy players can end the round on 1 bad HB into a dizzy 3 piece into a 4 piece.
Be wary of random hooligan setups and throw out a st.jab or st.fierce to beat this out. If you have charge jab HB bodies hooligan also.
If you get knocked down, be wary of setups - meaty cr.fwd by Cammy can stuff reversal HB attempts, and she has ambiguous crossups that will beat your HB as well. Generally her j.lk crossup will not actually xup so you can try to block, most Cammys will try and tick throw. You can counter throw by plinking strong, fierce and rh. You can use RH buttslam to escape Cammy's pressure and create distance between you and your opponent however good Cammy players can punish the trash hitbox on the downside of your buttslam with RH drill. Unlike X-Honda she beats you clean basically every time.
Pressure with HHS can work well against Cammy because unlike most characters she doesn't have a normal that safely beats hands (like Gief's crouch Jab). She can however drill and thrust kick to beat hands.
Like many supers, RH buttslam can be used to escape Cammy's super after startup.
Much like Zangief if you have a life lead don't walk forward at all. Hold charge and stay mid-screen mixing st. jab, cr.jab cr. mk and HHS.
Vs. Fei Long
- 7 - 3
Play very defensively, force Fei to block headbutts and HHS, keep him in check with far st.RH if the opponent tries to simply walk in. Reverse chicken-wing pressure with jab headbutt, and attempt to punish flame kicks with either fierce headbutt or st.fierce (your standing kicks will most likely whiff). Jump-back RH can also work to avoid chicken-wing. Watch out for chicken wing looking like it may cross up if done close, it usually doesn't ACTUALLY cross up on Honda. Keep blocking as normal.
After last hit of Fei's super, you can use buttslam to punish.
Vs. Blanka
- 6.5 - 3.5
Originally listed as 7.5 - 2.5 for new Honda, I've bumped this down a bit but am still unsure if it's accurate. At the highest levels it appears to be a fairly even matchup.
Force Blanka to eat HHS and HB chip damage and use opportunities to continue pressure when you see them. An early j.jab to start off with pressure of your own is not a bad idea, as Blanka's pressure and throw pressure can be quite overwhelming - O.Honda has no 'get out of jail free card' as oicho provides for E.Honda, thus making this matchup more difficult. You can use cr.rh, or st. rh to punish Blanka's electricity or when expecting a string into electricity. Use headbutt to punish whiffed moves and st.fierce to try and avert crossup attempts.
Elite Blankas will mostly neutral jab with lk, trying to bait out a mistake and end the round. Mixing in st. lk to beat HHS and headbutt. Don't take the bait. If you have a life lead, just do nothing but maintain back charge by whiffing cr. jab, st. jab. If Blanka has a life lead an elite Blanka will do the same to you. If you have to advance forward do so slowly mixing cr. jab, st. jab and hands. The cr. jab will stuff slide and can get under st. lk. Blanka will wait for you to walk forward in a range that's close enough to jump forward, and this is where the match is worse for S-Honda because you don't get a free try at ochio on block. If the jump in is from far you may be able to anti-air with jab or crouch strong, if its middle distance you'll have to block in most cases but the pushback should make a tic-bite hard, if the jump in is near your head but front side snap out st. fierce it'll win or trade.
Blanka's up-ball is known for being a great reversal, but you can atleast trade with it using either dj.fierce or buttslam (short or forward) and from far j. forward and j. rh beat it clean.
Special mention on the crossup. Blanka's whole plan besides getting a random ToD is to start the lk crossup blender. If this happens don't panic but try to focus on your escape with either counter throw or rh. buttslam. Headbutt won't work, as your charge is getting blown up as Blanka jumps back and forth. The mixup from Blanka is xup, tic-mp/lp into bite, or cr. rh sweep into another lk xup. Blanka will look to hit confirm the lk into mpx2 cr. fierce. You have longer throw range than even Blanka's impressive range but only by a little bit (he's 64/32 axis/throwbox you are 64/36), this means if you guess no sweep you'll want to plink counter throw with your 3 buttons.
Be wary of dirty crossup ball shenanigans on your wakeup. If it isn't clear you can lk. mk. buttslam reversal and do well.
Vs. Dictator
- 6.5 - 3.5
Use jab and HHS pressure as these attacks can beat or trade with many of Dictator's normals. If he throws out a psycho crusher, you can react with jab headbutt or at least trade with HHS. If you block his scissor kicks, you can often go right into a throw or grab punish. As Dictator will probably go to the air, use dj.jab, dj.strong, dj.fierce to attempt to swat him out of his attacks and st.fierce if he is getting the jump on you. If you knock Dictator down, try to go for a Flying Sumo Press crossup into pressure as Dictator has no good reversal outside of super. If you block a Super attempt, quickly alternate between high and low blocking during the super and he may pass over you, allowing you to punish with a throw, grab or some other attack.
Vs. T.Hawk
- 6.5 - 3.5
Maintain distance and poke with st.forward and st.RH. Block T.Hawk's dives and punish on recovery with fierce headbutt. Punish his sweep with st.RH or fierce Headbutt. nj and dj.RH can be good anti-air options and air-to-air options vs T.Hawk. You can also use fierce headbutt to attempt to escape T.Hawk pressure if he jumps up or attempts to dive at you, resetting the situation in the process.
If you wish to pressure T.Hawk on wakeup, be sure to use low normals at max range to avoid T.Hawk's SRK.
Fair Matchups
Vs. E.Honda
- 5 - 5
Try to establish an early life-lead and then turtle as much as possible. Force Honda to block HHS, headbutts, and pressure him with far st.RH. Use cr.forward to pressure, beat HHS and headbutt. Late jab headbutt will also beat headbutt pressure from your opponent. If E.Honda attempts a Super, you can reversal headbutt after the first hit, often on hit AND block (terrible Super). If you are eating buttslam pressure, block the first hit and jab headbutt before the second hit.
Disadvantage Matchups
Vs. Claw
- 4-6
It is essential to this matchup that you don't get knocked down midscreen, so that being said, jumping back into a corner at the beginning of the round is not a horrible idea. You will need to understand and have the reactions to beat Claw's walldive attempts. If he is jumping off his wall and coming at you, you can attempt to jab headbutt, and this is especially good near the corner. You can also try a fierce headbutt to escape the pressure altogether. If he jumps off YOUR wall, eliminating your headbutt charge, you can either attempt to anti-air with st.fierce, attempt to block his attack (good Claw dives are incredibly difficult to perceive, so this is forced down to a guess as to which direction to block), or try RH buttslam to escape pressure (Claw can use slide to punish your buttslam, so rarely a good idea). If a walldive is done while you are already standing, a dj.jab, jumping back dj.fierce are good ways to knock Claw out of the air.
When you or Claw have your back to the wall, walldives are much easier to beat. If Claw has his back to the wall and attempts a walldive on his side, you can swat him out of the air with dj.jab or dj.fierce. st.fierce can sometimes work in this situation as well. If YOUR back is to the wall, the success rate of jab headbutt is much higher. If your back is to the wall and Claw attempts to dive off your wall, you can use st.fierce to knock him out of it.
Far st.forward/RH can be good to use to punish roll attempts, and be sure to maintain headbutt charge when pressuring Claw, especially on wakeup, so you can fierce headbutt any attempts to somersault out of your pressure.
Vs. Boxer
- 3.5 - 6.5
As usual with Honda's match-ups, understanding proper spacing will go a long way towards moving this match in your favour. The key elements of this match are being able to maintain a HHS range that will punish all of Boxer's rush special punches and yet avoid his cr.strong and headbutt. cr.jab and cr.forward are also good attacks to use against rush punches. When you move in closer, it's dangerous to use HHS at this range as Boxer has a number of attacks to punish. Instead, at that range you can jump in with dj.RH (often able to beat Boxer's rush attacks), far st.RH, and st. and cr.jab to close the gap. Another beating in this match is Boxers strong throw bug actually grants him a 1 pixel edge in throw range in this matchup, X-Honda's oicho is further but S-Honda doesn't have that luxury.
When playing this match, be sure to maintain pressure on Boxer and do not allow him to charge for TAPs. There are many situations in which your normals can trade with his normals or specials, and if you allow him to charge these attacks, the trades will most certainly NOT be in your favour. TAP will lose to headbutt, but beat hands. Hands will beat the other 3 rushes fairly reliably. Crouch mk beats TAP and all rushes clean but the startup often isn't fast enough.
The fierce grab setup detailed in the Advanced Strategy section works very well against Boxer, as a safe-jump dj.short, cl.st.short after a fierce grab puts you in a good spot to go right for another grab, sweep the opponent, or bait out a reversal. This match can often be won after one fierce grab and constantly keeping your opponent guessing. Combined with boxer being naturally easy to safe jump you should be hunting knockdowns and then aggressively safe jump him. Short, st. jab, cr. fierce, cancel hands is a nice combo vs. the reversal throw happy Boxer.
The pace of the match will change quite a bit if and when Boxer gets enough meter for a Super move. I would not try baiting out the Super due to the ridiculously-fast start-up time of the move, you will most likely lose. Do keep in mind that if Boxer is just throwing this move out to get you with chip damage, you can beat the super clean with a reversal buttslam after the super freeze.
If Boxer gets a reasonable life lead the match becomes extremely difficult to win for S-Honda. Boxer can simultaneously mash stand jab (reliably stops headbutt), while charging down (buffalo headbutt on deck which has insane invuln), and back (low rush on deck which is the fastest 'fireball' in the game, rush upper which is a great anti-air). You'll have to sort of waddle forward throwing out st. jab, cr. jab, cr. forward and going in and out of hands. Problem is reacting to low rush as you get closer gets impossible, so you are forced to risk and boxer is playing risk free.
"If he dies, he dies." - Ivan Drago
Vs. Dhalsim
- 3.5 - 6.5
Beating Dhalsim will require good use of your normals and headbutt to defeat. Any time Dhalsim throws out a ground limb is a headbutt opportunity, granting you a knockdown and allowing you to close the gap. You will need to keep this in mind to dissuade Dhalsim from throwing out normals whenever he pleases or attempting to control screen space with them. cr.forward is also a great normal to use to beat out Dhalsim's limbs, but it doesn't knockdown. Use headbutt/fierce headbutt to beat Dhalsim out of his fireball startup or after a floaty jump-back. You can jump over his fireballs and attack with a mix of dj.RH, dj.fierce, Flying Sumo Press (if expecting a slide), or dj.jab. Once you get in close, mix up with your standard Honda pressure - HHS can be difficult for Sim to deal with. Lacking a proper reversal, your grab and throw setups are great opportunities to lock down Dhalsim, and fortunately all your highest-damage combos work great on him.
To get over fireballs, you can also use RH buttslam to punish or to pressure if you either predict or guess a fireball attempt, or if done very early on reaction. At range, you can also pressure Sim with a Headbutt on wakeup, since he has few options to get around this pressure.
Vs. Sagat
- 3.5 - 6.5
This is a difficult matchup, but it is winnable if you can get a read on your opponent. Your initial means of getting in will most likely be to fierce headbutt over a low tiger shot for the knockdown. I have not found it possible to react to the difference between a high or low tiger shot (perhaps some people are able), but you can react to a tiger shot in general. Since you can simply duck under the high tiger shots, you can wait for your opponent to attempt to chip you with low tiger shots and get in with a headbutt. You also have the option of jumping over a high tiger shot and hitting Sagat's extended arms with a dj.RH, if he is throwing high tiger shots to dissuade your headbutt. Your opponent can also neutral jump, anticipating a fierce headbutt to try and punish you for attempting to get in, in which case you may want to mix up the strength of your headbutt in order to recovery early and punish Sagat on his way down from the neutral jump. This is a risky situation for both parties but it can happen.
Around sweep/HHS range is when you can use your far st.RH to knock Sagat out of fireball startup. HHS is also good for this and if you move a bit closer, st.fierce will work as well. The goal is to get your opponent to stop throwing fireballs and start worrying about you coming in, hopefully forcing them to make risky maneuvers in the process. Refer to anti-shoto strategies in the Advanced section for details.
Serious Disadvantage Matchups
Vs. Ken
- 4 - 6
Refer to anti-shoto strategies for general gameplay strategies shared between the shotos. That section outlines strategies for getting in close which apply to all shotos. Ken's slow fireball is harder to jump than Ryu's, however his startup is a few frames slower. This can give you a slight advantage in timing your jump in. Ken's jab DP is the marquee anti-air special in the game (besides S-Ken's). It will beat you hands, your stand roundhouse, all your jump-ins and headbutt.
Be wary of Ken's mixup possibilities, safe jump jab into hurricane kick into low attacks, safe jump o/s into DP.
If Ken is attempting to pressure you as you walk forward st.fierce will generally body all his kick jump ins. However Ken's jump fierce is a very beefy jump in that will beat your fierce from most distances. If this happens you are in a world of pain, he can cancel into tatsu and sweep, or combo into a DP for big damage and a knockdown. Unlike X-Honda you can't block high then go to downback with a stored ochio to negative edge for free. This means Ken is a shoto that can actually throw you.
If you block his Super, you can punish with jump-back dj.RH or neutral jump fierce. Be aware if he lands you might get thrown.
Vs. O.Ken (S-Ken)
- 3.5 - 6.5
Everything that applies in the X-Ken matchup is true here but it gets much, much worse. O.Ken's godly SRK makes pressuring with HHS far more difficult. His jab fireball is the slowest in the game and fat like X-Ken but he has superior recovery, this combined with your slowest pre-jump in the game means disaster. It is very difficult to neutral jump, as it is slow and wide. Additionally neutral jumping is not safe from really anywhere other than full screen. A fierce SRK will blow you up, and a react jump forward roundhouse will as well.
You also don't have a trade opportunity with your otherwise fantastic jump RH, O.Ken's SRK beat it clean. S-Kens jump ins are very difficult to beat with stand Fierce. However S-Ken's roundhouse is vastly superior and has a very beefy hit/hurt box setup. As with X-Ken jump fierce is very hard to deal with without a perfectly timed jab headbutt. If you are walking up and S-Ken jumps at you from far your only reliable anti-air will be cr.jab. If not you are blocking a 3 piece and will need to begin the slow march towards red Gouki.
This matchup is materially worse than Deejay. This is because even though Deejay is a nearly impossible match, if you do happen to get a fierce grab you are two 50/50s away from winning. A grab of O.Ken is just a grab; it will take multiple bait attempts in your favor to win. S-Ken is in Deejays league as far as insane normals, and S-Ken has a superior fireball.
Vs. O.Sagat (S-Sagat)
- 2 - 8
TODO: Detail differences in X vs. S Sagat matchup.
Vs. Guile
- 2 - 8
This is a very difficult match-up. You will need to remain patient and not get too carried away as Guile can easily capitalize on your errors in judgement.
Openers - walk forward st.RH, st.jab, walk forward st.jab
Avoid fireballs with neutral jumping short/RH/empty jump, try to avoid jumping over a sonic boom late as Guile will have enough time to recover and use one of his many good normals to attempt to beat your jump-in attack. Diagonal as soon as you see a Sonic boom come out and you should be able to either punish or at least force a block, close the gap and start your pressure attempts. A LATE neutral jump can be good bait for a flash kick if you have been diagonal-jumping over his sonic booms. It's important to pay attention to Guile's charging - if he stands up you don't have to worry about a flash kick, just his good normals. If Guile attempts to meet your jump-ins air to air, you can start using dj.jab to beat out his air options. Try and get close enough so you can trip Guile with a far st.RH, then jump in for st.jab-range pressure. HHS is not as good at range vs Guile since his hands do not extend out far like Ryu's when throwing a fireball. At sweep distance, early RH buttslam is also an option, but don't do any late buttslams once the Sonic boom is well on-screen, as Guile will have recovered in time and can do just about anything.
Around sweep distance and when Guile is expecting you to sweep is not a bad time to jump in with dj.short, as it has a low jump arc and may catch Guile off-guard. Just be sure he is not crouching as a flash kick will easily destroy this.
Use all the above techniques to walk Guile into the corner and keep him there, where his options are limited. If you have the chance at an early throw, consider your options of throwing him closer into the corner and significantly reducing Guile's offensive options, or going from fierce grab into Sumo Press mixups. Depending on the opponent's ability to deal with your grab mixups, the toss into the corner may be a safer bet.
cr.RH is also a good move to throw out if expecting Guile to use cr.forward or a cr.RH of his own. Even if cr.RH is done early, if Guile attacks he will most likely get knocked down, giving you a chance to get in and pressure your opponent.
Vs. Ryu
- 2 - 8
See general shoto strategy section for anti-Ryu notes. If you maintain proper spacing, this match is winnable. Ryu's super startup is too fast for you to reversal after the super freeze, so if you want to go for the gold and bet that Ryu will throw out his super, you can attempt an early buttslam or neutral or diagonal jump to evade it. Use st.fierce to attempt to negate hurricane kick mix-ups.
Vs. O.Ryu (S-Ryu)
- 1.5 - 8.5
Todo: This match is some amount worse than X-Ryu, most of the information about normals from the S-Ken section apply here.
Vs. Chun-Li
- 1.5 - 8.5
This matchup is pretty bad, once Chun-Li gets her bugged super it gets even worse if that's possible. Fighting Chun requires you to shrink the screen and not let her build meter for free. This can be difficult because of her beefy set of normals and having the fastest startup of any fireball in the game. It can be tempting to neutral jump her fireball for awhile because it's relatively easy, however this just enables her to get to super at which point the match drops to 1-9.
You will generally want to open with st.jab and moving closer with whiffed st.jabs. It will force Chun to block if she is walking back, and it will hold her at a closer range. You want to walk her down, 'bulldogging' her fireball with the goal being to get her in the corner. Chun's fireball is especially well suited as an anti-air as she moves backwards because of the hyper fast startup.
When you are just outside HHS range neutral jumping is off the table, as she can j. mk and beat your entire spite sheet. So just block and try to time a jump in. When you get an opening to jump in Chun has a few counters, st. mk, or she can go air to air with her godlike mk. If you read an air to air you'll want to use jump jab if you are early, jump strong if you are late. If you think she'll stay on the ground and you are a bit further out use j. mk, it will stuff all her normals, in between ranges go for j.rh. If either are blocked from far you can go into HHS to push her back and do chip. Empty jumping against Chun can also work to your advantage for a couple of reasons, first proximity guard won't trigger so she'll walk back into the corner, second often you can land and block a kikoken, even landing and eating a kikoken is fine as you've at least gained some ground. Great Chun-Li's will adjust to this and use cr.mk on your landing.
Lightning Legs essentially can't be bothered by any ground normal, unlike your peasant level HHS Chun-Li has no hurtboxes on her mash and chip move. That's right, none. You can wave a sword in there and nothing happens. You may be tempted to jump them because it looks like she isn't charging upkicks, but she can stand and mash legs and charge. Also most Chun's without their turbo on will be mashing lk legs which have a respectable 4 frame recovery. So they can stop and upkick pretty fast. You can whiff jab and cr.mk inside her legs and bait her.
Once you've walked Chun back into the corner she has more limited options, in which case you can jump in and pressure with dj.RH, cr.jab xx HHS, walk forward, sweep/HHS, walk closer and st.jab into throw mixups. You can also maintain a bit of distance from Chun in the corner if expecting her to jump out, so you can use a late st.fierce to beat or trade with her jumping attacks or attempts to wall-jump out of corner pressure. Buttslam can also provide great corner pressure as Chun does not deal well with attacks from directly overhead. A blocked buttslam can push you further away than st.jab pressure but still allow for HHS/sweep distance.
As stated above, it's important to maintain pressure on Chun so she does not easily gain meter as it makes the match far more difficult for you when she has a super available. If she does get it, you can attempt to bait it out at range (midscreen) with cr.jab or some other quick normal, or jumping from full screen into mid-screen, since some Chun players like to try and make you land on the Super. If you are too close it is best not to attempt to bait the Super as you may simply get hit out of your attack and eat 75% of your life. Try and maintain your charge as much as possible so you can reverse her super with a buttslam. Expecting this, Chun may walk forward and throw you. This is a good opportunity to use your option-selects for a throw attempt or buttslam/headbutt. You technically have a longer throw range, though her throw does an insane amount of damage so trying to counter throw is risky. If the Super is done at a distance, you can jump over it at hit with nj.RH, possibly leading into a combo.
If you get Chun knocked down you have an opportunity to take control. On Chun's wakeup, pressure with max range cr.jab to avoid being hit by her upkicks. If she blocks cancel into HHS, if she upkicks they will whiff and you can punish with fierce or HHS. Be aware, Chun-Li's 3rd beneficial software bug is she has no grounded frames on her upkicks meaning she is deceptively hard to throw even if you bait it. She can punish you for being a better player by getting a throw attempt (at SPD damage). So you may want to just punish with a normal rather than go for a grab. At close range, mixing st.jab or st. strong into a fierce tickgrab is a good idea. Fierce grab leads to great setups vs. Chun, you'll want to use splash and pay very close attention to the arc after you let go of the grab. You'll need to read xup or front side. Front side can be an opportunity to throw loop her. Xup is a chance to do massive damage. If you read xup be ready to read block on the built in safe jump. If she blocks the xup, link a normal (st.strong is nice here) and then you get a 50/50 -- either cr.fierce (cancel HHS) or another grab. After you condition your opponent you can mix it up by just going right for cr.fierce (cancel HHS). If you get the cr.fierce into cancel you will have charge for rh.buttslam which will cross her up again and possibly stun.
Note that Neckbreaker rarely crosses up E.Honda no matter what it looks like. However it will beat all your specials and even st.fierce. Block it and either try to throw her, or prepare to block the inbound cr.mk into legs.
Vs. DeeJay
- 1.5 - 8.5
This match-up will make you question why you chose E.Honda in the first place. Not only is it a difficult match-up, but new Honda's advancing fierce hands is one of the few ways for Honda to get in on DeeJay - an option that you don't have with O.Honda.
As always, attempt to beat fireball startup with far st.RH to force a knockdown and get in close on DeeJay. Try to avoid jumping in unless you are outside of upkicks distance, as within this range, DeeJay can use upkicks, his slide and st.RH to easily anti-air your jump-in attempts. You can try to use dj.short and dj.fierce to beat out his slide, or dj.RH at max range but the spacing is very difficult to get properly. HHS does not work well in punishing DeeJay at range as his hurtbox does not move forward like Ryu, Ken and Sagat when throwing fireballs. Additionally, his cr.strong can punish you for attempting to use HHS.
On wake-up, you can pressure DeeJay with a meaty cr.short or cr.forward as he will be unable to use rolling sabat (forward kicks) to go over these pokes, unlike cr.jab. However, meaty cr.jab is a good option vs upkicks and MGU reversal attempts, it can be done point-blank range if you are not worried about reversal throws, and allows you to stay close to maintain pressure. If you have the opportunity, cross-up Flying Sumo Press is an excellent pressure option on wake-up.
One strategy against upkicks happy DeeJay players is to empty jump into crouch. Upkicks will whiff many times and you can attempt a fierce grab when he lands. Smart DeeJay players will adjust and mixup with MGU (credit x64 for these strats).
If you manage to grab DeeJay you are closing in on 1 of the 1.5 wins you can expect. You can begin a safe jump by holding up as described above. Given this match is so bad going for the maximum damage setup is recommended. Roundhouse does big damage and is safe more consistently. Read the impact and go for a combo or into another grab. The best combo with roundhouses pushback is crouch fierce into cancelled HHS. You'll have enough time to go for another splash crossup, or pressure as above with crouching normals.
You can reversal with buttslam after DeeJay's super freeze to beat clean. You should also have time to neutral jump over it if done immediately when you see the super freeze.
