Introduction
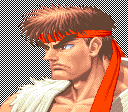
This page is about the Super Street Fighter II version of Ryu, also known as Old Ryu, or simply O.Ryu, for short. Ryu is the game's protagonist, and is considered a good all around character. Even though he is not the strongest in any aspect, he does have very good moves overall. Say, his projectile, the Hadouken, is the second best in the game, only after O.Sagat's Tiger. His special anti-air, the Shoryuken, is also the one with second best priority in the whole game, only after O.Ken's Shoryuken. Finally, his Forward and Roundhouse Tatsumaki Senpuu Kyakus recover faster for this version and may be hard to tell which version was used, being good to reposition O.Ryu or surprise the enemy with a throw.
Ryu's strategy in the Street Fighter II series is, mostly, to employ his Hadoukens wisely so as to pressure enemies and either force them to take risks or get pushed into the corner. As O.Ryu does not have a super, this is stressed even more. Would the enemy jump forward, Ryu has several moves to deal with that, being the Shoryuken the most damaging one. However, unlike Ken, his projectile has a relatively fast start-up, which allows him to use it as a poke tool. This is the main reason why he has less trouble against a number of characters which have the advantage or fair match-ups against Ken.
Super Street Fighter II Ryu has a completely invulnerable Shoryuken, which helps him in situations N.Ryu has trouble, such as against T.Hawk's Tomahawk Buster and Boxer's Buffalo Headbutt. His Hurricane Kick is not invulnerable up until it hits, like it was in CPS-1 Street Fighter II Champion Edition and Hyper Fighting. In addition, his crouching kicks have much better priority, making him a more solid zoning character. However, as any old character, he can never soften throws, he does not have ST Ryu's command punches and he has no super moves.
Among all characters (old versions included), O.Ryu is considered to be in the same league as other strong characters, such as Guile, Dee Jay, O.Ken, O.Chun and O.Dhalsim. He is certainly behind the so called "big five", which consists of Dhalsim, Vega (Claw), Old Sagat, Balrog (Boxer) and Chun Li, and also behind N.Ryu, but not by any large margin.
Few players choose to master O.Ryu, regardless of his strength. If you want to check Youtube and Nico Nico Douga for videos, Tatsumaki Ryu is one of the few players that uses him almost exclusively.
Picking Old Ryu
To select O.Ryu, choose Ryu and then press → → → ← Jab/Fierce, pressing Short simultaneously with the punch button for the alternate color.
| Normal | Secondary |
 |

|
--Born2SPD
Strengths & Weaknesses
Strengths
- Ryu's Hadouken speed and special properties allow it to be used as a poke;
- Two special moves to deal with ticks and meaties: Shoryuken and Tatsu;
- Some of the best zoning thanks to good startup/recovery on blue fireballs;
- Dragon punch is completely invincible until it stops being active.
Weaknesses
- Average throw range;
- Most normals have average range;
- The normals with most range have a very long recovery time;
- All shotos's diagonal jumping Fierce and Roundhouse attacks have nerfed dizzy properties;
- Most specials are quite baitable and have long recovery;
New & Old Versions Comparison
Here is the list of differences:
- Obvious stuff: O.Ryu can't tech throws, does not have the new punches (dash, overhead, and air juggle) and Super;
- O.Ryu has a faster pre-jump animation by 1 frame;
- O.Ryu has some differences in some of his normals:
- Far Standing Jab has a fatter hitbox;
- Far Standing Short has a slower start-up, but it is chain cancellable;
- Crouching Short has much better priority;
- Far Standing Forward has a slower start-up;
- Crouching Forward has much better priority;
- Close Standing Roundhouse activates from a closer distance;
- Crouching Roundhouse has much better priority and does more damage;
- Diagonal Jumping Strong behaves exactly like the Neutral Jumping one while for N.Ryu its a new Juggling Punch;
- Both Jumping Fierces do more damage;
- Diagonal Jumping Short has worse priority during the first 10 active frames;
- Diagonal Jumping Forward has better air-to-air priority but has somewhat worse air-to-ground priority;
- Neutral Jumping Roundhouse has better air-to-air priority but worse air-to-ground priority and do more damage;
- Diagonal Jumping Roundhouse has better air-to-air priority but has somewhat worse air-to-ground priority. It also does more damage;
- O.Ryu's ordinary (blue) Hadoukens have one less start-up and one less recovery frame, making the overall recovery 2 frames faster. Thus, they are better for zoning;
- O.Ryu's Shoryukens are completely invincible until the recovery frames, while for N.Ryu he is vulnerable during the rising/hitting part;
- O.Ryu's Shoryukens have many more active frames, but the same overall recovery;
- O.Ryu's Forward and Roundhouse Tatsus spin two less times than N.Ryu's;
- O.Ryu's air Tatsumakis have a bigger hitbox, do more damage and have a 50% chance of being unblockable if they connect on the first frame;
Moves Analysis
Disclaimer: To better understand the diagrams, read this.
Normal Moves
Ground Normals
- Close Standing Jab: (Base max activation range: 25)
| Damage | 4[0] |  |
 |

|
| Stun | 0~5 | |||
| Stun Timer | 40 | |||
| Chain Cancel | No | |||
| Special Cancel | Yes | |||
| Frame Advantage | +4 | |||
| Frame Count | 2 | 4 | 5 | |
| Simplified | 1 + 2 | 4 | 5 | |
O.Ryu performs an elbow smash in front and above his head. Fast start-up anti-air up close, with just OK priority.
- Far Standing Jab:
| Damage | 4[0] |  |
 |
 |

|
| Stun | 0~5 | ||||
| Stun Timer | 40 | ||||
| Chain Cancel | Yes | ||||
| Special Cancel | Yes | ||||
| Frame Advantage | +4 | ||||
| Frame Count | 2 | 4 | 4 | 1 | |
| Simplified | 1 + 2 | 4 | 5 | ||
Rapid-fire Jab that has very good priority (O.Ryu's arm is completely invulnerable) but just acceptable reach and very low damage.
- Crouching Jab:
| Damage | 4[0] |  |
 |
 |

|
| Stun | 0~5 | ||||
| Stun Timer | 40 | ||||
| Chain Cancel | Yes | ||||
| Special Cancel | Yes | ||||
| Frame Advantage | +4 | ||||
| Frame Count | 2 | 4 | 4 | 1 | |
| Simplified | 1 + 2 | 4 | 5 | ||
Rapid-fire ducking Jab with OK reach and very good priority. O.Ryu's arm is completely invincible.
- Close Standing Strong: (Base max activation range: 31)
| Damage | 22[0] |  |
 |
 |
 |
 |
 |

|
| Stun | 5~11 | |||||||
| Stun Timer | 60 | |||||||
| Chain Cancel | No | |||||||
| Special Cancel | Yes | |||||||
| Frame Advantage | -1 | |||||||
| Frame Count | 1 | 2 | 2 | 6 | 4 | 3 | 4 | |
| Simplified | 1 + 3 | 2 | 17 | |||||
O.Ryu performs a hook. This move has a not very good recovery, so try canceling it into some special such as the hadouken to avoid punishment.
- Far Standing Strong:
| Damage | 22[0] |  |
 |
 |
 |
 |

|
| Stun | 5~11 | ||||||
| Stun Timer | 60 | ||||||
| Chain Cancel | No | ||||||
| Special Cancel | Yes | ||||||
| Frame Advantage | +7 | ||||||
| Frame Count | 1 | 2 | 4 | 3 | 3 | 1 | |
| Simplified | 1 + 3 | 4 | 7 | ||||
O.Ryu performs a straight punch. This move has very good recovery, reach and priority. Works as anti-air against some moves, but notice ORyu's body moves forward a bit, so you need some room to use it correctly. ORyu's whole arm is invincible in this attack.
- Crouching Strong:
| Damage | 22[0] |  |
 |
 |
 |
 |

|
| Stun | 5~11 | ||||||
| Stun Timer | 60 | ||||||
| Chain Cancel | No | ||||||
| Special Cancel | Yes | ||||||
| Frame Advantage | +7 | ||||||
| Frame Count | 1 | 2 | 4 | 3 | 3 | 1 | |
| Simplified | 1 + 3 | 4 | 7 | ||||
O.Ryu does a crouching straight. Good damage, stun, recovery and priority. ORyu's whole arm is completely invincible.
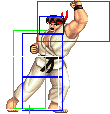
- Close Standing Fierce: (Base max activation range: 41)
| Damage | 28[1] |  |
 |
 |
 |

|
| Stun | 3~9 / 10~16 | |||||
| Stun Timer | 40 / 80 | |||||
| Chain Cancel | No | |||||
| Special Cancel | Yes / No | |||||
| Frame Advantage | -9 / -7 | |||||
| Frame Count | 3 | 2 | 6 | 10 | 13 | |
| Simplified | 1 + 3 | 8 | 23 | |||
O.Ryu does a close upper. Good priority anti-air if the enemy is on top of you, and if he is close it can be canceled into any special attack for a basic but damaging combo. Bad recovery.
- Far Standing Fierce:
| Damage | 28[1] |  |
 |
 |
 |
 |

|
| Stun | 10~16 | ||||||
| Stun Timer | 80 | ||||||
| Chain Cancel | No | ||||||
| Special Cancel | No | ||||||
| Frame Advantage | -7 | ||||||
| Frame Count | 3 | 2 | 6 | 10 | 12 | 1 | |
| Simplified | 1 + 5 | 6 | 23 | ||||
Similar to far.Strong, but with higher damage and longer reach, but the head hitbox moves forward just as much and the recovery is hideous. This move can not be canceled into specials, so make sure it hits or you will pay the price.
- Crouching Fierce:
| Damage | 28[1] / 22[1] |  |
 |
 |
 |
 |

|
| Stun | 3~9 / 10~16 | ||||||
| Stun Timer | 40 / 80 | ||||||
| Chain Cancel | No | ||||||
| Special Cancel | Yes / No | ||||||
| Frame Advantage | -12 / -9 | ||||||
| Frame Count | 3 | 3 | 8 | 10 | 12 | 1 | |
| Simplified | 1 + 3 | 11 | 23 | ||||
Uppercut from crouching position. It does good damage and has a deceptively long horizontal reach, but just average to low priority and quite long recovery. This move is unsafe on block or hit and is mainly used in combos or as close-up anti-air. Favor standing Fierce if you can for the latter.
- Close Standing Short: (Base max activation range: 0)
| Damage | 12[0] |  |
 |
 |
 |
 |

|
| Stun | 0~5 | ||||||
| Stun Timer | 40 | ||||||
| Chain Cancel | Yes | ||||||
| Special Cancel | No | ||||||
| Frame Advantage | +3 | ||||||
| Frame Count | 2 | 3 | 2 | 4 | 3 | 1 | |
| Simplified | 1 + 5 | 2 | 8 | ||||
O.Ryu performs a low kick that can be canceled into a far Short or crouching Short. This move must be blocked low.
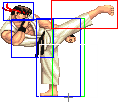
- Far Standing Short:
| Damage | 14[0] |  |
 |
 |
 |

|
| Stun | 0~5 | |||||
| Stun Timer | 40 | |||||
| Chain Cancel | Yes | |||||
| Special Cancel | No | |||||
| Frame Advantage | +0 | |||||
| Frame Count | 3 | 3 | 8 | 4 | 1 | |
| Simplified | 1 + 6 | 8 | 5 | |||
High side kick with good priority, but sort of slow. Good anti-air, but it is slower than N.Ryu's.
- Crouching Short:
| Damage | 4[0] |  |
 |
 |

|
| Stun | 0~5 | ||||
| Stun Timer | 40 | ||||
| Chain Cancel | Yes | ||||
| Special Cancel | Yes | ||||
| Frame Advantage | +4 | ||||
| Frame Count | 2 | 4 | 4 | 1 | |
| Simplified | 1 + 2 | 4 | 5 | ||
Rapid fire crouching low kick. This comes out slightly faster than N.Ryu's and has great priority: the whole leg is completely invincible during the move.
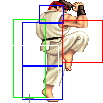
- Close Standing Forward: (Base max activation range: 0)
| Damage | 24[0] |  |
 |
 |
 |
 |

|
| Stun | 5~11 | ||||||
| Stun Timer | 60 | ||||||
| Chain Cancel | No | ||||||
| Special Cancel | Yes | ||||||
| Frame Advantage | +3 | ||||||
| Frame Count | 2 | 1 | 6 | 4 | 4 | 1 | |
| Simplified | 1 + 3 | 6 | 9 | ||||
Knee bash with a good recovery.
- Far Standing Forward:
| Damage | 24[0] |  |
 |
 |
 |

|
| Stun | 5~11 | |||||
| Stun Timer | 60 | |||||
| Chain Cancel | No | |||||
| Special Cancel | No | |||||
| Frame Advantage | -1 | |||||
| Frame Count | 5 | 6 | 12 | 6 | 1 | |
| Simplified | 1 + 11 | 12 | 7 | |||
High side kick with good priority, but hideous start-up. Good anti-air if you can hit the button early enough, but odds are you can't. Usual options are Shoryuken and far Short.
- Crouching Forward:
| Damage | 22[0] |  |
 |
 |
 |
 |

|
| Stun | 5~11 | ||||||
| Stun Timer | 60 | ||||||
| Chain Cancel | No | ||||||
| Special Cancel | Yes | ||||||
| Frame Advantage | +3 | ||||||
| Frame Count | 1 | 2 | 6 | 4 | 4 | 1 | |
| Simplified | 1 + 3 | 6 | 9 | ||||
Crouching side kick. This move has good reach and recovery, but is has projected vulnerable hitboxes before it becomes active. It is an important tool when closing the gap on the enemy and trying to push him into the corner as it can be canceled into Hadoukens. It is also used in bread and butter combos.
- Close Standing Roundhouse: (Base max activation range: 40)
| Damage | 30[1] + 4[1] |  |
 |
 |
 |
 |

|
| Stun | 10~16 + 1~7 | ||||||
| Stun Timer | 80 + 70 | ||||||
| Chain Cancel | No | ||||||
| Special Cancel | No | ||||||
| Frame Advantage | -1 / +7(+6) | ||||||
| Frame Count | 3 | 4 | 8 | 4 | 10 | 1 | |
| Simplified | 1 + 7 | 8 | 4 | 11 | |||
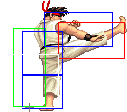
O.Ryu performs an axe kick that hits twice if the enemy is close enough. This is not a very useful move, but it is safe on block from point-blank range and often trades with aerial attacks. If you use it as a meaty, you can combo a crouching kick for two or three hits. you often have better options, though.
- Far Standing Roundhouse:
| Damage | 30[1] |  |
 |
 |
 |

|
| Stun | 10~16 | |||||
| Stun Timer | 80 | |||||
| Chain Cancel | No | |||||
| Special Cancel | Yes / No | |||||
| Frame Advantage | -7 / -3 | |||||
| Frame Count | 2 | 4 | 8 | 10 | 7 | |
| Simplified | 1 + 2 | 12 | 17 | |||
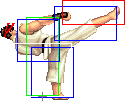
O.Ryu's staple Roundhouse kick. Mediocre anti-air that can be canceled in the odd event that it hits during the first active part. This move can not be canceled into specials if it hits while the leg is fully extended.
- Crouching Roundhouse:
| Damage | 30[1] |  |
 |
 |
 |

|
| Stun | 5~11 | |||||
| Stun Timer | 130 | |||||
| Chain Cancel | No | |||||
| Special Cancel | Yes | |||||
| Frame Advantage | -9 | |||||
| Frame Count | 3 | 6 | 6 | 8 | 11 | |
| Simplified | 1 + 3 | 6 | 25 | |||
O.Ryu's sweep kick. This move generates a fast knockdown if it hits. It has good range and the priority is such that it beats or trades with a number of moves. The recovery, however, is very long, so good players will try to bait this move so as to punish it afterward. This can be canceled into Hadoukens so you can push the enemy towards his corner.
Aerial Normals
- Neutral Jumping Jab:
| Damage | 12[0] |  |

|
| Stun | 1~7(-2) | ||
| Stun Timer | 40 | ||
| Special Cancel | Yes | ||
| Frame Count | 2 | ∞ | |
O.Ryu performs a jumping jab that is active throughout the whole jump. O.Ryu's hand has a relatively large active hitbox around it, making this a good air-to-air move. It can be used for jumping on you opponent after a knockdown and not generate much push-back, allowing you to apply mix-ups such as throw, cr.forward xx Hadouken/super or delayed Jab SRK (to beat reversal throws).
- Diagonal Jumping Jab:
| Damage | 12[0] |  |

|
| Stun | 1~7(-2) | ||
| Stun Timer | 40 | ||
| Special Cancel | Yes | ||
| Frame Count | 2 | ∞ | |
O.Ryu performs a jumping jab that is active throughout the whole jump. O.Ryu's hand has a relatively large active hitbox around it, making this a good air-to-air move. It can be used for jumping on you opponent after a knockdown and not generate much push-back, allowing you to apply mix-ups such as throw, cr.forward xx Hadouken/super or delayed Jab SRK (to beat reversal throws). This beats Zangief's Lariats from the right distance and still hits him if he crouches.
- Neutral/Diagonal Jumping Strong:
| Damage | 22[0] |  |
 |
 |
 |
 |
 |

|
| Stun | 5~11 | |||||||
| Stun Timer | 50 | |||||||
| Special Cancel | Yes* | |||||||
| Frame Count | 2 | 2 | 20 | 4 | 4 | 4 | ∞ | |
| Simplified | 4 | 20 | ∞ | |||||
This aerial punch stays active for quite some time, for a Strong punch. It has very good horizontal reach and O.Ryu's arm is completely invincible. A move to be considered when afraid of wall dives crossing you or aerial attacks in general. This attack does not hit crouching opponents.
- Neutral Jumping Fierce:
| Damage | 28[0] |  |
 |
 |
 |
 |
 |

|
| Stun | 11~17(-1) | |||||||
| Stun Timer | 60(+20) | |||||||
| Special Cancel | Yes* | |||||||
| Frame Count | 2 | 2 | 8 | 4 | 4 | 4 | ∞ | |
| Simplified | 4 | 8 | ∞ | |||||
Same as diagonal jump fierce, but does more dizzy.
- Diagonal Jumping Fierce:
| Damage | 28[1] |  |
 |
 |
 |
 |
 |

|
| Stun | 3~9 | |||||||
| Stun Timer | 40 | |||||||
| Special Cancel | Yes* | |||||||
| Frame Count | 2 | 2 | 8 | 4 | 4 | 4 | ∞ | |
| Simplified | 4 | 8 | ∞ | |||||
This move has very good air to ground priority, and O.Ryu's arm is also completely invincible. It can be used as anti-air from certain distances, and also beats or trades most other aerial attacks.
- Neutral Jumping Short:
| Damage | 14[0] |  |
 |

|
| Stun | 1~7(-2) | |||
| Stun Timer | 40 | |||
| Special Cancel | Yes | |||
| Frame Count | 3 | 40 | ∞ | |
This stays out for quite some time, but it has a very short reach. Mostly useless.
- Diagonal Jumping Short:
| Damage | 12[0] |  |
 |

| |
| Stun | 1~7(-2) | ||||
| Stun Timer | 40 | ||||
| Special Cancel | No | ||||
| Frame Count | 2 | 3 | ∞ | ||
| Simplified | 5 | ∞ | |||
This stays out for quite some time, but safe jumps aside, this does not have many uses. Its main downside is the short reach.
- Neutral Jumping Forward:
| Damage | 22[0] |  |
 |
 |
 |

|
| Stun | 5~11 | |||||
| Stun Timer | 50 | |||||
| Special Cancel | No | |||||
| Frame Count | 5 | 13 | 6 | 6 | ∞ | |
| Simplified | 5 | 13 | ∞ | |||
OK kick that stays active for some time. It can be used in certain situations where the enemy has trouble knowing which way to block. That aside, prefer neutral Strong, Fierce or Roundhouse.
- Diagonal Jumping Forward:
| Damage | 22[0] |  |
 |
 |
 |
 |
 |

|
| Stun | 5~11 | |||||||
| Stun Timer | 50(+10) | |||||||
| Special Cancel | No | |||||||
| Frame Count | 2 | 3 | 13 | 3 | 3 | 3 | ∞ | |
| Simplified | 5 | 13 | ∞ | |||||
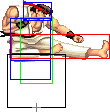
Rather long aerial kick with great priority. It can be used as a cross-up aerial attack, but diagonal Roundhouse is better for that. It can be used in safe jumps, to get less push-back if it gets blocked.
- Neutral Jumping Roundhouse:
| Damage | 30[0] |  |
 |
 |
 |
 |
 |

|
| Stun | 11~17(-1) | |||||||
| Stun Timer | 60(+20) | |||||||
| Special Cancel | Yes / No | |||||||
| Frame Count | 2 | 4 | 4 | 4 | 3 | 3 | ∞ | |
| Simplified | 2 | 8 | ∞ | |||||
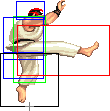
Neutral spin kick that has great reach and priority. The first active part becomes active very fast, saving you from some troublesome situations.
- Diagonal Jumping Roundhouse:
| Damage | 30[1] |  |
 |
 |
 |
 |
 |

|
| Stun | 3~9 | |||||||
| Stun Timer | 40 | |||||||
| Special Cancel | No | |||||||
| Frame Count | 2 | 3 | 7 | 3 | 3 | 3 | ∞ | |
| Simplified | 5 | 7 | ∞ | |||||
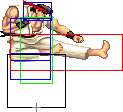
O.Ryu's best cross-up attack. This also has good reach and priority. From certain distances, this can also be used as anti-air, in the same fashion as diagonal jumping Fierce, hitting your enemy from above his attack or around the head.
Throws
O.Ryu can throw using Strong, Fierce, Forward, and Roundhouse. The direction of the joystick determines the direction the enemy gets thrown at. All his throws have the same range and do 32 points of damage (plus two more if behind in rounds). Due to the start-up and recovery properties if it fails, the towards+Fierce throw is often preferred.
- Normal Throws Throwboxes:
| Damage | 32 |  |
 |

| |
| Stun | 7~13 | ||||
| Stun Timer | 100 | ||||
| Range | (from axis) | 48 | |||
| (from throwable box) | 19 | ||||
- Shoulder Throw a.k.a. Seoi Nage: (←/↖/↗/→ + Strong/Fierce)
Both punch throws are the same, which allow O.Ryu to grab the enemy and throw him above his head.
- Circle Throw a.k.a. Tomoe Nage: (←/↖/↗/→ + Forward/Roundhouse)
The kick throws are also the same and have O.Ryu pull the enemy towards himself, lay down and throw them with the aid of his leg.
Special Moves
- Hadouken a.k.a. Fireball: (↓↘→ P)
Detailed Input: (↓ [7~14f] ↘ [7~14f] → [10/9/7f] Jab/Strong/Fierce)
- Startup:
 |
 |
 |

| |
| Frame Count | 2 | 6 | 1 | 1 |
| Simplified | 10 | |||
- Active:
- Jab Version:
| Damage | 18[0] |  |
 |
 |
 |

|
| Stun | 7~13 | |||||
| Stun Timer | 110 | |||||
| Frame Count | 1 | 2 | 3 | 3 | 3... | |
| Simplified | 40 | |||||
- Strong Version:
| Damage | 20[0] |  |
 |
 |
 |

|
| Stun | 7~13 | |||||
| Stun Timer | 110 | |||||
| Frame Count | 1 | 2 | 3 | 3 | 3... | |
| Simplified | 41 | |||||
- Fierce Version:
| Damage | 22[0] |  |
 |
 |
 |

|
| Stun | 7~13 | |||||
| Stun Timer | 110 | |||||
| Frame Count | 1 | 2 | 3 | 3 | 3... | |
| Simplified | 42 | |||||
NOTE: A lot of frames were omitted here, because in each frame the fb's hitbox move 1-3 pixels forward, the images are all uploaded though with the same name pattern, so you can still see them.
Ryu throws a blue ball of energy at his opponent. The strength of the punch determines its speed and damage: Jab flies the slowest and does less damage, while Fierce flies the fastest and does more damage. Fierce only does more damage than Strong if it hits during the first 26 active frames though (from point-blank range to mid screen). This happens because of a downgrade effect unique to Ryu and Akuma's projectiles.
This move is known to do high amounts of stun damage. Three hits in a row and pretty much any enemy falls dizzy.
Although all 3 versions (Jab, Strong, Fierce) have Ryu release the fireball at the same interval, Ryu will recover from the vulnerable "after-throw" state fastest after a Jab fireball and slowest after a Fierce fireball. However, the difference is almost imperceptible. Some characters such as Vega can punish Hadoukens on block or hit from close distance, so watch out for that. In addition to it, the move can evade completely when used from point-blank range, as some characters' attacks move their hitboxes towards a bit. This leaves Ryu wide open for throws or any ground combo they want to use.
Due to a glitch, it's possible to change the recovery of any Hadouken to that of a Jab by either whiffing or kara-canceling a Jab or Short normal. You can read more about it here.
Old Ryu gets the projectile in the air one frame faster and recovers from the move one frame faster after having thrown it, so he has an overall recovery that is faster by two frames.
Ryu's fireballs (blue or red) downgrade in strength after some time, and on the last downgrade they also disappear, similar to Chun's Kikoukens. When a downgrade happens, the projectile will inherit the properties of the lower strength, except for the travel speed which stays the same. For example, when a Strong Hadouken downgrades to a Jab Hadouken, it will be doing Jab Hadouken damage, will have the Jab Hadouken slightly smaller hitbox and will even use the same sprite as a Jab Hadouken, but it still travels with Strong Hadouken speed. The time required for them to actually disappear is rather long such that only Jab projectiles may ever disappear before leaving the screen, and that if both players walk or jump in the same direction the projectile is going for some distance. Special setups are usually required for a Strong or Fierce projectile to ever disappear. The data for that are as follows:
| 1st downgrade | 2nd downgrade | 3rd downgrade | Total duration | |
| Jab | 129f/384px (disappears) | 129f/384px | ||
| Strong | 48f/192px (downgrades to Jab) | 49f/192px (disappears) | 97f/384px | |
| Fierce | 26f/128px (downgrades to Strong) | 26f/128px (downgrades to Jab) | 24f/128px (disappears) | 76f/384px |
- Shakunetsu Hadouken a.k.a. Red Fireball: (←↙↓↘→ P)
Detailed Input: (← [7~14f] ↙ [7~14f] ↓ [7~14f] ↘ [7~14f] → [10/9/7f] Jab/Strong/Fierce)
- Startup:
 |
 |
 |

| |
| Frame Count | 2 | 6 | 2 | 1 |
| Simplified | 11 | |||
- Active:
- Jab Version:
| Damage | 18[0] |  |
 |
 |
 |

|
| Stun | 5~11 | |||||
| Stun Timer | 100 | |||||
| Frame Count | 1 | 2 | 3 | 3 | 3... | |
| Simplified | 41 | |||||
- Strong Version:
| Damage | 20[0] |  |
 |
 |
 |

|
| Stun | 5~11 | |||||
| Stun Timer | 100 | |||||
| Frame Count | 1 | 2 | 3 | 3 | 3... | |
| Simplified | 42 | |||||
- Fierce Version:
| Damage | 22[0] |  |
 |
 |
 |

|
| Stun | 5~11 | |||||
| Stun Timer | 100 | |||||
| Frame Count | 1 | 2 | 3 | 3 | 3... | |
| Simplified | 43 | |||||
NOTE: A lot of frames were omitted here, because in each frame the fb's hitbox move 1-3 pixels forward, the images are all uploaded though with the same name pattern, so you can still see them.
This is very similar to the normal fireball, except it will knock a grounded opponent down if it hits during the first 9 active frames or put them in a burning hitstun if it hits a grounded opponent after the 9th active frame. The damage is the same as those of the ordinary hadouken, but in O.Ryu's case, the startup and recovery are both slower by 1 frame. It also does less stun than the ordinary hadouken, so it's less effective at dizzying an opponent than the blue hadouken. As for some curiosity, this is one of the few special attacks that do not force a standing state on the enemy if it hits, but Ryu does not take any advantage or disadvantage from this.
Due to the lesser dizzy potential, as well as the extended recovery and start-up, O.Ryu will do better if he restricts red fireballs to situations where a knockdown is important, and up close.
Getting a knockdown with a red fireball can be a good opportunity to throw a meaty fireball onto the opponent who's just standing up and continue your pressure.
- Shouryuken a.k.a. Dragon Punch: (→↓↘ P)
Detailed Input: (→ [7~14f] ↓ [7~14f] ↘ [10/9/7f] Jab/Strong/Fierce)
Ryu becomes invulnerable, does a damaging upper, then follows up with a rising punch. After that, he remains completely defenseless as he falls back to the ground. Hit anyone with with move and they will take a full knockdown. Jab makes him jump the lowest and most vertical and does 20% if it hits early. This move is very good for evading projectiles, it's O.Ryu's best reversal, and it has two advantages over N.Ryu's Jab Shoryuken: it is completely invulnerable while active, so you can never be thrown or comboed, and it has more active frames while having as many less recovery frames, so it stays out there controlling space for more time. The Strong version rises a bit higher and does 21% damage and Fierce rises up the highest and does the most damage (24%), so this is O.Ryu's move of choice for punishing people who jump at you honestly. If Ryu hits the enemy during the rising part of the move, it will deal 18% damage for all versions.
Since a properly-timed Dragon Punch will beat most other moves, its simplest and most common application is as a general anti-air counter, because you have a lot of time to react and time the attack as you see the opponent approaching through the air. Because it'll knock down, you can continue pressuring with whatever you like, such as a meaty fireball or a cross-up attack. In addition to it, any character that can not alter his or her jump arc will be unable to evade the move if you time it late, for highest damage, as Ryu will be invulnerable.
You can also use it to stuff virtually any normal ground attack from your opponent, but the timing for this is much more difficult. It's high-reward but also high-risk strategy, since missing can result in you being wide open to punishment. Unless your opponent is very predictable, this can be considered a very high-level strategy that should only be attempted with caution. Again, it seems largely a matter of taste; some excellent Ryu players attempt a lot of ground Dragon Punches, while other great players almost never try them. Sometimes players will immediately do another ground Dragon Punch if the first one misses, reasoning that the second might connect with the opponent's counterattack if they time it just a bit too late.
The Dragon Punch is an excellent reversal move in general: it avoids or beats pretty much all other attacks in the game, but few exceptions that have sort of hidden, retracted hitboxes.
- Tatsumaki Senpuu Kiaku a.k.a. Hurricane Kick: (↓↙← K)
Detailed Input: (↓ [7~14f] ↙ [7~14f] ← [10/9/7f] Short/Forward/Roundhouse)
- Startup:
 |
 |

| |
| Frame Count | 4 | 4 | 3 |
| Simplified | 11 | ||
- Active:
- Short Version: This happens only once.
- Forward Version: This happens twice.
- Roundhouse Version: This happens 3 times.
| Short | Forward | Rh |  |
 |
 |

| |
| Damage | 24[1] | 26[1] | 28[1] | ||||
| Stun | 3~9 | ||||||
| Stun Timer | 90 | ||||||
| Frame Count | 3 | 3 | 3 | 3 | |||
- Recovery:
 |
 |
 |

| |
| Frame Count | 4 | 4 | 4 | 0 |
| Simplified | 12 | 0 | ||
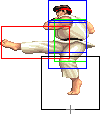
Ryu advances with a spinning kick that will knock down the opponent if it hits. Different kicks have different effects: Short has the lowest duration and speed, while Roundhouse has the highest. The Short and Forward versions do 15% damage; the Roundhouse version does 16%. Ryu is invulnerable during the first four frames of the move and is airbone by the time he can be hit again: this makes this attack a good option for evading safe jumps, meaty cross-ups and tick throws such as Zangief's spinning pile driver or T. Hawk's typhoon: he can never be thrown out of the move from the ground. This also makes it a good option to avoid meaty cross-ups and safe jumps. As soon as Ryu recovers from the move, he can only jump or block, thus the recovery listed as of zero frame. The next frame, he can not throw.
The Hurricane Kick safely travels right over some projectiles and, with good positioning and timing, can be used to punish characters like Dhalsim and Guile for trying to use them. More information can be found in the specific character match-ups.
Another trick with the Hurricane Kick is to use it to set up throws. Often this is done at close range with the Short version so that it takes place quickly, hopefully before the opponent can react in time. They see the Hurricane Kick come out and stay ducking, and then you land and throw them. A few people are not used to facing O.Ryu, and expect either one rotation, or either three or more. O.Ryu's Forward Tatsu can position him in a way players do not expect.
Finally, O.Ryu cannot use this move as a reversal after you are hit by normal attacks while airborne, that is to say, after an air reset.
- Kuuchuu Tatsumaki Senpuu Kiaku a.k.a. Air Hurricane Kick: (Min activation height: 16/16 upwards/downwards, ↓↙← K)
Detailed Input: (↓ [7~14f] ↙ [7~14f] ← [10/9/7f] Short/Forward/Roundhouse)
- Active: (The Air version does not has a startup animation)
- Short Version: This happens only once.
- Forward Version: This happens twice.
- Roundhouse Version: This happens 3 times.
| Short | Forward | Rh |  |
 |
 |

| |
| Damage | 22[1] | 24[1] | 26[1] | ||||
| Stun | 3~9 | ||||||
| Stun Timer | 90 | ||||||
| Frame Count | 3 | 3 | 3 | 3 | |||
- Recovery:
 |
 |
 |
 |
 |

| |
| Frame Count | 4 | 4 | 4 | 4 | ∞ | 5 |
| Simplified | ∞ | 5 | ||||
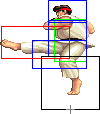
The Tatsumaki can also be done while airborne. Again, stronger kicks give it longer duration. Unlike the ground version, it does not always move O.Ryu forward; if performed while jumping backwards, O.Ryu will continue moving in that direction.
The Air Hurricane Kick has some interesting effects on the speed and trajectory of the jump, as felineki writes:
The character's vertical velocity is not directly affected. Rather, their gravity value is temporarily adjusted. Every character has their own jump gravity value (as I'm sure you've noticed, Dhalsim falls much more slowly from a jump than Claw). This normally stays constant throughout a jump. However, when a shoto performs a mid-air Hurricane Kick, their gravity value is temporarily decreased. This gives them the effect of falling more slowly if it is performed on the way down, or allowing them to gain more height if done on the way up.
The decreased gravity value lasts as long as the character's leg is out, able to hit. As soon as they pull their leg back in, the gravity value returns to normal.
In addition, they are given a slight boost in horizontal velocity as the kick starts (a forward boost if jumping forward or straight up, a backward boost if jumping back). This additional velocity lasts until they actually touch the ground.
The Air Hurricane Kick has a multitude of uses. It serves as an alternative air attack with alternative properties than O.Ryu's normal attacks and may interact with opponent anti-air moves differently. As it changes jump properties, it can surprise the opponent. Done correctly, it can actually cross-up enemy air counters like the Flash Kick to hit the opponent from behind. Or it can be used for purposes as simple as building meter on the way down from a jump that you otherwise aren't interested in doing an attack in, such as when jumping far back away from an opponent or jumping straight up over a projectile from a distance. Finally, if it hits on the first attacking frame, it has a 50% chance of being unblockable.
While the air Tatsumaki looks like the grounded one, in fact it has much worse priority. Also, it does not recover instantly when O.Ryu touches the ground.
--Raisin (March 29, 2007)
--Special thanks to felineki for the info on the Air Hurricane Kick.
Misc Animations
Jump Animations
- Neutral Jump:
 |
 |
 |
 |
 |
 |
 |
 |
 |

| |
| Frame Count | 2 | 1 | 8 | 8 | 8 | 8 | 8 | 4 | 1 | 7* |
| Simplified | 2 | 1 | 44 | 1 | 7* | |||||
- Back Jump:
 |
 |
 |
 |
 |
 |
 |
 |
 |

| |
| Frame Count | 2 | 1 | 15 | 3 | 3 | 3 | 3 | 18 | 1 | 7* |
| Simplified | 2 | 1 | 43 | 1 | 7* | |||||
- Forward Jump:
 |
 |
 |
 |
 |
 |
 |
 |
 |
 |

| |
| Frame Count | 2 | 1 | 13 | 5 | 3 | 3 | 3 | 5 | 11 | 1 | 7* |
| Simplified | 2 | 1 | 43 | 1 | 7* | ||||||
O.Ryu's prejump animation is considerably fast, unlike N.Ryu's that was nerfed by 1 frame. This is can be useful on some situations.
You see the gap between the leg and body hurtboxes during the prejump frames on the back jump? That happens to be just enough to allow the shotos to evade Low Tiger Shots entirelly! You can even evade meaty Low Tiger Shots on wake up since the first wake up frame will be the first prejump frame if you wake up holding up-back. Mattsun does this frequently. Be aware though that if it's a meaty Short Low Tiger Shot you'll most likelly end up landing on it, unless you react with an air tatsu to alter your jump trajectory, of course.
The landing recovery has a special property which allows it to be canceled into certain actions. At the first landing frame, you can perform throws (including command throws), and on the second landing frame, you can start another jump, attack with a normal or special move, or block. Blocking not being until the second landing frame, as well as hitbox-hurtbox interactions having priority over throwbox-throw hurtbox is why sweeps work as anti airs in this game.
Things are different when jumping over your opponent, however. In that situation it's possible to walk back/forward, to jump again or to even block on the first landing frame! Strangely, if a throw is timed on the first landing frame of a jump that crosses over, a throwbox will never come out, even though that input will result in a normal coming out 2 frames later (like it normally would). Anyway, being able to block on the first landing frame can help a little bit on some safe jump crossup setups, or maybe in other situations as well if your character has a huge jump arc.
The Basics
Ryu's basic game centers around two moves: the Hadouken (Fireball) and the Shoryuken (Dragon Punch).
The Hadouken is a powerful move - it advances across the screen independently of Ryu, harming anything it touches. Even if blocked, it still does damage (albeit only a little). As a result, throwing one forces the opponent to react; they have to try and find a way around it, or they will eventually succumb to the constant chip damage.
Every character has an easy way to try and avoid the Hadouken: jumping over it. Unfortunately for them, O.Ryu has also been equipped with the game's best anti-air move: the Shoryuken. If an opponent reacts to a Hadouken by jumping over it, Ryu can respond by performing a Shoryuken as they are coming down. Since they cannot block while in the air, there is nothing they can do to prevent it from hitting them.
If a character jumps over a Hadouken from a distance, out of the range of Ryu's Shoryuken, he can still walk forward and force them to land on a cr.RH. They cannot block this when timed correctly, and it will knock them down.
Zoning
Ryu's ideal positioning against most characters is at the very end of their jump arc - this gives him the maximum amount of time to recover from a Hadouken, while still being in range to hit them with a Shoryuken if they try to jump.
The Fireball Trap
Ryu's famous Fireball Trap is a simple but deadly pattern he can follow on a cornered opponent. After scoring a knock-down on an opponent in the corner, Ryu can first position himself at the end of their jump arc, and then throw a Jab Hadouken as they are getting up. The Jab Hadouken hits meaty, after which Ryu can immediately throw a second Jab Hadouken, which hits just after the first. Finally, he throws a Fierce Hadouken just as the second Jab Hadouken ends.
If done correctly, the enemy cannot jump out of this pattern. If they try to jump between any of these fireballs, the next fireball will hit them on the way up, they will be knocked down, and the pattern can be begun again. If they decide to jump after the last fireball in the pattern, Ryu can use his Shoryuken to knock them out of the sky and back into the corner. Then he can throw a meaty Jab Hadouken as they are getting up, and repeat the process all over again.
A few characters can break the pattern by evading the Jab Hadouken with an invulnerable move. Ryu and Ken can use their Jab Shoryukens to escape. Honda can use a Buttslam, which can be countered by a Shoryuken, but if you have committed to throwing a Fierce Hadouken, you can get a move to whiff and be punished for it as Honda descends. In order to avoid this problem, consider using the button-release Hadouken.
Due to O.Ryu's better recovery and start-up on his projectiles, his fireball trap is superior to N.Ryu's, being easier to maintain due to having more time to input Shoryukens, Hadoukens and sweeps. It is also slightly harder for the enemy to react to the Hadoukens.
Hadouken tick
If you knock an enemy down at their corner, try getting from close to mid distance and throwing a Jab Hadouken so that it hits near their back. This gives you time to walk up and throw them while their are worried about cr.forward xx red Hadouken, walk up and retreat to bait reversals and walk-up Jab shoryuken. If the Hadouken hits, you can combo a crouching kick as they recover. Note that this strategy has risks: as the Hadouken has to land really meaty, many special attacks that have short periods of invulnerability can be used to evade the projectile completely, which would not be possible otherwise. This includes Ryu's Tatsumakis, short Flash Kick, Dee Jay and Vega's (Claw) flip kicks and many supers.
Tencho bait
Throw a few Fierce or Strong Hadoukens at your enemy. If they get blocked and you feel they are about to jump in, step back and throw a Jab Hadouken for them to land on it.
Feints
Ryu (or Ken) have to duck for a split second if they throw a Hadouken while walking or standing still. Other players can react to this and the move's initial frames to evade the projectile or even punish you for using it. Ryu can fake Hadouken by simply ducking and standing, or throwing some standing Jab or Strong punches. Use this against enemies that can punish Hadoukens on reaction, such as Vega (Claw), M. Bison (Dictator), Sagat and others. If they jump in, punish with a Fierce Shoryuken or other appropriate option. Against charge characters, mix up Hadoukens with feints, walkin up and short tatsus so as to be at the end of their jump arc while pushing them back to their corner at the same time. That is the most dangerous distance for you to be if they guess right, but with mix-ups it should get difficult for your enemies to jump the right time.
Advanced Strategy
Canceling into Hadoukens
You want to push your enemies into the corner in most your match-ups. A few of them actually have better ground normals than you do, or at least better range on them. As your projectile/anti-air game is very strong, second only to O.Sagat's, learning to push the opponent away from you is of crucial importance. One important skill is being able to walk up and cancel a crouching kick into a Hadouken. Because of the threat of the walk-up Shoryuken, enemies will be worried about sticking too many pokes in front of you, which might give you time to do this. To ensure you get a Hadouken, cancel the crouching kick as late as possible, do not rush the move. If you are facing an opponent which has an horizontal super, never cancel your crouching kicks into Hadoukens, but the Forward kick from close range. They have enough time to pull out the super and punish you hard for it.
Cross-up tatsu
Do a safe jump as you normally would. At the peak of your jump, do an air Tatsumaki to increase your horizontal speed and land on the other side of your enemy. This is easier to do as Ken than Ryu due to his longer and faster air Tatsumaki. On the other hand, Ryu has the advantage of knocking down the enemy if it hits, allowing him to repeat the tactic to try a variation. If they block, you will have a good frame advantage, which can be used to land an attack such as cr.Roundhouse or mix up throws, Shoryukens and low attacks.
Walk-up Shoryuken
Simply move the joystick towards your enemy. As you get close, quickly complete the Shoryuken motion, that is, move the joystick down and then down-towards while pressing Jab. Due to being invincible, this move will stuff most every other move in the game: most likely, a poke the enemy sticks out to prevent you from getting close and controlling space. The idea is that the enemies will be worried about the walk-up Shoryuken and it will allow you to close in on your enemy and push them further back towards their corner with crouching kicks into Hadoukens or even throws. O.Ryu has a good deal in his fully invilcible Jab Shoryuken, but it is still slower than Ken's and has less range, so this already risky strategy is riskier for him. Keep it in mind for surprising your enemy and applying mix-ups, mostly.
Meaty into Shoryuken
This is a very basic option-select tool, that can be used here and there, specially against enemies that have trouble punishing your Jab Shoryuken on block. A basic meaty option could be to wait your enemy with a cr.Short or Forward just as he gets up, and cancel it normally, so you hit them for another knockdown or add some chip damage to the block string. The command would be ↓ + kick, then →↓↘ + Jab, of course. This can be countered right away in two ways: reversal throw and reversal special attacks (invulnerable or instantly-hitting ones). However, if you always kara-cancel the first hitting frames of the move, you can beat many reversal attacks. The command is →↓ + Short or Forward, ↘ + Jab. You have to time the Jab so that the crouching kick has enough time to come out. If the enemy misses his reversal, he eats a damaging two-hit combo into another knockdown. If he uses an invulnerable reversal that has any start-up, O.Ryu's Jab Shoryuken beats it. If he blocks and you have spaced the kick correctly, his counter pokes whiff, depending on the enemy character. This has some risk as you can get thrown out of it, but as throws are harder than specials when it comes to reversals, this is also risky for them. You must also time it right so that the kick is still cancelable: the last active (read hit-able) frames of most attacks can not be cancelled into special moves. Avoid doing this from point-blank range, else even shotos will be able to punish you for free. The SRK must hit with the tip of the punch.
A safer version is to simply use a Jab Shoryuken on the enemy's wake-up. This does less damage and stun, but is harder to mess up and gives the enemy one less frame of advantage as you recover. Meaty Shoryuken, meaty kick into Shoryuken, safe jumps and built-in Shoryuken will eventually train your enemy to block as he wakes up, which allows O.Ryu to use another tricky option-select, the throw-SRK option-select.
Built-in Shoryuken
Built-in Shoryukens are explained here, be sure to read that. In a nutshell: as you perform a safe jump, do a Jab Shoryuken as you land so that it comes out if they reverse, stuffing their special move. Because O.Ryu's Shoryukens are invulnerable on the way up, they can only ever lose to other moves during recovery. In practice, this happens mostly against Boxer's headbutts, depending on the range and the headbutt strenght. Here is a list of moves that O.Ryu's built-in Jab Shoryuken will beat:
- Ryu: Tatsu, Shoryuken, super
- E.Honda: Headbutt, Sumo Drop, Super Headbutt
- Chun-Li: Super, upkicks;
- Guile: Flash Kick
- T.Hawk: Tomahawk Buster
- Fei-Long: Flame Kick, Chicken Kick, Super
- Cammy: Cannon Spike, Spin Knuckle, Super
- DeeJay: Machine Gun, upkicks;
- Boxer: Super
- Claw: Scarlet Terror
- Sagat: Tiger Uppercut
You can not safe jump against Chun Li's roundhouse upkicks, so avoid safe jumping her from the front if your enemy is good with one-button reversals.
Button-release Hadouken
Check this article from Nohoho's blog. This is important against E.Honda and characters whose super travels forward.
Throw-Shoryuken
A basic shoto strategy comes from mixing Shoryukens and throws at close range. Any shoto character can use that, but there is a variation that O.Ken, O.Ryu and Ryu can use to narrow the enemy's options when dealing with throws, which is the Throw-Shoryuken option-select. By using the command →↓↘→ + Forward~Jab, you can try to use the kick throw, if the enemy is in range and not invincible, and immediately obtain a Jab Shoryuken if he can not be thrown, dealing with late counter throws and reversals. This forces the enemy to resort to counter throws, which is harder than a special as a reversal and may fail if his throw range is shorter than the shotos'. The technique works better for the old Shotos, as their Shoryukens are fully invincible during the way up, and after an attack that leaves your enemy at close range, so you don't risk getting thrown even before finishing the SRK motion.
Check Super Turbo Saturdays episode 2 to see it in action.
Match-ups
Vs. Balrog (boxer):
Vs. Blanka:
- 7 - 3
Round Start
Block, walk up block, walk up cr.kick xx Hadouken, cr.Strong.
Main Strategy
Stay on the ground. Crouching Strong beats a number of his pokes, but does not have enough reach to guarantee that you will control him in footsies. Use Hadoukens from a distance to push him back. If he uses his horizontal rolling attack, block it standing and do a reversal Fierce Hadouken to punish him. If Blanka jumps in on top of you, use a Shoryuken. If he jumps from a distance such that it would whiff, use cr.Roundhouse, standing Strong and jumping Fierce as anti-air. Blanka can often counter those moves, so mix them up to keep him off balance. If you score a knockdown, use your projectile game or jumping Fierce or Roundhouse if you believe he will try a reversal. Do a Hadouken as you land to punish a possible reversal back hop. The horizontal rolling part of Blanka's super can be hit by Hadoukens or cr.Short.
Vs. Cammy:
- 7.5 - 2.5
Round start
Block, jump back, backwards juice kick.
Main strategy
Use your projectile game to zone her, and use standing Strong or cr.Roundhouse to punish jump-ins. If she gets up close, try a red Hadouken between her pokes, or a walk-up cr.Forward or Roundhouse into Hadouken only if she does not have super. Jump ins, Spinning Backfist and Hooligan Combination can all be punished with a Shoryuken on reaction.
Vs. Chun-Li:
Vs. Dee Jay:
- 7 - 3
Round Start
Walk up and block, walk up cr.kick into Haoduken, block.
Main Strategy
Use a barrage of Hadoukens to cancel his Max Out game, and walk up or short Tatsus to close the gap and push him into the corner. If he jumps, you will be in position for a Shoryuken for high damage and a full knockdown. At the corner, keep the pressure up with Hadoukens and crouching kicks into Hadoukens. Do not threat him with whiffed normals: most his normals have good priority and will either beat or trade with your attacks. This is specially true for cr.Forward, which gets beaten cleanly by Dee Jay's cr.Strong and cr.Forward. If he tries to escape, use close standing Fierce or Shoryuken. If he jumps from a distance such that a SRK is unsafe, try a perfectly spaced sweep, diagonal Fierce or check his usual action after he lands. Due to the threat of cr.Roundhouse, you may be able to simply walk up and throw him. Neutral jumping Roundhouse will stuff his diagonal jumping Roundhouse, but it is very risky. Only use it if you know for sure it will get used.
If you score a knockdown against Dee Jay, consider either safe jumping, meaty Hadouken, cross-up Tatsu or meaty cr.Forward into cr.RH or another cr.Forward. Dee Jay's reversals have trouble hitting low, so you can usually punish him afterwards (Up kicks) or simply stuff him (Machine Gun Upper). Or you can use the buil-in SRK and beat anything he does. Avoid meaty Jab Shoryukens, as his standing Roundhouse will punish it on block.
As it is usual against charge projectile characters, pay attention to his style, the clock and your life lead. The more jumpy the enemy gets, the more dangerous it is to throw Hadoukens, but the more damage you deal if you feint and punish with Shoryukens. Also, as his projectiles are fast and some of his normals have long reach, watch out when throwing a Hadouken if the previous one has been blocked or if you are at a frame disadvantage. You may eat a Max Out or a standing Roundhouse and get hit out of your projectile.
If cornered, stay calm. Dee Jay may get a sort of long block-string pressure going, but he will eventually have to either give up frame advantage or take some risk such as jumping in or trying to predict a Hadouken with standing RH. Be ready to sweep, SRK or get a red Hadouken in between his pokes. Also, be wary of supers, which will surely get all hits if you are cornered.
Watch out for trying to reversal throw after his awesome cross-up aerial Forward kick. Talented Dee Jays will use cr.Jab linked into cr.Short either once or twice, canceling it into MGU for major damage. Concentrate on softening the throw in that situation, and consider yourself lucky if your opponent always goes for the st.Strong xx Dread Kicks, which can be simply blocked.
O.Ryu has a bit more trouble punishing jump-ins due to the lack of the rush punch to reposition himself, but his projectile game is much better. Dee Jay will be quickly forced to jump or block if he tries to trade projectiles against O.Ryu.
Vs. Dhalsim:
Vs. E. Honda:
- 8 - 2
Round start
Block; step back a bit then use crouching Strong (beats HHS and Dos Koi headbutt); jump back.
Main Stretegy
Use your projectile game to zone him, and cr.Roundhouse or SRK to punish jump-ins. Against buttslams, prefer Shoryukens, back + strong or cr.strong xx red Hadouken or cr.Roundhouse. If he gets up close, do not panic. Watch out for opportunities such as a jump-in or a Buttslam. Try red Hadoukens between his pokes occasionally. If he does a super, either SRK him right away if you got the time or simply block the first hit and use a reserval Shoryuken to knock him out of the air. If you score a knockdown, simply have him wake up on meaty Hadoukens and continue with your zone game. Do not attempt normal meaties against him: odds are you will eat a free Oiicho throw.
Vs. Fei Long:
Vs. Guile:
Vs. Ken:
Vs. M. Bison (dictator):
- 6 - 4
Round Start
Block, Strong Hadouken, rapid-fire st.Jab.
Main Strategy
Dictator will try to poke you with his kicks and hit you out of your projectiles, then force you to throw a Hadouken or predict one and punish with a ToD combo. Also, he will want to put you in a defensive position and tick throw you from a range only Shoryuken will work, as Tatsus get beat by his punches. To avoid that, Ryu will use well placed projectiles, which will put Dictator on defense and force him to either play patiently and carefully, or take constant risks.
If you get him cornered, pressure him with Hadoukens. He is particularly vulnerable to your projectile trap.
From full screen, Dictator can punish Hadoukens on reaction with Headstomps. Thus, keep constantly feinting so you can throw occasional Hadoukens (Fierce only). If you bait a Headstomp, diagonal Strong can punish it for some good damage and a full knockdown.
Learn the timing for crossing him on on knockdowns. This will put Dictator in a situation his only hope is to block correctly. If he does not, he will eat aerial Roundhouse, cr.Strong and either a Hadouken or a Shoryuken, which can be hit-confirmed. If he blocks correctly, he still has to deal with guessing games between throw, cr.kick (xx Hadouken) and Shoryuken. Avoid Tatsu as a follow-up as Dictator can react with diagonal Strong for a 3-hit juggle combo.
Training should help you differentiate jump-ins from Headstomps and Devil's Reverse. You must punish the jump-ins with Shoryukens: allowing Dictator to land aerial attacks on you is a losing strategy, even if you manage to block them. His tick throw game is very strong, and his block strings will allow him to get meter early, limiting your options.
If he tries a super from mid or long distance, use a Shoryuken on reaction. If you bait a super by jumping, Fierce beats it on the way down, if he is not anymore invulnerable, which is usually the case. Do not throw Jab Hadoukens from close and mid distance when he has bar: he will punish with the super on reaction.
If he tries a Headstomp while you are standing, crouch to avoid it. Zone him carefully and be ready to Shoryuken jump-ins.
Vs. Ryu:
Vs. Sagat:
Vs. T. Hawk:
Round Start
Crouching Strong, wait, jump back.
Main Strategy
Hawk can kill you with his Typhoon loop. Fast. You have to keep him out if you want to survive. Hawk's plan, on the other hand, is to get in. This is the match-up, not trying to escape the loop, which means you are already counting on luck or an execution mistake.
Hawk has several ways of getting in, but all put him in range for some of Ryu's melee attacks, or force him to give up blocking, which also leaves him wide open to Hadoukens. He can simply walk up and do a typhoon, which you can counter with a crouching kick or Red Hadouken. We can whiff a normal outside your range and throw you faster by previously buffering the command, which you can also stop with a crouching kick or Hadouken. The normal whiff can be a warning. This, however, force you to throw a normal or a projectile which he can predict and punish with cr.RH, getting a fast knockdown, or even walk-up and Rising Hawk, which gives him the full knockdown, to great advantage. From a range, he can control some space with Roundhouse, which gets stuffed by your Strong punch, and can be hit if he attacks again by a properly timed Hadouken.
Other ways of getting in are aerial normals (Jab "wall" or Fierce) and the Condor Dive, or simply dive, for short. The dive gives Ryu some time to either block it or punish it, which can be done with a Shoryuken, standing Jab or standing Short, depending on the angle. Notice he can only dive until the apex of his jump. As he falls, he can only use normals. The normals, usually Jab, can be swept from the right range, or punished with a Shoryuken from closer range. If the jump is ambiguous, try to simply jump back, as accepting it will lead to a safe option-select throw attempt. If you have super, you can use it as anti-air in that situation. Crouching Roundhouse gives you a safe jump on Hawk, if it hits. You have to wait for a split second before jumping, or your aerial attack will whiff.
If he gets you in his loop, O.Ryu has no guaranteed way out. Among Ryu's specials, the one that has the best chance of escaping the loop is Short Tatsu. Rarely, the Tatsus can also allow Ryu to escape the installed Rising Hawk after safe jumps, but this demands certain fortunate distances and timing from Hawk as he jumps. As O.Ryu's Shoryuken will beat the installed Rising Hawk, odds are the opponent will just use normals to beat eventual Tatsumakis, or punish the recovery. The reversal Tatsumaki may also help before the typhoon, as a Rising Hawk, crouching Strong or Fierce do less damage than the command throw, and there is a small chance that they mistime a move and you get away with a throw or Shoryuken.
Vs. Vega (claw):
Vs. Zangief:
- 4.5 - 5.5
Round Start
Stand still and wait, Red Hadouken, walk up cr.Forward xx Hadouken, walk up cr.kick, jump back + Tatsu.
Main Strategy
Your projectile game mostly fails against Zangief, as 1) he can evade Hadoukens with Lariats and 2) his jumps are short, often allowing him to hit your extended arms before you can react with a Shoryuken. You will want to throw projectiles in the hope he messes up and with timing such that he will get hit if he tries to predict them with a Green Hand. He can also use his st.Forward kick to poke you from outside your normal move range. If it whiffs, you can tr crouching or standing Strong to stuff it, but recall these two options project your hitboxes forward a bit. That aside, you can try walk up sweep or cr.Forward, simply feint or use a Red Hadouken between his pokes. While Zangief can counter all these, mixing up between them all makes it troublesome for Zangief to use his many ground tools. You must try not to default to blocking, at it allows Zangief to Lariat in front of you freely, getting meter and position while you stay pinned due to block recovery. If you see a Lariat and you are not blocking, however, you can walk up and sweep him with your crouching Roundhouse. Also, keep in mind that kick Lariats are vulnerable at the end of the move and punch Lariats have the range increase as Zangief spins. This means you risk getting stuffed if you guess a kick lariat wrong (hadouken) or SPDed or punched if you guess a punch Lariat wrong (while walking forward for a crouching kick).
Do not default to Shoryukens as a reversal move against Zangief. Mix it up with (Short) Tatsu from a distance as the SRK is not safe on block and has long recovery. Do not overuse the Tatsu: after a safe jump, if Gief sees it coming, he can Lariat you out of it and earn a cross-up guessing game that will most likely end in you taking a lot of damage. In the worst case, you may be dizzied and lose the round there.
This is one of the many match-ups where you must not allow the opponent to freely jump on you. Unless he is out of range, have the Shoryuken or the sweep ready. If you score a knockdown, know your jumping Strong and Jab punches will stuff hit reversal Lariat. This will force him to block, which then gives you some mean guessing games with options among throw, delayed Jab Shoryuken or Short Tatsu (for throw mashers) and crouching kicks into Hadouken. If you get him on his corner, pressure him with cr.kicks into Hadouken, sweeps and projectiles. Lariats are risky for him there, as he has little room to walk back and avoid sweeps, but he is forced to try something risky in that situation. Be on the safe side, though: if he grabs you, he can steer his SPDs to spin in the direction of his own corner, extending his pressure in both sides of the screen.
In this match-up, do not
- try cross-up Tatsus;
- try meaty grounded normal attacks;
- spam Forward and Roundhouse tatus;
- default to Shoryuken as a reversal;
- default to Red Hadouken between his pokes;
- default to backward or down back, getting pinned down during Lariats;
- try any meaty aerial attack on top of him;
- discard the risk of him jumping on you.
O.Ryu does not have the rush punch and the swing, which can be useful to rush and sweep Zangief out of Lariats and to punish exceedingly defensive stances. However, his ground game is much better, as Ryu relies on his crouching kicks and O.Ryu's are much better.
