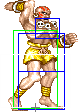
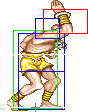
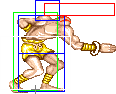
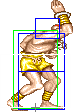
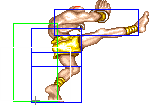
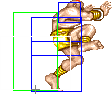
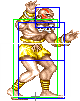
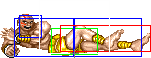
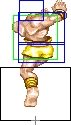
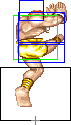
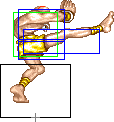
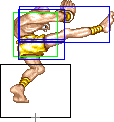
Disclaimer: To better understand the diagrams, read this.
Normal Moves
Ground Normals
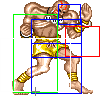
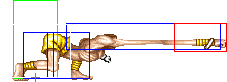
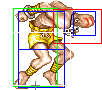
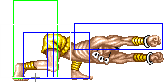
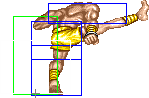
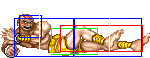
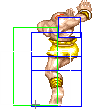
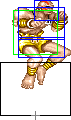
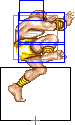
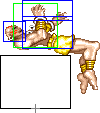
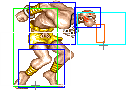
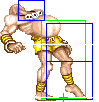
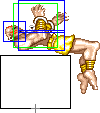
- Close Standing Jab: (Base max activation range: 21)
| Damage |
14[0] |
 |
 |
 |
|
| Stun |
0~5
|
| Stun Timer |
40
|
| Chain Cancel |
No
|
| Special Cancel |
Yes / No
|
| Frame Advantage |
-1 / +2
|
| Frame Count |
2 |
3 |
6 |
5
|
| Simplified |
1 + 2 |
9 |
5
|
One of your best standing anti-airs due to the low start-up frames. Not as effective for old Dhalsim as he has to be very close to use this move.
| Damage |
12[0] |
 |
 |
 |
|
| Stun |
0~5
|
| Stun Timer |
40
|
| Chain Cancel |
No
|
| Special Cancel |
Yes*
|
| Frame Advantage |
+2
|
| Frame Count |
2 |
3 |
6 |
5
|
| Simplified |
1 + 5 |
6 |
5
|
A key move for O.Sim, because, unlike N.Sim, he can't use close crouching lp from far, so this ends up being the only decent answer for moves like Honda's headbutt for example.
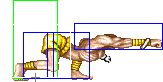
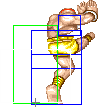
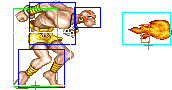
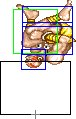
- Close Crouching Jab: (Base max activation range: 47)
| Damage |
14[1] |
 |
 |
|
| Stun |
0~5
|
| Stun Timer |
40
|
| Chain Cancel |
No
|
| Special Cancel |
Yes
|
| Frame Advantage |
+4
|
| Frame Count |
2 |
4 |
5
|
| Simplified |
1 + 2 |
4 |
5
|
Not as useuful with O.Sim because of the strict activation range, since you can't really use it as a defensive poke on neutral.
| Damage |
12[0] |
 |
 |
 |
 |
|
|
| Stun |
0~5
|
| Stun Timer |
40
|
| Chain Cancel |
No
|
| Special Cancel |
No
|
| Frame Advantage |
-2
|
| Frame Count |
2 |
3 |
3 |
6 |
4 |
5
|
| Simplified |
1 + 8 |
6 |
9
|
Mostly outclassed by far crouch mp, but this does less pushback, so can be ok if you need them at a specific range.
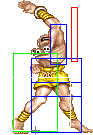
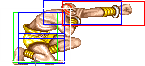
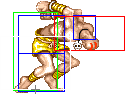
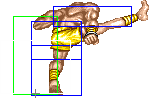
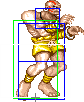
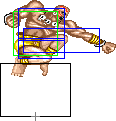
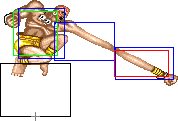
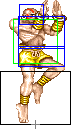
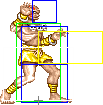
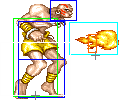
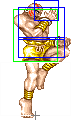
- Close Standing Strong: (Base max activation range: 48)
| Damage |
18[1] |
 |
 |
 |
 |
|
| Stun |
5~11
|
| Stun Timer |
60
|
| Chain Cancel |
No
|
| Special Cancel |
Yes / No
|
| Frame Advantage |
+4 / +7
|
| Frame Count |
2 |
3 |
6 |
4 |
1
|
| Simplified |
1 + 2 |
9 |
5
|
Works as an anti air, and pretty fast to come out.
| Damage |
16[1] |
 |
 |
 |
|
| Stun |
5~11
|
| Stun Timer |
60
|
| Chain Cancel |
No
|
| Special Cancel |
No
|
| Frame Advantage |
-1 / +3
|
| Frame Count |
3 |
4 |
4 |
6
|
| Simplified |
1 + 7 |
10
|
|
 |
|
|
| Frame Count |
4 |
4 |
1
|
| Simplified |
9
|
Ok as a poke, can beat some attacks that are low on the ground.
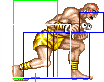
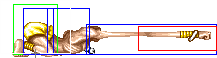
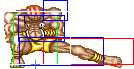
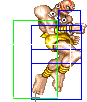
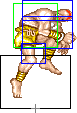
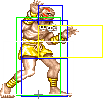
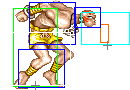
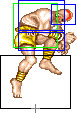
- Close Crouching Strong: (Base max activation range: 47)
| Damage |
18[1] |
|
 |
|
| Stun |
5~11
|
| Stun Timer |
60
|
| Chain Cancel |
No
|
| Special Cancel |
Yes
|
| Frame Advantage |
+6
|
| Frame Count |
3 |
5 |
7
|
| Simplified |
1 + 3 |
5 |
7
|
Less priority than close crouch lp, but more reach, can still be good to keep them out, as it has fast startup. Old Dhalsim has to be close to use it though, so it can be harder to use in some situations.
| Damage |
16[0] |
|
|
|
 |
|
|
| Stun |
5~11
|
| Stun Timer |
60
|
| Chain Cancel |
No
|
| Special Cancel |
No
|
| Frame Advantage |
+3
|
| Frame Count |
2 |
3 |
3 |
6 |
4 |
5
|
| Simplified |
1 + 8 |
6 |
9
|
This is a good low poke to pressure and punish with. It gives good frames upon landing, and forces them to block low. Gives Guile and DJ a lot of problems as it can safely punish their fireballs, you can even block them if you get up as the move ends.
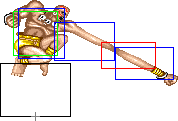
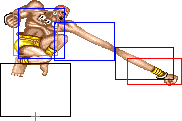
- Close Standing Fierce: (Base max activation range: 60)
| Damage |
22[1] + 22[1] |
 |
 |
 |
 |
 |
|
| Stun |
10~16 + 10~16
|
| Stun Timer |
80 + 80
|
| Chain Cancel |
No
|
| Special Cancel |
Yes* / No
|
| Frame Advantage |
-6 / -3(-4)
|
| Frame Count |
2 |
3 |
3 |
8 |
10 |
7
|
| Simplified |
1 + 5 |
3 |
8 |
17
|
Does a huge amount of dizzy in the case that both hits land, and they do combo properly most of the time. Best to set this up after crossup drill, or meaty crossup slides. The old Dhalsim range restrictions don't hurt much here since you only want this move when close anyway.
| Damage |
20[1] |
|
|
 |
|
| Stun |
10~16
|
| Stun Timer |
80
|
| Chain Cancel |
No
|
| Special Cancel |
No
|
| Frame Advantage |
-7 / -3
|
| Frame Count |
3 |
4 |
4 |
6
|
| Simplified |
1 + 7 |
10
|
|
 |
|

|
| Frame Count |
10 |
8 |
1
|
| Simplified |
19
|
Good range, but is a little unsafe to whiff. Useful to punish moves like blanka ball, or to push the opponent back to a more ideal range. The old Dhalsim range restrictions don't negatively effect this movem much, since it's mainly only used from far away.
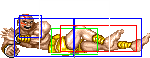
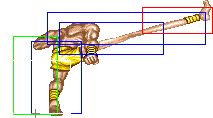
- Close/Far Crouching Fierce:
| Damage |
20[2] |
|
|
|
 |
|
|
| Stun |
10~16
|
| Stun Timer |
80
|
| Chain Cancel |
No
|
| Special Cancel |
No
|
| Frame Advantage |
-3
|
| Frame Count |
3 |
4 |
4 |
6 |
10 |
9
|
| Simplified |
1 + 11 |
6 |
19
|
Can still low profile under a lot of moves like the weaker variants, but has a much longer recovery. It has great reach, and good priority for a stretching normal, use carefully. This is his only crouch heavy punch normal, old Dhalsim lacks the close version that new Dhalsim gained.
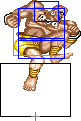
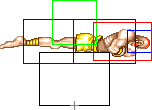
- Close Standing Short: (Base max activation range: 51)
| Damage |
14[0] |
 |
 |
|
| Stun |
0~5
|
| Stun Timer |
40
|
| Chain Cancel |
No
|
| Special Cancel |
Yes
|
| Frame Advantage |
+0
|
| Frame Count |
3 |
8 |
5
|
| Simplified |
1 + 3 |
8 |
5
|
Ok as an anti air. Just be careful as you need to be in activation range to use it.
| Damage |
12[1] |
|
 |
 |
|
 |
|
| Stun |
0~5
|
| Stun Timer |
40
|
| Chain Cancel |
No
|
| Special Cancel |
Yes*
|
| Frame Advantage |
-4
|
| Frame Count |
2 |
3 |
8 |
4 |
4 |
1
|
| Simplified |
1 + 5 |
8 |
9
|
Can be ok for checking some moves like chicken wing and scissor kicks, but usually far mk is a better move to use. Like far stand mk, old Dhalsim can also cancel this move, useful for locking opponents down.
- Close/Far Crouching Short:
| Damage |
12[1] |
 |
 |
 |

|
| Stun |
0~5
|
| Stun Timer |
40
|
| Chain Cancel |
No
|
| Special Cancel |
Yes
|
| Frame Advantage |
-6
|
| Frame Count |
1 |
1 |
14 |
5
|
| Simplified |
1 + 2 |
14 |
5
|
This slide is not much use for anti fireball tactics, but can combo into most other normals if done meaty enough. Also useful for ticks into throw, and as an anti air. This is his only crouching light kick normal, he lacks the close version that New Dhalsim gained.
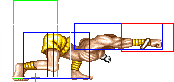
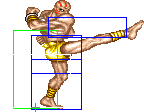
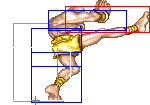
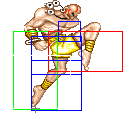
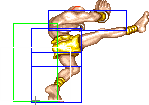
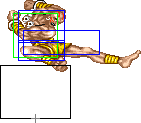
- Close Standing Forward: (Base max activation range: 56)
| Damage |
18[0] |
|
 |
|
| Stun |
5~11
|
| Stun Timer |
60
|
| Chain Cancel |
No
|
| Special Cancel |
Yes
|
| Frame Advantage |
+5
|
| Frame Count |
3 |
8 |
5
|
| Simplified |
1 + 3 |
8 |
5
|
Ok as a trade anti air, comes out pretty fast. Just make sure you know the activation range, so you don't get far mk by mistake.
| Damage |
16[1] |
|
 |
 |
 |
|
| Stun |
5~11
|
| Stun Timer |
60
|
| Chain Cancel |
No
|
| Special Cancel |
Yes*
|
| Frame Advantage |
+1
|
| Frame Count |
2 |
3 |
8 |
4 |
5
|
| Simplified |
1 + 5 |
8 |
9
|
If there is a single reason to consider using O.Sim, this move is it. Notice how it is special cancelable? Great for locking opponents down.
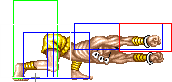
- Close Crouching Forward: (Base max activation range: 60)
| Damage |
18[2] |
|
 |
|
| Stun |
5~11
|
| Stun Timer |
60
|
| Chain Cancel |
No
|
| Special Cancel |
Yes
|
| Frame Advantage |
+5
|
| Frame Count |
1 |
8 |
5
|
| Simplified |
1 + 1 |
8 |
5
|
Probably the best anti-ticking normal in the game due to the 1-frame startup. Mash on this to deter tick or walk-up throws. Still great, but now it only works when close, so it is less useful as a counter poke.
| Damage |
16[1] |
|
 |
 |
|
| Stun |
5~11
|
| Stun Timer |
60
|
| Chain Cancel |
No
|
| Special Cancel |
No
|
| Frame Advantage |
-1
|
| Frame Count |
3 |
4 |
16 |
5
|
| Simplified |
1 + 7 |
16 |
5
|
Not used as much as his other slides, but can still set up mixups. Only works from far away, so less useful in general as old Dhalsim.
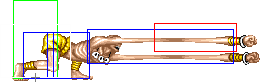
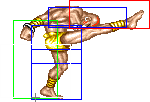
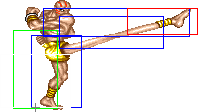
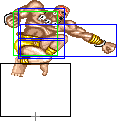
- Close Standing Roundhouse: (Base max activation range: 66)
| Damage |
22[1] |
 |
 |
 |
 |
|
|
|
| Stun |
10~16
|
| Stun Timer |
80
|
| Chain Cancel |
No
|
| Special Cancel |
No
|
| Frame Advantage |
+6
|
| Frame Count |
3 |
3 |
2 |
8 |
3 |
4 |
1
|
| Simplified |
1 + 8 |
8 |
8
|
Underrated move, has great priority, it will beat a lot of attacks clean. You can do it as a meaty from far, and a lot of characters reversals will whiff or lose. Much harder to use effectively as it now has a range restriction as old Dhalsim.
| Damage |
20[1] |
 |
 |
 |
 |
|
| Stun |
10~16
|
| Stun Timer |
80
|
| Chain Cancel |
No
|
| Special Cancel |
No
|
| Frame Advantage |
-3
|
| Frame Count |
1 |
2 |
3 |
4 |
6
|
| Simplified |
1 + 10 |
6
|
|
 |
 |
|
| Frame Count |
10 |
8 |
1
|
| Simplified |
19
|
A little slow, but has great range. Very effective at punishing fireballs, and for an anti air if they jump from far away.
- Close/Far Crouching Roundhouse:
| Damage |
20[2] |
|
|
 |
|
|
| Stun |
5~11
|
| Stun Timer |
130
|
| Chain Cancel |
No
|
| Special Cancel |
No
|
| Frame Advantage |
-17
|
| Frame Count |
3 |
4 |
18 |
20 |
1
|
| Simplified |
1 + 7 |
18 |
21
|
Great for punishing fireballs thanks to the long range, and the fact that it knocks down on hit. This is his only crouching heavy kick normal, he lacks the close version that new Dhalsim gained.
Aerial Normals
- Neutral/Diagonal Jumping Jab:
| Damage |
14[1] |
 |
 |
 |
 |
|
| Stun |
1~7(-2)
|
| Stun Timer |
40
|
|
| Frame Count |
3 |
4 |
16 |
4 |
∞
|
| Simplified |
7 |
16 |
∞
|
Jump hp is much better to use, however this can hit in spaces where j hp could whiff.
- Neutral/Diagonal Jumping Strong:
| Damage |
18[1] |
|
|
 |
|
|
| Stun |
5~11
|
| Stun Timer |
50(+10)
|
|
| Frame Count |
3 |
4 |
10 |
4 |
∞
|
| Simplified |
7 |
10 |
∞
|
Jump hp is flat out better, though this might hit in spaces where j hp would whiff.
- Neutral/Diagonal Jumping Fierce:
| Damage |
24[2] |
|
|
 |
|
|
| Stun |
11~17(-1)
|
| Stun Timer |
60(+20)
|
|
| Frame Count |
3 |
4 |
4 |
4 |
∞
|
| Simplified |
7 |
4 |
∞
|
Ok range, but poor priority, can defend you from air to airs if you hit them early enough.
- Neutral/Diagonal Jumping Short:
| Damage |
14[1] |
 |
 |
 |
 |
|
| Stun |
1~7(-2)
|
| Stun Timer |
40
|
|
| Frame Count |
4 |
6 |
18 |
4 |
∞
|
| Simplified |
10 |
18 |
∞
|
Jump mk is just flat out better, though this has a little more active frames.
- Neutral/Diagonal Jumping Forward:
| Damage |
18[1] |
|
|
 |
|
|
| Stun |
5~11
|
| Stun Timer |
50(+10)
|
|
| Frame Count |
4 |
6 |
12 |
4 |
∞
|
| Simplified |
10 |
12 |
∞
|
Beats a handful of moves if used at specific ranges, but still has poor priority.
- Neutral/Diagonal Jumping Roundhouse:
| Damage |
24[2] |
 |
 |
 |
 |
 |
 |
 |
|
| Stun |
11~17(-1)
|
| Stun Timer |
60(+20)
|
|
| Frame Count |
1 |
2 |
3 |
4 |
6 |
4 |
3 |
∞
|
| Simplified |
10 |
6 |
∞
|
Good reach. This is useful for air to airs, and for beating walldive attempts vs Claw.
Command Normals
It should be noted that all of his drills can hit low, and in some cases must be blocked low. They don't hit overhead like air normals, so it's usually best to crouch block drills.
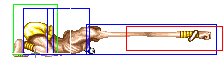
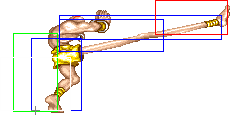
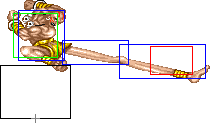
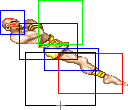
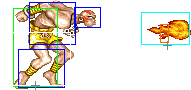
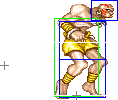
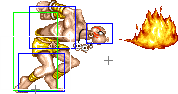
- Drill Zutsuki a.k.a. Mummy Drill: (On air, ↙/↓/↘ + Fierce)
| Damage |
18[4] |
 |
 |

|
| Stun |
10~16
|
| Stun Timer |
80
|
|
| Frame Count |
1 + 5 |
∞ |
7
|
Useful because O.Sim can use it as a tick into Noogie.
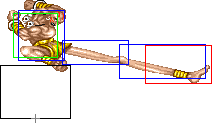
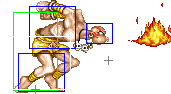
- Drill Kick: (On air, ↙/↓/↘ + Roundhouse)
| Damage |
18[4] |
 |
 |
|
| Stun |
10~16
|
| Stun Timer |
80
|
|
| Frame Count |
1 + 5 |
∞ |
7
|
O.Sim can only use the N.Sim Forward drill (though with the Roundhouse button), so he can't use the other drills to set up the opponent as much from up close, or as a reaction to a thrown fireball.
Throws
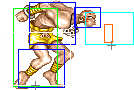
Dhalsim can throw using Strong and Fierce. The direction of the joystick determines the direction the enemy gets thrown at.
| Hold |
Throw |
 |
 |
|
| Damage |
26 + 4*n |
Damage |
34
|
| Set amount of hits |
6 |
Stun |
7~13
|
| Holds do no stun |
Stun Timer |
100
|
| Range |
(from axis) |
64 |
(from throwable box) |
29
|
- Yoga Smash a.k.a. Noogie: (←/↖/↗/→ + Strong)
Dhalsim's Hold. This is his most damaging grab. It may be a good idea to try cheap out and loop this, depending on the opponent's reversal options and grab range. Against Dictator for example, it's possible to make it safe by spacing it out of his throw range, unless he has his super meter full, of course. Against Honda, you can followup with a Yoga Flame which he is pretty much forced to block.
- Yoga Throw: (←/↖/↗/→ + Fierce)
Dhalsim's Throw. It actually does a little more damage than most normal throws, a lot less than Chun's Strong throw though. Go for this throw when you want to keep a confortable distance from your oppponent or when you want to finish a round (the extra damage helps on this).
Special Moves
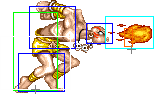
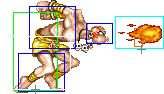
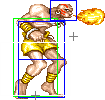
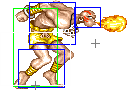
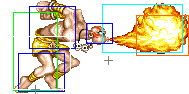
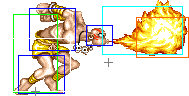
Detailed Input: (↓ [7~14f] ↘ [7~14f] → [10/9/7f] Jab/Strong/Fierce)
|
 |
 |
 |
|
| Frame Count |
2 |
2 |
7 |
1
|
| Simplified |
12
|
| Damage |
17[2] |
 |
 |
 |
 |
|
| Stun |
9~15
|
| Stun Timer |
100
|
|
| Frame Count |
1 |
1 |
3 |
6 |
9...
|
| Simplified |
40
|
| Damage |
18[2] |
|
 |
 |
 |
|
| Stun |
9~15
|
| Stun Timer |
100
|
|
| Frame Count |
1 |
1 |
3 |
6 |
9...
|
| Simplified |
40
|
| Damage |
20[3] |
|
 |
 |
 |

|
| Stun |
9~15
|
| Stun Timer |
100
|
|
| Frame Count |
1 |
1 |
3 |
6 |
9...
|
| Simplified |
40
|
Average frames in terms of startup and recovery, and has a small hitbox. However it has some great qualities, medium and heavy versions cause a hard knockdown, unlike Ryu's red fireballs, this can happen a any time, not just during the first few active frames. Jab version keeps them standing. Like Guile, you can throw one, and stay behind it, and try punish anything they do to avoid it. Dhalsim doesn't make himself nearly as vulnerable as most characters during startup, so it's not too hard to get this out sometimes.
Detailed Input: (← [7~14f] ↙ [7~14f] ↓ [7~14f] ↘ [7~14f] → [10/9/7f] Jab/Strong/Fierce)
|
 |
 |
 |
 |
 |
 |
|
| Frame Count (Jab) |
2 |
2 |
3 |
2 |
2 |
1 |
1
|
| Simplified (Jab) |
13... (21)
|
| Frame Count (Strong) |
2 |
2 |
3 |
2 |
3 |
1 |
1
|
| Simplified (Strong) |
14... (22)
|
| Frame Count (Fierce) |
2 |
2 |
4 |
2 |
4 |
1 |
1
|
| Simplified (Fierce) |
16... (24)
|
|
 |
 |
 |
 |

|
| Frame Count |
1 |
2 |
1 |
3 |
1
|
| Simplified (Jab) |
...8 (21)
|
| Simplified (Strong) |
...8 (22)
|
| Simplified (Fierce) |
...8 (24)
|
| Damage |
28[7] |
 |
 |
 |
|
| Stun |
9~15
|
| Stun Timer |
100
|
| Frame Advantage |
+16
|
| Frame Count |
3 |
1 |
3 |
1
|
| Simplified |
8 (32)
|
|
 |
 |
 |
|
| Frame Count |
3 |
1 |
3 |
1
|
| Simplified |
8... (32)
|
|
 |
|
 |
|
| Frame Count |
3 |
1 |
3 |
1
|
| Simplified |
...8... (32)
|
|
 |
|
|
|
| Frame Count |
3 |
1 |
3 |
1
|
| Simplified |
...8 (32)
|
| Damage |
28[5] / 32[5] |
|
|
|
|
| Stun |
9~15
|
| Stun Timer |
100
|
| Frame Advantage |
+16
|
| Frame Count |
3 |
1 |
3 |
1
|
| Simplified |
8 (48)
|
|
|
|
|
|
| Frame Count |
3 |
1 |
3 |
1
|
| Simplified |
8... (48)
|
|
|
|
|
|
| Frame Count |
3 |
1 |
3 |
1
|
| Simplified |
...8... (48)
|
|
|
|
|
|
| Frame Count |
3 |
1 |
3 |
1
|
| Simplified |
...8... (48)
|
|
|
|
|
|
| Frame Count |
3 |
1 |
3 |
1
|
| Simplified |
...8... (48)
|
|
|
|
 |
|
| Frame Count |
3 |
1 |
3 |
1
|
| Simplified |
...4 (48) |
4 (48)
|
NOTE: The higher damage value is for the last 4 active frames where the hitbox is bigger.
| Damage |
32[5] |
|
|
|
|
| Stun |
9~15
|
| Stun Timer |
100
|
| Frame Advantage |
+16
|
| Frame Count |
3 |
1 |
3 |
1
|
| Simplified |
8 (63)
|
|
|
|
|
|
| Frame Count |
3 |
1 |
3 |
1
|
| Simplified |
8... (63)
|
|
|
|
|
|
| Frame Count |
3 |
1 |
3 |
1
|
| Simplified |
...8... (63)
|
|
|
|
|
|
| Frame Count |
3 |
1 |
3 |
1
|
| Simplified |
...8... (63)
|
|
|
|
|
|
| Frame Count |
3 |
1 |
3 |
1
|
| Simplified |
...8... (63)
|
|
|
|
|
|
| Frame Count |
3 |
1 |
3 |
1
|
| Simplified |
...8... (63)
|
|
|
|
 |
|
| Frame Count |
3 |
1 |
3 |
1
|
| Simplified |
...4 (63) |
4... (63)
|
|
|
|
|
| Frame Count |
3 |
1 |
3
|
| Simplified |
...7 (63)
|
|
 |
 |
|
 |
|
|
| Frame Count (Jab) |
|
3 |
1 |
3 |
1 |
3
|
| Simplified (Jab) |
11... (19)
|
| Frame Count (Strong) |
|
3 |
1 |
3 |
1 |
3
|
| Simplified (Strong) |
11... (19)
|
| Frame Count (Fierce) |
1 |
3 |
1 |
3 |
1 |
3
|
| Simplified (Fierce) |
12... (20)
|
|
|
 |
|
 |
|
| Frame Count |
1 |
3 |
1 |
1 |
2
|
| Simplified (Jab) |
...8 (19)
|
| Simplified (Strong) |
...8 (19)
|
| Simplified (Fierce) |
...8 (20)
|
A great pressure tool, as it recovers almost instantly when it connects. If spaced from afar, most characters have no choice but to block, so in the corner you can use it to set up mixups into throw or low attacks. Useful in fireball wars to get the advantage.
- Yoga Teleport: (→↓↘/←↓↙ 3P/3K)
Detailed Input: (→/← [7~14f] ↓ [7~14f] ↘/↙ [7~14f] 3P/3K)
|
 |
 |
 |
 |
 |
 |

|
| Frame Count |
2 |
3 |
3 |
3 |
3 |
12 |
12
|
| Simplified |
38
|
|
|
|
|
|
|

|
| Frame Count |
8 |
9 |
3 |
3 |
3 |
3
|
| Simplified |
26 |
3
|
Dhalsim's only true invincible reversal. Though it often still gets you punished. Vs chip kill attempts, or command grab ticks, this is your only option. In the corner, reversal teleport usually appears in the same spot, which does no good for you.
Misc Animations
Jump Animations
|
 |
 |
 |
 |
 |
|
|
 |
|
| Frame Count |
1 |
1 |
15 |
8 |
8 |
15 |
17 |
1 |
7*
|
| Simplified |
1 |
1 |
63 |
1 |
7*
|
|
|
|
 |
 |
 |
 |
|
 |
|
| Frame Count |
1 |
1 |
15 |
8 |
8 |
8 |
25 |
1 |
7*
|
| Simplified |
1 |
1 |
64 |
1 |
7*
|
|
|
|
|
 |
|
|
|
|
|
| Frame Count |
1 |
1 |
15 |
8 |
8 |
8 |
24 |
1 |
7*
|
| Simplified |
1 |
1 |
63 |
1 |
7*
|
Even though it may not look like, Dhalsim actually has the fastest prejump speed on the game (tied with Dictator and O.Sagat). On the other hand he has the overall longest jump duration on the game.
The landing recovery has a special property which allows it to be canceled into certain actions. At the first landing frame, you can perform throws (including command throws), and on the second landing frame, you can start another jump, attack with a normal or special move, or block. Blocking not being until the second landing frame, as well as hitbox-hurtbox interactions having priority over throwbox-throw hurtbox is why sweeps work as anti airs in this game.
Things are different when jumping over your opponent, however. In that situation it's possible to walk back/forward, to jump again or to even block on the first landing frame! Strangely, if a throw is timed on the first landing frame of a jump that crosses over, a throwbox will never come out, even though that input will result in a normal coming out 2 frames later (like it normally would). Anyway, being able to block on the first landing frame can help a little bit on some safe jump crossup setups, or maybe in other situations as well if your character has a huge jump arc.


