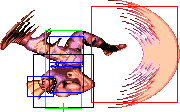
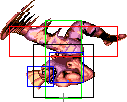
Introduction
Guile is a all-around balanced character. He can pressure his enemies by shielding his advances with Sonic Booms and also use them as a barrier, together with his Flash Kick, to apply chip damage while holding a defensive position. However, he has been toned down quite a bit, compared to his CPS-1 versions. His Sonic Booms have projected vulnerable hitboxes, his main poke - the crouching Forward kick - has worse priority and he has lost his dangerous CPS-1 chains. Similarly to other characters, his aerial normal moves have worse priority.
Competitive Overview
Strengths & Weaknesses
Strengths
- Fastest recovering fireball in the game (21 frames), and pretty fast to come out also.
- Good mobility, and fast footspeed.
- Lots of command normals, large and versatile moveset.
- A very good crossup.
- Flash kick is a great anti air.
- Fireball is incredibly good both as a defensive, and offensive tool.
- Good range on most normals/command normals, and good damage.
- High damage combos/air throws.
Weaknesses
- Can be safejumped/crossed up fairly easily, then is left with no reversal special.
- Most normals have long recovery and/or startup.
- Struggles in situations where he cannot fireball
- Diagonal jump normals all have horrible air to ground priority
- Most high damage combos are not easy
- Anti airs take practice to use effectively
New & Old Versions Comparison
To select O.Guile, choose Guile and then press ↑ ↓ ↓ ↓ Jab/Fierce, pressing Short simultaneously with the punch button for the alternate color.
Here is the list of differences:
- Obvious stuff: O.Guile can not tech throws and does not have a Super
- O.Guile has some differences in some of his normals:
- Far Standing Strong does not have an anti-air hitbox (the first part is better, but he does not has a second active part like N.Guile has) but it does more damage
- Crouching Strong does more damage
- Close Standing Fierce does more damage, and has a bigger activation range
- Crouching Fierce does more damage
- Far Standing Fierce is the back fist (N.Guile has a straight punch instead, his back fist that is now a command normal also does less damage)
- Close Standing Forward does more damage
- Far Standing Forward has worse feet vulnerability during start-up (plus he does not have the command normal versions) but it does more damage
- Crouching Forward does more damage
- Both Standing Roundhouse kicks are the classic kicks from the CPS-1, while N.Guile has a mediocre anti-air one for the close version and a donkey kick as the far one
- Crouching Roundhouse does more damage
- Both Jumping Fierces does more damage
- Diagonal Jumping Short is not a cross-up attack
- Both Jumping Forwards does more damage
- Both Jumping Roundhouses does more damage
- The Knee Bazooka is performed with Short instead of Forward. It also does more damage
- The Reverse Spin Kick does more damage
O.Guile has some benefits like the ability to do the back fist and the standing short while charging for Booms, his standing Roundhouse is a decent anti-air, plus most of his normals are more damaging, but all in all N.Guile is slightly better due to the cross-up and most of the normal moves he has gained.
Color Options
| Jab | Strong | Fierce | Start | Old |
 |
 |
 |
 |

|
 |
 |
 |
 |

|
| Short | Forward | Roundhouse | Hold | Old Alternative |
--Born2SPD
Video Overview
Moves Analysis
Disclaimer: To better understand the diagrams, read this.
Normal Moves
Ground Normals
- Close/Far Standing Jab:
| Damage | 4[0] |  |
 |
 |

|
| Stun | 0~5 | ||||
| Stun Timer | 40 | ||||
| Chain Cancel | Yes | ||||
| Special Cancel | Yes | ||||
| Super Cancel | Yes | ||||
| Frame Advantage | +4 | ||||
| Frame Count | 3 | 4 | 2 | 3 | |
| Simplified | 1 + 3 | 4 | 5 | ||
Rapid-fire jab. Guile's arm is fully invincible, but it does not have much reach, just like other such Jabs. It is a good move.
It whiffs on most characters if they are crouching, but will still hit these characters regardless: Sim, Hawk, Gief, Sagat, Boxer, Deejay, Old Fei.
- Crouching Jab:
| Damage | 4[0] |  |
 |

|
| Stun | 0~5 | |||
| Stun Timer | 40 | |||
| Chain Cancel | Yes | |||
| Special Cancel | Yes | |||
| Super Cancel | Yes | |||
| Frame Advantage | +4 | |||
| Frame Count | 3 | 4 | 5 | |
| Simplified | 1 + 3 | 4 | 5 | |
The crouching version also has rapid-fire properties, and similar priority.
In some matchups this is a useful move to apply pressure and be safe vs a reversal special. This mainly applies to Chun Li, and shotos, you want to space the cr lp so it hits from max range.
- Close Standing Strong: (Base max activation range: 40)
| Damage | 22[0] |  |
 |
 |
 |
 |

|
| Stun | 5~11 | ||||||
| Stun Timer | 60 | ||||||
| Chain Cancel | No | ||||||
| Special Cancel | Yes | ||||||
| Super Cancel | Yes | ||||||
| Frame Advantage | +3 | ||||||
| Frame Count | 3 | 3 | 3 | 3 | 3 | 3 | |
| Simplified | 1 + 3 | 3 | 12 | ||||
This is not very safe if you do not cancel. It mostly spoils the anti-air properties of far standing Strong, which is not really good for Guile.
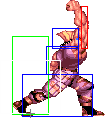
- Far Standing Strong:
| Damage | 22[1] |  |
 |
 |
 |
 |

|
| Stun | 5~11 | ||||||
| Stun Timer | 60 | ||||||
| Chain Cancel | No | ||||||
| Special Cancel | Yes / No | ||||||
| Super Cancel | Yes / No | ||||||
| Frame Advantage | +3 / +5 | ||||||
| Frame Count | 4 | 2 | 4 | 3 | 3 | 3 | |
| Simplified | 1 + 4 | 6 | 9 | ||||
Uppercut punch. This has good range and recovery, and work as anti-air, from the right range.
Useful for frame traps, usually relying on the first active part, then cancelling into sonic boom. Though the fireball usually cannot reach in time to actually combo.
- Crouching Strong:
| Damage | 20[0] |  |
 |
 |

|
| Stun | 5~11 | ||||
| Stun Timer | 60 | ||||
| Chain Cancel | No | ||||
| Special Cancel | Yes | ||||
| Super Cancel | Yes | ||||
| Frame Advantage | +6 | ||||
| Frame Count | 3 | 4 | 4 | 4 | |
| Simplified | 1 + 3 | 4 | 8 | ||
This has just acceptable range for a crouching Strong move. The priority is poor, so this is mostly used in combos and to punish moves such as whiffed Tatsumakis.
A decent answer to check walk up throws as it comes out as fast as his jabs, and does better pushback/damage. Also has the ability to hit low in some situations vs some characters.
Hits low all the time: Guile (mirrors), Deejay, Old Sagat (new sagat has a larger low hurtbox, so he can always stand block it).
Hits low from a distance : Chun, Claw, Cammy, Hawk, Fei.
On some characters, crossup j lk> cr mp> cr mp, they have to block the 2nd one low. That only works vs Claw and Cammy, obviously Guile, DJ, and Old Sagat have to block it low as well.
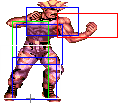
- Close Standing Fierce: (Base max activation range: 45)
| Damage | 24[1] |  |
 |
 |
 |
 |

|
| Stun | 10~16 | ||||||
| Stun Timer | 80 | ||||||
| Chain Cancel | No | ||||||
| Special Cancel | Yes | ||||||
| Super Cancel | Yes | ||||||
| Frame Advantage | -10 | ||||||
| Frame Count | 3 | 3 | 10 | 8 | 6 | 5 | |
| Simplified | 1 + 3 | 3 | 29 | ||||
Upper that has long recovery, but more damage. It can be canceled into special attacks so as not to be punished on block.
All the characters that can't crouch stand jab, cannot crouch this either. Except for N.Fei, Claw, and Honda, who can crouch stand jab, but not close stand fierce.
- Far Standing Fierce:
| Damage | 24[1] |  |
 |
 |
 |
 |
 |
 |

|
| Stun | 1~7 | ||||||||
| Stun Timer | 70 | ||||||||
| Chain Cancel | No | ||||||||
| Special Cancel | No | ||||||||
| Super Cancel | No | ||||||||
| Frame Advantage | +6 | ||||||||
| Frame Count | 2 | 2 | 2 | 3 | 3 | 3 | 3 | 4 | |
| Simplified | 1 + 6 | 6 | 10 | ||||||
Can be used in situations where standing jab would be good, such as anti airs vs boxer and gief, and to stuff headbutts and drills. Can also be used like shoto far stand strong to anti air in mirrors and stuff specific moves. But it cannot be rapid fired or cancelled, and 10 frame recovery is not desirable.
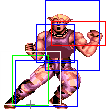
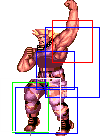
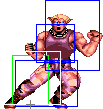
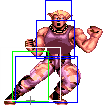
- Crouching Fierce:
| Damage | 24[1] |  |
 |
 |
 |
 |
|
| Stun | 10~16 | ||||||
| Stun Timer | 80 | ||||||
| Chain Cancel | No | ||||||
| Special Cancel | No | ||||||
| Super Cancel | Yes / No | ||||||
| Frame Advantage | -4 / +0 | ||||||
| Frame Count | 2 | 3 | 4 | 12 | 9 | 1 | |
| Simplified | 1 + 5 | 16 | 10 | ||||
The main anti air to use when being jumped on and you aren't charged for a flash kick. This takes training to time: you want it to trade if the enemy attacks the right time. It can also be used as a feint, tricking the enemy into thinking you stood up and lost charge.
- Close/Far Standing Short:
| Damage | 12[0] |  |
 |
 |
 |

|
| Stun | 0~5 | |||||
| Stun Timer | 40 | |||||
| Chain Cancel | Yes | |||||
| Special Cancel | Yes | |||||
| Super Cancel | Yes | |||||
| Frame Advantage | +3 | |||||
| Frame Count | 2 | 2 | 4 | 3 | 3 | |
| Simplified | 1 + 4 | 4 | 6 | |||
Quite good priority, useful for beating sliding attacks like vs Deejay, Blanka, and Sim. You can actually mash this while charging a fireball and not get bazooka knee. Start mashing in neutral, then while still mashing, hold back, as long as you don't stop rapid firing while standing, you won't get the knee.
- Crouching Short:
| Damage | 14[0] |  |
 |
 |
 |

|
| Stun | 0~5 | |||||
| Stun Timer | 40 | |||||
| Chain Cancel | Yes | |||||
| Special Cancel | No | |||||
| Super Cancel | No | |||||
| Frame Advantage | +3 | |||||
| Frame Count | 3 | 3 | 4 | 3 | 3 | |
| Simplified | 1 + 6 | 4 | 6 | |||
This move combos into itself. A fast attack to push a close opponent away to ideal c.mk range.
Guile's only low attack that can lead to flash kick/super. This has to be done as a renda cancel though. It's an important skill to learn as to punish players trying to counter throw, or reverse.
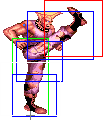
- Close Standing Forward: (Base max activation range: 38)
| Damage | 22[0] |  |
 |
 |
 |

|
| Stun | 5~11 | |||||
| Stun Timer | 60 | |||||
| Chain Cancel | No | |||||
| Special Cancel | No | |||||
| Super Cancel | No | |||||
| Frame Advantage | +8 | |||||
| Frame Count | 3 | 3 | 4 | 3 | 3 | |
| Simplified | 1 + 6 | 4 | 6 | |||
Pretty much solely used as an anti air when the opponent is above you. Useful vs shotos to stuff jump fierce and other air normals. This has a lot of frame advantage, which allows you to link things like cr mp after it lands, and close fierce on some characters. Though this is not useful aside from styling when getting a KO.
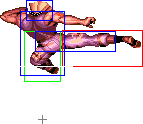
- Far Standing Forward:
| Damage | 22[0] |  |
 |
 |
 |
 |
 |
 |
 |
 |

|
| Stun | 5~11 | ||||||||||
| Stun Timer | 60 | ||||||||||
| Chain Cancel | No | ||||||||||
| Special Cancel | No | ||||||||||
| Super Cancel | No | ||||||||||
| Frame Advantage | +0 | ||||||||||
| Frame Count | 2 | 2 | 2 | 3 | 5 | 4 | 3 | 2 | 2 | 2 | |
| Simplified | 1 + 9 | 5 | 13 | ||||||||
This is exactly the same as his command sobats, and can be used in the same ways.
- Crouching Forward:
| Damage | 22[0] |  |
 |
 |
 |

|
| Stun | 5~11 | |||||
| Stun Timer | 60 | |||||
| Chain Cancel | No | |||||
| Special Cancel | No | |||||
| Super Cancel | No | |||||
| Frame Advantage | +5 | |||||
| Frame Count | 3 | 4 | 5 | 4 | 4 | |
| Simplified | 1 + 7 | 5 | 8 | |||
Guile's main poke. It has a very good range, but poor priority. The key to using this attack well is not using it all the time, but positioning yourself so that it will hit or control space when the enemy is not throwing his pokes, which often beat Guile's.
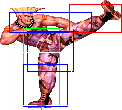
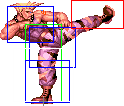
- Close Standing Roundhouse: (Base max activation range: 72)
| Damage | 26[1] |  |
 |
 |
 |
 |
 |
|
| Stun | 1~7 | |||||||
| Stun Timer | 70 | |||||||
| Chain Cancel | No | |||||||
| Special Cancel | No | |||||||
| Super Cancel | No | |||||||
| Frame Advantage | -1 | |||||||
| Frame Count | 2 | 2 | 2 | 1 | 1 | 4 | 4 | |
| Simplified | 1 + 8 | 8 | ||||||
 |
 |
 |
 |

| |
| Frame Count | 3 | 3 | 3 | 3 | 3 |
| Simplified | 15 | ||||
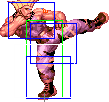
Mediocre anti air kick, Guile usually always has better options. You cannot reliably do this while keeping fireball charge either since you get the upside down kick within this moves activation range if you are holding back or forward while pressing hk.
- Far Standing Roundhouse:
| Damage | 24[1] |  |
 |
 |
 |
 |
 |
|
| Stun | 1~7 | |||||||
| Stun Timer | 70 | |||||||
| Chain Cancel | No | |||||||
| Special Cancel | No | |||||||
| Super Cancel | No | |||||||
| Frame Advantage | +3 | |||||||
| Frame Count | 6 | 2 | 1 | 3 | 1 | 3 | 3 | |
| Simplified | 1 + 13 | 6 | ||||||
 |
 |
 |

| |
| Frame Count | 3 | 3 | 3 | 4 |
| Simplified | 13 | |||
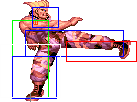
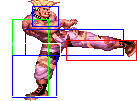
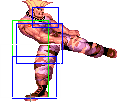
Tied with the second hit of sweep for the most ranged normal. Safe when it lands, and beats a handful of good attacks in some matchups. First 6 startup frames are also airborne, he's immune to ground throws/command grabs, and will air reset if hit during this part.
- Crouching Roundhouse:
| Damage | 24[1] |  |
 |
 |
 |
 |
 |
 |

|
| Stun | 5~11 | ||||||||
| Stun Timer | 130 | ||||||||
| Chain Cancel | No | ||||||||
| Special Cancel | No | ||||||||
| Super Cancel | No | ||||||||
| Frame Advantage | -26 / +7 | ||||||||
| Frame Count | 3 | 4 | 5 | 4 | 6 | 8 | 6 | 4 | |
| Simplified | 1 + 7 | 5 | 28 | ||||||
 |
 |

| |
| Frame Count | 5 | 4 | 6 |
| Simplified | 5 | 10 | |
Used as an anti air at a certain range. The second active part of the move has very good range, which can be used to control space in specific situations, such as on the enemy's wake-up or after forcing him to block a Sonic Boom, with noticeable frame advantage.
Aerial normals
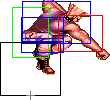
- Neutral Jumping Jab:
| Damage | 12[0] |  |
 |
|
| Stun | 1~7(-2) | |||
| Stun Timer | 40 | |||
| Frame Count | 3 | 4 | ∞ | |
| Simplified | 7 | ∞ | ||
Pretty much only useful for the occasional safejump. One good property of this move is that it stays active throughout the whole jump.
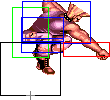
- Diagonal Jumping Jab:
| Damage | 12[0] |  |
 |
 |
 |

|
| Stun | 1~7(-2) | |||||
| Stun Timer | 40 | |||||
| Frame Count | 3 | 4 | 24 | 4 | ∞ | |
| Simplified | 7 | 24 | ∞ | |||
Weird hitbox, decent for punishing fireballs when jumping from really far away, particularly vs sim and sagat. Does not stay active long enough to last the whole jump.
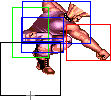
- Neutral Jumping Strong:
| Damage | 22[0] |  |
 |
 |
 |

|
| Stun | 5~11 | |||||
| Stun Timer | 50(+10) | |||||
| Frame Count | 3 | 4 | 20 | 4 | ∞ | |
| Simplified | 7 | 20 | ∞ | |||
Same startup as neutral jump fierce but more active frames, and less priority and reach. Decent despite this, but neutral jump fierce is usually preferred.
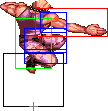
- Diagonal Jumping Strong:
| Damage | 22[0] |  |
 |
 |
 |

|
| Stun | 5~11 | |||||
| Stun Timer | 50(+10) | |||||
| Frame Count | 3 | 4 | 20 | 4 | ∞ | |
| Simplified | 7 | 20 | ∞ | |||
Usually diagonal jump fierce is preferred for the better priority, but this has more active frames, and is still pretty good nonetheless.
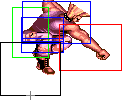
- Neutral Jumping Fierce:
| Damage | 24[0] |  |
 |
 |
 |

|
| Stun | 11~17(-1) | |||||
| Stun Timer | 60(+20) | |||||
| Frame Count | 3 | 4 | 8 | 4 | ∞ | |
| Simplified | 7 | 8 | ∞ | |||
Guile punches down while in the air. This move has short reach, but good priority. Great for stuffing sliding attacks, and a lot of moves in general, good defensive move. Good move to use against Honda, especially at the beginning of a round (will hit him out of HHS, Headbutt, Sumo Smash, and jump attack).
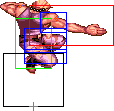
- Diagonal Jumping Fierce:
| Damage | 24[1] |  |
 |
 |
 |

|
| Stun | 3~9 | |||||
| Stun Timer | 40 | |||||
| Frame Count | 3 | 4 | 8 | 3 | ∞ | |
| Simplified | 7 | 8 | ∞ | |||
A good air to air move. Can be used as anti-air with good reactions or to mix-up moves. Also used when jumping backwards to counter Dictator's stomps or Claw's wall dives.
- Neutral Jumping Short:
| Damage | 14[0] |  |
 |

|
| Stun | 1~7(-2) | |||
| Stun Timer | 40 | |||
| Frame Count | 3 | 4 | ∞ | |
| Simplified | 7 | ∞ | ||
For what it's worth this move is nothing special. Pretty much exclusively used for safejumps, and it stays active the whole jump to make this easier. Never use this when jumping a fireball as Guile gets a bigger hurtbox during startup.
- Diagonal Jumping Short:
| Damage | 14[0] |  |
 |

|
| Stun | 1~7(-2) | |||
| Stun Timer | 40 | |||
| Frame Count | 3 | 4 | ∞ | |
| Simplified | 7 | ∞ | ||
For crossups and ticks.
- Neutral Jumping Forward:
| Damage | 22[0] |  |
 |
 |
 |
 |
 |
 |

|
| Stun | 5~11 | ||||||||
| Stun Timer | 50(+10) | ||||||||
| Frame Count | 1 | 2 | 2 | 3 | 5 | 4 | 3 | ∞ | |
| Simplified | 8 | 5 | ∞ | ||||||
Decent air to air, mainly used as an anti air vs Blanka.
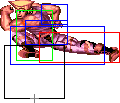
- Diagonal Jumping Forward:
| Damage | 22[0] |  |
 |
 |
 |

|
| Stun | 5~11 | |||||
| Stun Timer | 50(+10) | |||||
| Frame Count | 3 | 4 | 20 | 4 | ∞ | |
| Simplified | 7 | 20 | ∞ | |||
A good jump-in move with acceptable range and priority. It stays active for quite some time, which is good or control space while airborne.
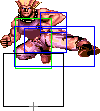
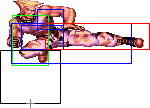
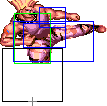
- Neutral Jumping Roundhouse:
| Damage | 24[0] |  |
 |
 |
 |
 |

|
| Stun | 11~17(-1) | ||||||
| Stun Timer | 60(+20) | ||||||
| Frame Count | 2 | 4 | 5 | 4 | 4 | ∞ | |
| Simplified | 6 | 5 | ∞ | ||||
The same as diagonal jump roundhouse. Doubles as an air throw command like all other medium/heavy air normals. Both versions of jumping roundhouse are sometimes favoured over fierce since roundhouse does more dizzy, usually resulting in a dizzy combo ending in flash kick. Jumping roundhouse can hit the following characters standing if done quickly : Boxer, Sagat, Hawk, Gief, Claw, DJ.
- Diagonal Jumping Roundhouse:
| Damage | 24[1] |  |
 |
 |
 |
 |

|
| Stun | 11~17(-1) | ||||||
| Stun Timer | 60(+20) | ||||||
| Frame Count | 2 | 4 | 5 | 4 | 4 | ∞ | |
| Simplified | 6 | 5 | ∞ | ||||
A jump-in move with very good range, but poor priority. It is very useful to hit extended limbs due to long recovery projectiles such as Hadoukens or Tigers. It can also be used as a punishing tool while the enemy is in the air after Shoryukens, Condor Dives and jumps in general. If you get lucky or time it well and the enemy is close enough, it will become Guile's most damaging throw: the Flying Buster Drop a.k.a. the back-breaker.
--Tataki 21:44, 1 September 2007 (UTC) --GolcarJack (2018)
Command Normals
- Spinning Back Knuckle a.k.a. Back Fist: (On ground, →/↗ + Fierce)
| Damage | 24[1] |  |
 |
 |
 |
 |

|
| Stun | 10~16 | ||||||
| Stun Timer | 80 | ||||||
| Frame Advantage | -1 | ||||||
| Frame Count | 2 | 3 | 4 | 5 | 10 | 8 | |
| Simplified | 1 + 9 | 5 | 18 | ||||
Guile's patented backfist punch. Its awesome range makes this Guile's best punish normal move. It can used at anti air at certain ranges, but mostly to punish projectile recovery after you canceled the projectile itself with a Sonic Boom and the opponent is left open. This move has relatively low priority and can by punished if whiffed.
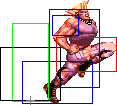
- Knee Bazooka: (On ground, ←/↖/↑/↗/→ + Short)
| Damage | 22[0] |  |
 |
 |
 |
 |

|
| Stun | 5~11 | ||||||
| Stun Timer | 60 | ||||||
| Frame Advantage | -8 | ||||||
| Frame Count | 1 | 2 | 2 | 5 | 14 | 7 | |
| Simplified | 1 + 5 | 5 | 21 | ||||
This allows you to advance while charging a Sonic Boom, and hits extended limbs from Low Tigers.
- Rolling Sobat a.k.a. Hop Kick: (On ground, ←/↖/↑/↗/→ + Forward)
- Backwards:
| Damage | 22[0] |  |
 |
 |
 |
 |
 |
 |
 |
 |

|
| Stun | 5~11 | ||||||||||
| Stun Timer | 60 | ||||||||||
| Frame Advantage | +0 | ||||||||||
| Frame Count | 2 | 2 | 2 | 3 | 5 | 4 | 3 | 2 | 2 | 2 | |
| Simplified | 1 + 9 | 5 | 13 | ||||||||
- Forwards:
| Damage | 22[0] |  |
 |
 |
 |
 |
 |
 |
 |
 |

|
| Stun | 5~11 | ||||||||||
| Stun Timer | 60 | ||||||||||
| Frame Advantage | +0 | ||||||||||
| Frame Count | 2 | 2 | 2 | 3 | 5 | 4 | 3 | 2 | 2 | 2 | |
| Simplified | 1 + 9 | 5 | 13 | ||||||||
A great kick. It allows you to move forwards or backwards while attacking, and also goes above low hits like shoto's crouching kicks or Guile's cr.Forward. At certain ranges, it can be used as an anti air.
NOTE: You can kara cancel this move into flash kick for additional range!
Thats a trick Muteki uses, here is a example video. It indeed gives Flash kick a bit little more range, if hopping forward since it will push guile forward a bit, the timing is tricky though.
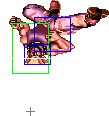
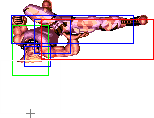
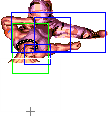
- Reverse Spin Kick: (On ground and close, ←/↖/↑/↗/→ + Roundhouse. Base max activation range: 71)
| Damage | 26[1] |  |
 |
 |
 |
 |
|
| Stun | 1~7 | ||||||
| Stun Timer | 70 | ||||||
| Frame Advantage | +0 | ||||||
| Frame Count | 3 | 3 | 2 | 3 | 4 | 6 | |
| Simplified | 1 + 15 | 6 | |||||
 |
 |
 |
 |

| |
| Frame Count | 4 | 3 | 3 | 3 | 3 |
| Simplified | 16 | ||||
Guile performs an upside-down version of his crouching kick. This is a command normal, but it also demands you to be close enough to the opponent, so you can not take advantage of the reach. It is very good to trick the enemy into throwing a crouching move and punishing it by prediction, though.
--Tataki 21:44, 1 September 2007 (UTC)
Throws
Guile can throw using Strong and Fierce. If in air, he can throw with Forward and Roundhouse too. The direction of the joystick determines the direction the enemy gets thrown at. All his ground throws have the same range and do 32 points of damage (plus two more if behind in rounds).
- Ground Throws Throwboxes:
| Damage | 32 |  |
 |

| |
| Stun | 7~13 | ||||
| Stun Timer | 100 | ||||
| Range | (from axis) | 48 | |||
| (from throwable box) | 18 | ||||
- Judo Throw: (←/↖/↑/↗/→ + Strong)
Guile's shoulder throw, leaves them further away than the dragon suplex, but if they tech the distance is not much. Useful if you want to throw them far away, especially vs old characters that cannot tech.
- Dragon Suplex: (←/↖/↑/↗/→ + Fierce)
The suplex throw, leaves them not too far away, and Guile recovers quickly.
- Flying Mare: (Min activation height: 32/48 upwards/downwards, ←/↖/↙/↓/↘/↗/→ + Strong/Fierce)
| Damage | 34 | 
| |
| Stun | 7~13 | ||
| Stun Timer | 100 | ||
| Range | (from axis) | 54 | |
| (from throwable box) | 24 | ||
Grabs opponents slightly above airborne Guile. Useful vs buttslams, can be used a reactionary anti air in some matchups, the damage is pretty high, so if you get this on accident vs a walldive or something, it's often more than welcome.
- Flying Buster Drop: (Min activation height: 32/48 upwards/downwards, ↖/←/↙/↓/↘/→/↗ + Forward/Roundhouse)
| Damage | 46 | 
| |
| Stun | 7~13 | ||
| Stun Timer | 100 | ||
| Range | (from axis) | 54 | |
| (from throwable box) | 24 | ||
Grabs opponents slightly below airborne Guile. Does insane damage when not teched. Basically this can kill if they have a little less than half life remaining. This move can be ok for punishing whiffed srks, flash kicks, up kicks from Chun etc. Though they can always tech, so only fully favoured if they are in range to be ko'd by this.
--GolcarJack (2018)
Special Moves
- Sonic Boom: (Charge ←, → P)
Detailed Input: (Charge ←/↙/↖ for at least 60f, [7~14f] → [11/9/7f] Jab/Strong/Fierce. It is needed to wait at least 1 frame after leaving the charge direction to enter with the P button)
- Startup:
 |
 |
 |
 |

| |
| Frame Count | 2 | 2 | 2 | 2 | 1 |
| Simplified | 9 | ||||
- Active:
- Jab Version:
| Damage | 17[1] |  |
 |
 |
 |

|
| Stun | 5~11 | |||||
| Stun Timer | 100 | |||||
| Super Meter | 7 | |||||
| Frame Count | 1 | 1 | 1 | 1 | 1... | |
| Simplified | 21 | |||||
- Strong Version:
| Damage | 18[1] |  |
 |
 |
 |

|
| Stun | 5~11 | |||||
| Stun Timer | 100 | |||||
| Super Meter | 7 | |||||
| Frame Count | 1 | 1 | 1 | 1 | 1... | |
| Simplified | 21 | |||||
- Fierce Version:
| Damage | 20[1] |  |
 |
 |
 |

|
| Stun | 5~11 | |||||
| Stun Timer | 100 | |||||
| Super Meter | 7 | |||||
| Frame Count | 1 | 1 | 1 | 1 | 1... | |
| Simplified | 21 | |||||
Guile's projectile. The punch strength determines the projectile's speed and damage, Jab being the slowest/weakest and Fierce the fastest/strongest. This move recovers quickly, giving Guile time to walk up to apply pressure or punish jump-ins or long recovery moves. You can use ↙ so as to charge both Sonic Booms and Flash Kicks at the same time.
- Somersault Kick a.k.a. Flash Kick: (Charge ↓, ↑ K)
Detailed Input: (Charge ↓/↙/↘ for 60f, [7~14f] ↑/↖/↗ [11/9/7/2f] Short/Forward/Roundhouse/any K if you are at a jumpable state. It is needed to wait at least 1 frame after leaving the charge direction to enter with the K button)
- Startup:
 |
 |

| |
| Frame Count (Short) | 1 | 2 | 2 |
| Frame Count (Forward) | 2 | 2 | 1 |
| Frame Count (Rh) | 3 | 1 | 1 |
| Simplified | 5 | ||
- Active:
NOTE: On the last active frame, Guile has a hurtbox of the exact same size of the hitbox which is placed exactly at the same coordinates, so don't be fooled by its looks, the move has very poor priority on that exact moment.
- Recovery:
 |
 |
 |

| |
| Frame Count (Short) | 2 | 2 | 25 | 5 |
| Simplified (Short) | 34 | |||
| Frame Count (Forward) | 4 | 4 | 28 | 7 |
| Simplified (Forward) | 43 | |||
| Frame Count (Rh) | 5 | 5 | 31 | 8 |
| Simplified (Rh) | 49 | |||
Guile becomes invulnerable for a split second, performing an acrobatic aerial kick that has good range and causes a full knockdown, however leaving himself vulnerable during a long recovery. The kick version determines how high the move hits and how much longer the recovery is, but the damage are almost the same. Short gives the fastest recovery while Roundhouse makes Guile jump higher, however yielding a longer recovery. It is recommended that one charges with ↙ so as to have a Sonic Boom available, if needed.
Super Move
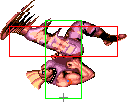
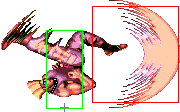
- Double Somersault Kick: (Charge ↓, → ← ↑ K)
Detailed Input: (Charge ↓/↙ for at least 60f, [7~14f] →/↘/↗ [7~14f] ←/↙/↖ [7~14f] ↑/↖/↗ [8/2f] K/if you are at a jumpable state)
| Damage | 16[0] * 6 |  |
 |
 |
 |
 |
 |
 |
 |

|
| Stun | 0~4 * 6 | |||||||||
| Stun Timer | 20 * 6 | |||||||||
| Frame Advantage | -17 | |||||||||
| Frame Count | 1 + [18] + 3 | 1 | 1 | 2 | 1 | 1 | 4 | 2 | 2 | |
| Simplified | 6 | 2 | 2 | 4 | 4... (15) | |||||
 |
 |
 |
 |
 |
 |
 |
| |
| Frame Count | 9 | 1 | 1 | 2 | 1 | 1 | 4 | 1 |
| Simplified | ...11 (15) | 2 | 6 | 1 | ||||
 |
 |
 |

| |
| Frame Count | 5 | 5 | 22 | 8 |
| Simplified | 30 | |||
Guile becomes invulnerable and does a relatively fast Flash Kick that hits up to three times if up close, then a longer recovery one that also hits up to three times. Similarly to an ordinary Flash Kick, Guile is left vulnerable during the recovery.
This is a risky move, in general. It must be done from point-blank range to get hits to connect. It juggles air opponents for 4 hits. It is also a good wake-up tool, but generally unsafe. If the enemy blocks the move and last flash kick does not connect from a distance, all characters will be able to punish Guile for free.
Misc Animations
Jump Animations
- Neutral Jump:
 |
 |
 |
 |
 |
 |
 |
 |
 |
 |

| |
| Frame Count | 2 | 1 | 10 | 6 | 7 | 10 | 7 | 6 | 2 | 1 | 7* |
| Simplified | 2 | 1 | 48 | 1 | 7* | ||||||
- Back Jump:
 |
 |
 |
 |
 |
 |
 |
 |
 |
 |

| |
| Frame Count | 2 | 1 | 4 | 5 | 6 | 6 | 6 | 5 | 16 | 1 | 7* |
| Simplified | 2 | 1 | 48 | 1 | 7* | ||||||
- Forward Jump:
 |
 |
 |
 |
 |
 |
 |
 |
 |
 |

| |
| Frame Count | 2 | 1 | 4 | 5 | 6 | 6 | 6 | 5 | 15 | 1 | 7* |
| Simplified | 2 | 1 | 47 | 1 | 7* | ||||||
Guile has a considerably fast prejump. This is not bad as he has the "longest" real jump in the game, as he stays in the air for a while. Dhalsim has the actual longest jump, but he can use drills to get down quickly. In theory there might be times where characters with better throw range, or command grabs tick you, and you have no flash kick available. This could be an ok option to try if their timing is not on point, but since you have 2 frames of vulnerabilty, it's not reliable vs a good player.
The landing recovery has a special property which allows it to be canceled into certain actions. At the first landing frame, you can perform throws (including command throws), and on the second landing frame, you can start another jump, attack with a normal or special move, or block. Blocking not being until the second landing frame, as well as hitbox-hurtbox interactions having priority over throwbox-throw hurtbox is why sweeps work as anti airs in this game.
Things are different when jumping over your opponent, however. In that situation it's possible to walk back/forward, to jump again or to even block on the first landing frame! Strangely, if a throw is timed on the first landing frame of a jump that crosses over, a throwbox will never come out, even though that input will result in a normal coming out 2 frames later (like it normally would). Anyway, being able to block on the first landing frame can help a little bit on some safe jump crossup setups, or maybe in other situations as well if your character has a huge jump arc.
The Basics
Guile needs just about a second (60 frames) to charge his moves. This allows him to keep a constant wave of Sonic Booms coming, controling the space in front of him, while leaving himself vulnerable for little time, as the Sonic Boom is the fastest recovery projectile move in the game. His long range pokes allow him to punish mistakes and apply pressure of he decides to follow the Sonic Booms.
Guile wants to force characters without a projectile to jump or otherwise use some longer recovery move to avoid his Sonic Booms, then punish accordingly. Against motion projectile characters, Guile wants to take advantage of his fast charge time to throw as many Booms as possible, forcing the motion character to either throw too many projectiles as a counter, leaving themselves vulnerable for prediction attacks such as a jump-in, or throwing a projectile too late, getting punished by the reviled backfist punch or the knee bazooka (in case of Sagat's Low Tigers).
Even though Guile's Sonic Boom recovers fast, it has been given vulnerable hitboxes in front of the move. Also, most often he will not have a charge ready for the Flash Kick if the enemy jumps as you throw one. Finally, some moves such as Ryu's Tatsu can punish Guile for using a Sonic Boom, if close enough or as a prediction. As a result, Guile must feint while throwing projectiles, tricking the enemy into jumping over no Sonic Booms (eating a Flash Kick) or staying on the ground, getting pushed by the wave of Sonic Booms while accepting chip damage. Guile can feint or disturb his enemy by throwing different fast pokes while crouching, such as Jabs and Shorts, and using a cr.Fierce punch, which makes it look like Guile is on neutral position, apparently losing his vertical charge.
Advanced Strategy
Kara Sobat kick
Either using forward+mk, or back+mk, you can cancel startup to change your position. This can be done with both specials, and super. Kara flash kick is useful to extend forward reach on flash kicks, you can do kara forward sobat into flash kick at round start in mirrors for instance, and it punishes sonic boom. In most cases forward sobat is used for kara flash kick, while back sobat is used for kara sonic boom. Use Kara back sobat into fireball to get out of harms reach when close, such as to avoid a sweep or something.
Frame traps
Obviously it depends on the matchup, and in some cases the situation, such as if they have super/charge or not.
Cr mk > Step kick (far stand hk) : Useful vs some characters that have fireballs. Mainly vs shotos to beat their fireball attempt, and beat some normals. It pushes them back quite a bit, and the step kick leaves you in a good position if blocked/hits. This is also good in mirrors, sometimes vs dj to catch him by surprise (his fireball beats the incoming step kick if done as a reversal). I've had occasional success with this vs Sagat, but his normals are a problem, usually better vs N.Sagat than old.
Cr lk > Cr mk : Decent low string to safely push them back. Just be careful for uppercuts inbetween hits. You have some room to mix it up with this, walk up throw after the cr lk is pretty reliable in my experience. Can be useful vs characters like Chun and Sagat who don't have low attacks fast enough to beat the incoming cr mk clean. And of course it is viable if they are trying to counter throw, such as after blocking a sonic boom.
Cr lk > Sobat : Usually forward sobat, neutral one works too vs most characters, but is usually not preferred as it whiffs a lot. Just a variation on the above frame trap, ensures you'll beat low attacks, and leads into mixups.
Cr lp > Cr lk/mk : Usually cr mk is favoured at the end. The main benefit is that cr lp is safe if done at max range vs some characters, such as shotos, and Chun to make srk/upkicks whiff. Some characters like Chun, and Guile in mirrors, can't use any normals to beat the incoming cr lk/mk. Cr lk is just to add more to the string, it comes out 1 frame faster than cr mk, so this may sometimes make it preferred. Once cr lk hits you can usually do cr mk afterwards.
Cr mp > cr lk/cr mk : A great frame trap since the cr mp gives great frame advantage. Making the following attacks pretty much unbeatable with their normals. You can bait unsafe moves and whiff punish them usually. Good to use this if they block a crossup.
Cr mp > far stand mp : Another good one off a cr mp. You can cancel far mp into fireball since it's the first part that hits. Great vs characters who won't have a reversal after blocking crossups, Chun, Dictator, Guile etc. Especially since most characters cannot throw you after blocking crossup> cr mp, so this is a suitable counter to a throw attempt.
Cr lp > far stand mp : Similar to the above one, just you are still able to use it after jabs. You need to be far enough to not get close mp, usually after a 2 chained cr jabs you are far enough vs most characters. Doing 3 chained jabs works just as well. You can use cr mp instead, but has less range, and gets bodied by reversals. Vs Blanka the cr mp is always favoured as he can crouch to make far mp and close mp whiff, and the faster startup of cr mp lets you beat reversal electricity.
Cr lp > sobat/upside down kick : You can sub the cr lp for point blank cr mp, or cr lk. But cr lp is usually easier to set it up optimally. Both basically destroy low attacks, and are leaving you at a good range. The upside down kick can be set up vs N.Ryu to beat srk. Crossup > cr jab x3 (try end off far away), back+hk (use back so you keep sonic boom charge). Also beats Chun upkicks, and I've had success vs tiger uppercuts from far away also.
-GolcarJack
Max range cr jab
This is very useful in a few matchups as it is pretty safe vs reversals. And in most cases you are too far for them to throw you. Mainly used vs Shotos (to make srk whiff), and Chun (beats upkicks or they whiff, and she can't throw you). Be careful on the spacing, doing it at max range usually refers to when they crouch (wider hitbox), but when they stand up they are thinner, causing cr jab to whiff. Generally the best way to set this up, is after a blocked sonic boom, after they get up from a knockdown, or after an air reset.
Vs Shotos | The main use is for srk to whiff if you think they'll do it to beat a throw attempt, or normal. When the srk comes down, you can punish however you like. Vs Ken try and stay down if you expect the srk, sometimes you end up blocking that jab srk late if you stand, and he can't be punished. Usually I use sweep or cr mk to punish the srk whiff. Air throw can work if you have practiced enough, good for killing them with 1/3 health left. Vs old shotos you might want to use walk up throw as a punish for the damage and hard knockdown. You are out of their throw range with this, tatsu whiffs since you are crouching. Ryu can use his super, and if they stand up and make it whiff, a very well timed sweep can punish it. Though if they stand, that's when you want to use cr mk, or cr lk. Another nice setup vs Ryu after landing a blocked crossup j lk, is cr mp> cr lp. The blocked cr mp leaves you at the perfect range.
Mixups after cr jab lands
Cr mk/cr lk : Good follow up if you expect them to use a normal, or block. Cr lk beats all their normals, cr mk will trade with their low kicks if you are both frame perfect. The bad time to use this would be if they try srk, or Ryu does super.
Back up : Walk backwards during their block/hit stun. Then maybe crouch when they recover (Guile has a thinner hitbox when crouching). You can whiff punish srk or tatsu attempts. If they use sweep or cr mk, whiff punish accordingly, usually I use sweep to whiff punish their cr mk whiff. Or just back up and fireball to start the trap again. Another good setup is to walk back until at max st hk range, then use it to beat their normals.
Walk up throw : Risky but sometimes ok, use if you think they'll block.
Forward sobat : Use to beat crouching normals, you have time to take to the air thanks to the +4 from cr jab. And forward sobat is high faster than the others. Leaves you at a nice distance if it lands, you can cr mk them, but their low kicks won't reach you.
Back sobat : Defensive move, pretty safe. Used more often vs Ken to retreat. Be careful using this on Ryu when he has super.
Upside down kick : If they stand after taking the cr jab, you get step kick instead. Still decent, and leaves you at a good range after it lands.
Vs Chun | Upkicks whiff at best, sometimes you hit her out the air, which is just as good. SBK is too slow, and would probably whiff anyway. If she does super it hits you obviously. One nice thing is that her throw cannot reach you. Like Ryu and Ken she can stand up to make if whiff, but you can space it so it still hits standing Chun if you have time. And even then, if you think she'll use this, you have sobat kick.
Mixups
Cr mk/cr lk > Beats all her normals clean if you are frame perfect. She can do upkicks to beat them after the cr jab lands, but this is risky, and precise. This is a great frame trap.
Forward sobat : This beats upkicks clean. Pretty safe in general. Like vs shotos it leaves you at a really good range. Also beats her normals thanks to the frame advantage gained from cr jab.
Upside down kick : Same as vs shotos. Beats upkicks clean also.
Back sobat : Just to get away, if she does sweep, this punishes it.
Walk up throw : More useful since she has slower normals in general. And reversals that have to be charged.
-GolcarJack
Combos
These are the only combos you should be trying to do.
- j.Fierce/RH, cl.Fierce/cr.Strong xx Flash Kick;
- j.Fierce/RH, Fierce xx Sonic Boom, Backfist (corner only);
- X-up Short, cr.Strong xx Flash Kick (for O.Guile you can swap the X-up LK to X-up MK but i think that only works on crouching opponents);
- X-up Short, cr.Short/cr.Jab x2 xx Flash Kick (Vs some characters you can do 3 cr jabs and the flash kick/super still connects) (chain cancel)
- cr.Forward (meaty), cr.Strong xx Sonic Boom or Flash Kick
- X-up Short, cr.Strong x2, flash kick (character specific)
The best way to land the super is on a cross-up aerial Short kick
- X-up Short, cr.Short/cr.Jab x2 xx Super (chain cancel)
- j.Rierce/Roundhouse, cr.Fierce xx super (super cancel)
You gotta be a superman to land this one. Dump the jumping attack and do the C.Fierce cancelled into super as a meaty If you really want to do the super off a forward jumping attack do it like this:
- j.Fierce/Roundhouse, cr.Strong xx Super
Extra notes All combos that end in a Sonic Boom can be followed by a Backfist (+Fierce) or donkey kick (far Roundhouse) if the enemy is cornered, for more damage and, most certainly, a dizzy. The X-up Short-cr.Strong and safe-jump-cr.Strong combos can be hit-confirmed, so you cancel into a Flash Kick if it hits, or apply some mix-ups if it does not. Possible actions are throw, cr.Short-cr.Forward block string, delayed Flash Kick or canceling into a Sonic Boom (non-cross-up safe-jump, only). With faster reflexes, you may also not use cr.Strong if it does not hit, but use cr.Short instead, which hits low, or got for the throw immediately. Diagonal aerial Roundhouse deals much higher stun damage than other similar attacks. Favor this move if you have mastered the timing or if you are sure it will hit (e.g., you have just guessed right that your enemy would throw a projectile).
Meaty
Cr lk > Cr mp > flash kick | The meaty is not too hard to do since cr lk is a slow move. You can also do Close stand hp instead of cr mp, but most characters can crouch to make it whiff.
Cr mk > Cr mp> Flash kick | This one can be done without a meaty on some wide characters like Dhalsim, but it's a 1 frame link. Keep in mind meaty cr mk is kind of unsafe due to long recovery.
Cr lp > Cr mp | The cr lp only has to connect a frame after it becomes active for this to be possible. Can lead into flash kick if you want.
-GolcarJack
Crossup
All of these are done with a crossup j lk unless specified.
Cr mp > flash kick | Easy and can lead to mixups after cr mp instead if blocked. Hit confirm it. Pretty great for mirrors since not only is crossup very safe to do, but cr mp has to be crouch blocked, and links into itself.
Cr lp chain > flash kick/super | A single cr lp works, but cr mp is better for that. You can chain 2/3 jabs depending on the character. Renda cancel into flash kick or super for a combo.
Cr lpx1/2/3 > Stand lp > Flash kick/super, or sonic boom | Depends on the character for how many jabs you can do. The cr lpx2 > st lp > hk flash kick works on nearly everyone. Going into sonic boom at the end is good if they block, and it combos, just make sure the opponent cannot crouch st lp. Best saved for characters like Sim or Gief.
Cr lk chain > flash kick/super | Same as above, but this in my opinion is mostly better as it hits low (if they mash to counter throw, or certain reversals, they get hit), and the cr lk does more damage than cr lp. The main difference is that you have to hit deeper as cr lk is 3 frames slower to come out than cr lp. Cr lk does not cancel, you renda cancel the chained/single cr lk all the time.
Cr lk x1/2 > st lk> hk flash kick | This is the one you use vs Chun and Claw. They are too thin for cr lkx2 into whatever to work. For some reason the st lk lets hk flash kick work after. Only hk flash kick seems to work consistently, so always do that. This will actually work on the rest of the cast as well if you want slightly more damage.
Cr mp> cr mp> flash kick | This is only possible vs some characters. The link is about 2 frames, you can get it perfectly consistent with practice. and obviously it's a blockstring if they block, and you are safe, cancel the second cr mp into fireball when blocked if you want. This is best used in mirrors to maximise damage off a low hitting attack. Also useful vs sim, cammy, fei, hawk.
Crossup j mk > cr mp> flash kick | Quite hard to set up, and is easy for them to block. I can only get this consistently vs dictator, fei, and cammy after a lot of practice. Slightly better damage, but probably not worth it.
Crossup j hp > cr mpx2 > flash kick | The ultimate style combo, only works in mirrors, when he's near the corner, but not fully into it. He can maybe crouch to make this whiff, but that's unlikely since usually you expect crossup j lk. You don't need to do two cr mp, but it does a ton of damage.
-GolcarJack
Match-ups
Matchups classified with this diagram in mind. For the old characters i guessed the positions.
--Born2SPD
Serious Advantage Match-ups
Vs. E. Honda:
- 8 - 2
Keep him off you at all costs. Constantly fire booms to zone him out. In between booms do rapid fire jabs to discourage/stop headbutt. If he lands right in front of you with a butt slam you can sweep him with crouching roundhouse. Don't let him start neutral jumping over booms at full screen for free, jump at him with roundhouse to knock him out of the air and move back to full screen. He should never be close enough to you to sweep you or start doing hands, but if he gets in do your best to get away from him again. If he is bulldogging you just keep throwing your booms and poking while retreating a bit if necessary. Do whatever you need to do to trade with him (usually cr. fierce) if you can't cleanly knock him out of the air because trading and getting back to ideal spacing is MUCH better than blocking and letting him gain ground. Same thing applies to trying to combo/safe jump him. It's much better to just keep him out where you have the advantage than take the risk and give him an opportunity. Do not ever try to tick throw him or challenge the stored ochio in any way because if the Honda is any good you will almost certainly lose. If you are knocked down in the corner and start getting ochio'd you are most likely screwed but a reversal flash kick can get you out if he makes a mistake. This match is easy until he gets you in the corner with ochio. The key is to not give him an inch for free and keep him full screen. Punish any attempt to get in or close the distance between you.
-Akagi
Not a whole lot to add, Akagi went over most things, not much you need to know vs Honda. Mashing cr lp is great for beating hands, and headbutt. You can try use step kick or forward sobat if you expect walk up sweep kick when you have not enough charge. And when in the corner and he starts with oicho, use reversal throw to punish meaty tick > oicho, make sure to use back throw to escape the corner. Of course this one might be obvious, but you can flash kick/super inbetween the hits of his super when blocking, Cr mk is also ok to punish after blocking the second hit, if you couldn't flash kick.
-GolcarJack
Vs. Zangief:
- 8 - 2
This is probably Guile's easiest matchup, but it's still important to know your options. Cr mk is the key move for Guile in this matchup as it has great range and is an effective poke, also beats lariats clean. His only option to beat this is a sweep, his cr mk sometimes works from far away, and stand short at max range for minimal damage. Once you have distance, you can zone him pretty easily as his methods of getting in are quite easy to punish.
Lariat: Can pass through fireballs, but is vulnerable to low attacks, use cr mk to stuff this, or at the very least force him to block and get pushed back to far away. When doing a meaty fireball you can afford to walk up and use cr mk to force block and discourage reversal lariat. Jump forward fierce is also a good meaty option following a meaty fireball to stuff this, since his head is vulnerable.
Green hand: Decent if he destroys a fireball with perfect timing and gets to spd range. Otherwise this is pretty unsafe. If this moves so much as hits you clean, you can punish with cr mp>flash kick, raw flash kick, sweep, cr mk etc. Whiffed green hand is usually punishable with sweep, backfist, and cr mk. If he gets one from far away and the timing is good, putting him at ideal spd range, best bet is to jump back if possible if you don't have time to do anything.
SPD and running grab can be flash kicked to prevent getting grabbed. If he manages to safejump you it might be worth taking the hit so you still have charge to reverse an spd, but he has ways of dealing with any option so avoid this at all costs. Basically unless he can cross you up, or get you down in the corner, you are still good.
Pokes: cr mk: Low attack with great range, not a bad idea to walk up sometimes and throw it out. Best punish to lariat, and also good for green hand and sweep whiffs.
Step kick (far stand hk): Pretty safe to use as it beats a lot of his good normals, also Guile's best ranged normal tied with the second hit of his sweep. Good to use this after a blocked cr mk to keep the pressure going.
Backfist: Use sparingly, catch him walking up to you, loses to most of his attacks, the idea is to be patient and bait him to walk up, either by whiffing jab fakes, or walking backwards while he is 1/3 screen away. Can be used to punish green hand whiffs, and as an anti air from far away.
Forward sobat (forward+mk): Use super sparingly, ok to beat crouching normals, but use from max range to avoid getting grabbed after it lands.Not bad if you expect him to sweep as a poke, or to stuff your cr mk.
Anti airs: His low jump makes it easy, and his air normals all have similar range.
Standing jab: This can be used from a distance to stuff pretty much everything, best saved for when you expect him to do an air kick or jump forward fierce. Plenty of time to walk back, or walk up and max range meaty cr mk after.
Far fierce: Used like stand jab but has more startup and bad recovery, probably no reason to use this over stand jab other than the damage.
Backfist: Use from really far away, even if you trade he gets pushed back basically full screen.
cr mk/sweep: Trip guard. Use from a distance. Loses to the knee drop (down+mk during diagonal jump) but otherwise pretty good.
Sobat: From a distance this is fairly good, destroys the knee drop.
Crouching fierce: Use to hit during the first part for a good trade. Very consistent, use late. Best option if he is right above you.
Jumping roundhouse: If he jumps in from far away, this can be good to catch him early. Try to use as early as possible, you end up close after, in the corner you won't have time to retreat since the corner makes him land quicker, so best to avoid this when he's cornered.
Pressure: He's pretty weak when getting up since cr mk from far away is outside of spd range, and lariat gets stuffed. Use meaty fireballs for chip and pushback, occasionally walking up for a meaty cr mk to discourage and beat reversal lariat. He will get hit by the kick, and fall into the fireball for a two hit combo.
Sweep bait: After a meaty fireball walk up for a max range cr lk, either follow up with cr mk for a quick sequence. Or wait for a jump or risky option. One cool trick is to wait after the cr lk, and whiff punish a sweep on reaction with your sweep, or a cr mk. The cr lk leaves you outside of his sweep range, so you are safe unless he walks forward (and he should be too afraid of fireballs and cr mk to try this).
Safe crossup lk: Usually lariat will just beat it, or trade in his favour. You can use a trick to make it safe, but it's easy to block in this case. Do it so that it lands at the back of his legs, more of a safejump than a crossup. You can do some blockstrings like cr jabX2> stand jab>fireball. Or jump cancel one of the jabs to retreat.
Sweep trick: Meaty fireball, whiff the first hit either by getting just out of its range, or whiffing it before he gets up. So the second hit will land after the fireball, either comboing if he does not block for a knockdown, or being a blockstring if he blocks. The second hit pushes back a lot, and is very safe. The trick where you do a meaty fireball and sweep simultaneously can work, but it's not that useful on gief as he can sweep in between hits to knock you down.
Vs. T.Hawk:
- 7.5 - 2.5
Pretty much the same as Old Hawk, but a lot of his normals are worse. The only thing that makes it different is the super, this is basically just a higher damage version of his 360 grab. He cannot actually do a standing 720 like gief, he has to whiff a normal/move first, or do it after landing or recovering.
Vs. Old T.Hawk:
- 7 - 3
Slightly harder than N.Hawk due to better normals, and a better uppercut. The best situation to be in vs Hawk, is a distance where you can use jump forward fierce on reaction to forward jumps, this really shuts down a lot of his options. Obviously you are going to want to play a keepaway/turtle style since Hawk has to go in to get damage, and he's dangerous to pressure because of his 360 range/negative edge OS.
When close: He will be using stand hk to beat/trade with fireballs, this usually whiffs when you are crouching, unless he is close to you. You can do cr mk to beat this, but that's kind of risky at this range. Back sobat also beats it if you have space to back up to (e.g not being in the corner). And his cr mk/sweep is a good counter to Guile's cr mk. My favourite thing to do is react to the whiff of the heavy normals, then throw a sonic boom during his recovery, making me safe. If his second hit of the sweep will reach you when you are in a crouching stance, you can use lk flash kick to hit him if you can react. And similar to many other characters, Hawk can do his cr mk at max range, you have to block, and flash kicks whiff. The other thing to be wary of, is walk up 360/throw. Cr mk is generally the best tool to deal with this due to the range, and good frame advantage. If he does a really early dive, react with flash kick, or mash stand jab to stuff it.
If he knocks you down in the corner, it's ggs. If he is able to safejump, and then do negative edge 360, you have no chance, if you take the hit he can still get you since the 360 is negative edge and has much, much more range than Guile's throw, trying to super or flash kick will just cause him to block if he does the OS right. And he can punish with walk up 360 or uppercut. It's not likely he will walk up and ground tick, if he does, use reversal throw to put him in the corner, then jump back to get out of there, because he's old Hawk, he can't tech, so he'll take a hard knockdown.
Getting knocked down mid screen is usually not as bad. Sometimes he can safejump you, but it's rare. If he is going for a tick into 360, flash kick the tick. Technically his stand jab is a safe tick since it has 4f recovery, but if he's doing the OS, he should get hit, and 1 frame timing is pretty hard to get every time. Though you still want to avoid this at all costs. Watch out for max range cr mk baits to punish reversal flash kick.
From a distance, just zone with fireballs, whiff jabs for fakes to bait jumps. Basically you want to get to a range where jump forward fierce can be used effectively as an air to air (so basically half screen-ish or more). The reason this is so good, is because Guile's jump forward fierce, will beat all Hawk's air normals clean, even jump jab. If he jumps forward, over a fireball, or just in general. Try to do jump forward fierce as fast as possible, usually you can catch a dive unless he does it super early. If you find yourself without charge, walk up cr mk or backfist is ok to punish his bulldogging/forward walking. Cr mk might be favoured due to better frame advantage, and safe vs uppercuts. Other useful anti airs include sweep/cr mk (use outside of jump jab reach to hit him as he lands, watch out for dives). Cr hp late to trade (can trade with all his air normals, and dive, but it knocks down, so don't use it vs dive). Jump hk is also decent sometimes, but his jump jab often beats it. Far mp can beat his jump jab clean, but is not that great otherwise, back sobat is ok from a distance, kind of similar to how you'd use it vs Honda and Blanka. If he neutral jumps, cr mk/sweep are pretty great, and j hk to beat dive attempts. Close stand mk might be ok if he's right above you, but I have not found many times to use it vs Hawk. One thing to be careful for is that his jump forward jab stuffs flash kicks from max range. This is probably a good time to use neutral sobat to trade/stuff it, or jump back and get out of there before it gets bad.
Knowing how to deal with his dives is also very important, as these can knockdown on hit. One useful thing to know before anything else, is that you can crouch block these like Sim drills, Chun neck breaker etc. There are times where his dive is safe, if it hits kind of late, he will be unpunishable. You can throw a sonic boom, but he can jump over it as he recovers. But otherwise, jump forward hk is the winning move here, best punish for dives by far, learn the range for it so you know when it will work. Usually in the corner it always works, and more often than not, you are left at a perfect range for safe cr mk when you land, he cannot jump, uppercut whiffs, and you are out of his 360 range. If you expect a dive from far away, you can walk forward and then block to increase the chance of it being unsafe. Likewise if he jumps when close to you, best bet if you expect a dive is to just wait if you don't have flash kick ready, block and punish. You can use j hk to punish dive attempts, usually I do this to neutral jumps since j hp has less range. If a dive whiffs in front of you, you can punish him as he is landing, has a lot of recovery. Flash kick is probably the best, but throw is also great since he cannot tech, the throws leave him far, and force him to work his way in again. The last useful tech vs dive is stand jab, far fierce and sobat work too, but are much less consistent, and harder to utilize. Basically mash stand jab to stuff dive, great to catch early dives. And it is generally just good to have a move that beats dive clean, that does not require charge, just be careful he's not above you, this can result in you getting hit, or trading (horrible trade for Guile). Basically if it would of traded/beat standing jab, then it would have been punishable on block with jump forward hk. In some situations, flash kick will punish blocked dives, kind of rare, you can usually tell when this is the case.
As far as pressure goes, you can't take many risks since his 360 negative edge is just too dangerous. Even if you are good enough to safejump him all the time, all you can really do is push him back with a blockstring, he cannot crouch stand jab or close fierce, but this is not very useful for you. Crossups are safe, but you get no reward for it if he blocks. I only use crossups when I'm in/near the corner, and get a knockdown. Basically use it to escape the corner, practice cr mp> cr mp blockstring, 2 frame window, but you can be consistent with it if you practice. Use cr mp> cr mp into sonic boom after blocked crossups to push him back. Three crouch jabs jump cancelled into back jump is also ok. You can risk going for a throw maybe, but the chance of getting grabbed usually makes me never bother. If he does not block the crossup, just do a combo into flash kick or super for a knockdown.
A better pressure method is to do meaty fireball, and then use your low kicks. Max range cr mk and sweep (for both hits) are safe vs his uppercut, it will whiff. For the first hit of sweep, you might need to practice the spacing until you master it, but it is possible. I'll list some of the things you can do with this trick, and what beats it etc. Assume they all start with meaty sonic boom (max range cr mk and second sweep hit without the meaty boom are good as well though).
meaty fireball > cr mk : Safe and easy, pushes him back, try to land cr mk just after sonic boom, if they land at the same time, he has no pushback, and it's a bad situation. Reversal uppercut will whiff, use flash kick, cr mp> flash kick, step kick, sweep, or walk up throw to punish.
Sweep (meaty, first hit): Do the first hit at max range, and as a meaty like the sonic boom. He gets pushed back almost not at all by the first part. Then he has to block the second hit due to the blockstun, uppercut whiffs vs first and second hit. If he does not block the first hit, he gets hit, but thanks to the sf2 engine being weird, he takes barely any hitstun. He still can't do anything to you after though, and takes a ton of damage from these two moves.
Sweep (first hit whiff, second hits) : This is also good if you have no chance to meaty fireball. A little tight with the timing and spacing for this to work with a fireball. The second hit will catch him during pushback from the fireball, causing him to get pushed back quite a lot. And second sweep hit does give nice frame advantage, giving you time to retreat to j hp range. The uppercut will whiff obviously.
Throw : Just walk up and throw, you can whiff cr lk or something before he gets up to bait a block. This is a little risky, but vs old Hawk especially it is sometimes worth it.
Cr lk : This puts you close enough for uppercut to hit you. And it will knockdown. At the last second, walk up and do cr lk, you have time to do cr mk after as a little blockstring. Aim for cr lk to hit from far away, this allows the following cr mk to be safe should he uppercut between cr lk> cr mk. Walk up throw after cr lk to mix it up can also be nice sometimes.
He is a big target, pretty tall also. Jump hk can hit him standing if done as soon as you jump. One nice corner combo if he cannot be killed when dizzy : Jump hk, crouch/stand jab > sonic boom > jump back hk. Do the j hk instantly. The purpose is to get back to j hp range, and get good damage at the same time. This literally sends Guile flying full screen after the jump back hk hits. The pushback from the first jump in is stored since the combo is still going.
Vs. Cammy:
- 7 - 3
Main objective is to keep her out with sonic boom zoning. She struggles to get in when you have space, it's very important you master anti air cr hp timing vs her, since her j mp is a very high priority attack, and Cammy players will use it when they jump forward over a fireball and are in range. Otherwise when she jumps and cannot even reach you with j hk, use sweep or your cr mk to anti air and push her back. Her neutral jump mp can beat anti air sweep and cr mk, you can either try hit her early with jump forward hk/hp, try sweep anyway, or use backfist as she comes down to take the trade and maintain distance. Other anti airs include back sobat vs forward jumps, (trades ok from a distance) and close stand mk when she is right above you (if her air normal hits you early, you can sac throw).
Basically her options to get in are all punishable, other than the jumps I went over already, she can use the jab version of her spinning backfist, this move straight up sucks, incredibly punishable, hit her just before it comes out, you can get a hard knockdown with sweep if you have no flash kick charge, or hit her a little earlier with cr mk to score an air reset. This move is only effective when she needs to get through a meaty fireball and you're like full screen away. Cannon spike/thrust kick can be ok, but is also very punishable, usually not worth it, meaty fireball beats it etc. The fierce hooligan is her best option when close enough, a hard read used to score a knockdown with the grab. Without charge you can mash stand jab to beat it, from far away just about anything works. If she cancels into it from a normal, jump back mk, or cr hp work ok in my experience. The other versions are slower, but still viable for sonic boom avoidance, just hit her out of them, they are very slow, even if you can't punish, just back up, plenty of time to get another fireball out.
Round start: Wait - Self explanatory, flash kick if she jumps or does hooligan. Fireball - Her only effective answer is fierce hooligan. Walk backwards - Remember drill can always be blocked standing, you can react and jab a hooligan, and anti air with cr hp. Forward sobat - Nice option, beats drill and hooligan, and her crouch mk/mp.
Her normals are decent if she gets the chance to use them, cr mk is her main poke, but your cr mk has more range, you can risk using it to push her back. Her cr mp is pretty much used to counter your cr mk from that range, so be careful. Her st mk is also decent, but the sobat kick still beats it out. Your sobat kick and cr mk are all you need here, and sonic boom is ok if used smartly, step kick is not bad either, but be careful in case she does a drill or hooligan to beat this.
The typical situation in an ideal match is her trying to close the gap while you zone, if she gets confident with bulldogging, walk up throw is ok, or walk up cr mk/backfist to hit her. Sometimes I just walk backwards to bait her to walk to me, then pelt her with a normal. Cr mk> step kick is a great frame trap for pushing her back, if you expect her to challenge the st hk with a drill, hooligan etc, do back sobat, this leaves you at a range where you can jab hooligan, and sweep her lk drill recovery if she tries it, plenty of time to cr hp a jump also. Walk up sobat is also not bad to throw out sometimes, not a lot she can do, this move really bodies her, not a lot you can do after, I like to walk backwards and punish anything she does.
Your crossup is quite effective and safe vs her, cr mpx2 into flash kick works vs her, so practice it. Cr jabx3, jump cancel to backwards jump, then j hp, beats cannon spike reversals. You also have more throw range than her, so tick throws are not out of the question. Decent 50/50, cr mp after blocked crossup, then throw or psychic flash kick to beat cannon spike, risky but sometimes worth it.
Her crossup is more dangerous than yours as it leads to touch of death combos. Make sure to look at the hitbox for her j lk, and practice blocking it. Don't get too reliant on mashing throw after a blocked crossup, she can do cr mp (Hits low), into a touch of death.
Cannon spike is safe on block if it lands from a distance, just fireball to gain some ground by walking back afterwards, or go for the step kick frame trap etc. Otherwise cr mk, backfist, and step kick are decent for punishment. As for drill you just want to make sure it doesn't hit or trade, you can block it standing, so don't fear it much. It can be safe if spaced well, feel free to fireball in this case, unless she has super she has to block the fireball. Her super is an ok tool vs fireballs, but just keep her at a distance and it's not that threatening, you can usually punish with flash kick or step kick, like cannon spike it can be safe, just fireball in this case.
-GolcarJack
Advantage Match-ups
Vs. Fei Long:
- 6 - 4
Try to keep him out with fireballs and baits. Fei wants to get a knockdown with rekka or chicken wing combos, or a throw to start mixups. Punish jumps and chicken wing whiffs with sweep/cr mk, otherwise cr hp to trade with jumps and chicken wings is effective. If he gets in just be patient, you can mash cr jab to consistently stuff rekka. Neutral jumps are punished just like diagonal jumps, if you can't reach in time, back up using sobat to gain distance.
Round start : Fireball is only getting countered by chicken wing, and even then you can block in time. But he does get a mixup opportunity, so this is bad for Guile, flash kick is the best punish to chicken wing, but otherwise you need to rely on late cr hp to trade and push him back, practice the timing. His jump is not too hard to anti air, far mp is incredible here if spaced right. His bulldogging is effective thanks to his fast walk speed, walk up throw to punish this is incredibly effective. The other offensive option at round start would be cr mk, this is risky, but beats rekka attempts.
In the neutral game patience is really the best tool, but cr mk is ok as a poke, but be careful for his cr hp, and rekka to punish the whiff. Mashing cr lp is effective as a bait, and discourages rekka. Step kick can be useful here also, make sure it's used sparingly, beats cr hp, and ok vs rekka from a distance. If he whiffs rekka to try reach you from mid screen, you can sweep it.
You can pressure with crossups well since his reversals whiff at best. You have more throw range also, just watch out for flame kick. Crossup mixups are a lot like vs Cammy. Gamble flash kick beats flame kick, cr mpx2 works etc. Safejumping is sometimes better however, try not to go for a crossup that leaves you cornered, he can't crouch close stand hp, so you can use strings like j hk> st hp> fireball to create space.
In the corner is usually pretty bad for Guile, if he cancels normals into chicken wing you can use cr hp to trade still, so it's not as bad as other characters have it. He can do jump forward mk in the corner to hit you high, and flash kick whiffs. Super hits once sometimes. You have to block this, if he does it too early you can use st mk to trade or at the very least a sac throw.
After a teched kick throw, he can do 50/50 thanks to walk under close stand mk crossing up and leading to rekka combos, reversal flash kick is decent, but blocking is usually better. Remember when he goes for tick throws, that you have more throw range. After a blocked chicken wing is usually the most common setup for a throw attempt, just remember he has flame kick to beat your throw attempt, block or throw are your options.
His super is fully invincible until the recovery, you can punish it on block at least, if the last hit whiffs, use flash kick. If not, you want to do your super in the middle to catch him at the end with the second flash kick. If he does it to chip, then use reversal flash kick to fly over him. Watch out for setups in the corner like 2nd hit of rekka blocked, then super to punish a fireball.
-GolcarJack
Vs. Blanka:
- 6 - 4
Beat the Slide Punch
1) Standing short
Standing short beats not only the slide punch but also horizontal balls and Blanka's super. One of the sweetest things Guile can do is jab sonic -> standing short. If Blanka tries to slide under the sonic at max-range your short will hit him into it for a 2 hit combo.
2) Standing roundhouse
Try to catch him as he goes into the punch. Especially good if Blanka tries two slide punches in a row -- hit him with roundhouse in between. Blanka can beat Guile's standing roundhouse with his standing jab but if he's doing those jabs you can hit him with an old fashioned crouching forward.
3) Fierce Sonic
Mix these in with the jab sonic booms sometimes to try to catch him flinching.
No-charge Air Defense (Standard)
Any given option can be beat, so good anti-air is a matter of knowing the proper spacing and reading your opponent.
1) Crouching forward/roundhouse
Loses to a late Blanka jump fierce. You can also do the crouching forward a little late looking for a blocked hit. If Blanka is really sneaky he could forward hop over that one but you should have a Flash Kick charged by then so...
2) Vertical jump roundhouse / climbing jump fierce
If you're backed into the corner and you get beat air-to-air by a Blanka jump jab, note that you're vulnerable to his fierce ball trickery so be careful.
3) Crouching fierce
This usually loses to Blanka's jump short but that ain't the end of the world. Do it early such that Blanka hits you high, and you can do a defensive two-way mix-up on the back end: sac-throw or Flash Kick. Crouching fierce a little later if you're trying to trade.
No-charge Air Defense (Non-standard)
1) Backfist
At long range this is not unlike Sagat's standing fierce. Do it as late as possible to try to trade or beat Blanka's jumping jab/jumping roundhouse.
2) Far standing strong
3) Neutral or back+medium kick Sobat
4) Standing roundhouse
5) Standing short (!?)
Cross-up Short
Blanka is a huge target for an ambiguous jump short -> crouching strong -> (hit confirm) flash kick. If your opponent has a reliable reversal vertical ball this doesn't mean much but...
Whiff -> Throw Trickery
Up close, joystick plus roundhouse (the upside down kick) and joystick plus medium kick (sobat) both miss. Whiff the kick and throw the beast. (nohoho)
Vs. Ken:
- 6 - 4
Get to a safe distance, and try to bait risks while applying pressure with sonic booms. He has to work his way in because his fireball game is not very strong, and tatsu is usually ineffective. Ken wants to get a knockdown or kneebash to start mixups. You can afford to rush him down in some situations, but try not to get too predictable.
His high priority j hp and j hk are sometimes nasty to deal with without flash kick charge, try discourage jumps, then rush him down with fireball pressure. Sonic boom > bazooka knee is great for pushing him to the corner, and baiting him to take risks. Once you get Ken in the corner, try get yourself to max cr mk range after a knockdown, then you can pressure with fireballs and baits.
If he tries to zone, don't crack and jump predictably, you can usually afford to let him come to you, but his startup and recovery is quite long, so he is very punishable, use walk up backfist/cr mk to punish fireball attempts mid screen. Just like vs Ryu you can use backfist and sweep to punish fireball recovery. Try not to neutral jump his jab fireballs often, he has time to get close and apply pressure, just block or destroy them.
His tatsu is only safe on hit at specific ranges, don't be afraid to use cr hp if he flies over you, the trade is almost always in your favour. If he does mk tatsu at round start to punish a sonic boom, it leaves you at max cr jab range, stand lk is also safe here as well, and unlike cr jab this does not whiff if he stands.
At round start waiting is usually the best option I find. The forward sobat is actually quite decent as well, trades with a fireball at worst, same vs tatsu, and he generally can't do much about it without taking a gamble. If he walks towards you, use cr mk to push him back, or walk back slightly and use fireballs if you think he'll try sweep/whiff punish etc.
Use cr hp to anti air, though this is not easy thanks to his good jump ins, st mk is excellent if he's right above you. And early j hk also is a good option when you're without charge, hit him early and create distance.
For pressure, the bazooka knee after fast sonic boom is a good start. But the max range cr lp is very good after a knockdown /anti air cr hp. His srk will whiff, and can be punished. The step kick is also useful if used at max range, to beat his normals (watch out for his st hk). Sobat mixups are the same as vs Ryu, just be careful for psychic srk, punish them with normals or flash kick if possible.
When he gets you in a kneebash, try mash out while keeping flash kick charge, the safejump after kneebash is inconsistent vs Guile, so Ken's usually don't try it. He can still use max range sweep vs flash kicks though, so be careful. Just remember if he gets close after a knockdown etc, that shoto ground normals are never safe vs flash kick when close, since they recovery too slow to be safe meaties.
You can punish his super with air throw if it will kill him, good option. Don't challenge it until it ends since it's fully invincible, wait until it ends and try get him with flash kick or air throw before he lands.
-GolcarJack
Vs. Sagat:
- 6 - 4
Easier than old Sagat due to tigers being less powerful, and no cancel on second hit of st lk also helps. The high tiger is not much different from old Sagat, but you can just crouch it, more vulnerable hitbox, so backfist is great to punish recovery. The low tiger is much weaker, quite easy to punish during startup and recovery.
The main thing I see a lot of newer Guile players do wrong in this matchup is jump way too much, be patient, you'll get your chance eventually. Everytime he waits for a jump, that's a chance for you to get pressure going. You can still use neutral jump fierce to punish low tigers at round start, it's easier vs new sagat as his low tiger hurtbox is bigger. Use bazooka knee to punish low tiger recovery from far away, step kick is also good, time permitting.
At the start of the round he can punish sonic boom with stand hp, this whiffs if you crouch, and if you try walk back or neutral jump, it whiffs. You can use cr mk to punish his st hp, but don't get too greedy. Though slightly walking forward and doing cr mk is good at round start, beats low tiger and st hp. Generally I prefer to just wait at round start, if he does knee you can punish it, blocking tiger this close is ok. If he does st hp or st mk and you react, fireball when you see them whiff, he usually blocks in time, but it lets you safely get a fireball out.
Anti air him the same as you would vs old Sagat, cr mk to punish diagonal and neutral jumps outside of his j hk range.Cr hp late to trade is great otherwise, early j hk is ok sometimes, and far mp is good at a specific range. He can crossup with j mk, unlike old Sagat, this is always a fake crossup it seems, easy to block when you see it.
From far away, just be patient. You can jump at him with j mk/ j hp/ j lp, if he recovers in time you'll get hit by uppercut, or st mk. If he is recovering from low tiger when you hit him with an air normal, you can usually always follow up with cr mk/sweep, the game considers him crouching, so he takes extra hitstun. Jumping backwards over mk/hk tigers is still ok if you're not too predictable, good way to avoid chip while maintaining charge.
From mid range you can usually punish his fireball recovery, incredibly easy to do now thanks to the nerfed low tiger recovery/hurtbox. Most of the time bazooka knee leaves you at max cr mk range, which is ideal. Even when you have not enough charge, don't be afraid to sometimes do step kick or forward sobat. These catch his low tiger startup quite easily. From almost full screen you can sometimes do after a fireball, slight walk forward into step kick, to beat a low tiger attempt.
When you get close, stay outside of his st hp range, and try get him to the corner using fireballs. He can use tiger knee to go over them if timed right, but this is often punishable, either with throw, cr mp> flash kick, or with no charge just cr mp, sets you up for a frame trap with cr mk. Anti air jumps accordingly, you usually want to stick with slow fireballs when close, when he's conditioned to not jump, use bazooka knee after fireballs to force him into the corner. Walk up behind a fireball > cr lk> cr mk is also a good string to push him to the corner. Sobat kick also sets up some mixups, I like to get to max cr mk range and just wait. His sweep is whiff punishable, and he has to worry about your cr mk. Basically if you expect him to do an unsafe move or tiger, use cr mk, if not just wait for him to take a risk, or sonic boom when you can.
His st lk is still a decent counter poke, st mk is strong vs sobat as well. Just don't get too predictable and you'll be ok. His pressure is not that great outside of fireball traps, don't let him get you in the corner, and it's not that bad at all. He can safejump, and maybe do st lk for 50/50 between throw or jab uppercut, but in most cases I just take the throw since the damage is low, and he is at risk anyway as guile has more throw range.
If he gets you in the corner, just don't try anything stupid. Best bet is to not get here in the first place obviously. Use neutral jumps/backwards jumps when appropriate. Sonic boom has to be used sparingly.
When you get him in the corner, this is the best situation, get outside of knee/st hp range (ideally at a range where his jump forward hk whiffs too), and lock him down with fireballs. His worse fireball, and slower jump make it harder for him to escape, his knee and jumps are all very unsafe if you are spaced correctly.
Super can go through fireballs, but it's more of a hard read than anything, it's very punishable if it does not hit anyway. Other than that, it's just a case of not cracking under pressure, and knowing your options. Unlike old Sagat, cr mp does not hit low on him, so there's that I guess.
Vs. Old Dictator:
- 6 - 4
This is easier than New Dictator because he has less tools, and some he retains are weaker. No juggle j mp, a devil reverse that sucks, and no throw tech/super. You can approach this how you would with n.dictator. Flash kick beats devil reverse, which he cannot control after he executes it, similarly jump hp can catch him flying towards you if you anticipate it. Other than that, he still has the same touch of death/crossup tech. His far mk/hk have much worse priority, so you don't have to consider potential trades with st hk as you might vs n.dictator.
Vs. Old Deejay:
- 6 - 4
Old Deejay has longer recovery on his fireballs, as well as a much worse crossup, and no upkicks. You can afford to turtle harder since he will have to work more to get in. And throwing is less risky here due to lack of upkicks, he has to rely on mgu as a reversal, which is poor vs grounded opponents.
Fair Match-ups
Vs. Dee Jay:
- 5.5 - 4.5
This is slightly in Guile's favour thanks to better fireball recovery, and better defense in general. That said it's pretty much even, and dj has all the tools to win this. His fireball has 2 frames faster startup than Guile's, so be careful when waiting to fireball when up close. He has the horrible crossup shenanigans and touch of death combos, and some high priority normals to stuff Guile's.
Close range: His slide will go under your fireballs, but only if he touches you, the hit freeze allows him to clear it, otherwise he gets hit, or might trade when at a specific distance. It's usually best to use slow sonic booms when close since it's harder for him to slide under, and gives you more time to pressure/charge after each fireball is out. Crouching strong can usually counter his slide, cr mk and sweep are also decent as long as you are not too close. Of course you can use normals to punish his fireball startup, backfist can be used to punish his fireball recovery, but you have to be close, and of fireballed just slightly before him.
From further away: You can anti air him using cr mk and sweep outside of his jump forward hk range. Late cr hp is great in this match, far mp can also be good as well if spaced correctly (it can stuff his jump jab clean). He can try to slide in between his fireballs during a fireball war, this gets him closer but you can still keep up just fine, if he gets predictable with this, you can walk up and do cr mk or sweep to punish the slide, use sparingly though. You can use jump forward hk to punish his fireballs from very far away, but try not to be predictable.
Dealing with his normals: The slide is fairly straightforward, that can be countered with a well timed cr mp or sweep. His most annoying normals are his high priority ones, like cr mp, cr mk, and cr hp. Cr mp is pretty much exclusively a counter poke for dj in this match, it beats your sweep (first hit anyway), and cr mk. You can use a sobat to fly over and hit him in the head, or a step kick to trade from far away. As far as cr hp goes, this cancels during the first part, and can be used as an anti air in the fashion as Guile cr hp. But he may throw it out in between fireballs to stuff a low kick or sobat. Best option is to punish him during recovery, or just wait and fireball him. Cr mk is the hardest to counter, hit is safe vs sobats (it whiffs vs him since he low profiles it), and your low kicks and cr mp lose to it. This attack is also a knockdown on hit, so typically bad to trade. The best option I found was to just to not bother trying to counter and fireball from a safe distance. Second hit of your sweep seems to sometimes work though.
Pressure and punishment: His upkicks whiff if you crouch, so you can go for meaty crouching normals (just not cr hp, upkick will hit that) and get some pressure. Just watch out for the lk sobat since it can go over and punish lows. Here are some strings worth trying vs deejay after he is down. Cr jab x2 > throw/far mp into fireball/ cr lk/ cr mk/ cr jab into fireball. Meaty cr mk > cr mp/throw/cr lk (cr mp afterwards can be cancelled into flash kick for a combo if he gets hit by the meaty cr mk). Cr lkx2> throw/cr mk/ cr lk renda cancel into fireball, far mp> fireball. Cr mp> cr mp/far mp/ throw. Keep in mind far mp can be stuffed with upkicks, but this is a big risk for him, try to punish upkicks with a flash kick or normal before he lands.
If he does a super and you block, the hits usually whiff if he is not at point blank when he does it, during a whiffed hit you can do a flash kick to punish him.
Vs. Guile (self):
In many ways this can be considered a war of attrition, just make sure you do not end up down on life by a fair amount, coming back in this matchup is harder than no other. Pay attention to the movements of the other player, while making sure not to give too much away yourself, generally the idea when in a fireball war is to either punish a fireball with a normal, or to bait him to try that himself, and punish that.
At round start you can do kara flash kick (with forward sobat), to beat sonic booms, usually best to use lk flash kick since you land quicker, giving you time to pressure harder. To counter that however, you can do kara sonic boom (with back sobat) to move yourself back slightly, making the kara fk whiff. Though the kara sonic boom takes slightly longer to come out than a raw one, so if one Guile does kara boom, but the other a normal sonic boom, doing a regular one leaves you at an advantage in the fireball war. If you must use a normal to trade with sonic boom at the start, I recommend walk up cr mk, you can keep charge as you activate it. Backfist takes too long, and you lose charge anyway. Step kick however is very useful in this scenario, if done early enough (double tapping helps here) at round start, it will trade with a sonic boom, even if they do kara back sobat, guile's leg will still reach easily. This leaves you in a good position as you have full charge.
When countering fireballs mid screen and closer, you will walk up and use cr mk or backfist to hit him out of sonic boom startup, make sure you have time to reach, trading is bad since you're sacrificing charge. If you expect them to do this to you, you can use a normal like your own cr mk to hit them walking up, or hold back to walk back as they move in, giving you time to fireball out of their reach, back sobat is also good for this sometimes. If they keep walking back when close, in fear of your normals, let them move, and slowly walk him to the corner with step kicks to close distance.
Mobility when charging is still good thanks to step kick and bazooka knee, only use knee from like full screen distance if you want to get in, otherwise his step kick can punish this, really bad situation to be in.
Proximity block is a big factor in this matchup also, keeps him in place, which is the main reason players whiff jabs when charging. Though back sobat can be used to move back when in proximity block.
Anti airs are very effective since Guiles jump ins are usually low priority. Cr hp trade works wonders here, but from far away cr mp is incredible, so is cr lp, but the damage is really low. You can meet him in the air with j hk, but be careful not to use it from too close.
Pressure : Practice spacing max range cr lk, this is safe as flash kick and super whiff. leads into cr mk for a nice frametrap, going for walk up throw after the cr lk is also surprisingly effective. Likewise cr mk at max range is safe, and second sweep hit is ok for this to create distance. One other thing to remember is that cr mp hits low in mirrors, this makes it a deadly move after crossups, cr mpx2 into fk hurts a lot, he either has to take your throw, or risk getting hit by that. Safejump is also viable, practice the timing as it's kind of awkward visually. Sobat mixups are ok, remember whatever you have, he also has, so it's a case of reading the other player. Remember cr mk is a great chance to whiff punish with your sweep if you're in range, likewise for the second hit of his sweep if it whiffs, just remember Guile's hitbox is thinner when he is crouching.
Frame traps: Cr mk into step kick is nice, even if it trades with a fireball you should have charge, so taking the trade is good usually. Cr mk into backfist is better in the sense you can do it from further away, just be careful as it whiffs if he crouches. Usually at low health you use cr mk> cr mk on them, walk up between each one, Guile's leg goes under the sonic boom, so he usually gets hit before you. He can use sobat or sweep to beat this as a read though.
-Golcarjack
Vs. O.Guile:
- 5.5 - 4.5
He has none of those kara tricks since he has no moving sobats, and his mobility is much worse because of no step kick. Only things to look out for are his standing lk, which he can do while charging, it's a decent defensive normal, but nothing major. And his backfist can be done while holding back, at the start of the round this would be a bad trade for you, so be careful. His normals also do more damage than yours, but you have the advantage thanks to a more versatile moveset. He lacks a crossup, and no throw tech will ruin him after he is knocked down. He lacks good defense vs sobat, don't be afraid to abuse this and hop kick him over and over in the corner.
-GolcarJack
Vs. M. Bison (dictator):
- 5.5 - 4.5
Controlling space is very important. Do not let him trap you in the corner and start his mixups and tick throws. Zone him out with sonic booms, if he tries to jump at you knock him out of the air with jumping fierce or roundhouse. Be careful with your booms when he has super. If he does a psycho crusher that puts you in the corner, you can throw before he does right as you come out of blockstun, same thing with scissor kick. Sometimes you can backfist him after he passes through you with a psycho crusher but the timing is kind of iffy. If he tries to slide at you and stops right next to you, you can flash kick him as you come out of blockstun for a knockdown. Once you have him on the ground you can go for j. short, cr. strong xx flash kick pretty safely since he doesn't have a good reversal on wake up.
As long as you can keep him from getting close enough to harass you with standing forward and out of the corner then this matchup isn't too bad. You just have to be able to zone properly. Ideally you want to keep him at fullscreen. Sometimes I will do pre-emptive jumping fierce/roundhouse in between booms to discourage him from even trying to jump at me but this can be punished with psycho crusher as you come down.
-Akagi
Vs. Chun-Li:
- 5 - 5
This matchup mainly comes down to two things; who gets momentum first, and the state of Chuns life when her meter becomes full. The stored super is pretty dangerous if she can get in, and makes pressuring much more difficult because of the threat of losing over half your life bar. Plus if you block she's safe anyway. The main objective in this matchup is to either get a huge lead before she gets super, or keep her pinned down to prevent her from building meter in time.
At the start of the round it's a case of will she use fireball, or use normals. After a sonic boom you have plenty of time to backfist her, step kick can usually work because of her long fireball recovery, which is more than welcome since you can retain charge with this. Forward sobat at round start is a good option for coverage since you trade with her fireball, and win if she tries walk up cr mk/sweep. Likewise if you expect her to walk up and do cr mk or sweep at round start to beat sonic boom, walk backwards a little then fireball works pretty well.
Anti airs
This matchup has a ton, basically every range has a different one.
Crouching fierce: Use late to trade, takes practice to time, but when timed well it covers you pretty well.
Far stand mp: At the right distance this is very reliable, if timed well it should be able to beat both her j mk and j mp clean.
Sobat kick: Use sparingly, can be good for catching j mk from a distance.
Jump forward fierce: Beats everything, make sure you react quick enough to get it out safely.
Crouch mk: Use from max distance to hit her as she lands, headstomp beats this, but she bounces towards and can then be flash kicked, or far mp.
Stand mk: Use when she's above, beats j mp, j mk either trades or beats this, but it makes Guiles hitbox taller, so you can usually sac throw in this case.
Sac throw: Either with close stand mk or sobat kick, both make Guile higher so he gets hit earlier.
Walk under: You may have time to walk forward and let her pass over, her crossup j mk is not as good as Guiles crossup lk. You can punish her with any close standing punch, crouch jab sometimes can work also.
When Chun has distance and is fireballing, you can technically keep up with her, but ideally you want to get close and apply pressure before she has super ready. When Guile crouches his hitbox is thinner, using this you can crouch at full screen and jab fireball whiffs, you can then throw a fireball followed by bazooka knee, usually she fireballs after this, so jump forward. It's rare you'll get a full jump in combo, just do j mk into cr mp or far mp depending on range, then cancel it into jab sonic boom and go from there. If she does use a medium or heavy fireball in a fireball war, fireball yourself after it fades out, step kick is useful here to gain ground while keeping charge.
Once you get in you can start rushing down with sonic booms and blockstrings. If she neutral jumps over a fireball, use max range cr mk to hit her as she lands, or jump forward with fierce to hit her out the air. She may also use neckbreaker (df+hk) to pass over fireballs, there are a ton of ways to punish this. Jabs work well, sobat, bazooka knee etc.
For pressure you have a few good options, crouching jab is my favourite, this move is safe at max range, upkicks lose to it, whiff at best, she cannot throw you either. The frame advantage and speed or cr mk allows it to come out safe after this, beating her normals clean. She can do upkicks after the cr jab to beat the cr mk, in that case either wait, or use sobat kick to beat/dodge it.You can follow the cr jab up with cr lk if you want, adds more hits to the string, cr mk after the cr lk to end it. Walk up throw after cr jab is also legit as she may be afraid to press anything. Upside down kick after cr jab is also good as this beats upkicks, and low attacks. Main time I use upside down kick is as a meaty after an air to air j hp mid screen.
Sobat kick can be used for pressure similar to in other matchups like shotos and sim etc. One fantastic property of sobat kick in this matchup is that it beats her upkicks clean, if you're at point blank it will lose, but you'd never do that anyway. Basically after the sobat kick lands, (assuming you are landing it at a range as such that her cr mk whiffs afterwards, which you always should aim to do) you can use another sobat to keep the pressure up. This beats cr mk and upkicks, back sobat if you expect her to sweep (trades with st mk also), cr mk beats her st mk which she will use to beat sobat kick. Standing jab also beats st mk, good frame advantage from this move, but you are wide open to sweep, so be careful. Neutral jump fierce if you expect her to fireball after the sobat kick.
Crouching lk is a good low starter to beat her throw, basically do cr mk after, you have other options like walk up throw and sobat as well. Obviously in addition to all these you can just go in and throw her.
I recommend going for crossup in most cases, it's incredibly hard for Chun to block, and her upkicks always seem to whiff vs it. Usually you do cr mp after, you can then do a 3 way mixup if it's blocked, walk up throw, cr lk, or far mp into fireball as a frametrap. Crouching jab after crossup is alright, two cr jabs into flash kick works as a combo, if she blocks do far mp into fireball after. Crouching lk is ok if used sparingly, make sure to use cr lk x2, st lk>hk flash kick if you want a combo from it, two cr lk into flash or super seems to whiff vs Chun after crossup.
Preferably you want her in the corner, if she tries to jump back to get over fireballs, either jump forward hp or cr mk work well. Far mp can work sometimes but kind of awkward to space and risky. Mashing stand jab can also work ok if spaced correctly.
When Chun gets a knockdown, she will usually do crossup j mk, or neckbreaker. Neckbreaker only seems to cross up if she first hits you air to air. Otherwise if you crouch block it seems to never cross Guile up. In the corner she can use j mk and flash kick whiffs, so just block, flash kick if you expect a throw, but be careful.
When she has super it limits your rush down heavily, use slow sonic booms from mid screen or closer, this way she has to use super when incredibly close to get more than one hit. The slow fireball can come out and hit her after the first hit when she becomes vulnerable. You can whiff a jab or something to bait it, but be careful since you can still be punished for this. If she walks up and you know it's stored super, she cannot use kicks on the ground without sacrificing that super. You can walk up a little and use a normal to hit her early. If she does it towards you in the corner and you jump back, use jump back hp to crossup as she is recovering, and do a combo.
Vs. O.Ken:
- 5 - 5
Unlike N.Ken, he does not have the kneebash, but better zoning, and alternate mixups with his srk OS. You can play some situations out the same as vs N.Ken. But you might have to play more aggressive if the other player prefers to zone you out. His anti sonic boom options are the same, his tatsu is the same. His fireball still is very punishable during startup and recovery, but each version has the same recovery, making his corner trap very powerful.
The srk has full invincibility, but cr lp trick still works to make it whiff at max range. Try punish srk whiffs with walk up throw since he has to take full damage. He also shares the same normals as old Ryu, his jump fierce is still better however. Anti air cr lp vs the old shoto j hk is less useful here since ken often favours j hp when jumping in. Don't be afraid to just block, it's sometimes not worth risking it letting him land j hp> jab srk.
Your offense is pretty much the same regarding sobat mixups etc. Just be aware of the old shoto normals and you should be ok. His air tatsu can be unblockable like old Ryu, though this is even less useful since it does not knockdown. If he gets a knockdown and goes for srk OS with throw, don't be afraid to take the throw, better than getting knocked down again.
-GolcarJack
Vs. Ryu:
- 5-5
Objective: Get into the range just outside of sweep distance. Punish whatever he tries to do while trying to pressure him and baiting risky moves. Sonic Booms are a great tool due to low recovery.
Full screen: Throw booms and move forward by using bazooka knee or standing roundhouse. Make use of neutral jumps to avoid fireballs you don't have charge to cancel out while retaining your spacing.
Optimal range: Poke and throw booms to pressure while looking for a mistake to punish. If he throws a fireball too late, punish with backfist. If he tries a psychic DP, punish on the way down. Punish jump ins with Flash Kick or crouching fierce.You can jump in to punish a bad fireball with jumping Fierce/Roundhouse, crouching strong xx Flash Kick. Risky but sometimes worth it.
In the corner: Block and wait for an opportunity to throw a boom and backfist or punish him for a psychic DP/jump in.
Mix ups: After a knockdown use ambiguous jumping short, crouching strong xx Flash Kick. Hit confirm it and either finish the combo, go for a throw or finish with a boom to create some space.
Things to look out for:
Tatsu: These go over booms. Try to bait them out with jabs to feint Sonics. Flash Kick him or use crouching fierce to trade in your favor if you don't have a charge. Look out for short tatsu immediately followed by jab dp.
Juice Kick: He can do this to cross you up and hit you out of a flash kick. Don't take the bait and punish him on the way down.
Super: Be careful with your booms and pokes. Try to bait him into wasting it by feinting Sonics and jumping or blocking.
-Akagi
Crouch jab tech: Use a crouch jab at max range, his srk whiffs, and so does tatsu since you are crouching.You are also outside of his throw range. If he stands up he avoids it since his hitbox is less wide, but it's not likely he'll punish your cr jab whiff, and this leaves him open to a low kick. Use this after he blocks a fireball, after a blocked cr strong following a blocked cross up, when he gets up etc. Basically a save option that is safe against his srk.
Follow ups after safe cr jab: Wait : Just wait for him to do something like an srk whiff or jump/tatsu etc.
Walk back: Will have enough time to get out of his sweep range thanks to the frame advantage from cr jab, and Guile's superior walk speed. One good thing about doing this is that you can bait him to try a cr mk/hk after he blocks the cr jab, expecting it to hit you. You can whiff punish both of these with your sweep.
Neutral or forward sobat: Use to beat his low normals. Still pretty safe if he just blocks, only an srk/super or standing normal will be able to deal with this. And you have another set of options after your sobat lands.
Walk up throw: Risky but sometimes useful if you condition him to block.
Upside down kick: Done by getting slightly closer than usual when using the cr jab, therefore it's not safe vs the srk. But this seems to be a great option since it beats his low attacks and is a very strong, safe attack to use.
Low attack: Cr lk or cr mk, use like a frame trap, can lead to more mixups.
Fireball: Just fireball after the cr jab lands, or cancel it to keep the pressure going.
Disadvantage Match-ups
Vs. O.Ryu :
- 4 - 6
In my opinion, this is harder than N.Ryu. Mainly due to his better zoning (1 frame less startup and recovery on blue fireballs), better priority normals (mainly crouching kicks), and mk and hk tatsu being more effective.
You want to play it the same as vs N.Ryu for the most part. He has less comeback potential due to no super, and no overhead for mixups. The unblockable air tatsu is not too much of an issue since you have a reversal flash kick to deal with it. His mk and hk tatsu on the ground move faster when travelling, but startup/recovery frames and invincibility are the same, basically just means he is more likely to punish a sonic boom. The trajectory is different too, mk spins twice, hk 3 times.
His normals are better for counter pokes, mainly crouching kicks. The priority is better, but range appears the same, all can still be dealt with using a sobat kick. His far jab has better priority for beating sobats and step kicks, so be careful. The diagonal jump hk/mk improved hitbox is only a problem from far away. Otherwise cr hp trades easily, and you can even mash cr lp to stuff it clean when underneath.
The srk has full invincibility until it's no longer active, but startup and range is the same. Cr jab is still fantastic here for baiting them. Use walk up throw to punish things since he cannot tech.
Vs. Balrog (boxer):
- 4 - 6
You have no choice but to play the more defensive game here, his rushdown is too powerful and dangerous. Keep boxer out with sonic booms, and use safejumps to pressure/push him back out when you land a big punish. Guile has some good anti airs vs boxer as well, and long ranged normals.
At the start of the round, if you expect him to do any rush punch, do cr mp just very slightly after the round begins, it will beat them all clean. Same for crouching short (this can be rapid fired for better consistency, and proximity block) but this is at risk of getting caught by a headbutt, or cr mk. Other good options include whiffing a jab or two to fake a fireball, jumping back is also a good option. If you expect him to open up with standing fierce or any non low rush dash move, you can hold back to block it, if you crouch these rush moves and st hp whiff, this pushes you back to ideal range, keep in mind you are open to low rush. If you are really confident he will do dash punch, st hp, or headbutt at round start, you can start off with a sweep, this beats rush moves, st hp, and the second hit usually catches headbutt recovery.Basically it's just a case of creating that good range to safely zone.
Safejump pressure: Pretty easy since jab headbutt takes 11 frames to come out. Super is a little harder to safejump, but easily possible with practice. I like to do something basic at the start of a set/game and pay close attention to his movements. Look for when he crouches/stands up. Obviously it's likely he won't do the same thing every time. But you can use this to see what he wants to do when close. If you expect him to mash throw, you want to go for cr lk after the air normal, best to use weak air normals for this since they do less pushback. You can get usually 2 cr lk to combo if he is standing. Options are the same anyway. A single cr lk works as a tick, if he gets hit you can do st lk chain after the first cr lk, then cancel it into hk flash kick for a combo. Renda cancelling the single cr lk into flash kick or super also works, just not really viable as a hit confirm.
For the most pushback, try doing jump roundhouse, then close fierce into fireball. He cannot crouch stand fierce so don't worry about it whiffing. This will usually dizzy if he does not block as well. Try do the jump hk as late as possible for this to connect easier. If you do a jab sonic boom (recommended) you have enough charge for another as soon as he recovers from blockstun, allowing you to maintain keepaway range, just watch out if he has super.
Some other good setups include the above one but instead use a medium air normal to change his timing. Hitstun is the same for any strength air normal, but blockstun is not. He can't crouch standing jab either, so you can do weak air normal> stand jab> either walk up throw, or far stand mp into fireball (beats throw). He can super between the far mp and fireball since it does not actually combo. You can sub the stand jab for cr lk instead. In the case of a safejump from a jump cancelled standing jab, weak air normal into crouch strong, then crouching forward, is a good one. This is not advised when he has super, but basically he can't hit you out of it and it pushes him back. You should be able to fireball after the cr mk, since you should be out of his st hp range.
Anti airs: Obviously a flash kick is the best choice, likewise super beats everything clean. But otherwise... Crouch fierce: Actually not often used in this matchup, use it late to get a trade, can be done early to try get a sac throw if he is right above you.
Stand jab: Actually the best anti air vs boxer, use from as far away as possible. You can even jump cancel it to get a free safejump after, sick.
Far stand hp: Used like stand jab, but more damage. I usually prefer jab though.
Backfist: Really good if used right, do it from far away to trade with his jump ins, basically you are both like full screen after this trade, so great for guile.
Sobat: Surprisingly decent, use like st jab, usually st jab is preferred, but sobat reaches further.
Jump roundhouse: Usually a forward jump on reaction to hit him out the air, use instantly, very nice since he has a low jump, decent vs float punch as well.
Diagonal jump fierce: Better priority than jump hk but less range. Seems to beat everything.
cr mk/sweep first hit: Typical low anti air, his heavy air normals, and neutral jump hk beat these, but they beat everything else.
If he tries to float punch over fireballs and you can get close enough to punish, try backfist as he comes down, or cr mk is decent. Jump hk if you are far away.
Ground game: Just zone with fireballs, it's important to always have one on screen if possible to prevent him getting close, since you're usually dead if he gets in. If you suspect a headbutt walk forward and try punish with sweep, backfist, step kick, walk up throw etc. Jumps are a little easier since you can anti air from far away thanks to backfist and j hk having so much reach. When he has super be careful walking up, watch out for it after headbutts, or weak rush moves.
When you are close, and within normal range, you can use moves to push him away, step kick is great at max range, trades with cr mk and beats a lot of moves. Cr mk is also good, just watch out for his crouching kicks. Sobat kick goes over his cr mk and cr mp, good counter, but use sparingly.He can use st hp to beat or trade with sonic booms within range, you can use a cr mk to beat it, but honestly this is a needless risk usually, guile can crouch to make this move whiff completely.
You can use normals inbetween bad sonic booms to beat/discourage rush moves, keep in mind these are all punishable. Step kick is great if you expect him to attack since it is consistent, and leaves you at a good range after landing. Back sobat beats low rush, and far standing fierce seems to beat low rush as well. Cr mk is decent, but has vulnerable recovery and startup.
If he gets in, all I can suggest is be patient and look for a good time to escape. After throws you can try flash kick but do so sparingly. Cr jab/strong are ok to fend off walk up throws and upper whiffs into throw. After safe headbutt, he may try cr mp to beat your normals, and continue his pressure, all I can find to escape this is to flash kick his cr mp.
If he does a super when you are by the corner, it may slow down, you can flash kick/super or throw (recommend throwing him into the corner with a fierce throw) when this occurs. Though if he does an upper I think you only can get a cr lp/mp at best.
When he does not have super, you can do some meaties that are safe since headbutt takes so long to come out. Jabs, cr strong, and stand short are all ok. But crouching short and cr mk are the best ones since they hit low, and are safe on block anyways. Plus you can do them from a distance to be out of his mp throw range. Meaty cr lk is pretty effective after air to air j hk/ jump forward hp, or after a teched throw to apply pressure. Use all the standard mixups after as if it was a sobat. So cr mk, step kick, walk up throw, walk back, jump cancel, jab fakes are all great options.
Serious Disadvantage Match-ups
Vs. Dhalsim:
- 1 - 9
Don't feel discouraged if this feels impossible vs a strong Dhalsim. It's very bad,even if you know the matchup well. It's a bad matchup because Dhalsim can easily punish sonic booms from far away with crouching punches, and even then he also has slides, and drills to go over them. Basically you want to try get some damage in, if possible try take advantage of his lack of reversals after a knockdown.
Round start: Do nothing (usually the best option, just wait and flash kick a fireball/flame or drill on reaction if he does one.), walk up cr mk, walk up forward sobat, fireball/wait then fireball, jump back lp.
A lot of these are risky and punishable. Do jump back jab if you think you are better off playing the full screen game, at least you're safe from his limbs from that far away. Walk up cr mk and sobat are ok for pressure, both can deal with low punches and are safe.
Countering his normals: Stand lk: beats slides, crouching punches, and st mp/st hp. Main use is similar to the trick vs blanka slides. Throw a fireball, then get to a range to punish a slide or limb, and mash it. He'll usually get hit by the fireball and the kick and take a lot of damage.
Sobat kick: Use this to pressure, and to work your way back to a safe distance when far away. It floats over slides and crouching punches, though usually vs slides you get hit during recovery, not too bad to walk up and do a forward sobat to fly over a crouch punch, and throw him as you land. These are pretty safe in general from far away, trades or stuffs all of his standing ranged normals. Can also be used to punish drills.
Standing jab: Mainly for beating/discouraging drills, mash it a few times to increase the success rate. If spaced properly it beats drills clean, can also beat standing kicks from a distance as well. After the drill loses to this, you can walk up and use it to pressure, it's an excellent pressure tool as he is a character who cannot crouch under it, he can't throw you out of it if you are far away enough as well.
cr mk: Use to push him back when he tries to walk you into the corner. If you see him walk up and try for a crouching punch, use this, it's 1 frame faster startup than the cr punches, and they have a projected startup so it's a good option. In most cases you are close enough to do a step kick afterwards, this frame trap will beat a crouch punch if he tries one after getting hit. Or just do back sobat to get to safety, forward sobat to pressure if you want.
Neutral jump fierce: Beats everything, if you are directly above he can do back+mp to beat it, but that's all. Just avoid using it at point blank and you'll be good, super and up flame can beat it, but not likely he'll get either out in time. Good if you are trying to sit on a lead, this attack also destroys slides.
General tech: From far away just work your way in with fireballs. You can jump backwards to get over fierce and medium fireballs. Jab ones are pretty nasty, if you neutral jump, he can use st hk to trade with your attacks. Be patient, when he gets close try walk up cr mk to push him out. Jump forward hk punishes fireballs from full screen, use step kick after as it beats most of his attacks, or just block. If he uses a flame it will destroy your fireball and he recovers instantly, if you predict one you can walk up, jump over and punish him with a big combo.
If he tries a fireball or flame within flash kick range, use it to go through and punish him. Kara flash kick can be useful here. If you have a life lead and want to play for time, use sobat kicks after sonic booms to repel drills and prevent him from getting close. Neutral jump fierce if he gets close and you want to push him out. I also recommend learning to super on reaction to his super, you have like 5 frames I think (has to be inputted after the super freeze), you can do it reliably with practice. His throw has much more range than yours, keep that in mind. Punish teleports with flash kick, sweep if you can't charge in time.
When you get to a closer distance, like half screen or so. You can then start pressuring with fireballs, st lk after the boom to beat slides and low punches. Mash standing jab to beat the forwards moving drills. Sobat is good for beating drills, more specifically hk ones that go downwards, and it goes over cr punches and slide safely most of the time. Walking up and getting real close is ideal as you have more options, you need to discourage these other moves first.
When Dhalsim gets himself in a good position just be patient, if he tries to cancel something into a fireball flash kick, if he keeps sliding at close range, cr mp can be ok to beat the weak and medium slides. Flash kick is ok if you expect a tick throw, but don't get carried away. When you see a gap, neutral jump fierce can bail you out if he's in range. Just be careful when he does safejumps with drills, they usually hit low when done like this.
Mixups: Safejump is really only used if you have no time to crossup, which may well happen since he gets up very fast. As long as your air attack is meaty, then you're good since he can't reversal super. Basically a choice between low or throw, use tick throws, medium air normal into flash kick is ok if you expect him to counter throw. Do crouch lk> st lk> hk flash kick if you expect him to not crouch block. A single cr lk into flash kick or super works, but pretty tough to hit confirm. I recommend always using fierce throw (suplex) vs Dhalsim, this gives you time to pressure afterwards. After a crossup it's a similar deal, low or throw, sometimes gamble flash kick after a tick to beat his throw or cr mk. You can do fancy blockstrings like cr mpx2, or cr jabx2/3 then standing jab into fireball, followed by step kick if you want.
The other mixups mainly come down to 3 moves and your options afterwards, as far as a blocked cr mk goes, just make sure it's not blocked from max range, or you can do basically no mixups after. But otherwise step kick is good for beating crouching punches, fireball and cr mk. Forward sobat for drill or slide. Back sobat as a "safe" option if you want to retreat. After a forward sobat kick (do it from a distance that his cr mk will not reach you after it lands.) you have similar options to other matchups where it's used this way. Sobat again to beat slides or crouching attacks. You can use cr mk if you expect him to use a standing attack or block. Walk up throw is ok if used sparingly, neutral jump fierce should reach from here, so use that if you want to push him back or stuff a slide or fireball. And finally a couple of mashed standing jabs work ok if you expect him to drill, or if he tries a standing kick normal.
Standing jab is a fantastic and underrated pressure/mixup starter in this matchup. Good frame advantage and not crouchable. Learn the range on this so you can use it effectively, don't worry he won't be throwing you out of it unless you're really close, or rather; too close. The best times to go for this standing jab is after beating a drill/air to air, or after a teched fierce throw. You can do a lot of cool things after, walk up throw, or sobat to beat his normal/escape attempt is the basic way to explain it. You can try crouch after the blocked jab (makes Guile's hitbox thinner) or do a weird shimmy, wait for his normal to whiff, then walk up throw. Jump cancel into jump forward lk crossup is ok on occasion, but can be beaten. Neutral jump fierce afterwards is also usable.
Upside down kick has occasional uses, usually I use it after an air to air, or sometimes after a crossup blockstring. As far as air to airs are concerned, use jump forward hk or hp to hit him out the air if he's hesitating to drill, then after you can do stand jab or sobat to start mixups.
Vs. O. Sagat:
- 3.5 - 6.5
Objective: Get into just outside sweep range to apply pressure and bait mistakes to punish. Be patient getting in but take enough risks to not eat chip damage all day.
Getting in: Throw as many Booms as you can while using bazooka knee or standing roundhouse to move yourself forward while retaining charge. Use neutral jumps to avoid getting pushed back by blocked Tigers. Be patient and don't jump in or you will eat standing fierce or Tiger Uppercut. If you must jump, do it when he is throwing a low Tiger and hit him with jumping forward (risky.)
Optimal range: You must apply enough pressure to bait him into doing something unsafe but not so much that he tiger uppercuts you and then tigers you back to fullscreen, it's a delicate balance. Use your sobat kick to punish him for throwing low Tigers, use low forward or sweep to punish high Tigers. If you cancel a Tiger with a Sonic hit him with one of your forward moving normals usually bazooka knee. You can use neutral jump fierce to punish low Tigers. Bait out psychic DPs and punish him as he lands. Look out for his sweep and standing short cancelled into Tiger Shot.
Video examples: Kurahashi vs Choi: http://youtu.be/xidXHA8c7Ic Kurahashi vs Valle: http://youtu.be/Wum5MqwWJek
-Akagi
Vs. Vega (claw):
- 3 - 7
- Sliding is annoying
- No air defense when he jumps a sonic [from close]
- Difficult to okiseme
Pinned in the corner
- Use flash kick vs. chip damage attempt [rolling claw]
- Gamble flash kick vs. Izuna/Barcelona
- When you predict a wall dive fake out, fierce sonic
Anti Slide Kick
Unless he's right on top of you there's no good way to stop the slide kick.
Gamble flash kick misses. Sonic trades unfavorably. Towards+medium kick sometimes works but you have to predict and Guile's down on a trade.
[Far standing roundhouse works here and there, too.]
Keeping quiet and blocking is safest. At least it doesn't do chip damage.
Also, after a blocked slide, sonic is not recommended. You'll eat crouching strong. If he gets predictable with blocked slide -> crouching strong you can flash kick but don't get carried away.
Bad range for Vega
Get into a more favorable position with jab sonics. Some breathing room. [half screen ish]
- Counter the jump in with crouching roundhouse.
- If he vertical jumps the sonic, use crouching forward. (Try to meet him in the air [w/ jump roundhouse or whatever] and you'll eat his vertical jab)
- If he blocks it, move back with back+medium kick and throw the next sonic.
Okiseme
[when you knock Vega down you want to try to tick but:]
- Very difficult to time safe jump in vs. Vega.
- Doesn't mean much since he's got standing flip kick.
- If he backflips you can't throw him.
- Even when you do get the throw he'll tech hit.
Risk reward stinks.
Ultimately, a blocked jab sonic might be best.(T.Akiba via nohoho)
