Lichmassacre (talk | contribs) m (Removed redundant links at the top. TOClimit added.) |
|||
| Line 646: | Line 646: | ||
{{STDiagramCellColSpan| 2 | Simplified}} |{{STDiagramCellColSpan| 4 | 1 + 16}} |{{STDiagramCell| 3}} |{{STDiagramCell| 4}} |{{STDiagramCellColSpan| 2 | 9}} | {{STDiagramCellColSpan| 2 | Simplified}} |{{STDiagramCellColSpan| 4 | 1 + 16}} |{{STDiagramCell| 3}} |{{STDiagramCell| 4}} |{{STDiagramCellColSpan| 2 | 9}} | ||
|} | |} | ||
Fei takes a quick step forward then performs a double kick, his twice. Gives good frame advantage, and you can link some normals after the 2nd hit, a lot of the startup is airborne, this seems to not have much benefit since it takes so long to come out. This move is ok to do as a meaty to start mixups vs characters that cannot reverse it. | Fei takes a quick step forward then performs a double kick, his twice. Gives good frame advantage, and you can link some normals after the 2nd hit, a lot of the startup is airborne, this seems to not have much benefit since it takes so long to come out. This move is ok to do as a meaty to start mixups vs characters that cannot reverse it.<br> | ||
During the only grounded startup frame, Fei moves 16px forward instantly. So it is totaly possible to kara cancel this move into, say, a Rekka Ken, for extra horizontal range (similar to how DeeJay can cancel his slide into a Sobat for example or how Guile can cancel his Sobats into FLash Kicks for extra horizontal range), although very hard to execute due to the 2nd startup frame having Fei on an airborne state (meaning it can't be kara-canceled anymore). The input for that would be ↓↘→+Rh,Fierce (with the Fierce button being pressed EXACTLY on the 2nd frame after the Roundhouse). You only have a 1f window for it to work though so in the end this is not really usable (unlike in DeeJay's and Guile's case, for them it's totally usable because the window is more forgiving). | |||
===Throws=== | ===Throws=== | ||
Revision as of 01:45, 25 July 2021
Introduction
Picking Old Fei Long
To select O.Fei Long, choose Fei Long and then press ← ← → → Jab or Fierce, pressing Short simultaneously with the punch button for the alternate color.
| Normal | Secondary |
 |

|
--Born2SPD
Strengths & Weaknesses
Strengths
- Speed, Speed and more Speed. Fei Long's strength lies in his ability to deal quick damage with his rekka punches and deadly combos.
- Jumping Jab has very good priority. Almost as good as T.Hawk's Jumping Jab.
- Standing fierce has crazy hit box/dizzy properties.
- Has good dizzy combos.
- Is able to cancel nearly all normals into specials, this gives him incredible combo potential, and dangerous mixups.
Weaknesses
- He's a mini-me version of E.Honda only he can't "float" over fireballs and doesn’t have a flying headbutt to get your out of those tight spots. Fei has all the weakness of a "fat" character meaning he has a huge hit box and can easily be crossed up. This makes Fei very vulnerable to fireball traps, keep away patterns and zone tricks. Combine this with the fact that there is no trip guard in ST you will quickly realize just how much work you have cut out for you.
- Flame kick whiffs vs low attacks, and has slightly longer startup compared to other reversal specials, making him easy to safejump.
- He's a brawler... meaning you have to make physical contact with your opponents to win. No projectiles means more risk. Playing Fei = taking calculated risks to win.
- Not being able to tech throws, and having the worst throw range in the game, is a big problem.
New & Old Versions Comparison
Here is the list of differences:
- Obvious stuff: O.FeiLong can not tech throws, does not have the Chicken Wing and Super;
- O.FeiLong has a 2 pixels taller head hurtbox compared to N.Feilong, which affects his grounded, walking, crouching and aerial stances. It is mainly relevant when O.FeiLong is crouched, since some moves that could be avoided by crouching with N.FeiLong can not for O.FeiLong. Also note that this affects most of his normals so it will not be listed on the normal moves differences list;
- O.FeiLong does not have an air throw;
- O.FeiLong has some differences in some of his normals:
- Crouching Jab last recovery frame has extended limbs;
- Far Standing Strong can be special canceled;
- Crouching Strong can be special canceled;
- Far Standing Fierce can be special canceled;
- Far Standing Short can be special canceled;
- Crouching Short can be special canceled;
- Close Standing Forward can be special canceled;
- Far Standing Forward can be special canceled but does less hit/block stun, pushback and stun(dizzy);
- Crouching Forward last recovery frame has extended limbs but can be special canceled;
- Diagonal Jumping Strong animates like the Diagonal Jumping Jab, has nice priority air to ground and more active frames;
- Diagonal Jumping Fierce has better priority plus more attacking frames with very good air to ground priority;
- Diagonal Jumping Short has better priority (beats E.Honda's headbutt cleanly);
- Diagonal Jumping Forward has better horizontal priority but has worse vertical priority and its harder to use as a crossup;
- Diagonal Jumping Roundhouse has the Chicken Wing animation frames and different priorities;
- O.Feilong's hop kick command normal can not be steered forward and is not an overhead attack;
- O.FeiLong's Rekka Ken Punches have some differences: they recover faster (excluding the Jab version's first hit). On the other way, the first Rekka Ken punch has bigger hurtboxes during its recovery. All in all O.FeiLong's Rekka Kens are better;
O.FeiLong has better normals and safer Rekka Kens, but the lack of Chicken Wing, Super and throw teching really hurts him. He is viable but N.FeiLong is better (less bad I'd say).
Moves Analysis
Disclaimer: To better understand the diagrams, read this.
Normal Moves
Ground Normals
- Close Standing Jab: (Base max activation range: 42)
| Damage | 4[0] |  |
 |

|
| Stun | 0~5 | |||
| Stun Timer | 40 | |||
| Chain Cancel | Yes | |||
| Special Cancel | Yes | |||
| Frame Advantage | +3 | |||
| Frame Count | 2 | 6 | 4 | |
| Simplified | 1 + 2 | 6 | 4 | |
A spear-hand attack to the head. This is a very good move to hit-confirm aerial attacks. You can cancel it into itself, another standing Jab, or a crouching Jab, which in turn can be cancelled into specials or super.
- Far Standing Jab:
| Damage | 4[0] |  |
 |
 |

|
| Stun | 0~5 | ||||
| Stun Timer | 40 | ||||
| Chain Cancel | Yes | ||||
| Special Cancel | Yes | ||||
| Frame Advantage | +3 | ||||
| Frame Count | 2 | 6 | 3 | 1 | |
| Simplified | 1 + 2 | 6 | 4 | ||
Rapid-fire hooks.
- Crouching Jab:
| Damage | 4[0] |  |
 |
 |

|
| Stun | 0~5 | ||||
| Stun Timer | 40 | ||||
| Chain Cancel | No | ||||
| Special Cancel | Yes | ||||
| Frame Advantage | +5 | ||||
| Frame Count | 2 | 4 | 3 | 1 | |
| Simplified | 1 + 2 | 4 | 4 | ||
A crouching elbow strike. This move is important in combos, specially after close standing Jabs. However, since O.Fei does not have the Rekka kicks (Chiken Wing) nor has an aerial attack that is tailored for cross-ups, he has fewer chances of using it.
- Close Standing Strong: (Base max activation range: 29)
| Damage | 22[0] |  |
 |

|
| Stun | 5~11 | |||
| Stun Timer | 60 | |||
| Chain Cancel | No | |||
| Special Cancel | Yes | |||
| Frame Advantage | +9 | |||
| Frame Count | 3 | 4 | 5 | |
| Simplified | 1 + 3 | 4 | 5 | |
A backfist. Good start-up and recovery. This can also be used in combos, links into several other attacks (and into itself, from point-blank range) and lets you cancel into specials. It is also good for ticks and baits, such as throw-wait-Flame-Kick mix-ups. Note that this does more stun than close Fierce, which makes it easier to obtain dizzy combos with this move.
- Far Standing Strong:
| Damage | 22[0] |  |
 |
 |

|
| Stun | 5~11 | ||||
| Stun Timer | 60 | ||||
| Chain Cancel | No | ||||
| Special Cancel | Yes* | ||||
| Frame Advantage | +7 | ||||
| Frame Count | 2 | 2 | 6 | 5 | |
| Simplified | 1 + 4 | 6 | 5 | ||
Knife-hand attack. O.Fei can cancel this into specials.
- Crouching Strong:
| Damage | 22[0] |  |
 |
 |

|
| Stun | 5~11 | ||||
| Stun Timer | 60 | ||||
| Chain Cancel | No | ||||
| Special Cancel | Yes* | ||||
| Frame Advantage | +4 | ||||
| Frame Count | 2 | 2 | 6 | 8 | |
| Simplified | 1 + 4 | 6 | 8 | ||
A spear-hand attack with nice range but very bad priority. It has good speed and recovery. This is a good attack, but demands distance awareness, since Fei's whole arm is also vulnerable. This move is special-cancelable, but Rekkas may whiff if you hit with the tip of Fei's hands.
- Close Standing Fierce: (Base max activation range: 48)
| Damage | 28[1] |  |
 |
 |

|
| Stun | 3~9 / 10~16 | ||||
| Stun Timer | 40 / 80 | ||||
| Chain Cancel | No | ||||
| Special Cancel | Yes / No | ||||
| Frame Advantage | +2 / +6 | ||||
| Frame Count | 3 | 4 | 10 | 6 | |
| Simplified | 1 + 3 | 14 | 6 | ||
An upper with very fast recovery. Good anti air and combo starter (canceling into Rekka Kens). Keep this in mind when you are getting crossed-up or when someone jumps and lands on top of you. It can also be used as a meaty.
- Far Standing Fierce:
| Damage | 28[1] |  |
 |
 |

|
| Stun | 10~16 | ||||
| Stun Timer | 80 | ||||
| Chain Cancel | No | ||||
| Special Cancel | Yes* | ||||
| Frame Advantage | +6 | ||||
| Frame Count | 2 | 2 | 10 | 6 | |
| Simplified | 1 + 4 | 10 | 6 | ||
Fei's famous "handshake" attack. It stays active for some time and also recovers very fast for a Fierce attack.
- Crouching Fierce:
| Damage | 28[1] |  |
 |
 |
 |

|
| Stun | 10~16 | |||||
| Stun Timer | 80 | |||||
| Chain Cancel | No | |||||
| Special Cancel | No | |||||
| Frame Advantage | +8 | |||||
| Frame Count | 2 | 2 | 2 | 8 | 6 | |
| Simplified | 1 + 6 | 8 | 6 | |||
Nice recovery, priority, range, damage and dizzy potential. Can be used to hit several characters under their projectiles.
- Close Standing Short: (Base max activation range: 24)
| Damage | 4[0] |  |
 |

|
| Stun | 0~5 | |||
| Stun Timer | 40 | |||
| Chain Cancel | No | |||
| Special Cancel | Yes | |||
| Frame Advantage | +3 | |||
| Frame Count | 3 | 6 | 4 | |
| Simpified | 1 + 3 | 6 | 4 | |
A knee strike to the body. Good for tick throwing.
- Far Standing Short:
| Damage | 4[0] |  |
 |
 |
 |

|
| Stun | 0~5 | |||||
| Stun Timer | 40 | |||||
| Chain Cancel | Yes | |||||
| Special Cancel | Yes* | |||||
| Frame Advantage | -4 | |||||
| Frame Count | 2 | 2 | 8 | 5 | 4 | |
| Simplified | 1 + 4 | 8 | 9 | |||
A high side kick. One of Fei's best anti-airs.
- Crouching Short:
| Damage | 4[0] |  |
 |
 |

|
| Stun | 0~5 | ||||
| Stun Timer | 40 | ||||
| Chain Cancel | No | ||||
| Special Cancel | Yes* | ||||
| Frame Advantage | +5 | ||||
| Frame Count | 2 | 2 | 4 | 4 | |
| Simplified | 1 + 4 | 4 | 4 | ||
Crouching inside kick. O.Fei's ability to cancel it into specials makes it a much better move.
- Close Standing Forward: (Base max activation range: 36)
| Damage | 22[0] |  |
 |

|
| Stun | 5~11 | |||
| Stun Timer | 60 | |||
| Chain Cancel | No | |||
| Special Cancel | Yes* | |||
| Frame Advantage | +7 | |||
| Frame Count | 4 | 6 | 5 | |
| Simplified | 1 + 4 | 6 | 5 | |
High vertical kick. Good recovery. This move is very interesting due to its ability to hit after ground cross-ups. It can lead to dizzy combos after softened kick throws or air resets.
- Far Standing Forward:
| Damage | 22[0] |  |
 |
 |
 |

|
| Stun | 0~5 | |||||
| Stun Timer | 40 | |||||
| Chain Cancel | No | |||||
| Special Cancel | Yes* | |||||
| Frame Advantage | -1 | |||||
| Frame Count | 2 | 2 | 6 | 4 | 4 | |
| Simplified | 1 + 4 | 6 | 8 | |||
High side kick. Good anti-air. Note that the O.Fei version of this move actually behaves like a Short (i.e. it does less hit/blockstun, pushback and stun(dizzy)).
- Crouching Forward:
| Damage | 22[0] |  |
 |
 |

|
| Stun | 5~11 | ||||
| Stun Timer | 60 | ||||
| Chain Cancel | No | ||||
| Special Cancel | Yes* | ||||
| Frame Advantage | +4 | ||||
| Frame Count | 4 | 6 | 7 | 1 | |
| Simplified | 1 + 4 | 6 | 8 | ||
A crouching side kick. Bad priority. Good for throw-Flame-Kick-low into Rekkas mixups.
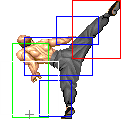
- Close Standing Roundhouse: (Base max activation range: 40)
| Damage | 20[0] + 20[1] |  |
 |
 |
 |
 |
 |
 |

|
| Stun | 2~8 + 10~16 | ||||||||
| Stun Timer | 90 + 80 | ||||||||
| Chain Cancel | No | ||||||||
| Special Cancel | No | ||||||||
| Frame Advantage | +2 / +6(+5) | ||||||||
| Frame Count | 3 | 3 | 3 | 4 | 6 | 3 | 3 | 4 | |
| Simplified | 1 + 9 | 4 | 6 | 10 | |||||
A double-hitting roundhouse kick. It is an interesting attack, but since it does not lead to anything else, it does not get used much. Fei's several close-range cancelable and frame-advantage attacks are better options, most the time.
- Far Standing Roundhouse:
| Damage | 30[1] |  |
 |
 |
 |
 |

|
| Stun | 10~16 | ||||||
| Stun Timer | 80 | ||||||
| Chain Cancel | No | ||||||
| Special Cancel | No | ||||||
| Frame Advantage | +7 | ||||||
| Frame Count | 2 | 3 | 1 | 8 | 3 | 4 | |
| Simplified | 1 + 6 | 8 | 7 | ||||
A vertical kick with the rear leg. This can be used as an anti-air, but Fei also has better options.
- Crouching Roundhouse:
| Damage | 30[1] |  |
 |
 |
 |

|
| Stun | 5~11 | |||||
| Stun Timer | 130 | |||||
| Chain Cancel | No | |||||
| Special Cancel | No | |||||
| Frame Advantage | -1 | |||||
| Frame Count | 3 | 3 | 4 | 10 | 9 | |
| Simplified | 1 + 6 | 4 | 19 | |||
Some weird backwards roundhouse crouching kick. This generates a fast knockdown, but its short range makes it not that great an attack in O.Fei's arsenal, since he can cancel low attacks into Rekkas for much higher damage from that distance.
Aerial normals
- Neutral Jumping Jab:
| Damage | 14[1] |  |
 |
 |
 |

|
| Stun | 1~7(-2) | |||||
| Stun Timer | 40 | |||||
| Frame Count | 1 | 2 | 30 | 4 | ∞ | |
| Simplified | 3 | 30 | ∞ | |||
Good air to air for countering their air normals. Stays out for a long time.
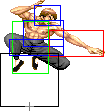
- Diagonal Jumping Jab:
| Damage | 14[1] |  |
 |
 |

|
| Stun | 1~7(-2) | ||||
| Stun Timer | 40 | ||||
| Frame Count | 1 | 2 | 30 | ∞ | |
| Simplified | 3 | 30 | ∞ | ||
A lot like the neutral jump version, this has great forwards priority, and long active frames. Decent jump in from a distance.
- Neutral Jumping Strong:
| Damage | 22[1] |  |
 |
 |
 |

|
| Stun | 5~11 | |||||
| Stun Timer | 50(+10) | |||||
| Frame Count | 1 | 2 | 14 | 5 | ∞ | |
| Simplified | 3 | 14 | ∞ | |||
Pretty much the same as nj lp, but better damage, though much less active frames.
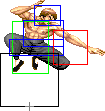
- Diagonal Jumping Strong:
| Damage | 22[1] |  |
 |
 |

|
| Stun | 5~11 | ||||
| Stun Timer | 50(+10) | ||||
| Frame Count | 1 | 2 | 14 | ∞ | |
| Simplified | 3 | 14 | ∞ | ||
Think of this as nj mp, but it sacrifices some forwards priority/reach for downwards priority/reach. Can be ok in some matchups.
- Neutral Jumping Fierce:
| Damage | 30[1] |  |
 |
 |
 |

|
| Stun | 3~9 | |||||
| Stun Timer | 40 | |||||
| Frame Count | 1 | 2 | 8 | 6 | ∞ | |
| Simplified | 3 | 8 | ∞ | |||
Decent priority, but it's not very useful since you have nj lp/mp which are more consistent.
- Diagonal Jumping Fierce:
| Damage | 28[1] / 24[1] |  |
 |
 |
 |

|
| Stun | 3~9 | |||||
| Stun Timer | 40 | |||||
| Frame Count | 1 | 4 | 6 | 4 | ∞ | |
| Simplified | 5 | 10 | ∞ | |||
Old Fei has the much better version of this move. The first part has good air to air properties, the 2nd part really shines as the priority is much better, can beat a lot of anti airs that N.Fei's wouldn't. Also great for beating moves like sumo headbutt, and psycho crusher when jumping back.
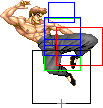
- Neutral Jumping Short:
| Damage | 14[1] |  |
 |
 |

|
| Stun | 1~7(-2) | ||||
| Stun Timer | 40 | ||||
| Frame Count | 3 | 20 | 4 | ∞ | |
| Simplified | 3 | 20 | ∞ | ||
Decent priority both vertically and horizontally, mainly used to help when neutral jumping fireballs.
- Diagonal Jumping Short:
| Damage | 14[1] |  |
 |
 |

|
| Stun | 1~7(-2) | ||||
| Stun Timer | 40 | ||||
| Frame Count | 3 | 20 | 4 | ∞ | |
| Simplified | 3 | 20 | ∞ | ||
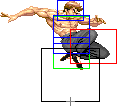
Another instance where old Fei's better air normals shine, this move has deceptively good downwards priority, Dictator for example, can't seem to do much of anything against this if you use it early when near to him.
- Neutral Jumping Forward:
| Damage | 24[1] |  |
 |
 |
 |

|
| Stun | 5~11 | |||||
| Stun Timer | 50(+10) | |||||
| Frame Count | 1 | 2 | 8 | 5 | ∞ | |
| Simplified | 3 | 8 | ∞ | |||
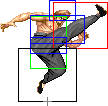
A pretty interesting high kick, appears difficult to utilize, Fei has better options.
- Diagonal Jumping Forward:
| Damage | 24[1] |  |
 |
 |

|
| Stun | 3~9 | ||||
| Stun Timer | 40 | ||||
| Frame Count | 3 | 10 | 5 | ∞ | |
| Simplified | 3 | 10 | ∞ | ||
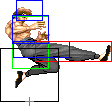
Not a crossup as old Fei, but has better forwards priority, but has less downwards reach. Overall, N.Fei's is much better.
- Neutral Jumping Roundhouse:
| Damage | 30[1] |  |
 |
 |
 |

|
| Stun | 3~9 | |||||
| Stun Timer | 40 | |||||
| Frame Count | 2 | 3 | 8 | 6 | ∞ | |
| Simplified | 5 | 8 | ∞ | |||
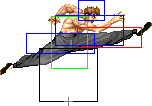
Acceptable reach, but otherwise nothing special.
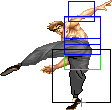
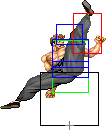
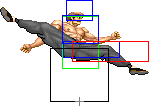
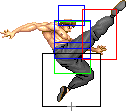
- Diagonal Jumping Roundhouse:
| Damage | 30[1] |  |
 |
 |
 |
 |
 |
 |

|
| Stun | 3~9 | ||||||||
| Stun Timer | 40 | ||||||||
| Frame Count | 1 | 2 | 2 | 2 | 6 | 5 | 4 | ∞ | |
| Simplified | 5 | 13 | ∞ | ||||||
This move has 3 active parts, but will only hit once. Can work as a crossup vs fatter characters if spaced correctly.
Command Normals
- Chokka Raku Shou a.k.a. Hop Kick: (On ground, ←/↖/↗/→ + Forward)
| Damage | 24[1] |  |
 |
 |
 |
 |
 |
 |
 |
 |
 |

|
| Stun | 3~9 | |||||||||||
| Stun Timer | 40 | |||||||||||
| Frame Advantage | -2 | |||||||||||
| Frame Count | 2 | 4 | 2 | 2 | 3 | 8 | 5 | 9 | 1 | 4 | 1 | |
| Simplified | 1 + 21 | 5 | 15 | |||||||||
Doing it while holding forward (the direction) will not make O.FeiLong move while attacking like N.FeiLong. Also, it does not has overhead properties like N.FeiLong's version of the move.
- En Geki Shuu a.k.a. Double Kick: (On ground, →/↗ + Roundhouse)
| Damage | 20[0] + 20[1] |  |
 |
 |
 |
 |
 |
 |

|
| Stun | 2~8 + 10~16 | ||||||||
| Stun Timer | 90 + 80 | ||||||||
| Frame Advantage | +6 / +9(+8) | ||||||||
| Frame Count | 1 | 8 | 6 | 1 | 3 | 4 | 4 | 5 | |
| Simplified | 1 + 16 | 3 | 4 | 9 | |||||
Fei takes a quick step forward then performs a double kick, his twice. Gives good frame advantage, and you can link some normals after the 2nd hit, a lot of the startup is airborne, this seems to not have much benefit since it takes so long to come out. This move is ok to do as a meaty to start mixups vs characters that cannot reverse it.
During the only grounded startup frame, Fei moves 16px forward instantly. So it is totaly possible to kara cancel this move into, say, a Rekka Ken, for extra horizontal range (similar to how DeeJay can cancel his slide into a Sobat for example or how Guile can cancel his Sobats into FLash Kicks for extra horizontal range), although very hard to execute due to the 2nd startup frame having Fei on an airborne state (meaning it can't be kara-canceled anymore). The input for that would be ↓↘→+Rh,Fierce (with the Fierce button being pressed EXACTLY on the 2nd frame after the Roundhouse). You only have a 1f window for it to work though so in the end this is not really usable (unlike in DeeJay's and Guile's case, for them it's totally usable because the window is more forgiving).
Throws
FeiLong can throw using Strong, Fierce, Forward and Roundhouse. Unlike N.FeiLong, O.FeiLong does not has an aerial throw. The direction of the joystick determines the direction the enemy gets thrown at. All his ground throws have the same range and do 32 points of damage (plus two more if behind in rounds). Even though he has the worst normal throw range in the game he still has a good tick throwing game.
- Throws Throwboxes:
| Damage | 32 |  |
 |

| |
| Stun | 7~13 | ||||
| Stun Timer | 100 | ||||
| Range | (from axis) | 40 | |||
| (from throwable box) | 11 | ||||
- Gankai Hou: (←/↖/↗/→ + Strong/Fierce)
Has less mixup potential compared to kick throw if they tech, but getting a whiffed stmp/hp is usually better than the overhead, or step kick/st hk. So in the case they can jump out, this might be useful.
- Shuu Kubi Kari: (←/↖/↗/→ + Forward/Roundhouse)
Usually favoured over punch throw since this lets you do better mixups in most cases, such as crossup close mk after walking underneath.
Special Moves
- Rekka Ken: (↓↘→ P)
Detailed Input: (↓ [7~14f] ↘ [7~14f] → [10/9/7f] Jab/Strong/Fierce)
- First Punch:
- Second Punch:
- Last Punch:
Fei Long attacks the enemy with a cancelable punch while moving forward, attacking up to three times. The first punch is a jab that has good reach, the second one is a hook to the body and the last one is a backfist, followed by a relatively long recovery. Each punch has a unique animation and demands the input. Thus, to get all three punches, you need to input ↓↘→ + P for the jab, then ↓↘→ + P again for the body punch and, finally, ↓↘→ + P for the backfist. It's a known behavior of O.Fei's Rekkas that the last punch does not always have the same recovery timings: sometimes it can have less recovery, that's probably related to the distance it was performed, similar to Boxer's Rushes.
- Shien Kyaku a.k.a. Flame Kick: (←↓↙ K)
Detailed Input: (← [7~14f] ↓ [7~14f] ↙ [10/9/7f] Short/Forward/Roundhouse)
- Startup + Invincible active part:
| Short | Forward | Rh |  |
 |
 |

| |
| Damage | 38[2] / 22[2] | 30[2] + 18[2] | |||||
| Stun | 9~15 | 2~8 + 2~8 | |||||
| Stun Timer | 100 | 90 + 90 | |||||
| Frame Advantage | -17 | -26 / -24(-25) | -36 / -34(-35) | ||||
| Frame Count | 2 | 2 | 2 | 2 | |||
| Simplified | 6 | 2 | |||||
- Non-invincible active part:
- Short Version:
 |
 |
 |
 |
 |
 |
 |

| |
| Frame Count | 2 | 2 | 2 | 2 | 2 | 2 | 2 | 4 |
| Simplified | 18 | |||||||
- Forward Version:
 |
 |
 |
 |
 |
 |
 |

| |
| Frame Count | 2 | 2 | 2 | 2 | 2 | 2 | 2 | 2 |
| Simplified | 16... (22) | |||||||
 |

| ||||
| Frame Count | 2 | 4 | |||
| Simplified | ...6 (22) | ||||
- Roundhouse Version:
 |
 |
 |
 |
 |
 |
 |

| |
| Frame Count | 2 | 2 | 2 | 2 | 2 | 2 | 2 | 2 |
| Simplified | 16... (27) | |||||||
 |
 |
 |
 |

| |
| Frame Count | 2 | 2 | 2 | 1 | 4 |
| Simplified | ...11 (27) | ||||
- Recovery:
 |
 |
 |

| ||
| Frame Count (Short) | 4 | 4 + {5} | 2 | 4 | |
| Simplified (Short) | 19 | ||||
| Frame Count (Forward) | 12 + {5} | 2 | 5 | ||
| Simplified (Forward) | 24 | ||||
| Frame Count (Rh) | 4 | 12 + {5} | 2 | 6 | |
| Simplified (Rh) | 29 | ||||
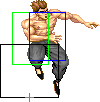
Fei Long becomes invulnerable for a split second, attacks with a low spinning roundhouse flaming kick, which turns into an ascending spinning kick (which is not anymore invincible). After that, Fei falls helpless as he recover from the move.
Misc Animations
Jump Animations
- Neutral Jump:
 |
 |
 |
 |
 |
 |
 |
 |
 |
 |

| |
| Frame Count | 2 | 1 | 8 | 7 | 5 | 8 | 5 | 7 | 4 | 1 | 7* |
| Simplified | 2 | 1 | 44 | 1 | 7* | ||||||
- Back Jump:
 |
 |
 |
 |
 |
 |
 |
 |
 |
 |

| |
| Frame Count | 2 | 1 | 8 | 5 | 5 | 5 | 5 | 5 | 12 | 1 | 7* |
| Simplified | 2 | 1 | 45 | 1 | 7* | ||||||
- Forward Jump:
 |
 |
 |
 |
 |
 |
 |
 |
 |
 |

| |
| Frame Count | 2 | 1 | 8 | 5 | 5 | 5 | 5 | 5 | 8 | 1 | 7* |
| Simplified | 2 | 1 | 41 | 1 | 7* | ||||||
FeiLong has a considerably fast prejump. Note that O.FeiLong has bigger head hurtboxes on his jumping animation as well (in comparison to N.FeiLong), but on this case it doesn't has much effect.
The landing recovery has a special property which allows it to be canceled into certain actions. At the first landing frame, you can perform throws (including command throws), and on the second landing frame, you can start another jump, attack with a normal or special move, or block. Blocking not being until the second landing frame, as well as hitbox-hurtbox interactions having priority over throwbox-throw hurtbox is why sweeps work as anti airs in this game.
Things are different when jumping over your opponent, however. In that situation it's possible to walk back/forward, to jump again or to even block on the first landing frame! Strangely, if a throw is timed on the first landing frame of a jump that crosses over, a throwbox will never come out, even though that input will result in a normal coming out 2 frames later (like it normally would). Anyway, being able to block on the first landing frame can help a little bit on some safe jump crossup setups, or maybe in other situations as well if your character has a huge jump arc.
The Basics
At a glance, old Fei may seem like a waste of time due to lack of chicken wing, and a reliable crossup. However he does have some interesting tools that make him quite different from N.Fei. All of your normals except cr hp, and heavy kicks will cancel, and combo into both rekka and flame kick. In addition to this, his rekkas leave him at better advantage on block, this helps his ground game somewhat.
The general aim with old Fei is to get a knockdown, or any way to force the opponent to block something that leads into his many high damage mixups. In neutral rekka is incredibly good as it's very safe on block if space right (jab rekka is good for ending block strings since it recovers the fastest), he can also use some of his better normals like cr hp, cr mp, and far hp to pressure.
After a knockdown, you have a very good mixup game against most of the cast, you can use the same meaty setups as N.Fei with close mp, and close/crouch hp to go for high damage rekka combos, or use close mp to set up a massive mixup, you are able to do a safejump before this if you wish. Once you land the close mp, you can link it into cr mk > rekka if you expect them to try reversal or throw mash, even if they block this is safe on most characters. The big frame advantage also lets you tick, so you can throw them once they are conditioned to block, use kick throw, and you can go for a 50/50 if they tech, use walk under close mk> close mp> cr mp/mk > rekka for a dizzy (usually), or stay in front and do something else into rekka. Delayed lk flame kick is good if you want to beat any of their attacks, the longer startup of flame kick lets you beat a lot of would be good reversals like n.shoto srks, flash kick etc.


