Introduction
| Unarmed | Weapon |
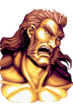
Story:
Normally a big kind-hearted guy becomes blindlly violent when drunk.
After kicked out of the mountain temple which he entered for training, he has secluded himself in the mountains to continue training.
Strategy
Unzen is a mix of a Grappler and a Rushdown, this is thanks to both is great Command Grabs, his multiple moves to dodge Projectiles, his safe Chains and the absurd damage he can generate on a simple opening. His Normals are also a mixed bag: Some are amazing, others are utter trash. They mostly are for poking or Tick Throws, which are very important for Unzen. The Chain Combos are the main strength of Unzen: Not only they open his ToD combo, but they also allow for safe pressure that he can use to mix with the Command Grabs.
However... If Unzen gets pressured his options to break free are limited, his Lariat has some invulnerability and he can grab you out of badly executed chains, but that's about all he has. Being so big also means that he is very vulnerable to crossups and varied Okizeme plays, meaning that a mistake can cost you a lot.
Overall, Unzen is a very volatile character that can crush the opponent if he is able to get in, or he himself gets crushes if he can't handle the opponent.
Weapon info
Unzen's Weapon is a steel hammer, while equipped his Chains and Specials change quite a bit: His Lariat can no longer be crouched but it loses some priority as an Anti-air, he gains a new move on 623P which is a long range thrust that knocks the opponent down, his 63214P changes to be a fixed distance.
The most important change is with his 6A overhead, it becomes the longest range command overhead of the game, and he has follow-ups it that make it all the more threatening. His Normals change to be more oriented to poking and being annoying compared to his Unarmed ones, but they are still alright.
This state is useful for neutral thanks to his insanely long overhead, but besides that it doesn't holds much use outside of specific Chains and matchups.
| Pros | Cons |
|
|
Move list
Normals
Standing
Far
Unarmed

| Damage | Meter | Stun | Guard | Cancel | Startup | Active | Recovery | On Hit | On Block |
|---|---|---|---|---|---|---|---|---|---|
| 10 | 7 | - | - | - | - | - | - | - | - |
|
- | |||||||||
Armed

| Damage | Meter | Stun | Guard | Cancel | Startup | Active | Recovery | On Hit | On Block |
|---|---|---|---|---|---|---|---|---|---|
| 13 | 9 | - | - | - | - | - | - | - | - |
|
- | |||||||||
Unarmed

| Damage | Meter | Stun | Guard | Cancel | Startup | Active | Recovery | On Hit | On Block |
|---|---|---|---|---|---|---|---|---|---|
| 22 | 10 | - | - | - | - | - | - | - | - |
|
- | |||||||||
Armed

| Damage | Meter | Stun | Guard | Cancel | Startup | Active | Recovery | On Hit | On Block |
|---|---|---|---|---|---|---|---|---|---|
| 31 | 12 | - | - | - | - | - | - | - | - |
|
- | |||||||||

| Damage | Meter | Stun | Guard | Cancel | Startup | Active | Recovery | On Hit | On Block |
|---|---|---|---|---|---|---|---|---|---|
| 15 | 7 | - | - | - | - | - | - | - | - |
|
- | |||||||||

| Damage | Meter | Stun | Guard | Cancel | Startup | Active | Recovery | On Hit | On Block |
|---|---|---|---|---|---|---|---|---|---|
| 25 | 10 | - | - | - | - | - | - | - | - |
|
- | |||||||||
Close
Unarmed
| Damage | Meter | Stun | Guard | Cancel | Startup | Active | Recovery | On Hit | On Block |
|---|---|---|---|---|---|---|---|---|---|
| 10 | 7 | - | - | - | - | - | - | - | - |
|
- | |||||||||
Armed
| Damage | Meter | Stun | Guard | Cancel | Startup | Active | Recovery | On Hit | On Block |
|---|---|---|---|---|---|---|---|---|---|
| 13 | 9 | - | - | - | - | - | - | - | - |
|
- | |||||||||
Unarmed

| Damage | Meter | Stun | Guard | Cancel | Startup | Active | Recovery | On Hit | On Block |
|---|---|---|---|---|---|---|---|---|---|
| 22 | 12 | - | - | - | - | - | - | - | - |
|
- | |||||||||
Armed

| Damage | Meter | Stun | Guard | Cancel | Startup | Active | Recovery | On Hit | On Block |
|---|---|---|---|---|---|---|---|---|---|
| 31 | 12 | - | - | - | - | - | - | - | - |
|
- | |||||||||
| Damage | Meter | Stun | Guard | Cancel | Startup | Active | Recovery | On Hit | On Block |
|---|---|---|---|---|---|---|---|---|---|
| 15 | 7 | - | - | - | - | - | - | - | - |
|
- | |||||||||
| Damage | Meter | Stun | Guard | Cancel | Startup | Active | Recovery | On Hit | On Block |
|---|---|---|---|---|---|---|---|---|---|
| 25 | 12 | - | - | - | - | - | - | - | - |
|
- | |||||||||
Crouching
Unarmed

| Damage | Meter | Stun | Guard | Cancel | Startup | Active | Recovery | On Hit | On Block |
|---|---|---|---|---|---|---|---|---|---|
| 7 | 7 | - | - | - | - | - | - | - | - |
|
- | |||||||||
Armed

| Damage | Meter | Stun | Guard | Cancel | Startup | Active | Recovery | On Hit | On Block |
|---|---|---|---|---|---|---|---|---|---|
| 13 | 9 | - | - | - | - | - | - | - | - |
|
- | |||||||||
Unarmed


| Damage | Meter | Stun | Guard | Cancel | Startup | Active | Recovery | On Hit | On Block |
|---|---|---|---|---|---|---|---|---|---|
| 22 | 10 | - | - | - | - | - | - | - | - |
|
- | |||||||||
Armed

| Damage | Meter | Stun | Guard | Cancel | Startup | Active | Recovery | On Hit | On Block |
|---|---|---|---|---|---|---|---|---|---|
| 31 | 12 | - | - | - | - | - | - | - | - |
|
- | |||||||||

| Damage | Meter | Stun | Guard | Cancel | Startup | Active | Recovery | On Hit | On Block |
|---|---|---|---|---|---|---|---|---|---|
| 15 | 9 | - | - | - | - | - | - | - | - |
|
- | |||||||||

| Damage | Meter | Stun | Guard | Cancel | Startup | Active | Recovery | On Hit | On Block |
|---|---|---|---|---|---|---|---|---|---|
| 25 | 10 | - | - | - | - | - | - | - | - |
|
- | |||||||||
Jumping
Unarmed

| Damage | Meter | Stun | Guard | Cancel | Startup | Active | Recovery | On Hit | On Block |
|---|---|---|---|---|---|---|---|---|---|
| 15 | 9 | - | - | - | - | - | - | - | - |
|
- | |||||||||
Armed

| Damage | Meter | Stun | Guard | Cancel | Startup | Active | Recovery | On Hit | On Block |
|---|---|---|---|---|---|---|---|---|---|
| 13 | 9 | - | - | - | - | - | - | - | - |
|
- | |||||||||
Unarmed

| Version | Damage | Meter | Stun | Guard | Cancel | Startup | Active | Recovery | On Hit | On Block |
|---|---|---|---|---|---|---|---|---|---|---|
| Neutral | 22 | 12 | - | - | - | - | - | - | - | - |
|
- | ||||||||||
| Diagonal | 22 | 12 | - | - | - | - | - | - | - | - |
|
- | ||||||||||
Armed

| Version | Damage | Meter | Stun | Guard | Cancel | Startup | Active | Recovery | On Hit | On Block |
|---|---|---|---|---|---|---|---|---|---|---|
| Neutral | 33 | 13 | - | - | - | - | - | - | - | - |
|
- | ||||||||||
| Diagonal | 33 | 13 | - | - | - | - | - | - | - | - |
|
- | ||||||||||
| Damage | Meter | Stun | Guard | Cancel | Startup | Active | Recovery | On Hit | On Block |
|---|---|---|---|---|---|---|---|---|---|
| 12 | 9 | - | - | - | - | - | - | - | - |
|
- | |||||||||
| Damage | Meter | Stun | Guard | Cancel | Startup | Active | Recovery | On Hit | On Block |
|---|---|---|---|---|---|---|---|---|---|
| 24 | 12 | - | - | - | - | - | - | - | - |
|
- | |||||||||
Command Normals
Unarmed

| Damage | Meter | Stun | Guard | Cancel | Startup | Active | Recovery | On Hit | On Block |
|---|---|---|---|---|---|---|---|---|---|
| 18 | 10 | - | high | - | - | - | - | - | - |
|
When this move hits a crouching opponent, it staggers them allowing for a follow-up | |||||||||
Armed

| Damage | Meter | Stun | Guard | Cancel | Startup | Active | Recovery | On Hit | On Block |
|---|---|---|---|---|---|---|---|---|---|
| 21 | 10 | - | high | - | - | - | - | - | - |
|
When this move hits a crouching opponent, it staggers them allowing for a follow-up. | |||||||||
Universal Mechanics

| Damage | Meter | Stun | Guard | Cancel | Startup | Active | Recovery | On Hit | On Block |
|---|---|---|---|---|---|---|---|---|---|
| - | - | - | - | - | - | - | - | - | - |
|
- | |||||||||

| Damage | Meter | Stun | Guard | Cancel | Startup | Active | Recovery | On Hit | On Block |
|---|---|---|---|---|---|---|---|---|---|
| - | - | - | - | - | - | - | - | - | - |
|
- | |||||||||
Close


| Damage | Meter | Stun | Guard | Cancel | Startup | Active | Recovery | On Hit | On Block |
|---|---|---|---|---|---|---|---|---|---|
| 34 | 12 | - | - | - | 1 | - | - | - | - |
|
Unarmed, Unzen grabs the opponent and slams them. Armed, He uses his Hammer to do a home run swing on the opponent. This is really outclassed by his command grabs. | |||||||||
close

| Damage | Meter | Stun | Guard | Cancel | Startup | Active | Recovery | On Hit | On Block |
|---|---|---|---|---|---|---|---|---|---|
| 40 | 14 | - | - | - | 1 | - | - | - | - |
|
Only works on crouching opponents. Launches on a juggling state, but Unzen has almost no options to do with it. However, it is really useful to do Okizeme 1214 plays. Use it to surprise turtlings. | |||||||||
Special Moves

| Damage | Meter | Stun | Guard | Cancel | Startup | Active | Recovery | On Hit | On Block |
|---|---|---|---|---|---|---|---|---|---|
| 50 | 12 | - | - | - | - | - | - | - | - |
|
Command Grab with nice range. Unzen grab the opponent and slams them on the ground for excellent damage. (half bar to be exact) Your main grab and the one you really want to learn how to tick properly because it hurts, a lot (More about this on the strategy section) If you have meter, you can do Power Move after it to erase full and a third of the opponent's health from a simple tick. Even tho the input is 1214+P, the game will accept 214214P too. Heavier versions make Unzen jump higher and further, increasing the damage a bit. | |||||||||


| Damage | Meter | Stun | Guard | Cancel | Startup | Active | Recovery | On Hit | On Block |
|---|---|---|---|---|---|---|---|---|---|
| 31 | 15 | - | - | no | - | - | - | - | - |
|
Unzen does a stance and waits for hits. Reversal move that only counters mids, but it stuns the opponent if it hits, allowing you to do 1214P. This move will make your opponent to think twice about how he must attack you as it can also catch specials and even some power moves. | |||||||||

| Damage | Meter | Stun | Guard | Cancel | Startup | Active | Recovery | On Hit | On Block |
|---|---|---|---|---|---|---|---|---|---|
| 25 | 12 | - | - | - | - | - | - | - | - |
|
After the Command grabs, Unzen's most important move, this lariat has some upper body invulnerability and ignores projectiles during the whole duration of it, making it a great anti-air option if done later on the opponent's jump or earlier if predicting a crossup, as this will hit them from the back, also helps Unzen to deal with projectiles, but this doesn't avoids low hitting projectiles like Goemon, Houoh or Raiga's ones. The first hit can reach crouchers, but after it the move can be crouched. | |||||||||


| Version | Damage | Meter | Stun | Guard | Cancel | Startup | Active | Recovery | On Hit | On Block |
|---|---|---|---|---|---|---|---|---|---|---|
| Light | 30 | 12 | - | mid | - | - | - | - | - | - |
| Heavy | 30 | 12 | - | mid | - | - | - | - | - | - |
| EX | 30 | 12 | - | mid | - | - | - | - | - | - |
|
Unzen jumps and slams the ground creating a fire that damages the opponent. This move is pretty useful to close the distance between you and the opponent, but use it sparingly since it is unsafe on block. Since the fire hits low, you can whiff this normal close to your opponent to score damage. Unarmed heavier versions make Unzen jump further and create a bigger flame that lasts longer, but with the weapon, all versions make Unzen jump the same distance but with the corresponding flame duration. | ||||||||||


| Version | Damage | Meter | Stun | Guard | Cancel | Startup | Active | Recovery | On Hit | On Block |
|---|---|---|---|---|---|---|---|---|---|---|
| Light | 15 * 3 | 12 * 3 | - | - | - | - | - | - | - | - |
| Heavy | 15 * 3 | 12 * 3 | - | - | - | - | - | - | - | - |
| EX | 15 * 3 | 12 * 3 | - | - | - | - | - | - | - | - |
|
Unzen hits the opponent for each consecutive " qcf + K " . Good damage and knockdown, easy to combo into. Heavier versions travel further. | ||||||||||
Armed

| 22 -13 | 4 * 2 | - | - | - | - | - | - | - | - |
|
Unzen does a long range hit with his hammer. Hits 2 times, the 2nd hit causes a knockdown. Good move to use on neutral but as Unzen lacks of special cancelable moves or chains that can be ended on a special this move is hard to combo into. All versions are the same. | |||||||||

| 40 | 15 | - | - | - | - | - | - | - | - |
|
Command throw with good range. Unzen grabs the opponent and slams him into the ground. Good move to tick into and leaves the opponent on a perfect position for Power Move. All versions are the same. | |||||||||
Spirit Gauge
Power Move
ch.


| Version | Damage | Meter | Stun | Guard | Cancel | Startup | Active | Recovery | On Hit | On Block |
|---|---|---|---|---|---|---|---|---|---|---|
| - | 54 | - | - | - | - | - | - | - | - | - |
|
Unzen charges meter, once is full he runs towards the opponent and grabs them. If you are hit during the charge you keep it, so you can sacrifice some health for meter. The strongest point with this move is that, if you do this while the opponent is knocked down and you reach him, he can do nothing to avoid this move, he can't jump or mash anything to get away. This move turns Unzen's knockdowns into a real threat for the opponent. This move also has a weird store trick (or glitch, not sure) If you hold AC after executing the move, Unzen will still get the gauge depleted, but you can move freely and use normals, specials and even draw/save your weapon, but when you release AC, Unzen will proceed to run and attempt to grab the opponent. This "store" remains even if Unzen gets hit or knocked down. | ||||||||||
Combo Super
Chain Combo Ender

| Damage | Meter | Stun | Guard | Cancel | Startup | Active | Recovery | On Hit | On Block |
|---|---|---|---|---|---|---|---|---|---|
| 67 | - | - | mid | - | - | - | - | - | - |
|
Unzen uses burning fire sumo slaps on the opponent. Fire knockdown. If done during Armed stance it changes to Unarmed stance. | |||||||||
Desperation Move

| Damage | Meter | Stun | Guard | Cancel | Startup | Active | Recovery | On Hit | On Block |
|---|---|---|---|---|---|---|---|---|---|
| 80 | - | - | - | - | - | - | - | - | - |
|
Command grab super, Less range than his regular command grabs but double the damage. If whiffs, Unzen does a single headbutt that knocks down with 18 damage on hit and is unsafe on block. | |||||||||
Finisher
Uarmed

| Damage | Meter | Stun | Guard | Cancel | Startup | Active | Recovery | On Hit | On Block |
|---|---|---|---|---|---|---|---|---|---|
| 96 | - | - | mid | - | - | - | - | - | - |
|
Unzen executes a hit grab with short range, but a superb damage. Can be comboed into after a stagger. | |||||||||
Srategy
As a grappler, Unzen's main objective is to land his command grabs for big damage, so a main step is learn how to land said grabs on a safe way. Here I will detail ways to accomplish this:
Tick throw:
By connecting a light normal po forcing the opponent to block it, gives you the chance to land a command grab as soon as they recover from the hit stun or block stun respectively, for this your best friends are:
cl.C: A quick low-hitting standing normal which doesn't has much hit stun so is perfect for tick throwing or starting a chain combo.
j.C: Good jump normal that seems to have a slightly lower hitbox than it may look, this makes it good for both tick throwing and opening a chance to start your combo, but be careful because it easily can lose on air to air engages.
st.A: Lightning quick jab with good range, good for both poking and tick throwing
w st.A: Same as st.A but hitting a bit harder and a bit longer too
Forward Dash: Unzen's command grabs have more range than what you would expect, dash forward into command grab is a quite efficient way to punish a move or as a surprise move.
(I will add more to this section with Matchup information and more specific plays)
Combos
Weapon Combos
Weapon Chain Attacks
--------------------
Punch Starters
``````````````
LP far     ---> LP        -----> HP         ----> HP       -----> HP (E)
LP close        HP               f + LP           f + HP (SE, U)
                LK               HK               d + HP (E)
                                 f + HP (T, E)    d + HK (_, E)
                                 LP (E)


f + LP (O) ---> HP (*)    -----> HP         ----> HP       -----> HP (E)
                                 f + LP           f + HP (SE, U)
                                 HK               d + HP (E)
                                 f + HP (T, E)    d + HK (_, E)
                                 LP (E)


Kick Starters
`````````````
LK far (_) ---> LP        -----> HP         ----> HP       -----> HP (E)
LK close (_)    HP               f + LP           f + HP (SE, U)
                LK               HK               d + HP (E)
                                 f + HP (T, E)    d + HK (_, E)
                                 LP (E)
Unarmed Combos
Chain Attacks
-------------
Punch Starters
``````````````
LP far     ---> HP        -----> HP         ----> f + LP (O)----> HP (E)
LP close        LK               HK               f + HP (SE)
                                 f + HP (T, E)    d + HK (_, E)


HP far     ---> HP (*)    -----> HP         ----> f + LP (O)----> HP (E)
                f + HP (T, E)    HK               f + HP (SE)
                                 f + HP (T, E)    d + HK (_, E)


Kick Starters
`````````````
LK far (_) ---> HP        -----> HP         ----> f + LP (O)----> HP (E)
LK close (_)    LK               HK               f + HP (SE)
                                 f + HP (T, E)    d + HK (_, E)