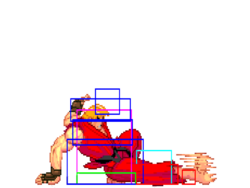
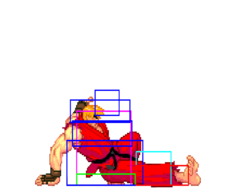
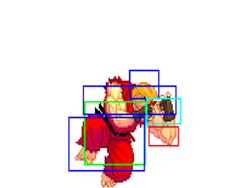
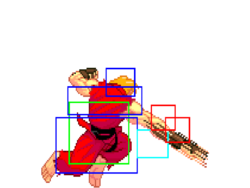
Street Fighter 3: 3rd Strike/Ken/2021: Difference between revisions

From SuperCombo Wiki
(→‎236236P (SA1): updated description)
 
(25 intermediate revisions by the same user not shown)
Line 51: Line 51:
* Self meter gain: Whiff: 0, Hit: 2, Block: 1.
* Opponent meter gain: Hit: 0, Block: 0.
* One of the best layered anti-air buttons in the game, due to recovery and special cancel frames. Jab jab jab.
* Layered anti-air. Jab jab jab.
* Tick throw option
{{3S Button FAT|link=https://fullmeter.com/fatonline/#/framedata/movedetail/3S/Ken/normal/Close%20LP}}
}}
}}
Line 78: Line 79:
* Self meter gain: Whiff: 0, Hit: 2, Block: 1.
* Opponent meter gain: Hit: 0, Block: 0.
* Great layered anti-air button for the same reasons as close LP, plus it self-cancels.
* Even better layered anti-air option due to self-cancel property.
{{3S Button FAT|link=https://fullmeter.com/fatonline/#/framedata/movedetail/3S/Ken/normal/Far%20LP}}
}}
}}
Line 106: Line 107:
* Opponent meter gain: Whiff: 0, Hit: 2, Block: 0.
* Tick throw option
* Tick throw option
* Theoretically hit-confirmable into super
* Theoretically hit-confirmable directly into super, but with only an 11f cancel window, it's very difficult.
* Cancels into target combo for an easy hit-confirm into super
* Also cancels into target combo for an easy hit-confirm into super
* Good mash option to beat throws on wakeup
* SGGK into target combo with parry -> cl.MP ~ LP+LK ~ HP
{{3S Button FAT|link=https://fullmeter.com/fatonline/#/framedata/movedetail/3S/Ken/normal/Close%20MP}}
}}
}}
Line 138: Line 140:
* Self meter gain: Whiff: 2, Hit: 11, Block: 6.
* Opponent meter gain: Whiff: 0, Hit: 2, Block: 0.
* The emperor punch
* The emperor punch. One of best moves in the game.
* One of best moves in the game
* Good hitbox, good frame data, links into SA3 for a hit-confirm
* Great hitbox, good frame data, links into SA3 for a hit-confirm
{{3S Button FAT|link=https://fullmeter.com/fatonline/#/framedata/movedetail/3S/Ken/normal/Far%20MP}}
}}
}}
Line 200: Line 201:
* Opponent meter gain: Whiff: 0, Hit: 4, Block: 0.
* Actual ridiculous hitbox with fierce priority
* Good anti-air coverage in some matchups
* Good anti-air coverage in some matchups, but dangerous if the opponent parries it, as it cannot be canceled
{{3S Button FAT|link=https://fullmeter.com/fatonline/#/framedata/movedetail/3S/Ken/normal/Far%20HP}}
}}
}}
Line 317: Line 318:
* Self meter gain: Whiff: 2, Hit: 11, Block: 5.
* Opponent meter gain: Whiff: 0, Hit: 2, Block: 0.
* Difficult to get optimal kara range
* Difficult to get optimal kara range. If you push back even 1f before MK, you will lose some range.
* Just fast enough that people still get hit with it sometimes
* Hit-confirmable into SA3 via 1f link
Line 442: Line 443:
* 1f faster than 2LK, with better frame advantage, and shorter overall recovery
* More vulnerable to parry than 2LK due to HL parry property
* Sometimes used as a mash
* Sometimes useful as a mash, interrupt, or dash-in button since it's 1f faster than low short and +3 on block.
* Sometimes used as a dash-in button
* Hit-confirmable into SA3 via light chain, usually 2LP > 2LK.
{{3S Button FAT|link=https://fullmeter.com/fatonline/#/framedata/movedetail/3S/Ken/normal/Crouch%20LP}}
Line 476: Line 476:
* Opponent meter gain: Whiff: 0, Hit: 2, Block: 0.
* Low emperor punch
* Low emperor punch
* One of the best general purpose pokes in the game, along with his standing MP
* One of the best general purpose pokes in the game
* Good hitbox and great frame data
* Great hitbox and frame data
* Hit-confirmable into SA3
* Cancels or links into SA3
{{3S Button FAT|link=https://fullmeter.com/fatonline/#/framedata/movedetail/3S/Ken/normal/Crouch%20MP}}
}}
}}
Line 513: Line 513:
* Opponent meter gain: Whiff: 0, Hit: 4, Block: 0.
* Anti-air option
* Anti-air option
* Whiff punish option
* The late hitbox cannot be canceled, so be wary when anti-airing
* 2HP xx super works as a whiff punish on a surprising number of buttons
* Is itself whiff punish bait, so be careful trying to clip people with this
{{3S Button FAT|link=https://fullmeter.com/fatonline/#/framedata/movedetail/3S/Ken/normal/Crouch%20HP}}
Line 577: Line 578:
* I promise you that this is a hit confirm, even though YOU might not be able to hit confirm it. It's difficult. Don't waste too much energy grinding this if you aren't already solid with your other hit-confirm options.
* Great neutral / whiff punish button
* His best kara throw option. Difficult because you have to return the lever to neutral in exactly one frame. On frame 1 you push 2MK, on frame 2 you push 5LP+LK.
* Used to kara shoryuken for W shoryu combos
* Can be vulnerable to jump-ins
{{3S Button FAT|link=https://fullmeter.com/fatonline/#/framedata/movedetail/3S/Ken/normal/Crouch%20MK}}
Line 605: Line 608:
* Opponent meter gain: Whiff: 0, Hit: 4, Block: 0.
* Good range, causes a knockdown
* Same kara range as 2MK, but much less safe if you mess up the kara throw input
* Can also be used for W shory combos due to having the exact same kara range as 2MK
* Easy whiff punish, very negative on block, vulnerable to jump-ins
{{3S Button FAT|link=https://fullmeter.com/fatonline/#/framedata/movedetail/3S/Ken/normal/Crouch%20HK}}
Line 950: Line 955:
* Extremely plus if you hit it as late as possible, up to +12 on hit
* Big damage hit confirms
* Useful "mixup" against anti-air parry since it can combo into SA3 from very high or very low hits
* Will occasionally hit crossup, try to be ready for a juicy combo
{{3S Button FAT|link=https://fullmeter.com/fatonline/#/framedata/movedetail/3S/Ken/normal/Jump%20HK}}
}}
}}
Line 985: Line 992:
* Confirms into DP meterless
* Confirms into SA3 with meter
* Not the best SGGK option due to zero (0) kara range, but it still option selects throw or parry into a hit confirm.
}}
}}
}}
}}
Line 1,132: Line 1,140:
|attackLevel=Mid
|attackLevel=Mid
|description=
|description=
*Increases damage for the next hit/combo by 31.3%. One taunt is the maximum.
* Self meter gain: Whiff: 4, Hit: 8, Block: 6.
* Opponent meter gain: Whiff: 0, Hit: 0, Block: 0.
* Increases damage for the next hit/combo by 31.3%. One taunt is the maximum.
* You lose the taunt bonus from any connected, parried or guarded action including throw.
* You retain the taunt bonus if you block attacks, you lose it if you get hit.
{{3S Button FAT|link=https://fullmeter.com/fatonline/#/framedata/movedetail/3S/Ken/normal/Taunt}}
}}
}}
Line 1,503: Line 1,513:
* Self meter gain: Whiff: -40, Hit: -40, Block: -40.
* Opponent meter gain: Whiff: 0, Hit: 0, Block: 0.
* Modified by Ken's jump vector
* Excellent corner escape
* Can create left/right mixups from a jump in
* In some situations (notably when it hits crossup midscreen) Ken get dash in W shoryu for big damage
* Easiest / most consistent option in case of crossup is just land 5MK
{{3S Button FAT|link=https://fullmeter.com/fatonline/#/framedata/movedetail/3S/Ken/normal/EX%20Air%20Tatsumaki%20Senpukyaku}}
}}
}}
Line 1,531: Line 1,546:
|description=
|description=
* Middle ground between the other two supers
* Two bars so you get some meter to play with
* Two bars -- more opportunity to use meter than SA2, but less than SA3
* Similarly limited hit confirms, but better whiff punishes due to forward movement, compared to SA2
* Limited hit confirms
* Better damage than SA3, but harder to hit in general
* Actually not too bad, just no reason to pick it when SA3 exists
{{3S Button FAT|link=https://fullmeter.com/fatonline/#/framedata/movedetail/3S/Ken/normal/Shoryureppa}}
}}
}}
Line 1,583: Line 1,597:
|stun=16
|stun=16
|description=
|description=
* One of the best supers in the game
* This is the one you want to pick
* Punishes tons of moves on block and even on hit
* Very fast with great range, one of the best whiff punish tools in the game

Latest revision as of 20:09, 7 June 2024

Introduction

After settling into married life for a couple of years, Ken entered the third Street Fighter tournament. He's a US Martial Artist who trains to keep up with his old friend / rival, Ryu.

As one of the most famous fighting game characters ever, and apparently the more popular of the original shotos, Ken needs little introduction. He is one of the best characters in the game, with very high meterless damage potential, one of the best anti-airs in the game with EX DP, and one of the best supers with SA3.

Super Arts

SAI (Shoryu-Reppa)

Has good close-range hit confirms, 2 stocks, good damage, and significant invulnerability frames. It is lacking in hit confirms from Ken's long range pokes and overheads.

SAII: (Shinryu-Ken)

A fairly good anti-air since you can mash it for lots of hits. Does the most damage out of his supers by a good amount. Has the same lack of hit confirms as SA1, but actually combos from a farther 2MK than SA1 does. Since it has a single, long bar, this super gives you the least opportunity to use EX moves.

SAIII: (Shippu-Jinrai-Kyaku)

The universal choice for good reason. 3 stocks means you have loopable okizeme in addition to plenty of EX meter for fireballs, uppercuts, and air tatsus. Has an absurd number of hit confirms -- it links or cancels from just about everything. Extremely fast startup and far range on the first hit lets Ken punish many moves that are usually considered safe, as well as making it one of the best whiff punish tools in the game. It is his lowest damage super, but it's still respectable for a 3 bar super with short meters, and the numerous positives outweigh this one small negative.

Pros & Cons

Strengths Weaknesses
  • Meterless damage: Target combo and W shoryu give Ken access some of the highest meterless damage in the game.
  • All-purpose normals: Ken's normals are great and have lots of utility: poking, anti-air, pressure, abare, etc.
  • Mobility: Ken has good walk speed and a great dash, plus EX air tatsu to escape corners.
  • SA3: One of the best supers in the game, having both a lot of meter for EX moves, and a lot of utility in combos and punishing.
  • Well-rounded: Ken doesn't have any glaring weaknesses, and has tools for any situation.
  • No gimmicks: While Ken delivers consistently high damage, he lacks the ability that many characters have to effectively one or two-touch the opponent. He thrives on consistent, strong fundamental play and good decisions.

Character Colors

(kcolor).gif
Ken
#3S_KE
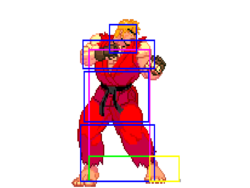
3S Ken Art.png
Vitals
Life Points 1200
Stun Points 64
Super Art Stock/Size
SA1 2/112
SA2 1/104
SA3 3/80
Ground Movement
Forward Dash duration/distance 12 (16)
(95px)
Back Dash duration/distance 15 (54px)
Jumping
Back Jump duration 42(4+36+2)
Neutral Jump duration 40(4+34+2)
Forward Jump duration 41(4+35+2)
Back Super Jump duration 47(6+39+2)
Neutral Super Jump duration 46(6+38+2)
Forward Super Jump duration 46(6+38+2)
Wake up
Wake up duration 75
Quick rise duration 48

Frame Data

3S Frame Data Glossary
Active

How many frames a move remains active (can hurt opponents) for. Consecutive sets of active frames on a multi-hit move are separated by an asterisk (ex: 3*5). If there is a gap between sets of active frames, the gap is denoted by a number in parentheses (ex: 2(4)2)

Attack

Attack level is L for low attacks (must be blocked crouching), H is for High attacks (which can be blocked high or low) and M for overhead (must be blocked standing). T is for throw attacks (which cannot be blocked).

Cancel options

Available cancel options.

  • "ch": Chain cancel (into itself or another light attack), refer to description for options.
  • "self": Self-only chain cancel. Much more restrictive than a standard chain cancel.
  • "tc": Target combo, refer to description for options. Successive attacks in a target combo may warrant their own move entry.
  • "dash": Grounded dashes.
  • "sj": Super jump.
  • "sp": Special move.
  • "su": Super Art.
Damage

Attack damage on hit in life points. Notation may denote multi-hit or "sweet spot" damage values on certain frames.

Hit/Block

These are frame advantage values when the attack hits or is blocked. If the number is positive, then the move will end before the defender can act again. If the number is negative, the defender will be able to act before the attacker and maybe even punish. D refers to knockdown on hit.

"Cr. Hit" is an additional frame advantage value denoting if the advantage on hit changes when the defender is being hit while crouching.

Kara Range

Almost all normal attacks can be canceled into a special or a multi-button command within three frames of startup. During that time, some attacks will shift position forward or backward and affect the reach of the special or command accordingly. This is denoted in pixels of range. There are a handful of moves in the game that can be kara-canceled after this initial window and will be denoted as a late kara-cancel.

Link

A combo that is performed by inputting the second move after the first move has completely recovered (as opposed to cancelling the first move's animation). In 3S, the final frame of a move's hitstun allows a character to block a normal or special move, as well as some projectile supers. Therefore, an attack's frame advantage must be 2 frames greater than the followup move's startup in order to link. Ex: a +6 normal can link into a 4f normal/special, or a 5f super.

Parry

This field will show a value of A if the attack can be parried standing or crouching, H if it must be parried standing or L if it must be parried crouching.

Recovery

How many frames it takes for a move to finish after it's been active.

Startup

How many frames it takes before the move becomes 'active' or has a hitbox. 3S uses classic startup notation, which does not include the first active frame. A move with 3 startup becomes active on frame 4.

Stun

Amount of stun added to the opponent's stun bar on hit.

Throw range

Range in pixels from the center of the character to the center of the opponent which allows a grab to connect.

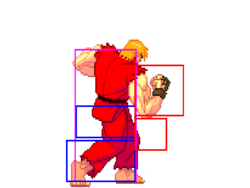
Standing Normals

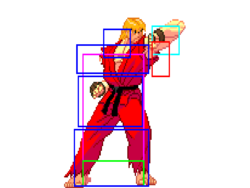
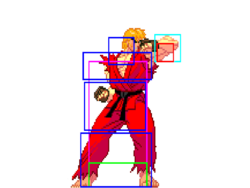
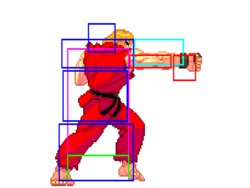
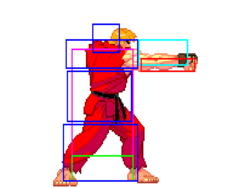
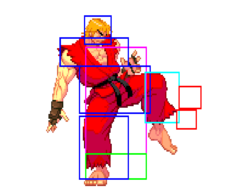
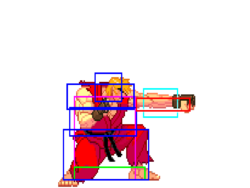
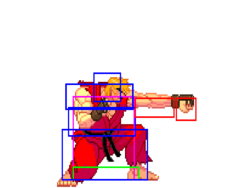
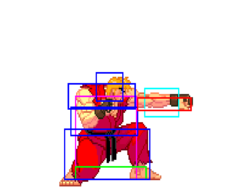
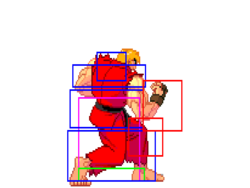
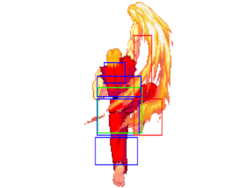
5LP (cl)
Close LP
Lp.png (cl)
3s ken cl.lp 1.png
Frame 4
3s ken cl.lp 2.png
Frames 5-6
Startup Active Recovery Hit Cr. Hit
3 3 5 +3 +3
Damage Stun Guard Parry Block
3 3 - A +3
  • Cancel options: sp su
  • Self meter gain: Whiff: 0, Hit: 2, Block: 1.
  • Opponent meter gain: Hit: 0, Block: 0.
  • Layered anti-air. Jab jab jab.
  • Tick throw option
FATonline.png
5LP (far)
Far LP
Lp.png (far)
3s ken st.lp.png
Startup Active Recovery Hit Cr. Hit
5 3 4 +4 +4
Damage Stun Guard Parry Block
2 3 - A +4
  • Cancel options: self sp su
  • Self meter gain: Whiff: 0, Hit: 2, Block: 1.
  • Opponent meter gain: Hit: 0, Block: 0.
  • Even better layered anti-air option due to self-cancel property.
FATonline.png
5MP (cl)
Close MP
Mp.png (cl)
3s ken cl.mp.png
Startup Active Recovery Hit Cr. Hit
4 4 10 +2 +3
Damage Stun Guard Parry Block
17 7 - H +1
  • Cancel options: tc sp su
  • Self meter gain: Whiff: 2, Hit: 11, Block: 6.
  • Opponent meter gain: Whiff: 0, Hit: 2, Block: 0.
  • Tick throw option
  • Theoretically hit-confirmable directly into super, but with only an 11f cancel window, it's very difficult.
  • Also cancels into target combo for an easy hit-confirm into super
  • Good mash option to beat throws on wakeup
  • SGGK into target combo with parry -> cl.MP ~ LP+LK ~ HP
FATonline.png
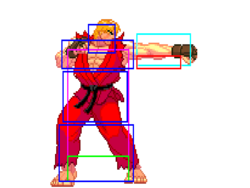
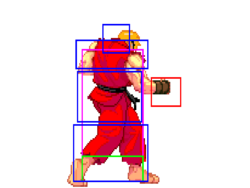
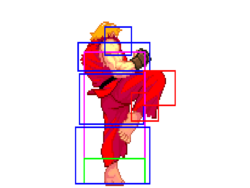
5MP (far)
Far MP
Mp.png (far)
3s ken st.mp 1.png
Frame 7
3s ken st.mp 2.png
Frames 8-9
Startup Active Recovery Hit Cr. Hit
6 3 10 +4 +5
Damage Stun Guard Parry Block
16 11 - H +3
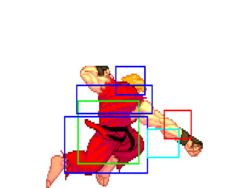
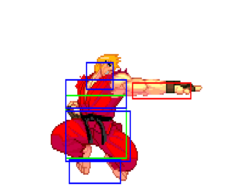
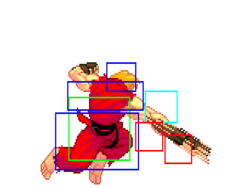
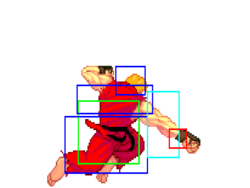
  • Self meter gain: Whiff: 2, Hit: 11, Block: 6.
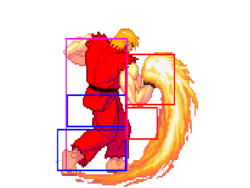
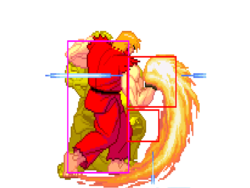
  • Opponent meter gain: Whiff: 0, Hit: 2, Block: 0.
  • The emperor punch. One of best moves in the game.
  • Good hitbox, good frame data, links into SA3 for a hit-confirm
FATonline.png
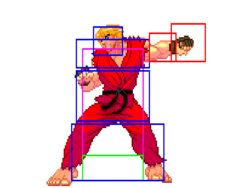
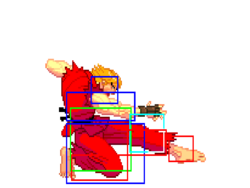
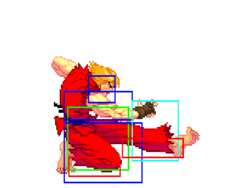
5HP (cl)
Close HP
Hp.png (cl)
3s ken cl.hp 1.png
Frame 7
3s ken cl.hp 2.png
Frames 8-9
Startup Active Recovery Hit Cr. Hit
6 3 15 0 +2
Damage Stun Guard Parry Block
23 15 - H -2
  • Cancel options: sp su
  • Self meter gain: Whiff: 3, Hit: 19, Block: 10.
  • Opponent meter gain: Whiff: 0, Hit: 4, Block: 0.
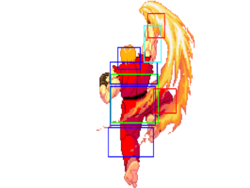
  • Anti-air option
  • Cancelable into specials in case of parry
  • A common option select is to late cancel this into HP DP on parry
FATonline.png
5HP (far)
Far HP
Hp.png (far)
3s ken st.hp.png
Startup Active Recovery Hit Cr. Hit
9 3 15 +2 +4
Damage Stun Guard Parry Block
23 13 - H 0
  • Self meter gain: Whiff: 3, Hit: 19, Block: 10.
  • Opponent meter gain: Whiff: 0, Hit: 4, Block: 0.
  • Actual ridiculous hitbox with fierce priority
  • Good anti-air coverage in some matchups, but dangerous if the opponent parries it, as it cannot be canceled
FATonline.png
5LK
Stand LK
Lk.png
3s ken st.lk.png
Startup Active Recovery Hit Cr. Hit
4 4 7 +2 +2
Damage Stun Guard Parry Block
7 3 - A +2
  • Self meter gain: Whiff: 0, Hit: 2, Block: 1.
  • Opponent meter gain: Hit: 0, Block: 0.
FATonline.png
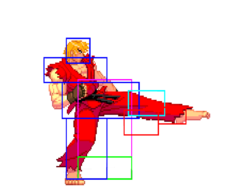
5MK
Stand MK
Mk.png
3s ken st.mk.png
Startup Active Recovery Hit Cr. Hit
8 7 16 -2 0
Damage Stun Guard Parry Block
19 15 - H -6
  • Self meter gain: Whiff: 2, Hit: 11, Block: 6.
  • Opponent meter gain: Whiff: 0, Hit: 2, Block: 0.
  • 6 kara range
  • Easiest kara button to use despite low kara range
  • Good anti-air / anti jump-out button, but watch out for parry
  • Common buffer parry bait -- tap down or toward on block
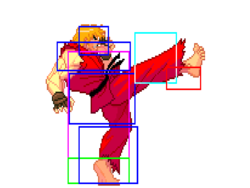
FATonline.png
5HK
Stand HK
Hk.png
3s ken st.hk.png
Startup Active Recovery Hit Cr. Hit
11 6 19 -2 0
Damage Stun Guard Parry Block
26 11 - H -4
  • Self meter gain: Whiff: 3, Hit: 19, Block: 10.
  • Opponent meter gain: Whiff: 0, Hit: 4, Block: 0.
  • 6 kara range
  • Good long range poke with heavy button priority
  • Vulnerable to jump-ins
FATonline.png


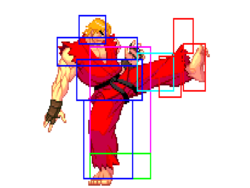
Command Normals

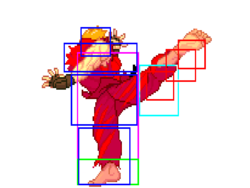
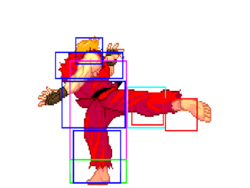
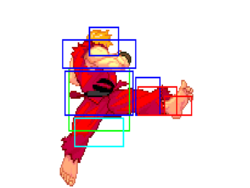
4MK
Inazuma Kakato Wari (Short)
B.png+Mk.png
3s ken b+mk 1.png
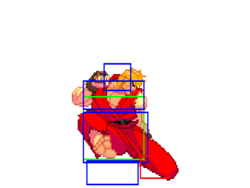
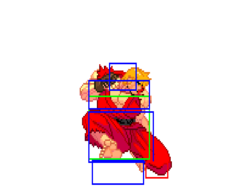
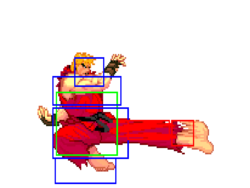
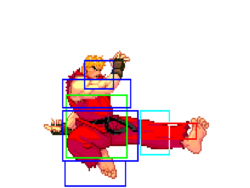
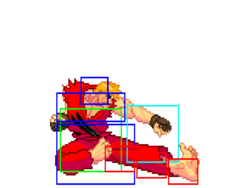
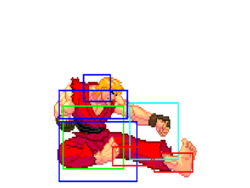
Frame 20
3s ken b+mk 2.png
Frame 21
Startup Active Recovery Hit Cr. Hit
18 4 10 +2 +3
Damage Stun Guard Parry Block
21 13 - H +1
  • 10 kara range
  • Self meter gain: Whiff: 2, Hit: 11, Block: 5.
  • Opponent meter gain: Whiff: 0, Hit: 2, Block: 0.
  • Difficult to get optimal kara range. If you push back even 1f before MK, you will lose some range.
  • Just fast enough that people still get hit with it sometimes
  • Hit-confirmable into SA3 via 1f link
FATonline.png
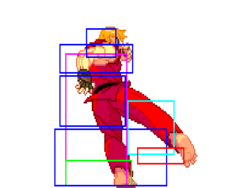
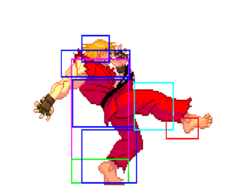
5MK (Hold)
Inazuma Kakato Wari (Long)
Mk.png (Hold)
3s ken st.mk.png
Frames 9-12
3s ken b+mk 1.png
Frames 38-39
3s ken b+mk 2.png
Frames 40-41
Startup Active Recovery Hit Cr. Hit
8>25 8 10 +2 +3
Damage Stun Guard Parry Block
29 22 - H -1
  • 6 kara range
  • Self meter gain: Whiff: 4, Hit: 21, Block: 10.
  • Opponent meter gain: Whiff: 0, Hit: 4, Block: 0.
FATonline.png
6MK
Fumikomi Maegeri
F.png+Mk.png
3s ken f+mk.png
Startup Active Recovery Hit Cr. Hit
16 4 15 -1 0
Damage Stun Guard Parry Block
14 7 - H -4
  • Self meter gain: Whiff: 3, Hit: 19, Block: 10.
  • Opponent meter gain: Whiff: 0, Hit: 4, Block: 0.
FATonline.png
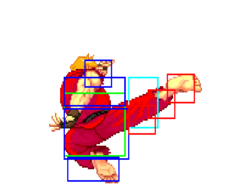
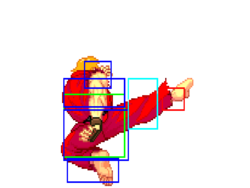
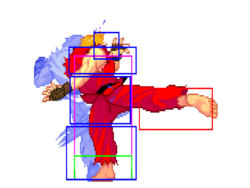
6HK
Shiden Kakato Otoshi
F.png+Hk.png
3s ken f+hk 1.png
Frames 31-33
3s ken f+hk 2.png
Frames 34-35
Startup Active Recovery Hit Cr. Hit
30 5 18 +1 +3
Damage Stun Guard Parry Block
21 11 - H -1
  • Self meter gain: Whiff: 3, Hit: 19, Block: 10.
  • Opponent meter gain: Whiff: 0, Hit: 4, Block: 0.
  • Very slow overhead, not really used on purpose
  • If it does hit for some reason, you can link into SA3
FATonline.png


Crouching Normals

2LP
Crouch LP
D.png+Lp.png
3s ken cr.lp.png
Startup Active Recovery Hit Cr. Hit
4 3 5 +3 +3
Damage Stun Guard Parry Block
3 3 - A +3
  • Self meter gain: Whiff: 0, Hit: 2, Block: 1.
  • Opponent meter gain: Hit: 0, Block: 0.
  • Cancel options: self sp su
  • 1f faster than 2LK, with better frame advantage, and shorter overall recovery
  • More vulnerable to parry than 2LK due to HL parry property
  • Sometimes useful as a mash, interrupt, or dash-in button since it's 1f faster than low short and +3 on block.
  • Hit-confirmable into SA3 via light chain, usually 2LP > 2LK.
FATonline.png
2MP
Crouch MP
D.png+Mp.png
3s ken cr.mp 1.png
Frame 6
3s ken cr.mp 2.png
Frames 7-9
Startup Active Recovery Hit Cr. Hit
5 4 7 +4 +5
Damage Stun Guard Parry Block
16 7 - A +3
  • Cancel options: sp su
  • Self meter gain: Whiff: 2, Hit: 11, Block: 6.
  • Opponent meter gain: Whiff: 0, Hit: 2, Block: 0.
  • Low emperor punch
  • One of the best general purpose pokes in the game
  • Great hitbox and frame data
  • Cancels or links into SA3
FATonline.png
2HP
Crouch HP
D.png+Hp.png
3s ken cr.hp 1.png
Frame 8
3s ken cr.hp 2.png
Frames 9-10
3s ken cr.hp 3.png
Frame 11
Startup Active Recovery Hit Cr. Hit
7 5 17 -4 -2
Damage Stun Guard Parry Block
23 13 - A -6
  • Cancel options: sp su
  • Self meter gain: Whiff: 3, Hit: 19, Block: 10.
  • Opponent meter gain: Whiff: 0, Hit: 4, Block: 0.
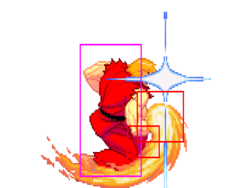
  • Anti-air option
  • The late hitbox cannot be canceled, so be wary when anti-airing
  • 2HP xx super works as a whiff punish on a surprising number of buttons
  • Is itself whiff punish bait, so be careful trying to clip people with this
FATonline.png
2LK
Crouch LK
D.png+Lk.png
3s ken cr.lk.png
Startup Active Recovery Hit Cr. Hit
5 3 7 +1 +1
Damage Stun Guard Parry Block
3 3 - L +1
  • Self meter gain: Whiff: 0, Hit: 2, Block: 1.
  • Opponent meter gain: Hit: 0, Block: 0.
  • Cancel options: self sp su
  • Low hit-confirm option with light chains, usually 2LK > 2LP or 2LK > 2LK.
  • Slower than 2LP, less frame advantage than 2LP, but less vulnerable to guess parry since it can only be parried low
FATonline.png
2MK
Crouch MK
D.png+Mk.png
3s ken cr.mk 1.png
Frame 7
3s ken cr.mk 2.png
Frames 8-11
Startup Active Recovery Hit Cr. Hit
6 5 17 -3 -2
Damage Stun Guard Parry Block
15 3 - L -4
  • Cancel options: sp su
  • 13 kara range
  • Self meter gain: Whiff: 2, Hit: 11, Block: 6.
  • Opponent meter gain: Whiff: 0, Hit: 2, Block: 0.
  • Commonly quoted as a "13f hit-confirm" because it has 13 super-cancelable frames. Realistically you have fewer frames than that after accounting for input delay and screen draw.
  • I promise you that this is a hit confirm, even though YOU might not be able to hit confirm it. It's difficult. Don't waste too much energy grinding this if you aren't already solid with your other hit-confirm options.
  • Great neutral / whiff punish button
  • His best kara throw option. Difficult because you have to return the lever to neutral in exactly one frame. On frame 1 you push 2MK, on frame 2 you push 5LP+LK.
  • Used to kara shoryuken for W shoryu combos
  • Can be vulnerable to jump-ins
FATonline.png
2HK
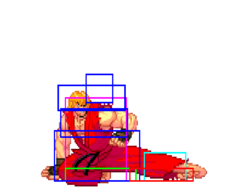
Crouch HK
D.png+Hk.png
3s ken cr.hk.png
Startup Active Recovery Hit Cr. Hit
6 5 26 Soft KD Soft KD
Damage Stun Guard Parry Block
23 3 - L -14
  • 13 kara range
  • Self meter gain: Whiff: 3, Hit: 19, Block: 10.
  • Opponent meter gain: Whiff: 0, Hit: 4, Block: 0.
  • Good range, causes a knockdown
  • Same kara range as 2MK, but much less safe if you mess up the kara throw input
  • Can also be used for W shory combos due to having the exact same kara range as 2MK
  • Easy whiff punish, very negative on block, vulnerable to jump-ins
FATonline.png


Jumping Normals

8LP
Jump LP (Neutral)
U.png+Lp.png
3s ken nj.lp.png
Startup Active Recovery Hit Cr. Hit
5 Until Landing - +3~+7 +7
Damage Stun Guard Parry Block
10 7 - H +3~+7
  • Self meter gain: Whiff: 0, Hit: 2, Block: 1.
  • Opponent meter gain: Whiff: 0, Hit: 0, Block: 0.
FATonline.png
j.LP
Jump LP
Uf.png+Lp.png
3s ken j.lp.png
Startup Active Recovery Hit Cr. Hit
4 Until Landing - -2~+7 +7
Damage Stun Guard Parry Block
8 7 - H -1~+8
  • Self meter gain: Whiff: 0, Hit: 2, Block: 1.
  • Opponent meter gain: Whiff: 0, Hit: 0, Block: 0.
FATonline.png
8MP
Jump MP (Neutral)
U.png+Mp.png
3s ken nj.mp 1.png
Frame 7
3s ken nj.mp 2.png
Frames 8-9
3s ken j.mp 3.png
Frames 11-12
Startup Active Recovery Hit Cr. Hit
6 5 - +2~+10 +10
Damage Stun Guard Parry Block
17 11 - H +4~+11
  • Self meter gain: Whiff: 2, Hit: 11, Block: 6.
  • Opponent meter gain: Whiff: 0, Hit: 2, Block: 0.
FATonline.png
j.MP
Jump MP
Uf.png+Mp.png
3s ken j.mp 1.png
Frame 7
3s ken j.mp 2.png
Frames 8-9
3s ken j.mp 3.png
Frames 11-12
Startup Active Recovery Hit Cr. Hit
5 5 - +1~+10 +10
Damage Stun Guard Parry Block
17 11 - H +2~+11
  • Self meter gain: Whiff: 2, Hit: 11, Block: 6.
  • Opponent meter gain: Whiff: 0, Hit: 2, Block: 0.
FATonline.png
8HP
Jump HP (Neutral)
U.png+Hp.png
3s ken nj.hp.png
Startup Active Recovery Hit Cr. Hit
7 3 - +9~+13 +13
Damage Stun Guard Parry Block
23 15 - H +10~+14
  • Self meter gain: Whiff: 3, Hit: 19, Block: 10.
  • Opponent meter gain: Whiff: 0, Hit: 4, Block: 0.
FATonline.png
j.HP
Jump HP
Uf.png+Hp.png
3s ken j.hp 1.png
Frame 7
3s ken j.hp 2.png
Frame 8
3s ken j.hp 3.png
Frames 9-10
Startup Active Recovery Hit Cr. Hit
6 4 - +1~+13 +13
Damage Stun Guard Parry Block
23 15 - H +5~+12
  • Self meter gain: Whiff: 3, Hit: 19, Block: 10.
  • Opponent meter gain: Whiff: 0, Hit: 4, Block: 0.
FATonline.png
8LK
Jump LK (Neutral)
U.png+Lk.png
3s ken nj.lk 1.png
Frame 6
3s ken nj.lk 2.png
Frames 7-onwards
Startup Active Recovery Hit Cr. Hit
5 Until Landing - +3~+7 +7
Damage Stun Guard Parry Block
8 7 - H +3~+7
  • Self meter gain: Whiff: 0, Hit: 2, Block: 1.
  • Opponent meter gain: Whiff: 0, Hit: 0, Block: 0.
FATonline.png
j.LK
Jump LK
Uf.png+Lk.png
3s ken j.lk.png
Startup Active Recovery Hit Cr. Hit
4 10 - 0~+6 +6
Damage Stun Guard Parry Block
8 5 - H -1~+6
  • Self meter gain: Whiff: 0, Hit: 2, Block: 1.
  • Opponent meter gain: Whiff: 0, Hit: 0, Block: 0.
FATonline.png
8MK
Jump MK (Neutral)
U.png+Mk.png
3s ken nj.mk 1.png
Frame 6
3s ken nj.mk 2.png
Frames 7-11
Startup Active Recovery Hit Cr. Hit
5 6 - +3~+10 +10
Damage Stun Guard Parry Block
16 9 - H +3~+10
  • Self meter gain: Whiff: 2, Hit: 11, Block: 6.
  • Opponent meter gain: Whiff: 0, Hit: 2, Block: 0.
  • Pretty good neutral option
  • Controls air space in air-to-air situations
  • Hit confirmable on grounded hits, even when it hits pretty high up
FATonline.png
j.MK
Jump MK
Uf.png+Mk.png
3s ken j.mk 1.png
Frame 6
3s ken j.mk 2.png
Frames 7-11
Startup Active Recovery Hit Cr. Hit
5 6 - +3~+10 +10
Damage Stun Guard Parry Block
16 9 - H +3~+10
  • Self meter gain: Whiff: 2, Hit: 11, Block: 6.
  • Opponent meter gain: Whiff: 0, Hit: 2, Block: 0.
  • The cross-up button
  • Useful both from neutral and for okizeme
  • Hit-confirmable
FATonline.png
8HK
Jump HK (Neutral)
U.png+Hk.png
3s ken nj.hk 1.png
Frames 8-9
3s ken nj.hk 2.png
Frames 10-12
Startup Active Recovery Hit Cr. Hit
7 5 - +9~+13 +13
Damage Stun Guard Parry Block
23 13 - H +7~+13
  • Self meter gain: Whiff: 3, Hit: 19, Block: 10.
  • Opponent meter gain: Whiff: 0, Hit: 4, Block: 0.
  • Good air-to-air option when you need something with a different angle than neutral jump MK
  • Hit-confirmable
FATonline.png
j.HK
Jump HK
Uf.png+Hk.png
3s ken j.hk 1.png
Frame 7
3s ken j.hk 2.png
Frames 8-10
Startup Active Recovery Hit Cr. Hit
6 4 - +5~+12 +12
Damage Stun Guard Parry Block
22 13 - H +5~+12
  • Self meter gain: Whiff: 3, Hit: 19, Block: 10.
  • Opponent meter gain: Whiff: 0, Hit: 4, Block: 0.
  • Great jump-in button
  • Extremely plus if you hit it as late as possible, up to +12 on hit
  • Big damage hit confirms
  • Useful "mixup" against anti-air parry since it can combo into SA3 from very high or very low hits
  • Will occasionally hit crossup, try to be ready for a juicy combo
FATonline.png


Target Combos

MPHP
Target Combo
Mp.png>Hp.png
3s ken cl.mp.png
3s ken cl.hp 1.png
3s ken cl.hp 2.png
Startup Active Recovery Hit Cr. Hit
4 - - 0 2
Damage Stun Guard Parry Block
7 3 - H -2
  • One of the best target combos in the game
  • Very easy hit confirm with or without meter
  • Confirms into DP meterless
  • Confirms into SA3 with meter
  • Not the best SGGK option due to zero (0) kara range, but it still option selects throw or parry into a hit confirm.


Throws

LPLK (mash)
Hizageri
Lp.png+Lk.png (mash)
3s ken lp+lk.png
(kenhg).gif
Startup Active Recovery Hit Cr. Hit
2 1 21 Soft KD Soft KD
Damage Stun Guard Parry Block
27 12 - - -
  • 24 throw range
  • Self meter gain: Whiff: 0, Hit: 7, Block: 0.
  • Opponent meter gain: Whiff: 0, Hit: 0, Block: 7.
  • Mash for more hits
  • Good okizeme
FATonline.png
4LPLK
Jigoku Kuruma
B.png+Lp.png+Lk.png
3s ken lp+lk.png
(kenjg).gif
Startup Active Recovery Hit Cr. Hit
2 1 21 D D
Damage Stun Guard Parry Block
19 14 - - -
  • 24 throw range
  • Self meter gain: Whiff: 0, Hit: 8, Block: 0.
  • Opponent meter gain: Whiff: 0, Hit: 2, Block: 7.
  • Back throw, side-switches with the opponent
  • Incredible corner carry
  • Ken actually recovers before the opponent hits the ground, so if this is going to kill them, you can sneak in a little shoryu before the end of the round for a bit of extra meter build
FATonline.png
6LPLK
Seoi Nage
F.png+Lp.png+Lk.png
3s ken lp+lk.png
(kensn).gif
Startup Active Recovery Hit Cr. Hit
2 1 21 D D
Damage Stun Guard Parry Block
21 8 - - -
  • 24 throw range
  • Self meter gain: Whiff: 0, Hit: 8, Block: 0.
  • Opponent meter gain: Whiff: 0, Hit: 2, Block: 7.
  • Okizeme is worse than neutral throw, but since this isn't mashable you get more guaranteed damage.
FATonline.png


Universal Overhead

MPMK
Straight Hit
Mp.png+Mk.png
3s ken mp+mk.png
Startup Active Recovery Hit Cr. Hit
15 8 7 0~+7 +1~+8
Damage Stun Guard Parry Block
7 3 - H -5~0
  • Self meter gain: Whiff: 0, Hit: 2, Block: 1.
  • Opponent meter gain: Whiff: 0, Hit: 0, Block: 0.
  • Standard universal overhead
  • Hit confirms into LP DP if you don't have meter
  • Hit confirms into SA3 if you do have meter
FATonline.png


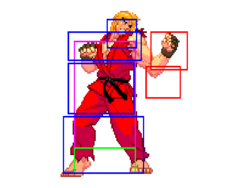
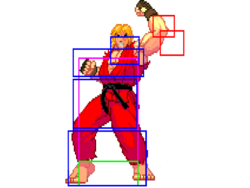
Taunt

HPHK
Taunt
Hp.png+Hk.png
3s ken hp+hk.png
(kent).gif
Startup Active Recovery Hit Cr. Hit
15 2 27 -18 -
Damage Stun Guard Parry Block
2 6 - A -18
  • Self meter gain: Whiff: 4, Hit: 8, Block: 6.
  • Opponent meter gain: Whiff: 0, Hit: 0, Block: 0.
  • Increases damage for the next hit/combo by 31.3%. One taunt is the maximum.
  • You lose the taunt bonus from any connected, parried or guarded action including throw.
  • You retain the taunt bonus if you block attacks, you lose it if you get hit.
FATonline.png


Special Moves

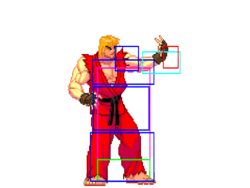
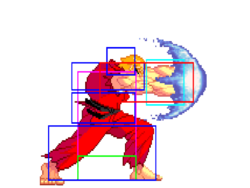
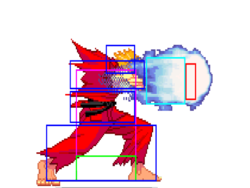
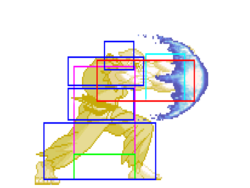
236P
Hadouken
Qcf.png+P.png
3s ken qcf1.png
Frame 12
3s ken qcf2.png
Lp.png/Mp.png/Hp.png Frame 13-onwards
3s ken exqcf 1.png
Frame 12
3s ken exqcf 2.png
Ex.png Frame 13-onwards
Lp.png Startup Active Recovery Hit Cr. Hit
11 - 38 -10 -10
Damage Stun Guard Parry Block
10 3 - H -11
  • Self meter gain: Whiff: 0, Hit: 2, Block: 1.
  • Opponent meter gain: Whiff: 0, Hit: 0, Block: 0.
  • Cancel options: su
FATonline.png
Mp.png Startup Active Recovery Hit Cr. Hit
11 - 38 -10 -10
Damage Stun Guard Parry Block
10 - - H -11
  • Self meter gain: Whiff: 0, Hit: 2, Block: 1.
  • Opponent meter gain: Whiff: 0, Hit: 0, Block: 0.
  • Cancel options: su
FATonline.png
Hp.png Startup Active Recovery Hit Cr. Hit
11 - 38 -10 -10
Damage Stun Guard Parry Block
10 - - H -11
  • Self meter gain: Whiff: 0, Hit: 2, Block: 1.
  • Opponent meter gain: Whiff: 0, Hit: 0, Block: 0.
  • Cancel options: su
FATonline.png
Ex.png Startup Active Recovery Hit Cr. Hit
11 - 38 Soft KD Soft KD
Damage Stun Guard Parry Block
20 5 - H -6
  • Self meter gain: Whiff: -40, Hit: -40, Block: -40.
  • Opponent meter gain: Whiff: 0, Hit: 0, Block: 0.
  • Cancel options: su
FATonline.png


Ken's fireballs are unsafe near point blank, but become safer the farther they are spaced out. The sweet spot is a bit outside his normal poke range, where it's hard to consistently parry on reaction. Be aware of the opponent's meter, as some fast ranged supers can be a threat even against well-spaced fireballs. The EX version is the most useful overall due to its knockdown and relative safety on block. Cancelling a normal into Hadoken can give more time for hitconfirming SA3, and throwing a raw fireball xx SA3 can mess up the opponent's parry timing when going for a chip KO.

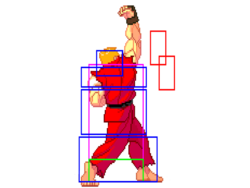
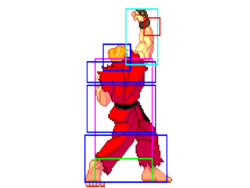
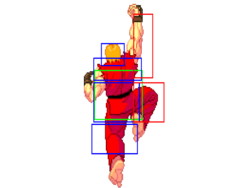
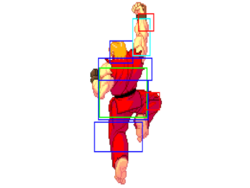
623P
Shoryuken
Dp.png+P.png
3s ken dp.lp 1.png
Frames 3-4
3s ken dp.lp 2.png
Frames 5-6
3s ken dp.lp 3.png
Lp.png/Mp.png Frames 7-10
3s ken dp.hp 1.png
Frames 4-5
3s ken dp.hp 2.png
Frames 6-7
3s ken dp.hp 3.png
Hp.png Frames 8-24
3s ken exdp 1.png
Frames 2-3
3s ken exdp 2.png
Frames 4-5
3s ken exdp 3.png
Ex.png Frames 6-24
Lp.png Startup Active Recovery Hit Cr. Hit
2 8 26 Soft KD Soft KD
Damage Stun Guard Parry Block
26 11 - A -17
  • 1-4f Upper Body Inv
  • Cancel options: su
  • Self meter gain: Whiff: 3, Hit: 21, Block: 15.
  • Opponent meter gain: Whiff: 0, Hit: 6, Block: 0.
  • Vulnerable to parry due to being one hit
  • Extremely high damage potential due to shoryu -> kara shoryu combo
FATonline.png
Mp.png Startup Active Recovery Hit Cr. Hit
3 14 28 Soft KD Soft KD
Damage Stun Guard Parry Block
28 15 - A -24
  • 1-5f Upper Body Inv
  • Cancel options: su
  • Self meter gain: Whiff: 3, Hit: 22, Block: 16.
  • Opponent meter gain: Whiff: 0, Hit: 6, Block: 0.
  • Typically this is the one you're going to cancel into super from
FATonline.png
Hp.png Startup Active Recovery Hit Cr. Hit
3 21 32 Soft KD Soft KD
Damage Stun Guard Parry Block
32 15 - A -31
  • 1-3f All Inv, 4-7f Upper Body Inv
  • Cancel options: su
  • Self meter gain: Whiff: 3, Hit: 23, Block: 17.
  • Opponent meter gain: Whiff: 0, Hit: 6, Block: 0.
  • Great meterless anti-air
  • Fully invulnerable until the first active frame
FATonline.png
Ex.png Startup Active Recovery Hit Cr. Hit
1 20 38 Soft KD Soft KD
Damage Stun Guard Parry Block
34 17 - A -36
  • 1-5f All Inv
  • Cancel options: su
  • Self meter gain: Whiff: -40, Hit: -40, Block: -40.
  • Opponent meter gain: Whiff: 0, Hit: 0, Block: 0.
  • Also a great anti-air
  • Invulnerable through the first active frame
FATonline.png
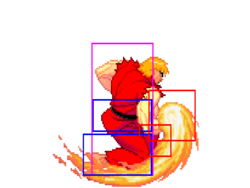
214K
Tatsumaki Senpukyaku
Qcb.png+K.png
3s ken qcb 1.png
Frame 7-8 / EX: Frame 5-6
3s ken qcb 2.png
Lk.png/Mk.png/Hk.png/Ex.png Frame 17-19 / EX: Frame 12-13
Lk.png Startup Active Recovery Hit Cr. Hit
6 7 14 -3 -3
Damage Stun Guard Parry Block
19 9 - H -5
  • Cancel options: su
  • Self meter gain: Whiff: 3, Hit: 19, Block: 13.
  • Opponent meter gain: Whiff: 0, Hit: 4, Block: 0.
FATonline.png
Mk.png Startup Active Recovery Hit Cr. Hit
6 14 15 -4 -4
Damage Stun Guard Parry Block
23 13 - H -6
  • Cancel options: su
  • Self meter gain: Whiff: 3, Hit: 21, Block: 15.
  • Opponent meter gain: Whiff: 0, Hit: 4, Block: 0.
FATonline.png
Hk.png Startup Active Recovery Hit Cr. Hit
6 17 15 -5~-3 -5~-3
Damage Stun Guard Parry Block
27 15 - H -7
  • Cancel options: su
  • Self meter gain: Whiff: 3, Hit: 22, Block: 16.
  • Opponent meter gain: Whiff: 0, Hit: 4, Block: 0.
FATonline.png
Ex.png Startup Active Recovery Hit Cr. Hit
4 21 13 -1 -1
Damage Stun Guard Parry Block
34 17 - H -3
  • Cancel options: su
  • Self meter gain: Whiff: -40, Hit: -40, Block: -40.
  • Opponent meter gain: Whiff: 0, Hit: 0, Block: 0.
FATonline.png
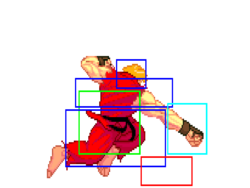
214K (air)
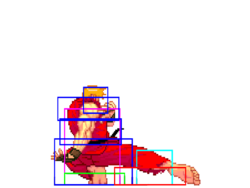
Air Tatsumaki Senpukyaku
Qcb.png+K.png (air)
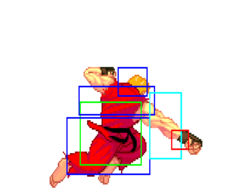
3s ken qcb 2.png
Lk.png/Mk.png/Hk.png/Ex.png
Lk.png Startup Active Recovery Hit Cr. Hit
7 4 - -5~+1 -1~+1
Damage Stun Guard Parry Block
27 9 - H -5~+1
  • Self meter gain: Whiff: 2, Hit: 17, Block: 3.
  • Opponent meter gain: Whiff: 0, Hit: 4, Block: 0.
FATonline.png
Mk.png Startup Active Recovery Hit Cr. Hit
7 6 - -6~+1 -1~+1
Damage Stun Guard Parry Block
40 13 - H -6~+1
  • Self meter gain: Whiff: 3, Hit: 25, Block: 3.
  • Opponent meter gain: Whiff: 0, Hit: 6, Block: 0.
FATonline.png
Hk.png Startup Active Recovery Hit Cr. Hit
7 8 - -6~+1 -1~+1
Damage Stun Guard Parry Block
40 13 - H -6~+1
  • Self meter gain: Whiff: 4, Hit: 26, Block: 3.
  • Opponent meter gain: Whiff: 0, Hit: 6, Block: 0.
FATonline.png
Ex.png Startup Active Recovery Hit Cr. Hit
6 13 - Soft KD Soft KD
Damage Stun Guard Parry Block
52 17 - H -1~+1
  • Self meter gain: Whiff: -40, Hit: -40, Block: -40.
  • Opponent meter gain: Whiff: 0, Hit: 0, Block: 0.
  • Modified by Ken's jump vector
  • Excellent corner escape
  • Can create left/right mixups from a jump in
  • In some situations (notably when it hits crossup midscreen) Ken get dash in W shoryu for big damage
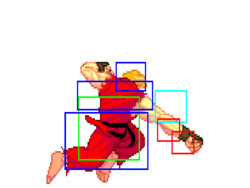
  • Easiest / most consistent option in case of crossup is just land 5MK
FATonline.png


Super Arts

236236P (SA1)
Shoryureppa
Qcf.pngQcf.png+P.png (SA1)
3s ken sa1.png
Startup Active Recovery Hit Cr. Hit
1 34 45 Hard KD Hard KD
Damage Stun Guard Parry Block
69 6 - A -38
  • Middle ground between the other two supers
  • Two bars -- more opportunity to use meter than SA2, but less than SA3
  • Limited hit confirms
  • Better damage than SA3, but harder to hit in general
FATonline.png
236236K (SA2)
Shinryuken
Qcf.pngQcf.png+K.png (mash K) (SA2)
3s ken sa1.png
Startup Active Recovery Hit Cr. Hit
2 36 61 Hard KD Hard KD
Damage Stun Guard Parry Block
67 - - A -80
  • Mash for more hits
  • Potentially big damage, but limits your meter usage due to having one long bar
  • Limited hit confirms
FATonline.png
236236K (SA3)
Shippu Jinraikyaku
Qcf.pngQcf.png+K.png (SA3)
3s ken sa3.png
Startup Active Recovery Hit Cr. Hit
2 9 27 Hard KD Hard KD
Damage Stun Guard Parry Block
51 16 - H -11
  • This is the one you want to pick
  • Punishes tons of moves on block and even on hit
  • Very fast with great range, one of the best whiff punish tools in the game
  • Confirmable from just about everything Ken wants to do
FATonline.png

3S Navigation

General
Controls
Notation
HUD
Glossary
System
FAQ
Characters
Akuma
Alex
Chun-Li
Dudley
Elena
Hugo
Ibuki
Ken
Makoto
Q
Necro
Oro
Remy
Ryu
Sean
Twelve
Urien
Yang
Yun
Gill