Introduction
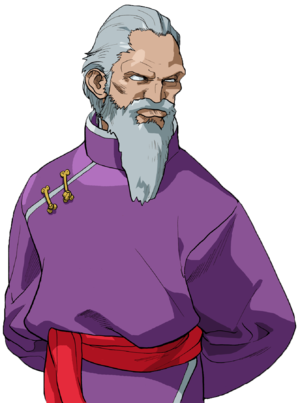
Gen has continued seeking other fighters in the hopes that the worthiest ones may participate in a "Death Match". Among those he deemed worthy, Akuma is one of them and Gen now wishes to encounter him again.
| Pros | Cons |
|
|
Moves List
Gen's full set of moves is divided between his two stances: Mantis (Gen's default stance, acessed by pushing all 3 punch buttons) and Crane (Gen's alternate stance, acessed by pushing all 3 kick buttons). Each stance comes with their own normals, throws, special moves and supers, all of them useful for different situations. Understanding the ways both stances work is 100% necessary if you want to master Gen.
Worth remembering that X-Ism fuses Gen's Mantis and Crane stances into a single stance, so his moves work differently depending on the distance, as the guide below explains.
Normal Moves
Mantis Stance Normals
- Standing Jab (A, V)/Close Standing Jab (X):
| Damage | 4 | 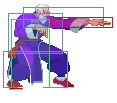
|
| Stun | 2 | |
| Chain Cancel | Yes | |
| Special Cancel | Yes | |
| Super Cancel | Yes | |
| Meter on whiff/hit | 0/1 | |
| Frame Count | 3/4/7 | |
| Block Stun | +3 | |
| Hit Stun/Counter Hit | +4/+9 |
- Standing Strong (A, V)/Close Standing Strong (X):
| Damage | 10 | 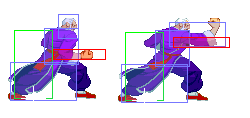
|
| Stun | 9/4 | |
| Chain Cancel | No | |
| Special Cancel | Yes, No (A, X) Yes, Yes (V) | |
| Super Cancel | Yes, No | |
| Meter on whiff/hit | 1/3(A) 4(V, X) | |
| Frame Count | 4/6/11 | |
| Block Stun | +2 | |
| Hit Stun/Counter Hit | +3/+7 |
- Standing Fierce (A, V)/Close Standing Fierce (X):
| Damage | 5+8 | 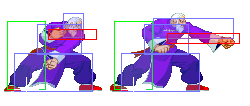
|
| Stun | 4x2 | |
| Chain Cancel | No | |
| Special Cancel | Yes, No | |
| Super Cancel | Yes, No | |
| Meter on whiff/hit | 1/1x2 (A) 3x2 (V, X) | |
| Frame Count | 5/5, 2/19 | |
| Block Stun | +2 | |
| Hit Stun/Counter Hit | +3/Launch |
- Standing Short (A, V)/Close Standing Short (X):
| Damage | 4 | 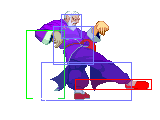
|
| Stun | 2 | |
| Chain Cancel | No | |
| Special Cancel | No (A) Yes (V, X) | |
| Super Cancel | Yes | |
| Meter on whiff/hit | 0/1 | |
| Frame Count | 8/5/15 | |
| Block Stun | -6 | |
| Hit Stun/Counter Hit | -5/0 |
- Standing Forward:
| Damage | 9 | 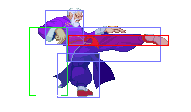
|
| Stun | 4 | |
| Chain Cancel | No | |
| Special Cancel | Yes | |
| Super Cancel | Yes | |
| Meter on whiff/hit | 1/3(A) 4(V, X) | |
| Frame Count | 6/3/16 | |
| Block Stun | 0 | |
| Hit Stun/Counter Hit | +1/+5 |
- Standing Roundhouse (A, V)/Far Standing Roundhouse (X):
| Damage | 13 | 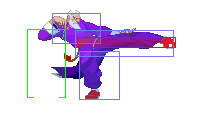
|
| Stun | 8 | |
| Chain Cancel | No | |
| Special Cancel | No | |
| Super Cancel | No | |
| Meter on whiff/hit | 1/4(A) 6(V, X) | |
| Frame Count | 8/2/18 | |
| Block Stun | +3 | |
| Hit Stun/Counter Hit | +4/Launch |
- Crouching Jab:
| Damage | 3 | 
|
| Stun | 2 | |
| Chain Cancel | Yes | |
| Special Cancel | Yes | |
| Super Cancel | Yes | |
| Meter on whiff/hit | 0/1 (A, V, X) | |
| Frame Count | 3/4/7 | |
| Block Stun | +3 | |
| Hit Stun/Counter Hit | +4/+9 |
- Crouching Strong:
| Damage | 9 | 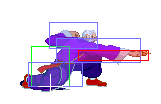
|
| Stun | 4 | |
| Chain Cancel | No | |
| Special Cancel | Yes | |
| Super Cancel | Yes | |
| Meter on whiff/hit | 1/3(A) 4(V, X) | |
| Frame Count | 6/4/13 | |
| Block Stun | +2 | |
| Hit Stun/Counter Hit | +3/+7 |
- Crouching Fierce:
| Damage | 12 | 
|
| Stun | 8 | |
| Chain Cancel | No | |
| Special Cancel | No | |
| Super Cancel | No | |
| Meter on whiff/hit | 1/4(A) 6(V, X) | |
| Frame Count | 8/4/14 | |
| Block Stun | +5 | |
| Hit Stun/Counter Hit | +6/Launch |
- Crouching Short:
| Damage | 3 | 
|
| Stun | 2 | |
| Chain Cancel | Yes | |
| Special Cancel | Yes | |
| Super Cancel | Yes | |
| Meter on whiff/hit | 0/1 (A, V, X) | |
| Frame Count | 4/4/7 | |
| Block Stun | +3 | |
| Hit Stun/Counter Hit | +4/+9 |
- Crouching Forward:
| Damage | 9 | 
|
| Stun | 4 | |
| Chain Cancel | No | |
| Special Cancel | Yes | |
| Super Cancel | Yes | |
| Meter on whiff/hit | 1/3(A) 4(V) | |
| Frame Count | 6/3/13 | |
| Block Stun | 0 | |
| Hit Stun/Counter Hit | +1/+5 |
- Crouching Roundhouse:
| Damage | 13 | 
|
| Stun | 8 | |
| Chain Cancel | No | |
| Special Cancel | No | |
| Super Cancel | No | |
| Meter on whiff/hit | 1/4(A) 6(V, X) | |
| Frame Count | 8/3/27 | |
| Block Stun | -7 | |
| Hit Stun/Counter Hit | - |
- Jump Jab:
| Damage | 5 | 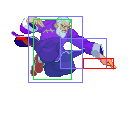
|
| Stun | 2 | |
| Meter on whiff/hit | 0/1 (A, V, X) | |
| Frame Count | 4/10/Land |
- Jump Strong:
| Damage | 10 | 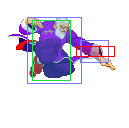
|
| Stun | 4 | |
| Meter on whiff/hit | 1/3(A) 4(V) | |
| Frame Count | 5/8/Land |
- Jump Fierce:
| Damage | 16 | 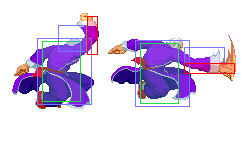
|
| Stun | 15/8 | |
| Meter on whiff/hit | 1/4(A) 6(V, X) | |
| Frame Count | 11/6/Land |
- Jump Short:
| Damage | 4 | 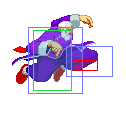
|
| Stun | 2 | |
| Meter on whiff/hit | 0/1 (A, V, X) | |
| Frame Count | 4/10/Land |
- Jump Forward:
| Damage | 9 | 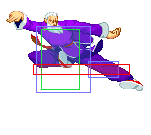
|
| Stun | 4 | |
| Meter on whiff/hit | 1/3(A) 4(V) | |
| Frame Count | 9/8/Land |
- Jump Roundhouse (A, V)/Diagonal Jump Roundhouse (X):
| Damage | 15 | 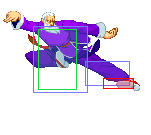
|
| Stun | 8 | |
| Meter on whiff/hit | 1/4(A) 6(V, X) | |
| Frame Count | 9/4/Land |
Crane Stance Normals
- Standing Jab (A, V)/Far Standing Jab (X):
| Damage | 7 | 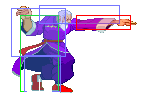
|
| Stun | 2 | |
| Chain Cancel | Yes | |
| Special Cancel | Yes | |
| Super Cancel | Yes | |
| Meter on whiff/hit | 0/1 | |
| Frame Count | 3/4/11 | |
| Block Stun | -1 | |
| Hit Stun/Counter Hit | 0/+5 |
- Standing Strong (A, V)/Far Standing Strong (X):
| Damage | 4+10 | 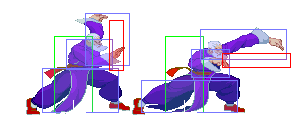
|
| Stun | 4x2 | |
| Chain Cancel | No | |
| Special Cancel | No | |
| Super Cancel | No | |
| Meter on whiff/hit | 1/3x2(A) 4x2(V, X) | |
| Frame Count | 23/2, 2/24 | |
| Block Stun | -7 | |
| Hit Stun/Counter Hit | -6/-2 |
- Standing Fierce (A, V)/Far Standing Fierce (X):
| Damage | 7+13 | 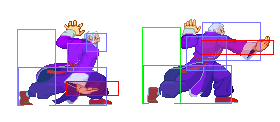
|
| Stun | 8x2 | |
| Chain Cancel | No | |
| Special Cancel | No | |
| Super Cancel | No | |
| Meter on whiff/hit | 1/4x2 (A) 6x2 (V, X) | |
| Frame Count | 22/5, 5/19 | |
| Block Stun | -1 | |
| Hit Stun/Counter Hit | 0/Launch |
- Standing Short (A, V)/Far Standing Short (X):
| Damage | 7 | 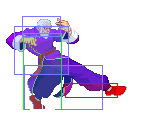
|
| Stun | 2 | |
| Chain Cancel | No | |
| Special Cancel | No (A) Yes (V, X) | |
| Super Cancel | Yes | |
| Meter on whiff/hit | 0/1 | |
| Frame Count | 8/4/11 | |
| Block Stun | -1 | |
| Hit Stun/Counter Hit | 0/+5 |
- Standing Forward:
| Damage | 13 | 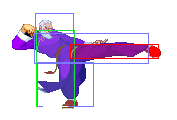
|
| Stun | 4 | |
| Chain Cancel | No | |
| Special Cancel | No | |
| Super Cancel | No | |
| Meter on whiff/hit | 1/3(A) 4(V) | |
| Frame Count | 8/4/21 | |
| Block Stun | -6 | |
| Hit Stun/Counter Hit | -5/-1 |
- Standing Roundhouse (A, V)/Close Standing Roundhouse (X):
| Damage | 8+7 | 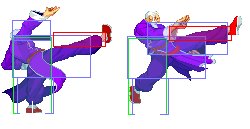
|
| Stun | 8x2 | |
| Chain Cancel | No | |
| Special Cancel | No | |
| Super Cancel | No | |
| Meter on whiff/hit | 1/4x2(A) 6x2(V, X) | |
| Frame Count | 5/2, 9*, 2/23 | |
| Block Stun | -2 | |
| Hit Stun/Counter Hit | -1/Launch |
Note: There's a 9 frame gap between the 2 kicks.
- Crouching Jab:
| Damage | 6 | 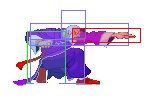
|
| Stun | 2 | |
| Chain Cancel | No | |
| Special Cancel | Yes | |
| Super Cancel | Yes | |
| Meter on whiff/hit | 0/1 | |
| Frame Count | 3/4/9 | |
| Block Stun | +1 | |
| Hit Stun/Counter Hit | +2/+7 |
- Crouching Strong:
| Damage | 13 | 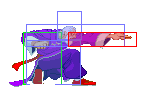
|
| Stun | 4 | |
| Chain Cancel | No | |
| Special Cancel | Yes | |
| Super Cancel | Yes | |
| Meter on whiff/hit | 1/3(A) 4(V) | |
| Frame Count | 4/4/16 | |
| Block Stun | -1 | |
| Hit Stun/Counter Hit | 0/+4 |
- Crouching Fierce:
| Damage | 17 | 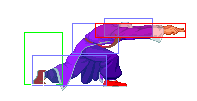
|
| Stun | 8 | |
| Chain Cancel | No | |
| Special Cancel | No | |
| Super Cancel | No | |
| Meter on whiff/hit | 1/4(A) 6(V) | |
| Frame Count | 22/6/15 | |
| Block Stun | +2 | |
| Hit Stun/Counter Hit | +3/Launch |
Note: The damage of this normal increases exponentially if it hits on Counter.
- Crouching Short:
| Damage | 6 | 
|
| Stun | 2 | |
| Chain Cancel | No | |
| Special Cancel | Yes | |
| Super Cancel | Yes | |
| Meter on whiff/hit | 0/1 | |
| Frame Count | 6/6/15 | |
| Block Stun | -7 | |
| Hit Stun/Counter Hit | -6/-1 |
- Crouching Forward:
| Damage | 12 | 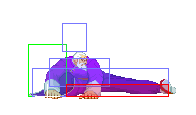
|
| Stun | 4 | |
| Chain Cancel | No | |
| Special Cancel | No (A, X) Yes(V) | |
| Super Cancel | Yes | |
| Meter on whiff/hit | 1/3(A) 4(V, X) | |
| Frame Count | 8/3/21 | |
| Block Stun | -5 | |
| Hit Stun/Counter Hit | -4/0 |
- Crouching Roundhouse:
| Damage | 16 | 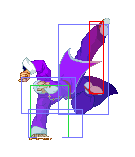
|
| Stun | 8 | |
| Chain Cancel | No | |
| Special Cancel | No | |
| Super Cancel | No | |
| Meter on whiff/hit | 1/4(A) 6(V) | |
| Frame Count | 4/1/42 | |
| Block Stun | -20 | |
| Hit Stun/Counter Hit | -19/Launch |
- Jump Jab:
| Damage | 8 | 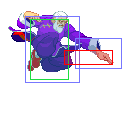
|
| Stun | 2 | |
| Meter on whiff/hit | 0/1 | |
| Frame Count | 4/10/Land (Neutral) 4/9/Land (Diagonal) |
- Jump Strong:
| Damage | 13 | 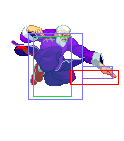
|
| Stun | 4 | |
| Meter on whiff/hit | 1/3(A) 4(V) | |
| Frame Count | 5/9/Land (Neutral) 5/8/Land (Diagonal) |
- Jump Fierce (A, V)/ Jump Strong (X):
| Damage | 19 (A, V) 15 (Neutral, X) 14(Diagonal, X) | 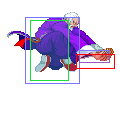
|
| Stun | 8 (A, V) 4 (X) | |
| Meter on whiff/hit | 1/4(A) 6(V, X) | |
| Frame Count | 6/8/Land |
- Jump Short:
| Damage | 7 | 
|
| Stun | 2 | |
| Meter on whiff/hit | 0/1 | |
| Frame Count | 4/10/Land (Neutral) 4/9/Land (Diagonal) |
- Jump Forward (A, V)/Diagonal Jump Forward (X):
| Damage | 12 | 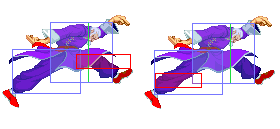
|
| Stun | 4 | |
| Meter on whiff/hit | 1/3(A) 4(V, X) | |
| Frame Count | 11/7/Land (Neutral) 11/6/Land (Diagonal) |
- Neutral Jump Forward (X):
| Damage | 14 | 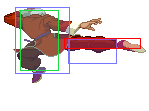
|
| Stun | 8 | |
| Meter on whiff/hit | 1/6 | |
| Frame Count | 6/2/Land |
- Neutral Jump Roundhouse:
| Damage | 8 | 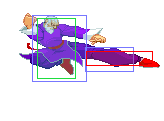
|
| Stun | 8 | |
| Meter on whiff/hit | 1/4(A) 6(V, X) | |
| Frame Count | 5/8/Land |
- Diagonal Jump Roundhouse:
| Damage | 8 | 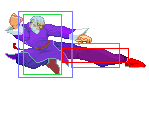
|
| Stun | 8 | |
| Meter on whiff/hit | 1/4(A) 6(V) | |
| Frame Count | 5/8/Land |
Special Moves
(SO) Hyakurenko: Punch rapidly [X Z V]
     -Gen jabs furiously in front of himself over a large radius. He will
      continue to attack until the Punch buttons are not pressed rapidly.
      The stronger the Punch button used, the faster Gen will punch.
(SO) Gekirou: F,D,DF+Kick (Kick rapidly) [X Z V]
     -Gen leaps into the air with a high kick. If he knocks his opponent
      into the air, he will pause for a moment. During that time, press the
      Kick button used to start the Gekirou rapidly to kick more times;
      pressing other Kick buttons will have no effect.
(KI) Jyasen: CB,F+Punch [X Z V]
     -Gen rolls forward and finishes with a chop strike. The stronger the
      Punch button used, the longer Gen will roll and the more times he
      will hit.
(KI) Oga: CD,U+Kick [Z V]
     -Gen leaps to the back wall, pushes himself off it, and dives down with
      a kick. The stronger the Kick button used, the farther Gen will leap.
      Pressing Up-Forward at the end of the motion will make Gen leap to the
      other wall. Upon touching the side of the screen, holding Up will make
      Gen bounce to the top of the screen, but he will not attack when he
      drops. Tap Up and Gen will do a head-stomp attack (Thanks Another
      Gamer).
Super Combos
(SO) Zanei: QCF,QCF+Punch [X Z]
     -Gen slides forward low along the ground. If he passes his opponent,
      they will be hit several times after Gen passes.
        Level 1: 4 Hits      Level 2: 5 Hits       Level 3: 6 Hits
(SO) Shitenshu: QCB,QCB+Punch [Z]
     -A more powerful version of the Kyakurenko, Gen swings a flurry of jabs
      finished with a finger jab. If the finger jab hits the opponent, they
      will start to flash and a 9-second countdown timer will appear over
      their head. Unless Gen is hit, the opponent will continue to take
      damage as the timer counts. When it reaches zero, the opponent will be
      knocked back and dizzied.
        Level 1: 3 Hits      Level 2: 5 Hits       Level 3: 7 Hits
(KI) Jyakoha: QCF,D,DF+Kick [Z]
     -Gen will leap forward into the air while trying to grab his opponent.
      If he makes contact with them in the air, he will stomp them to the
      ground and, at Levels 2 and 3, jump on their chest.
        Level 1: 1 Hit       Level 2: 2 Hits       Level 3: 3 Hits
(KI) Koga (air): QCB,QCB+Kick [Z]
     -A more powerful version of the Oga, Gen will do a diving kick, then leap
      to the opposite wall and perform another kick. Each Level will add
      another leap and kick.
        Level 1: 9 Hits      Level 2: 10 Hits      Level 3: 12 Hits
The Basics
Mantis Stance: Gen's gameplan remains mostly unchanged from his Alpha 2 appearance. You'll be in Mantis Stance for most of the time, as it has great normals and his best super (Zan'ei). His chain normals are mostly safe, so you can use them if you want to build meter while your opponent blocks up close. His cross-up (jumping forward) is a dangerous tool, as it can be easily followed by a chain combo. Gen also has some good normals to poke with, such as his cancellable crouching forward, crouching fierce and standing roundhouse. In addition to his blocked normals, whiffed upkicks are also a great tool to build meter. Since A-Ism doesn't have Custom Combos, Gen's primary use of meter will be for his supers, as his most damaging combos need the meter and come from the chains. A simple confirm combo like crouching short 2x, crouching forward into Level 2 or Level 3 Zan'ei will cause some good damage.
Crane Stance: Gen becomes a lot more mobile in this stance, thanks to a faster jump and his walldive (Oga) giving him a fast way to get out of the corner. His Jyasen roll is a good move to use against some fireballs, as Gen's hitbox shrinks enough that he can roll below them and hit the opponent, depending on the distance. The stance also gives Gen access to some good normals: standing jabs are fast and can be combo'd into his crouching short, who will put your opponent into a juggle state if it connects. Standing strong is an overhead with good range. Crouching fierce is a slow attack, but it will deal lots of damage if it counter hits. Jumping forward is a cross-up kick, while jumping roundhouse is a double kick. Gen's air-to-airs and throws become much deadlier once he has meter, as his Level 3 Jyakoha has great range and will grab the opponent even if they air tech.
Which Ism?
A-Ism
Recommended
Access to his huge array of amazing supers, along with his full moveset in both stances.
V-Ism
Custom combos are generally way too situational and require him to be very close AND in the right stance at the right time. Avoid for the most part.
X-Ism
Loses his normal moveset and gains a mixed moveset from both stances. Much easier to play overall, but loses access to many of his best tools.
Combos
A-ISM combos
V-ISM combos
Advanced Strategy
Match-ups
Notable Players
Japan
Bideru (A-Gen)
CR Daiku no Minamoto-san (A-Gen)
Dark (A-Gen)
DIN (A-Gen)
Kayaman (A/V Gen)
Makoto (A-Gen)
Miriyau (A-Gen)
Mokeke (A-Gen)
Morumomo (A-Gen)
Ry (A-Gen)
Shin Bashi (V-Gen)
TAK (V-Gen)
Tokage (A-Gen)
VER (A-Gen)
Yuda (V-Gen)
Zakki (V-Gen)
North America
Haqq (A-Gen)
JuniorMafia (A-Gen)
OCxRiDaH (A-Gen)
TS- (A-Gen)
Europe
Alioune (A-Gen)
Geejay (A-Gen)
