Introduction
Vega makes a return from Street Fighter II and is first introduced here as a Shadaloo assassin with Ninjutsu and nobility in his blood. He was assigned to a hit-squad responsible for apprehending a rogue doll named Cammy. Although he failed, Vega tipped Cammy off that Bison was after her, and later rescued her from a destructing Shadaloo base.
|
|
| Pros |
Cons |
- Easily the best runaway in the entire game
- Fastest walk speed in A3
- Good air to airs
- Fewest pre-jump frames in the game, making his air to airs very dangerous on V-ISM.
- Amazing ground normals, particularly c. MP
- Great air grab due to his fast jump startup
- Borderline impossible to keep cornered due to wall jump, wall dive and sky high claw
- Sky high claw recovers almost instantly on landing and travels incredibly fast. Can be used to sail over people from the corner
- Grab does full damage when teched
- Great custom combos that can lead into potential infinites
- One of the easiest infinites to keep going
- Good corner guard crush string on V-ISM
- j. RH can cross-up on some chars
- Backflip can be used to bail out of bad activates against many characters
- Can be nearly impossible to catch if he gets a big enough lead and just runs the timer out. The best runaway character in any SF game by far.
|
- Poor anti-air on the ground
- Actual jump-ins aren't the best
- Flip kick is airblockable
- No meterless reversal option, flipkick whiffs on crouchers, and backflip is punishable
- Lack of BnBs without meter, resulting in low damage
- Ground custom requires him to walk very close to start it if they're crouching
- Drops his claw very easily, which can be annoying for neutral
- Certain normals have bigger hurtboxes than it initially appears
- Can struggle to catch-up if he falls behind due to low damage/guard crush potential and mediocre mix-up
|
Moves List
- Note : Claws normals that have him attack with his claw, will generally have different hitboxes for with or without his claw attached, and in some cases other things can be effected by this.
Normal Moves
| Damage |
5 |
|
| Stun |
2
|
| Chain Cancel |
No
|
| Special Cancel |
Yes
|
| Super Cancel |
Yes
|
| Meter on whiff/hit |
0/1
|
| Frame Count |
5/4/8
|
| Block Stun |
+2
|
| Hit Stun/Counter Hit |
+3/+8
|
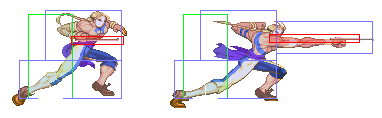
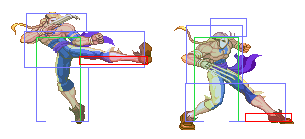
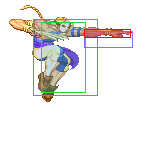
- Close Standing Strong (X):
| Damage |
12 |
|
| Stun |
4
|
| Chain Cancel |
No
|
| Special Cancel |
No
|
| Super Cancel |
No
|
| Meter on whiff/hit |
1/4
|
| Frame Count |
7/4/11
|
| Block Stun |
+4
|
| Hit Stun/Counter Hit |
+5/+9
|
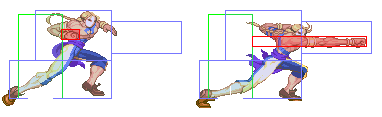
- Close/Far Standing Strong (A/V) Far Standing Strong (X):
| Damage |
11 |
|
| Stun |
4
|
| Chain Cancel |
No
|
| Special Cancel |
No
|
| Super Cancel |
No
|
| Meter on whiff/hit |
1/A3/XV4
|
| Frame Count |
8/2/14
|
| Block Stun |
+3
|
| Hit Stun/Counter Hit |
+4/+8
|
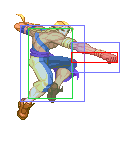
- Close/Far Standing Fierce:
| Damage |
14 |
|
|
|
|
| Stun |
13/8
|
| Chain Cancel |
No
|
| Special Cancel |
No
|
| Super Cancel |
No
|
| Meter on whiff/hit |
1/A4/XV6
|
| Frame Count |
10/5/21
|
| Block Stun |
-3
|
| Hit Stun/Counter Hit |
-2/Launch
|
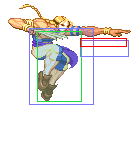
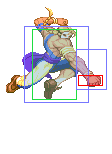
- Close/Far Standing Short:
| Damage |
5 |
|
| Stun |
2
|
| Chain Cancel |
No
|
| Special Cancel |
Yes
|
| Super Cancel |
Yes
|
| Meter on whiff/hit |
0/1
|
| Frame Count |
3/4/11
|
| Block Stun |
-1
|
| Hit Stun/Counter Hit |
0/+5
|
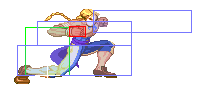
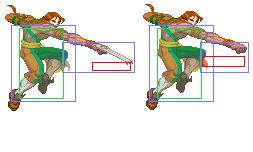
- Close/Far Standing Forward:
| Damage |
10 |
|
| Stun |
4
|
| Chain Cancel |
No
|
| Special Cancel |
Yes
|
| Super Cancel |
Yes
|
| Meter on whiff/hit |
1/A3/XV4
|
| Frame Count |
6/6/15
|
| Block Stun |
-2
|
| Hit Stun/Counter Hit |
-1/+3
|
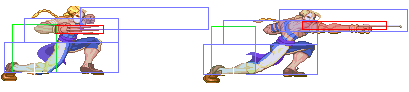
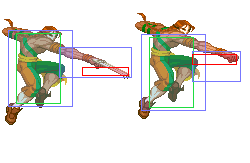
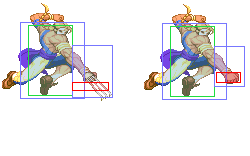
- Close/Far Standing Roundhouse:
| Damage |
16/15 |
|
| Stun |
8
|
| Chain Cancel |
No
|
| Special Cancel |
No
|
| Super Cancel |
No
|
| Meter on whiff/hit |
1/A4/XV6
|
| Frame Count |
24/6/21
|
| Block Stun |
-4
|
| Hit Stun/Counter Hit |
-3/Launch
|
| Damage |
4 |
|
| Stun |
2
|
| Chain Cancel |
No
|
| Special Cancel |
Yes
|
| Super Cancel |
Yes
|
| Meter on whiff/hit |
0/1
|
| Frame Count |
5/4/8
|
| Block Stun |
+2
|
| Hit Stun/Counter Hit |
+3/+8
|
| Damage |
12/10 |
|
|
|
|
|
|
|
| Stun |
4
|
| Chain Cancel |
No
|
| Special Cancel |
No
|
| Super Cancel |
No
|
| Meter on whiff/hit |
1/A3/XV4
|
| Frame Count |
5/4/18
|
| Block Stun |
-3
|
| Hit Stun/Counter Hit |
-2/+2
|
| Damage |
14/13 |
|
|
|
|
|
|
|
| Stun |
4/8+2
|
| Chain Cancel |
No
|
| Special Cancel |
No
|
| Super Cancel |
No
|
| Meter on whiff/hit (A) |
1/3/4+2
|
| Meter on whiff/hit (X/V) |
1/4/6+2
|
| Frame Count |
10/3/26
|
| Block Stun |
-6
|
| Hit Stun/Counter Hit |
-5/Launch
|
Without the claw he only has the second active part.
| Damage |
4 |
|
| Stun |
2
|
| Chain Cancel |
No
|
| Special Cancel |
Yes
|
| Super Cancel |
Yes
|
| Meter on whiff/hit |
0/1
|
| Frame Count |
4/4/7
|
| Block Stun |
+3
|
| Hit Stun/Counter Hit |
+4/+9
|
| Damage |
2 |
|
| Stun |
2
|
| Chain Cancel |
No
|
| Special Cancel |
Yes
|
| Super Cancel |
Yes
|
| Meter on whiff/hit |
0/1
|
| Frame Count |
5/3/10
|
| Block Stun |
+1
|
| Hit Stun/Counter Hit |
+2/+7
|
| Damage |
10 |
|
| Stun |
4
|
| Chain Cancel |
No
|
| Special Cancel |
Yes
|
| Super Cancel |
Yes
|
| Meter on whiff/hit |
1/A3/XV4
|
| Frame Count |
6/4/11
|
| Block Stun |
+4
|
| Hit Stun/Counter Hit |
+5/+9
|
| Damage |
14/7 |
|
| Stun |
8/4
|
| Chain Cancel |
No
|
| Special Cancel |
No
|
| Super Cancel |
No
|
| Meter on whiff/hit (A) |
1/4/3
|
| Meter on whiff/hit (X/V) |
1/6/3
|
| Frame Count |
9/7/31
|
| Block Stun |
-15
|
| Hit Stun/Counter Hit |
Knockdown/Launch
|
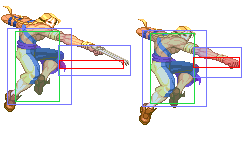
The two damage/dizzy values are determined by how early/late the attack hits, with the former doing the higher amount. Can be made safe/less unsafe if it hits later.
Air Normals
| Damage |
4 |
|
| Stun |
2
|
| Chain Cancel |
No
|
| Special Cancel |
No
|
| Super Cancel |
No
|
| Meter on whiff/hit |
0/1
|
| Frame Count |
3/8/6
|
| Block Stun |
N/A
|
| Hit Stun/Counter Hit |
N/A
|
Claw does a quick jab, he uses his arm without the claw, this attack is the same regardless of if your claw is on or not.
- Neutral/Diagonal Jump Jab (X):
| Damage |
4 |
|
| Stun |
2
|
| Chain Cancel |
No
|
| Special Cancel |
No
|
| Super Cancel |
No
|
| Meter on whiff/hit |
0/1
|
| Frame Count |
4/6/Land
|
| Block Stun |
N/A
|
| Hit Stun/Counter Hit |
N/A
|
- Neutral/Diagonal Jump Strong :
| Damage |
10 |
|
|
|
|
| Stun |
4
|
| Chain Cancel |
No
|
| Special Cancel |
No
|
| Super Cancel |
No
|
| Meter on whiff/hit |
1/A3/XV4
|
| Frame Count |
6/4/6
|
| Block Stun |
N/A
|
| Hit Stun/Counter Hit |
N/A
|
- Neutral Jump Fierce (A/V):
| Damage |
13 |
|
|
|
|
| Stun |
8
|
| Chain Cancel |
No
|
| Special Cancel |
No
|
| Super Cancel |
No
|
| Meter on whiff/hit |
1/A4/XV6
|
| Frame Count |
8/4/6
|
| Block Stun |
N/A
|
| Hit Stun/Counter Hit |
N/A
|
| Damage |
13 |
|
|
|
|
| Stun |
8
|
| Chain Cancel |
No
|
| Special Cancel |
No
|
| Super Cancel |
No
|
| Meter on whiff/hit |
1/A4/XV6
|
| Frame Count |
8/4/6
|
| Block Stun |
N/A
|
| Hit Stun/Counter Hit |
N/A
|
| Damage |
13 |
|
| Stun |
8
|
| Chain Cancel |
No
|
| Special Cancel |
No
|
| Super Cancel |
No
|
| Meter on whiff/hit |
1/9
|
| Frame Count |
8/4/Land
|
| Block Stun |
N/A
|
| Hit Stun/Counter Hit |
N/A
|
- Neutral/Diagonal Jump Short (A/V) Diagonal Jump Short (X):
| Damage |
5 |

|
| Stun |
2
|
| Chain Cancel |
No
|
| Special Cancel |
No
|
| Super Cancel |
No
|
| Meter on whiff/hit |
0/1
|
| Frame Count |
6/5/9
|
| Block Stun |
N/A
|
| Hit Stun/Counter Hit |
N/A
|
| Damage |
5 |
|
| Stun |
2
|
| Chain Cancel |
No
|
| Special Cancel |
No
|
| Super Cancel |
No
|
| Meter on whiff/hit |
0/1
|
| Frame Count |
4/6/Land
|
| Block Stun |
N/A
|
| Hit Stun/Counter Hit |
N/A
|
- Neutral/Diagonal Jump Forward (A/V):
| Damage |
10 |
|
| Stun |
4
|
| Chain Cancel |
No
|
| Special Cancel |
No
|
| Super Cancel |
No
|
| Meter on whiff/hit |
1/A3/V4
|
| Frame Count |
6/4/8
|
| Block Stun |
N/A
|
| Hit Stun/Counter Hit |
N/A
|
- Neutral Jump Forward (X):
| Damage |
10 |
|
| Stun |
4
|
| Chain Cancel |
No
|
| Special Cancel |
No
|
| Super Cancel |
No
|
| Meter on whiff/hit |
1/4
|
| Frame Count |
6/4/8
|
| Block Stun |
N/A
|
| Hit Stun/Counter Hit |
N/A
|
- Diagonal Jump Forward (X):
| Damage |
10 |
|
| Stun |
4
|
| Chain Cancel |
No
|
| Special Cancel |
No
|
| Super Cancel |
No
|
| Meter on whiff/hit |
1/4
|
| Frame Count |
8/2/Land
|
| Block Stun |
N/A
|
| Hit Stun/Counter Hit |
N/A
|
- Neutral Jump Roundhouse :
| Damage |
14 |
|
| Stun |
8
|
| Chain Cancel |
No
|
| Special Cancel |
No
|
| Super Cancel |
No
|
| Meter on whiff/hit |
1/A4/XV6
|
| Frame Count |
8/2/7
|
| Block Stun |
N/A
|
| Hit Stun/Counter Hit |
N/A
|
- Diagonal Jump Roundhouse :
| Damage |
9 |

|
| Stun |
13/8
|
| Chain Cancel |
No
|
| Special Cancel |
No
|
| Super Cancel |
No
|
| Meter on whiff/hit |
1/A4/XV6
|
| Frame Count |
6/4/10
|
| Block Stun |
N/A
|
| Hit Stun/Counter Hit |
N/A
|
Command Normals
- Wall Jump : (When in the corner or edge of the screen, any direction away from the wall during a jump)
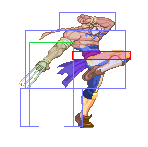
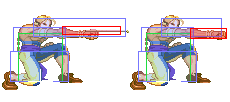
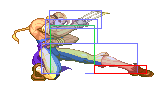
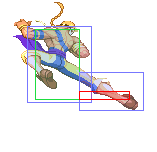
- Cosmic Heel :
 +
+
| Damage |
17 |
|
| Stun |
8
|
| Chain Cancel |
No
|
| Special Cancel |
No
|
| Super Cancel |
No
|
| Meter on whiff/hit |
1/A4/XV6
|
| Frame Count |
30/4/23
|
| Block Stun |
-4
|
| Hit Stun/Counter Hit |
-12/-7
|
Special Moves
Rolling Crystal Flash: CB,F+Punch [X Z V]
-Balrog will roll forward and finish with an upper claw stab. The stronger the
 Punch button used, the more times Balrog will roll and hit.
Sky High Claw: CD,U+Punch (Punch) [X Z V]
-Balrog will leap back and push himself off the wall, claw first. Pressing
 a Punch button during the attack will stretch out Balrog's arm for a slightly
 longer range. The weaker the Punch button used, the higher Balrog will shoot
 across the screen. Balrog will always try to jump to the wall behind him for
 this attack, but pressing (UF) instead of (U) will make him leap to the
 opposite wall and perform the attack.
Wall Leap: CD,U+Kick [X Z V]
-Balrog will leap back and push himself off the side of the screen towards his
 opponent. Balrog will always leap to whichever side of the screen he is closest
 to, unless (UF) or (UB) is used at the end of  the motion. After Balrog has
 pushed off the wall, hold Left or Right to slightly move him in the air. The
 following attacks can be used after the Wall Leap:
  []Flying Barcelona Attack: Punch                                    [X Z V]
     -Balrog will slash his arms out below him, hitting opponents on both sides,
      but not directly below him.
  []Izuna Drop (throw): (any direction but Up)+Punch                  [X Z V]
     -Balrog will grab them and perform a powerful suplex. This can only be done
      if Balrog is very close to his opponent.
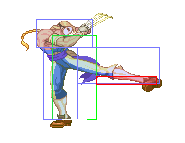
Scarlet Terror: CDB,F+Kick [V]
-Balrog will backflip and kick while moving slightly forward. The stronger the
 Kick button used, the higher and farther Balrog will flip.
Super Combos
Super Wall Leap: CDB,DF,DB,UF+Kick [X Z]
-A more powerful version of the Wall Leap, Balrog will leap forward and push
 himself off the side of the screen towards his opponent. Balrog will always
 leap towards the opposite side of the screen, unless (UB) is used at the end
 of the motion instead of (UF). After Balrog has pushed off the wall, hold Left
 or Right to slightly move him in the air. The following attacks can be used
 after the Super Wall Leap:
  []Flying Barcelona Special: Punch                                     [X Z]
     -A more powerful version of the Flying Barcelona Attack, Balrog will slash
      his arms out below him, hitting opponents multiple times on both sides,
      but not directly below him.
         Level 1: 2 Hits      Level 2: 3 Hits        Level 3: 4 Hits
  []Rolling Izuna Drop (throw): (any direction but Up)+Punch            [X Z]
     -A more powerful version of the Izuna Drop, Balrog will grab the opponent
      and perform multiple powerful suplexes. This can only be done if Balrog
      is very close to his opponent.
         Level 1: 2 Hits      Level 2: 3 Hits        Level 3: 4 Hits
Scarlet Mirage: CB,F,B,F+Kick [Z]
-A more powerful version of the Scarlet Terror that performs two backflip
 kicks in a row. At Level 3, a third backflip kick is added.
    Level 1: 5 Hits      Level 2: 6 Hits        Level 3: 9 Hits
Red Impact: CB,F,B,F+Punch [Z(LV3)]
-Balrog will perform a short claw swipe, which will toss his opponent into the
 air above him. He will then spin around and impale them with his claw. Balrog
 must be holding his claw to perform this attack.
    Level 3: 2 Hits


