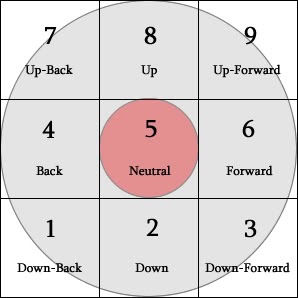
Directions
Button layout
Third Strike uses 6 buttons: LP, MP, HP, LK, MK, and HK.
Button Combinations
![]() +
+![]() : Throw
: Throw
- Performs a close-range throw that cannot be blocked. Some characters can also throw while in the air. The same input is used to defend (tech) against throws, both on the ground and in the air.
- A throw tech can also be input while crouching, but if the defending character is not already being thrown, then cr.LP will come out (resulting in a failed throw tech).
- Additionally, there is a bug in which attempted throw techs will fail if input on the same frame that the throw connects (3rd frame). This also locks out any further throw tech attempts.
![]() +
+![]() : Universal Overhead (UOH)
: Universal Overhead (UOH)
- Performs a short hopping attack that must be blocked standing. Generally, combos are only possible if spaced or timed to hit later in the attack's active frames.
![]() +
+![]() : Personal Action (Taunt)
: Personal Action (Taunt)
- Performs a unique taunt animation, usually granting a bonus effect such as increased health, damage, or faster stun reduction.
- Several taunts can also hit the opponent, and some may be required to do so in order to grant the bonus.
- Some taunts can be held or performed multiple times to stack their bonus effects.
Special Move Inputs
| 236 | Quarter Circle Forward | Down > Down-forward > Forward | |
| 214 | Quarter Circle Back | Down > Down-back > Back | |
| 41236 | Half Circle Forward | Back > Down-back > Down > Down-forward > Forward | |
| 63214 | Half Circle Back | Forward > Down-forward > Down > Down-back > Back | |
| 623 | Dragon Punch | Forward > Down > Down-forward | |
| 421 | Reverse Dragon Punch | Back > Down > Down-back | |
| 6248 4268 |
360° Spin | Can spin stick clockwise or counterclockwise (Must hit all 4 cardinal directions - R, D, L, U) | |
| [4]6 | Charge Back + Forward | Holding Down+Back (1) will charge both direction at once | |
| [2]8 | Charge Down + Up | Holding Down+Back (1) will charge both direction at once | |
(Mash) |
Rapidly tap kicks | Chun-Li only -Some specials/supers have enhanced properties when mashing |
Super Art Inputs
Most Super Arts require the same input: ![]()
![]() followed by a
followed by a ![]() or
or ![]() .
.
- A few supers must be done while in the air
- The strength of the button press may affect the move's properties
Exceptions:
![]() - 360 degree spin (Alex SA1 only)
- 360 degree spin (Alex SA1 only)
- Input requires 4 cardinal directions (u, r, d, l) to be considered valid -- diagonal inputs do not matter
![]()
![]() - 720 degree spin (Hugo SA1 only)
- 720 degree spin (Hugo SA1 only)
- Input requires 7 cardinal directions (u, r, d, l) to be considered valid -- diagonal inputs do not matter
![]()
![]()
![]()
![]()
![]() - Shun Goku Satsu (Akuma only)
- Shun Goku Satsu (Akuma only)
![]()
![]()
![]() - Kongou Kokuretsu Zan (Akuma only)
- Kongou Kokuretsu Zan (Akuma only)


