Introduction
Feeling somewhat empty since his last match with Ryu, Sagat now realizes that Ryu has purposely thrown out the match so his grudge can be satisfied. Sagat also realized the source of his scar comes from the Satsui no Hado, a dark power that possessed Ryu when he was first defeated by him. Realizing that anger and hatred have corrupted his actions, Sagat now actively seeks out Ryu to not fight him cleanly again for revenge, but out of honor.
|
|
| Pros |
Cons |
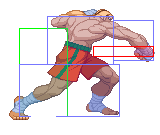
- c. FP is one of the best normals in the game. Great range/speed with an insane amount of priority.
- Some decent long range normals in s. LK, s. RH and s. MP
- Tiger knee is fast, good for mobility and reasonably safe on block in many situations
- Some of the best custom combos in the game, amazing anti-air setups and potential infinite setups that are very difficult to escape
- Can punish a ton of stuff from very far away with activates
- One of the easier CC infinites that doesn't require reactivates
- Larger than normal grab range
- One of the fastest backward walk speeds
- j. RH has good priority.
- Jab tiger uppercut has good horizontal range and can be difficult to punish effectively without meter for some characters
|
- Tallest character in the game with a very fat hurtbox makes him very vulnerable to guard crush pressure and a lot of standing combos
- Airborne hurtbox is very large
- Forward walk speed is very slow
- Sweep is very slow to start up.
- BnBs aren't great without meter
- s. MK has a lousy hurtbox, despite the animation
- Tiger uppercut is airborne very early and can be airblocked even somewhat deep
- Tiger uppercut has terrible i-frames compared to other DP moves
- Tiger shots have absolutely awful recovery/damage with giant extended hurtboxes
- Very meter dependent due to his weak neutral. A polarizing character due to how strong he is with meter and how weak he is without.
|
Moves List
Normal Moves
Ground Normals
| Damage |
7 |

|
| Stun |
2
|
| Chain Cancel |
No
|
| Special Cancel |
Yes
|
| Super Cancel |
Yes
|
| Meter on whiff/hit |
0/1
|
| Frame Count |
5/6/13
|
| Block Stun |
-5
|
| Hit Stun/Counter Hit |
-4/+1
|
| Damage |
12 |
|
| Stun |
4
|
| Chain Cancel |
No
|
| Special Cancel |
Yes
|
| Super Cancel |
Yes
|
| Meter on whiff/hit |
1/A3/XV4
|
| Frame Count |
6/3/25
|
| Block Stun |
-9
|
| Hit Stun/Counter Hit |
-8/-4
|
| Damage |
11 |

|
| Stun |
4
|
| Chain Cancel |
No
|
| Special Cancel |
No
|
| Super Cancel |
No
|
| Meter on whiff/hit |
1/A3/XV4
|
| Frame Count |
8/4/17
|
| Block Stun |
-2
|
| Hit Stun/Counter Hit |
-1/+3
|
| Damage |
17/16 |
|
| Stun |
8
|
| Chain Cancel |
No
|
| Special Cancel |
Yes
|
| Super Cancel |
Yes
|
| Meter on whiff/hit |
1/A4/XV6
|
| Frame Count |
7/5/26
|
| Block Stun |
-8
|
| Hit Stun/Counter Hit |
-7/Launch
|
Only the first active part can be special/super cancelled.
| Damage |
17 |
|
| Stun |
8
|
| Chain Cancel |
No
|
| Special Cancel |
No
|
| Super Cancel |
No
|
| Meter on whiff/hit |
1/A4/XV6
|
| Frame Count |
10/6/28
|
| Block Stun |
-11
|
| Hit Stun/Counter Hit |
-10/Launch
|
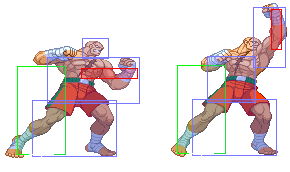
- Close/Far Standing Short:
| Damage |
3+2 |
|
| Stun |
1x2
|
| Chain Cancel |
No
|
| Special Cancel |
Yes
|
| Super Cancel |
Yes
|
| Meter on whiff/hit |
0/1x2
|
| Frame Count |
5/4/3/20
|
| Block Stun |
-9
|
| Hit Stun/Counter Hit |
-8/-3
|
Only the first hit can be cancelled.
- Close/Far Standing Forward:
| Damage |
12 |

|
| Stun |
4
|
| Chain Cancel |
No
|
| Special Cancel |
No
|
| Super Cancel |
No
|
| Meter on whiff/hit |
1/A3/XV4
|
| Frame Count |
10/3/26
|
| Block Stun |
-10
|
| Hit Stun/Counter Hit |
-9/-5
|
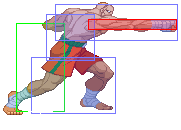
- Close/Far Standing Roundhouse:
| Damage |
9+8 |
|
| Stun |
4x2
|
| Chain Cancel |
No
|
| Special Cancel |
Yes
|
| Super Cancel |
Yes
|
| Meter on whiff/hit |
1/A1x2/XV3x2
|
| Frame Count |
6/3/2/29
|
| Block Stun |
-8
|
| Hit Stun/Counter Hit |
-7/Launch
|
Only the first hit is cancelleable.
| Damage |
6 |

|
| Stun |
2
|
| Chain Cancel |
No
|
| Special Cancel |
Yes
|
| Super Cancel |
Yes
|
| Meter on whiff/hit |
0/1
|
| Frame Count |
6/4/7
|
| Block Stun |
+3
|
| Hit Stun/Counter Hit |
+4/+9
|
| Damage |
11 |

|
| Stun |
4
|
| Chain Cancel |
No
|
| Special Cancel |
Yes
|
| Super Cancel |
Yes
|
| Meter on whiff/hit |
1/A3/XV4
|
| Frame Count |
5/4/13
|
| Block Stun |
+2
|
| Hit Stun/Counter Hit |
+3/+7
|
| Damage |
16 |

|
| Stun |
8
|
| Chain Cancel |
No
|
| Special Cancel |
No
|
| Super Cancel |
No
|
| Meter on whiff/hit |
1/A6/XV9
|
| Frame Count |
8/5/15
|
| Block Stun |
+3
|
| Hit Stun/Counter Hit |
+4/Launch
|
| Damage |
5 |
|
| Stun |
2
|
| Chain Cancel |
No
|
| Special Cancel |
Yes
|
| Super Cancel |
Yes
|
| Meter on whiff/hit |
0/1
|
| Frame Count |
4/4/7
|
| Block Stun |
+3
|
| Hit Stun/Counter Hit |
+4/+9
|
| Damage |
11 |

|
| Stun |
4
|
| Chain Cancel |
No
|
| Special Cancel |
Yes*
|
| Super Cancel |
Yes*
|
| Meter on whiff/hit |
1/A3/XV4
|
| Frame Count |
7/4/21
|
| Block Stun |
-6
|
| Hit Stun/Counter Hit |
-5/-1
|
- Cannot be special/super cancelled in A/Z, since you have no supers in V, it only super cancels in X.
| Damage |
16 |
|
| Stun |
8
|
| Chain Cancel |
No
|
| Special Cancel |
No
|
| Super Cancel |
No
|
| Meter on whiff/hit |
1/A4/XV6
|
| Frame Count |
9/5/26
|
| Block Stun |
-8
|
| Hit Stun/Counter Hit |
Knockdown/Launch
|
Air Normals
- Neutral/Diagonal Jumping Jab:
| Damage |
7 |

|
| Stun |
2
|
| Chain Cancel |
No
|
| Special Cancel |
No
|
| Super Cancel |
No
|
| Meter on whiff/hit |
0/1
|
| Frame Count |
4/10/Lands
|
| Block Stun |
N/A
|
| Hit Stun/Counter Hit |
N/A
|
- Neutral/Diagonal Jumping Strong:
| Damage |
12 |

|
| Stun |
16
|
| Chain Cancel |
No
|
| Special Cancel |
No
|
| Super Cancel |
No
|
| Meter on whiff/hit |
1/A3/XV4
|
| Frame Count |
4/8/Lands
|
| Block Stun |
N/A
|
| Hit Stun/Counter Hit |
N/A
|
- Neutral/Diagonal Jumping Fierce:
| Damage |
18 |

|
| Stun |
8
|
| Chain Cancel |
No
|
| Special Cancel |
No
|
| Super Cancel |
No
|
| Meter on whiff/hit |
1/A4/XV6
|
| Frame Count |
10/6/Lands
|
| Block Stun |
N/A
|
| Hit Stun/Counter Hit |
N/A
|
| Damage |
6 |

|
| Stun |
2
|
| Chain Cancel |
No
|
| Special Cancel |
No
|
| Super Cancel |
No
|
| Meter on whiff/hit |
0/1
|
| Frame Count |
6/10/Lands
|
| Block Stun |
N/A
|
| Hit Stun/Counter Hit |
N/A
|
| Damage |
6 |

|
| Stun |
2
|
| Chain Cancel |
No
|
| Special Cancel |
No
|
| Super Cancel |
No
|
| Meter on whiff/hit |
0/1
|
| Frame Count |
6/10/Lands
|
| Block Stun |
N/A
|
| Hit Stun/Counter Hit |
N/A
|
| Damage |
11 |

|
| Stun |
4
|
| Chain Cancel |
No
|
| Special Cancel |
No
|
| Super Cancel |
No
|
| Meter on whiff/hit |
1/A3/XV4
|
| Frame Count |
6/8/Lands
|
| Block Stun |
N/A
|
| Hit Stun/Counter Hit |
N/A
|
- Diagonal Jumping Forward:
| Damage |
11 |

|
| Stun |
4
|
| Chain Cancel |
No
|
| Special Cancel |
No
|
| Super Cancel |
No
|
| Meter on whiff/hit |
1/A3/XV4
|
| Frame Count |
8/8/Lands
|
| Block Stun |
N/A
|
| Hit Stun/Counter Hit |
N/A
|
- Neutral Jumping Roundhouse:
| Damage |
17 |

|
| Stun |
8
|
| Chain Cancel |
No
|
| Special Cancel |
No
|
| Super Cancel |
No
|
| Meter on whiff/hit |
1/A4/XV6
|
| Frame Count |
8/6/Lands
|
| Block Stun |
N/A
|
| Hit Stun/Counter Hit |
N/A
|
- Diagonal Jumping Roundhouse:
| Damage |
17 |

|
| Stun |
8
|
| Chain Cancel |
No
|
| Special Cancel |
No
|
| Super Cancel |
No
|
| Meter on whiff/hit |
1/A4/XV6
|
| Frame Count |
8/6/Lands
|
| Block Stun |
N/A
|
| Hit Stun/Counter Hit |
N/A
|
Special Moves
Tiger Shot: QCF+Punch [X Z V]
-Sagat tosses a wave-shaped fireball high across the screen. The stronger the
 Punch button used, the faster the projectile travels.
Ground Tiger Shot: QCF+Kick [X Z V]
-Sagat crouches down and tosses a wave-shaped fireball low across the screen.
 The stronger the Kick button used, the faster the projectile travels.
Tiger Blow: F,D,DF+Punch [Z V]
-Sagat will rise into the air with an uppercut. The stronger the Punch button
 used, the higher and faster Sagat will punch. Using MP or HP, the uppercut
 will hit 5 or 7 times respectively.
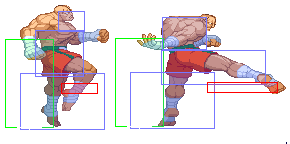
Tiger Crush: F,D,DF+Kick [Z V]
-Sagat hops forward with a quick high knee strike. The stronger the Kick
 button used, the farther Sagat will leap. Note that this attack has a
 different motion in X-Ism.
Tiger Crush: QCF,UF+Kick [X]
-Sagat hops forward with a quick high knee strike. The stronger the Kick
 button used, the farther Sagat will leap. Note that this attack has a
 different motion in Z-Ism and V-Ism.
Tiger Uppercut: F,D,DF+Punch [X]
-Sagat will rise into the air with an uppercut. The stronger the Punch button
 used, the higher and faster Sagat will punch. This attack can hit twice up
 close.
Super Combos
Tiger Genocide: QCF,D,DF+Kick [X A]
-A more powerful version of the Tiger Crush and Tiger Blow/Uppercut, Sagat
 hops forward with a multi-hitting Tiger Crush knee strike, then follows with
 a multi-hitting Tiger Blow/Uppercut. At Level 3, he will perform a second
 Tiger Blow/Uppercut.
    Level 1: 7 Hits      Level 2: 10 Hits      Level 3: 14 Hits
Tiger Cannon: QCF,QCF+Punch [A]
-A more powerful version of the Tiger Shot, Sagat tosses a multi-hitting
 wave-shaped fireball high across the screen. This can be used to cancel an
 oncoming projectile, removing one hit from the total. At Level 3, the
 fireball will burn opponents and knock them down.
    Level 1: 4 Hits      Level 2: 5 Hits       Level 3: 6 Hits
Tiger Raid: QCB,QCB+Kick [A]
-Sagat performs a series of increasingly high kicks, followed by a leaping
 multi-hit kick straight across the screen. At Level 3, Sagat's leg becomes
 fiery during the jumpkick for more damage.
    Level 1: 6 Hits      Level 2: 7 Hits       Level 3: 7 Hits
Angry Charge: QCF+Taunt [A]
-Sagat's scar on his chest glows while he does a pose, this will cost a single stock/ 1/3 of your meter.
The damage of the next tiger blow will be increased.
The Basics
Which Ism?
A-Ism
Unfortunately, one of the weakest characters in the game, despite him having his usual toolset. They gutted his tiger shots and tiger uppercut badly enough that he struggles in neutral against a lot of characters.
V-Ism
Recommended.
The character is very meter dependent, so you definitely want to play V-Sagat.
X-Ism
Advanced Strategy
Match-ups
Discussion
Game Navigation
| General
|
|
|
|
|
| Characters
|
|
|
|
|
| Home/Handheld Exclusive
|
|
|


