GolcarJack (talk | contribs) |
GolcarJack (talk | contribs) |
||
| Line 13: | Line 13: | ||
*<b>Close Standing Jab:</b> | *<b>Close Standing Jab:</b> | ||
{{STDiagramHeader}} | {{STDiagramHeader}} | ||
{{STDiagramCell| Damage}} |{{STDiagramCell| 5}} |{{STDiagramImageCell| 9 | | {{STDiagramCell| Damage}} |{{STDiagramCell| 5}} |{{STDiagramImageCell| 9 | a3cammycloselp.PNG}} | ||
|- | |- | ||
{{STDiagramCell| Stun}} |{{STDiagramCell| 2}} | {{STDiagramCell| Stun}} |{{STDiagramCell| 2}} | ||
| Line 34: | Line 34: | ||
*<b>Far Standing Jab:</b> | *<b>Far Standing Jab:</b> | ||
{{STDiagramHeader}} | {{STDiagramHeader}} | ||
{{STDiagramCell| Damage}} |{{STDiagramCell| 5}} |{{STDiagramImageCell| 9 | | {{STDiagramCell| Damage}} |{{STDiagramCell| 5}} |{{STDiagramImageCell| 9 | a3cammyfarlp.PNG}} | ||
|- | |- | ||
{{STDiagramCell| Stun}} |{{STDiagramCell| 2}} | {{STDiagramCell| Stun}} |{{STDiagramCell| 2}} | ||
| Line 55: | Line 55: | ||
*<b>Close Standing Strong:</b> | *<b>Close Standing Strong:</b> | ||
{{STDiagramHeader}} | {{STDiagramHeader}} | ||
{{STDiagramCell| Damage}} |{{STDiagramCell| 12/9}} |{{STDiagramImageCell| 9 | | {{STDiagramCell| Damage}} |{{STDiagramCell| 12/9}} |{{STDiagramImageCell| 9 | a3cammyclosemp.png}} | ||
|- | |- | ||
{{STDiagramCell| Stun}} |{{STDiagramCell| 4}} | {{STDiagramCell| Stun}} |{{STDiagramCell| 4}} | ||
| Line 77: | Line 77: | ||
*<b>Far Standing Strong:</b> | *<b>Far Standing Strong:</b> | ||
{{STDiagramHeader}} | {{STDiagramHeader}} | ||
{{STDiagramCell| Damage}} |{{STDiagramCell| 12}} |{{STDiagramImageCell| 9 | | {{STDiagramCell| Damage}} |{{STDiagramCell| 12}} |{{STDiagramImageCell| 9 | a3cammyfarmp.PNG}} | ||
|- | |- | ||
{{STDiagramCell| Stun}} |{{STDiagramCell| 4}} | {{STDiagramCell| Stun}} |{{STDiagramCell| 4}} | ||
| Line 98: | Line 98: | ||
*<b>Close Standing Fierce:</b> | *<b>Close Standing Fierce:</b> | ||
{{STDiagramHeader}} | {{STDiagramHeader}} | ||
{{STDiagramCell| Damage}} |{{STDiagramCell| 15}} |{{STDiagramImageCell| 9 | | {{STDiagramCell| Damage}} |{{STDiagramCell| 15}} |{{STDiagramImageCell| 9 | a3cammyclosehp.PNG}} | ||
|- | |- | ||
{{STDiagramCell| Stun}} |{{STDiagramCell| 8}} | {{STDiagramCell| Stun}} |{{STDiagramCell| 8}} | ||
| Line 119: | Line 119: | ||
*<b>Far Standing Fierce:</b> | *<b>Far Standing Fierce:</b> | ||
{{STDiagramHeader}} | {{STDiagramHeader}} | ||
{{STDiagramCell| Damage}} |{{STDiagramCell| 15/14}} |{{STDiagramImageCell| 9 | | {{STDiagramCell| Damage}} |{{STDiagramCell| 15/14}} |{{STDiagramImageCell| 9 | a3cammyfarhp.png}} | ||
|- | |- | ||
{{STDiagramCell| Stun}} |{{STDiagramCell| 8/6}} | {{STDiagramCell| Stun}} |{{STDiagramCell| 8/6}} | ||
| Line 140: | Line 140: | ||
*<b>Close Standing Short:</b> | *<b>Close Standing Short:</b> | ||
{{STDiagramHeader}} | {{STDiagramHeader}} | ||
{{STDiagramCell| Damage}} |{{STDiagramCell| 4}} |{{STDiagramImageCell| 9 | | {{STDiagramCell| Damage}} |{{STDiagramCell| 4}} |{{STDiagramImageCell| 9 | a3cammycloselk.PNG}} | ||
|- | |- | ||
{{STDiagramCell| Stun}} |{{STDiagramCell| 2}} | {{STDiagramCell| Stun}} |{{STDiagramCell| 2}} | ||
| Line 161: | Line 161: | ||
*<b>Far Standing Short:</b> | *<b>Far Standing Short:</b> | ||
{{STDiagramHeader}} | {{STDiagramHeader}} | ||
{{STDiagramCell| Damage}} |{{STDiagramCell| 5}} |{{STDiagramImageCell| 9 | | {{STDiagramCell| Damage}} |{{STDiagramCell| 5}} |{{STDiagramImageCell| 9 | a3cammyfarlk.PNG}} | ||
|- | |- | ||
{{STDiagramCell| Stun}} |{{STDiagramCell| 2}} | {{STDiagramCell| Stun}} |{{STDiagramCell| 2}} | ||
| Line 182: | Line 182: | ||
*<b>Close Standing Forward:</b> | *<b>Close Standing Forward:</b> | ||
{{STDiagramHeader}} | {{STDiagramHeader}} | ||
{{STDiagramCell| Damage}} |{{STDiagramCell| 9}} |{{STDiagramImageCell| 9 | | {{STDiagramCell| Damage}} |{{STDiagramCell| 9}} |{{STDiagramImageCell| 9 | a3cammyclosemk.PNG}} | ||
|- | |- | ||
{{STDiagramCell| Stun}} |{{STDiagramCell| 4}} | {{STDiagramCell| Stun}} |{{STDiagramCell| 4}} | ||
| Line 203: | Line 203: | ||
*<b>Far Standing Forward:</b> | *<b>Far Standing Forward:</b> | ||
{{STDiagramHeader}} | {{STDiagramHeader}} | ||
{{STDiagramCell| Damage}} |{{STDiagramCell| 10}} |{{STDiagramImageCell| 9 | | {{STDiagramCell| Damage}} |{{STDiagramCell| 10}} |{{STDiagramImageCell| 9 | a3cammyfarmk.PNG}} | ||
|- | |- | ||
{{STDiagramCell| Stun}} |{{STDiagramCell| 4}} | {{STDiagramCell| Stun}} |{{STDiagramCell| 4}} | ||
| Line 224: | Line 224: | ||
*<b>Close Standing Roundhouse:</b> | *<b>Close Standing Roundhouse:</b> | ||
{{STDiagramHeader}} | {{STDiagramHeader}} | ||
{{STDiagramCell| Damage}} |{{STDiagramCell| 8/7}} |{{STDiagramImageCell| 9 | | {{STDiagramCell| Damage}} |{{STDiagramCell| 8/7}} |{{STDiagramImageCell| 9 | a3cammyclosehk.png}} | ||
|- | |- | ||
{{STDiagramCell| Stun}} |{{STDiagramCell| 8}} | {{STDiagramCell| Stun}} |{{STDiagramCell| 8}} | ||
| Line 245: | Line 245: | ||
*<b>Far Standing Roundhouse:</b> | *<b>Far Standing Roundhouse:</b> | ||
{{STDiagramHeader}} | {{STDiagramHeader}} | ||
{{STDiagramCell| Damage}} |{{STDiagramCell| 16/14}} |{{STDiagramImageCell| 9 | | {{STDiagramCell| Damage}} |{{STDiagramCell| 16/14}} |{{STDiagramImageCell| 9 | a3cammyfarhk.png}} | ||
|- | |- | ||
{{STDiagramCell| Stun}} |{{STDiagramCell| 8/6}} | {{STDiagramCell| Stun}} |{{STDiagramCell| 8/6}} | ||
| Line 266: | Line 266: | ||
*<b>Crouching Jab:</b> | *<b>Crouching Jab:</b> | ||
{{STDiagramHeader}} | {{STDiagramHeader}} | ||
{{STDiagramCell| Damage}} |{{STDiagramCell| 5}} |{{STDiagramImageCell| 9 | | {{STDiagramCell| Damage}} |{{STDiagramCell| 5}} |{{STDiagramImageCell| 9 | a3cammycrlp.PNG}} | ||
|- | |- | ||
{{STDiagramCell| Stun}} |{{STDiagramCell| 2}} | {{STDiagramCell| Stun}} |{{STDiagramCell| 2}} | ||
| Line 287: | Line 287: | ||
*<b>Crouching Strong:</b> | *<b>Crouching Strong:</b> | ||
{{STDiagramHeader}} | {{STDiagramHeader}} | ||
{{STDiagramCell| Damage}} |{{STDiagramCell| 12}} |{{STDiagramImageCell| 9 | | {{STDiagramCell| Damage}} |{{STDiagramCell| 12}} |{{STDiagramImageCell| 9 | a3cammycrmp.PNG}} | ||
|- | |- | ||
{{STDiagramCell| Stun}} |{{STDiagramCell| 4}} | {{STDiagramCell| Stun}} |{{STDiagramCell| 4}} | ||
| Line 308: | Line 308: | ||
*<b>Crouching Fierce:</b> | *<b>Crouching Fierce:</b> | ||
{{STDiagramHeader}} | {{STDiagramHeader}} | ||
{{STDiagramCell| Damage}} |{{STDiagramCell| 13}} |{{STDiagramImageCell| 9 | | {{STDiagramCell| Damage}} |{{STDiagramCell| 13}} |{{STDiagramImageCell| 9 | a3cammycrhp.PNG}} | ||
|- | |- | ||
{{STDiagramCell| Stun}} |{{STDiagramCell| 8}} | {{STDiagramCell| Stun}} |{{STDiagramCell| 8}} | ||
| Line 329: | Line 329: | ||
*<b>Crouching Short:</b> | *<b>Crouching Short:</b> | ||
{{STDiagramHeader}} | {{STDiagramHeader}} | ||
{{STDiagramCell| Damage}} |{{STDiagramCell| 4}} |{{STDiagramImageCell| 9 | | {{STDiagramCell| Damage}} |{{STDiagramCell| 4}} |{{STDiagramImageCell| 9 | a3cammycrlk.PNG}} | ||
|- | |- | ||
{{STDiagramCell| Stun}} |{{STDiagramCell| 2}} | {{STDiagramCell| Stun}} |{{STDiagramCell| 2}} | ||
| Line 350: | Line 350: | ||
*<b>Crouching Forward:</b> | *<b>Crouching Forward:</b> | ||
{{STDiagramHeader}} | {{STDiagramHeader}} | ||
{{STDiagramCell| Damage}} |{{STDiagramCell| 9}} |{{STDiagramImageCell| 9 | | {{STDiagramCell| Damage}} |{{STDiagramCell| 9}} |{{STDiagramImageCell| 9 | a3cammycrmk.PNG}} | ||
|- | |- | ||
{{STDiagramCell| Stun}} |{{STDiagramCell| 4}} | {{STDiagramCell| Stun}} |{{STDiagramCell| 4}} | ||
| Line 371: | Line 371: | ||
*<b>Crouching Roundhouse:</b> | *<b>Crouching Roundhouse:</b> | ||
{{STDiagramHeader}} | {{STDiagramHeader}} | ||
{{STDiagramCell| Damage}} |{{STDiagramCell| 14}} |{{STDiagramImageCell| 9 | | {{STDiagramCell| Damage}} |{{STDiagramCell| 14}} |{{STDiagramImageCell| 9 | a3cammycrhk.PNG}} | ||
|- | |- | ||
{{STDiagramCell| Stun}} |{{STDiagramCell| 8}} | {{STDiagramCell| Stun}} |{{STDiagramCell| 8}} | ||
Revision as of 09:33, 26 May 2021

Introduction
Moves List
Normal Moves
Ground Normals
- Close Standing Jab:
| Damage | 5 | 
|
| Stun | 2 | |
| Chain Cancel | Yes | |
| Special Cancel | Yes | |
| Super Cancel | Yes | |
| Meter on whiff/hit | 0/1 | |
| Frame Count | 3/4/8 | |
| Block Stun | +2 | |
| Hit Stun/Counter Hit | +3/+8 |
- Far Standing Jab:
| Damage | 5 | 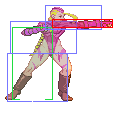
|
| Stun | 2 | |
| Chain Cancel | Yes | |
| Special Cancel | Yes | |
| Super Cancel | Yes | |
| Meter on whiff/hit | 0/1 | |
| Frame Count | 4/4/8 | |
| Block Stun | +2 | |
| Hit Stun/Counter Hit | +3/+8 |
- Close Standing Strong:
| Damage | 12/9 | 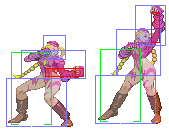
|
| Stun | 4 | |
| Chain Cancel | No | |
| Special Cancel | Yes/Yes* | |
| Super Cancel | No | |
| Meter on whiff/hit | 1/A3/XV4 | |
| Frame Count | 4/4/16 | |
| Block Stun | -1 | |
| Hit Stun/Counter Hit | +0/+4 |
- In V-ism, the second part of this attack can also be special cancelled.
- Far Standing Strong:
| Damage | 12 | 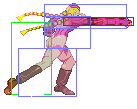
|
| Stun | 4 | |
| Chain Cancel | No | |
| Special Cancel | Yes | |
| Super Cancel | Yes | |
| Meter on whiff/hit | 1/A3/XV4 | |
| Frame Count | 6/4/11 | |
| Block Stun | +4 | |
| Hit Stun/Counter Hit | +5/+9 |
- Close Standing Fierce:
| Damage | 15 | 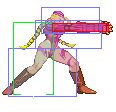
|
| Stun | 8 | |
| Chain Cancel | No | |
| Special Cancel | Yes | |
| Super Cancel | Yes | |
| Meter on whiff/hit | 1/A6/XV9 | |
| Frame Count | 6/5/12 | |
| Block Stun | +6 | |
| Hit Stun/Counter Hit | +7/Launch |
- Far Standing Fierce:
| Damage | 15/14 | 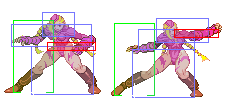
|
| Stun | 8/6 | |
| Chain Cancel | No | |
| Special Cancel | No | |
| Super Cancel | No | |
| Meter on whiff/hit | 1/A6/4/XV9/6 | |
| Frame Count | 6/8/12 | |
| Block Stun | +3 | |
| Hit Stun/Counter Hit | +4/Launch |
- Close Standing Short:
| Damage | 4 | 
|
| Stun | 2 | |
| Chain Cancel | Yes | |
| Special Cancel | Yes | |
| Super Cancel | Yes | |
| Meter on whiff/hit | 0/1 | |
| Frame Count | 3/6/6 | |
| Block Stun | +2 | |
| Hit Stun/Counter Hit | +3/+8 |
- Far Standing Short:
| Damage | 5 | 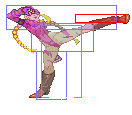
|
| Stun | 2 | |
| Chain Cancel | No | |
| Special Cancel | Yes | |
| Super Cancel | Yes | |
| Meter on whiff/hit | 0/1 | |
| Frame Count | 4/2/16 | |
| Block Stun | -4 | |
| Hit Stun/Counter Hit | -3/+2 |
- Close Standing Forward:
| Damage | 9 | 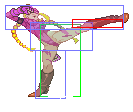
|
| Stun | 4 | |
| Chain Cancel | No | |
| Special Cancel | Yes | |
| Super Cancel | Yes | |
| Meter on whiff/hit | 1/A3/XV4 | |
| Frame Count | 5/2/16 | |
| Block Stun | +1 | |
| Hit Stun/Counter Hit | +2/+6 |
- Far Standing Forward:
| Damage | 10 | 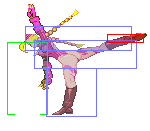
|
| Stun | 4 | |
| Chain Cancel | No | |
| Special Cancel | No | |
| Super Cancel | No | |
| Meter on whiff/hit | 1/A3/XV4 | |
| Frame Count | 7/2/17 | |
| Block Stun | +0 | |
| Hit Stun/Counter Hit | +1/+5 |
- Close Standing Roundhouse:
| Damage | 8/7 | 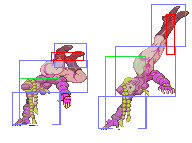
|
| Stun | 8 | |
| Chain Cancel | No | |
| Special Cancel | No | |
| Super Cancel | No | |
| Meter on whiff/hit | 1/A6/XV9 | |
| Frame Count | 9/5/22 | |
| Block Stun | -4 | |
| Hit Stun/Counter Hit | -3/Launch |
- Far Standing Roundhouse:
| Damage | 16/14 | 
|
| Stun | 8/6 | |
| Chain Cancel | No | |
| Special Cancel | No | |
| Super Cancel | No | |
| Meter on whiff/hit | 1/A6/4/XV9/6 | |
| Frame Count | 8/8/26 | |
| Block Stun | -11 | |
| Hit Stun/Counter Hit | -10/Launch |
- Crouching Jab:
| Damage | 5 | 
|
| Stun | 2 | |
| Chain Cancel | Yes | |
| Special Cancel | Yes | |
| Super Cancel | Yes | |
| Meter on whiff/hit | 0/1 | |
| Frame Count | 3/4/7 | |
| Block Stun | +3 | |
| Hit Stun/Counter Hit | +4/+9 |
- Crouching Strong:
| Damage | 12 | 
|
| Stun | 4 | |
| Chain Cancel | No | |
| Special Cancel | Yes | |
| Super Cancel | Yes | |
| Meter on whiff/hit | 1/A3/XV4 | |
| Frame Count | 5/4/10 | |
| Block Stun | +5 | |
| Hit Stun/Counter Hit | +6/+10 |
- Crouching Fierce:
| Damage | 13 | 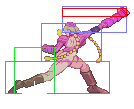
|
| Stun | 8 | |
| Chain Cancel | No | |
| Special Cancel | No | |
| Super Cancel | No | |
| Meter on whiff/hit | 1/A6/XV9 | |
| Frame Count | 8/2/20 | |
| Block Stun | +1 | |
| Hit Stun/Counter Hit | +2/Launch |
- Crouching Short:
| Damage | 4 | 
|
| Stun | 2 | |
| Chain Cancel | No | |
| Special Cancel | Yes | |
| Super Cancel | Yes | |
| Meter on whiff/hit | 0/1 | |
| Frame Count | 4/4/7 | |
| Block Stun | +3 | |
| Hit Stun/Counter Hit | +4/+9 |
- Crouching Forward:
| Damage | 9 | 
|
| Stun | 4 | |
| Chain Cancel | No | |
| Special Cancel | No | |
| Super Cancel | No | |
| Meter on whiff/hit | 1/A3/XV4 | |
| Frame Count | 6/4/19 | |
| Block Stun | -4 | |
| Hit Stun/Counter Hit | -3/+1 |
- Crouching Roundhouse:
| Damage | 14 | 
|
| Stun | 8 | |
| Chain Cancel | No | |
| Special Cancel | No | |
| Super Cancel | No | |
| Meter on whiff/hit | 1/A6/XV9 | |
| Frame Count | 7/4/27 | |
| Block Stun | -8 | |
| Hit Stun/Counter Hit | Knockdown/Launch |
Air Normals
- Neutral Jumping Jab:
| Damage | 5 | File:A3cammmynjlp.PNG |
| Stun | 2 | |
| Chain Cancel | No | |
| Special Cancel | No | |
| Super Cancel | No | |
| Meter on whiff/hit | 0/1 | |
| Frame Count | 3/10/20 | |
| Block Stun | N/A | |
| Hit Stun/Counter Hit | N/A |
- Diagonal Jumping Jab:
| Damage | 5 | File:A3cammmydjlp.PNG |
| Stun | 2 | |
| Chain Cancel | No | |
| Special Cancel | No | |
| Super Cancel | No | |
| Meter on whiff/hit | 0/1 | |
| Frame Count | 5/10/2 | |
| Block Stun | N/A | |
| Hit Stun/Counter Hit | N/A |
- Neutral Jumping Strong:
| Damage | 11 | File:A3cammmynjmp.PNG |
| Stun | 4 | |
| Chain Cancel | No | |
| Special Cancel | No | |
| Super Cancel | No | |
| Meter on whiff/hit | 1/A3/XV4 | |
| Frame Count | 5/8/2 | |
| Block Stun | N/A | |
| Hit Stun/Counter Hit | N/A |
- Diagonal Jumping Strong:
| Damage | 11 | File:A3cammmydjmp.PNG |
| Stun | 4 | |
| Chain Cancel | No | |
| Special Cancel | No | |
| Super Cancel | No | |
| Meter on whiff/hit | 1/A3/XV4 | |
| Frame Count | 6/8/2 | |
| Block Stun | N/A | |
| Hit Stun/Counter Hit | N/A |
- Neutral Jumping Fierce:
| Damage | 16 | File:A3cammmynjhp.PNG |
| Stun | 8 | |
| Chain Cancel | No | |
| Special Cancel | No | |
| Super Cancel | No | |
| Meter on whiff/hit | 1/A6/XV9 | |
| Frame Count | 5/6/2 | |
| Block Stun | N/A | |
| Hit Stun/Counter Hit | N/A |
- Diagonal Jumping Fierce:
| Damage | 16 | File:A3cammmydjhp.PNG |
| Stun | 8 | |
| Chain Cancel | No | |
| Special Cancel | No | |
| Super Cancel | No | |
| Meter on whiff/hit | 1/A6/XV9 | |
| Frame Count | 5/6/2 | |
| Block Stun | N/A | |
| Hit Stun/Counter Hit | N/A |
- Neutral/Diagonal Jumping Short:
| Damage | 5 | File:A3cammmynjlk.PNG |
| Stun | 2 | |
| Chain Cancel | No | |
| Special Cancel | No | |
| Super Cancel | No | |
| Meter on whiff/hit | 0/1 | |
| Frame Count | 4/10/2 | |
| Block Stun | N/A | |
| Hit Stun/Counter Hit | N/A |
- Neutral/Diagonal Jumping Forward:
| Damage | 9 | File:A3cammmynjmk.PNG |
| Stun | 4 | |
| Chain Cancel | No | |
| Special Cancel | No | |
| Super Cancel | No | |
| Meter on whiff/hit | 1/A3/XV4 | |
| Frame Count | 7/8/6 | |
| Block Stun | N/A | |
| Hit Stun/Counter Hit | N/A |
- Neutral Jumping Roundhouse:
| Damage | 14 | File:A3cammmynjhk.PNG |
| Stun | 8 | |
| Chain Cancel | No | |
| Special Cancel | No | |
| Super Cancel | No | |
| Meter on whiff/hit | 1/A6/XV9 | |
| Frame Count | 6/8/6 | |
| Block Stun | N/A | |
| Hit Stun/Counter Hit | N/A |
- Diagonal Jumping Roundhouse:
| Damage | 15 | File:A3cammmydjhk.PNG |
| Stun | 8 | |
| Chain Cancel | No | |
| Special Cancel | No | |
| Super Cancel | No | |
| Meter on whiff/hit | 1/A6/XV9 | |
| Frame Count | 6/8/6 | |
| Block Stun | N/A | |
| Hit Stun/Counter Hit | N/A |
Special Moves
Spiral Arrow: QCF+Kick [X Z V]
-Cammy will spin herself forward low along the ground feet-first. The
 stronger the Kick button used, the faster and farther Cammy spins. This
 attack can be used to pass under some projectile attacks. Using HK will
 hit twice up close.
Cannon Spike: F,D,DF+Kick [X Z V]
-Cammy performs a high rising kick into the air. The stronger the Kick button
 used, the higher and farther Cammy kicks.
Hooligan Combination: DB,D,DF,F,UF+Punch [X Z V]
-Cammy will roll into a ball and jump forward. This can be cancelled by
 pressing any Kick button, or followed into one of these attacks:
  -Fatal Leg Twister: (any direction but Up)+Kick (near opponent's head)
     -Cammy performs a Frankensteiner throw attack. Press the button when
      Cammy is near her opponent's head.
  -Cross Scissors Pressure: (any direction but Up)+Kick (near opponent's body)
     -Cammy will grab her opponent and spin them into the air, then land on
      them with a stomp. Press the button when Cammy is near her opponent's
      body.
  -Razor Edge Slicer: Neutral
     -Cammy will perform a sliding kick upon hitting the ground if nothing is
      done during the Hooligan Combination roll.
Axel Spinning Knuckle: HCB+Punch [X Z]
-Cammy will spin forward and perform a double-hit backfist. The spin before
 the attack is able to dodge oncoming attacks if the timing is right. The
 stronger the Punch used, the farther Cammy will spin.
Cannon Strike (jumping forward): QCB+Kick [V]
-Cammy dives almost straight down with a kick. The stronger the Kick button
 used, the fast Cammy will dive.
Cannon Revenge: QCB+Punch [V]
-Cammy raises an arm as if to block as says "Come on!". If she is hit by a
 high attack while in this stance, she will automatically counterattack with
 a Cannon Spike. If she isn't hit, she will pull her arm back and be unable
 to move for a moment. The stronger the Punch button used, the longer she
 stays in the counterattacking stance, but the longer she will be stunned
 after as well.
[Notes]
-If a Cannon Spike or Cannon Strike is blocked, Cammy will bounce back into
 the air and be quit open to a counterattack.
Super Combos
Spin Drive Smasher: QCF,D,DF+Kick [X Z]
-A more powerful version of the Spiral Arrow and Cannon Spike, Cammy will
 perform a multi-hitting Spiral Arrow, followed by a multi-hitting Cannon Spike.
    Level 1: 6 Hits      Level 2: 7 Hits       Level 3: 9 Hits
Reverse Shaft Breaker: QCB,QCB+Kick [Z]
-A more powerful variation of the Spiral Arrow, Cammy will spin straight up
 feet-first. Press the Control Pad Left and Right and all buttons rapidly
 during the spin for more hits.
    Level 1: 12 Hits     Level 2: 14 Hits      Level 3: 18 Hits
Killerbee Assault: CDB,DF,DB,UF+Kick [Z(LV3)]
-Cammy will leap up to the top of the screen, then push off of it and kick at
 her opponent. If she hits, she will bounce off the top and bottom of the
 screen while kicking twice more, then stomp them to the ground with a Cross
 Scissors Pressure.
    Level 3: 5 Hits
The Basics
Which Ism?
A-Ism
V-Ism
Recommended
