GolcarJack (talk | contribs) |
GolcarJack (talk | contribs) |
||
| Line 1: | Line 1: | ||
== Introduction == | == Introduction == | ||
Claw returns after being sealed away since ST, and for good reason, as he's still a very powerful character with great mobility, and strong pokes/neutral. | Claw returns after being sealed away since ST, and for good reason, as he's still a very powerful character with great mobility, and strong pokes/neutral. | ||
[[File:A3clawsjc.png]] | |||
== Moves List == | == Moves List == | ||
Revision as of 11:32, 12 May 2021
Introduction
Claw returns after being sealed away since ST, and for good reason, as he's still a very powerful character with great mobility, and strong pokes/neutral.
Moves List
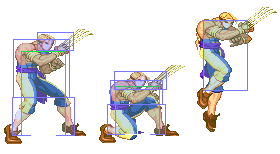
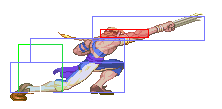
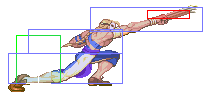
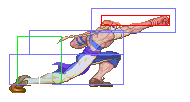
- Note : Claws normals that have him attack with his claw, will generally have different hitboxes for with or without his claw attached, and in some cases other things can be effected by this.
Normal Moves
- Close/Far Standing Jab:
| Damage | 5 | 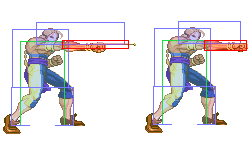
|
| Stun | 2 | |
| Chain Cancel | No | |
| Special Cancel | Yes | |
| Super Cancel | Yes | |
| Meter on whiff/hit | 0/1 | |
| Frame Count | 5/4/8 | |
| Block Stun | +2 | |
| Hit Stun/Counter Hit | +3/+8 |
- Close Standing Strong (X):
| Damage | 12 | 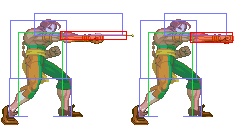
|
| Stun | 4 | |
| Chain Cancel | No | |
| Special Cancel | No | |
| Super Cancel | No | |
| Meter on whiff/hit | 1/4 | |
| Frame Count | 7/4/11 | |
| Block Stun | +4 | |
| Hit Stun/Counter Hit | +5/+9 |
- Close/Far Standing Strong (A/V) Far Standing Strong (X):
| Damage | 11 | 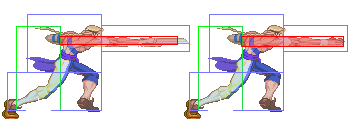
|
| Stun | 4 | |
| Chain Cancel | No | |
| Special Cancel | No | |
| Super Cancel | No | |
| Meter on whiff/hit | 1/A3/XV4 | |
| Frame Count | 8/2/14 | |
| Block Stun | +3 | |
| Hit Stun/Counter Hit | +4/+8 |
- Close/Far Standing Fierce:
| Damage | 14 | 
|

| ||
| Stun | 13/8 | |
| Chain Cancel | No | |
| Special Cancel | No | |
| Super Cancel | No | |
| Meter on whiff/hit | 1/A4/XV6 | |
| Frame Count | 10/5/21 | |
| Block Stun | -3 | |
| Hit Stun/Counter Hit | -2/Launch |
- Close/Far Standing Short:
| Damage | 5 | 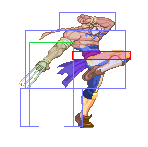
|
| Stun | 2 | |
| Chain Cancel | No | |
| Special Cancel | Yes | |
| Super Cancel | Yes | |
| Meter on whiff/hit | 0/1 | |
| Frame Count | 3/4/11 | |
| Block Stun | -1 | |
| Hit Stun/Counter Hit | 0/+5 |
- Close/Far Standing Forward:
| Damage | 10 | 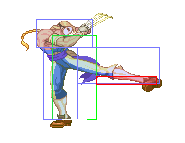
|
| Stun | 4 | |
| Chain Cancel | No | |
| Special Cancel | Yes | |
| Super Cancel | Yes | |
| Meter on whiff/hit | 1/A3/XV4 | |
| Frame Count | 6/6/15 | |
| Block Stun | -2 | |
| Hit Stun/Counter Hit | -1/+3 |
- Close/Far Standing Roundhouse:
| Damage | 16/15 | 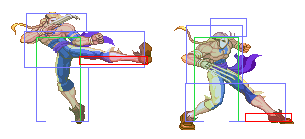
|
| Stun | 8 | |
| Chain Cancel | No | |
| Special Cancel | No | |
| Super Cancel | No | |
| Meter on whiff/hit | 1/A4/XV6 | |
| Frame Count | 24/6/21 | |
| Block Stun | -4 | |
| Hit Stun/Counter Hit | -3/Launch |
- Crouching Jab:
| Damage | 4 | 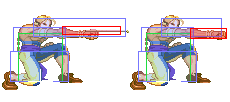
|
| Stun | 2 | |
| Chain Cancel | No | |
| Special Cancel | Yes | |
| Super Cancel | Yes | |
| Meter on whiff/hit | 0/1 | |
| Frame Count | 5/4/8 | |
| Block Stun | +2 | |
| Hit Stun/Counter Hit | +3/+8 |
- Crouching Strong:
| Damage | 12/10 | 
|

| ||

| ||
| Stun | 4 | |
| Chain Cancel | No | |
| Special Cancel | No | |
| Super Cancel | No | |
| Meter on whiff/hit | 1/A3/XV4 | |
| Frame Count | 5/4/18 | |
| Block Stun | -3 | |
| Hit Stun/Counter Hit | -2/+2 |
- Crouching Fierce:
Without the claw he only has the second active part.
- Crouching Short (A/V):
| Damage | 4 | 
|
| Stun | 2 | |
| Chain Cancel | No | |
| Special Cancel | Yes | |
| Super Cancel | Yes | |
| Meter on whiff/hit | 0/1 | |
| Frame Count | 4/4/7 | |
| Block Stun | +3 | |
| Hit Stun/Counter Hit | +4/+9 |
- Crouching Short (X):
| Damage | 2 | 
|
| Stun | 2 | |
| Chain Cancel | No | |
| Special Cancel | Yes | |
| Super Cancel | Yes | |
| Meter on whiff/hit | 0/1 | |
| Frame Count | 5/3/10 | |
| Block Stun | +1 | |
| Hit Stun/Counter Hit | +2/+7 |
- Crouching Forward :
| Damage | 10 | 
|
| Stun | 4 | |
| Chain Cancel | No | |
| Special Cancel | Yes | |
| Super Cancel | Yes | |
| Meter on whiff/hit | 1/A3/XV4 | |
| Frame Count | 6/4/11 | |
| Block Stun | +4 | |
| Hit Stun/Counter Hit | +5/+9 |
- Crouching Roundhouse :
The two damage/dizzy values are determined by how early/late the attack hits, with the former doing the higher amount. Can be made safe/less unsafe if it hits later.
Air Normals
- Neutral Jump Jab (A/V):
| Damage | 4 | 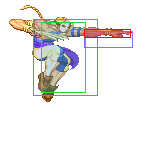
|
| Stun | 2 | |
| Chain Cancel | No | |
| Special Cancel | No | |
| Super Cancel | No | |
| Meter on whiff/hit | 0/1 | |
| Frame Count | 3/8/6 | |
| Block Stun | N/A | |
| Hit Stun/Counter Hit | N/A |
Claw does a quick jab, he uses his arm without the claw, this attack is the same regardless of if your claw is on or not.
- Diagonal Jump Jab (A/V):
| Damage | 4 | 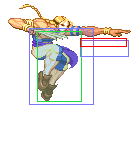
|
| Stun | 2 | |
| Chain Cancel | No | |
| Special Cancel | No | |
| Super Cancel | No | |
| Meter on whiff/hit | 0/1 | |
| Frame Count | 3/8/6 | |
| Block Stun | N/A | |
| Hit Stun/Counter Hit | N/A |
Claw does a quick jab, he uses his arm without the claw, this attack is the same regardless of if your claw is on or not.
- Neutral/Diagonal Jump Jab (X):
| Damage | 4 | 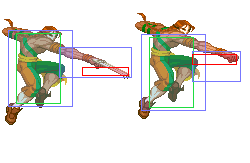
|
| Stun | 2 | |
| Chain Cancel | No | |
| Special Cancel | No | |
| Super Cancel | No | |
| Meter on whiff/hit | 0/1 | |
| Frame Count | 4/6/Land | |
| Block Stun | N/A | |
| Hit Stun/Counter Hit | N/A |
- Neutral/Diagonal Jump Strong :
| Damage | 10 | 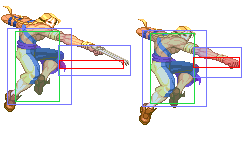
|
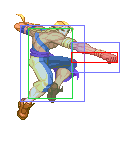
| ||
| Stun | 4 | |
| Chain Cancel | No | |
| Special Cancel | No | |
| Super Cancel | No | |
| Meter on whiff/hit | 1/A3/XV4 | |
| Frame Count | 6/4/6 | |
| Block Stun | N/A | |
| Hit Stun/Counter Hit | N/A |
- Neutral Jump Fierce (A/V):
| Damage | 13 | 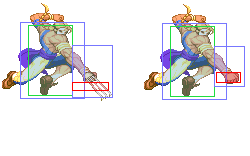
|
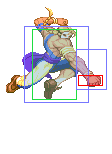
| ||
| Stun | 8 | |
| Chain Cancel | No | |
| Special Cancel | No | |
| Super Cancel | No | |
| Meter on whiff/hit | 1/A4/XV6 | |
| Frame Count | 8/4/6 | |
| Block Stun | N/A | |
| Hit Stun/Counter Hit | N/A |
- Diagonal Jump Fierce :
| Damage | 13 | 
|

| ||
| Stun | 8 | |
| Chain Cancel | No | |
| Special Cancel | No | |
| Super Cancel | No | |
| Meter on whiff/hit | 1/A4/XV6 | |
| Frame Count | 8/4/6 | |
| Block Stun | N/A | |
| Hit Stun/Counter Hit | N/A |
- Neutral Jump Fierce (X):
| Damage | 13 | 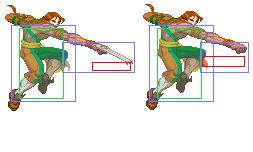
|
| Stun | 8 | |
| Chain Cancel | No | |
| Special Cancel | No | |
| Super Cancel | No | |
| Meter on whiff/hit | 1/9 | |
| Frame Count | 8/4/Land | |
| Block Stun | N/A | |
| Hit Stun/Counter Hit | N/A |
- Neutral/Diagonal Jump Short (A/V) Diagonal Jump Short (X):
| Damage | 5 | 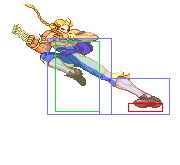
|
| Stun | 2 | |
| Chain Cancel | No | |
| Special Cancel | No | |
| Super Cancel | No | |
| Meter on whiff/hit | 0/1 | |
| Frame Count | 6/5/9 | |
| Block Stun | N/A | |
| Hit Stun/Counter Hit | N/A |
- Neutral Jump Short (X):
| Damage | 5 | 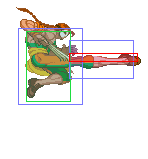
|
| Stun | 2 | |
| Chain Cancel | No | |
| Special Cancel | No | |
| Super Cancel | No | |
| Meter on whiff/hit | 0/1 | |
| Frame Count | 4/6/Land | |
| Block Stun | N/A | |
| Hit Stun/Counter Hit | N/A |
- Neutral/Diagonal Jump Forward (A/V):
| Damage | 10 | 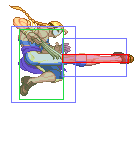
|
| Stun | 4 | |
| Chain Cancel | No | |
| Special Cancel | No | |
| Super Cancel | No | |
| Meter on whiff/hit | 1/A3/V4 | |
| Frame Count | 6/4/8 | |
| Block Stun | N/A | |
| Hit Stun/Counter Hit | N/A |
- Neutral Jump Forward (X):
| Damage | 10 | 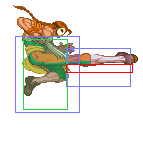
|
| Stun | 4 | |
| Chain Cancel | No | |
| Special Cancel | No | |
| Super Cancel | No | |
| Meter on whiff/hit | 1/4 | |
| Frame Count | 6/4/8 | |
| Block Stun | N/A | |
| Hit Stun/Counter Hit | N/A |
- Diagonal Jump Forward (X):
| Damage | 10 | 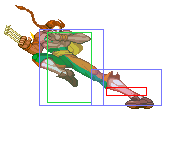
|
| Stun | 4 | |
| Chain Cancel | No | |
| Special Cancel | No | |
| Super Cancel | No | |
| Meter on whiff/hit | 1/4 | |
| Frame Count | 8/2/Land | |
| Block Stun | N/A | |
| Hit Stun/Counter Hit | N/A |
- Neutral Jump Roundhouse :
| Damage | 14 | 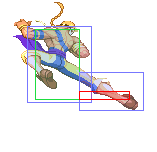
|
| Stun | 8 | |
| Chain Cancel | No | |
| Special Cancel | No | |
| Super Cancel | No | |
| Meter on whiff/hit | 1/A4/XV6 | |
| Frame Count | 8/2/7 | |
| Block Stun | N/A | |
| Hit Stun/Counter Hit | N/A |
- Diagonal Jump Roundhouse :
| Damage | 9 | 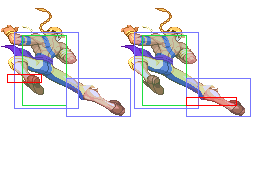
|
| Stun | 13/8 | |
| Chain Cancel | No | |
| Special Cancel | No | |
| Super Cancel | No | |
| Meter on whiff/hit | 1/A4/XV6 | |
| Frame Count | 6/4/10 | |
| Block Stun | N/A | |
| Hit Stun/Counter Hit | N/A |
Command Normals
- Wall Jump : (When in the corner or edge of the screen, any direction away from the wall during a jump)
| Damage | 17 | 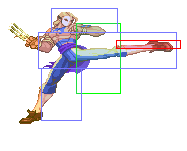
|
| Stun | 8 | |
| Chain Cancel | No | |
| Special Cancel | No | |
| Super Cancel | No | |
| Meter on whiff/hit | 1/A4/XV6 | |
| Frame Count | 30/4/23 | |
| Block Stun | -4 | |
| Hit Stun/Counter Hit | -12/-7 |
Special Moves
Rolling Crystal Flash: CB,F+Punch [X Z V]
-Balrog will roll forward and finish with an upper claw stab. The stronger the
 Punch button used, the more times Balrog will roll and hit.
Sky High Claw: CD,U+Punch (Punch) [X Z V]
-Balrog will leap back and push himself off the wall, claw first. Pressing
 a Punch button during the attack will stretch out Balrog's arm for a slightly
 longer range. The weaker the Punch button used, the higher Balrog will shoot
 across the screen. Balrog will always try to jump to the wall behind him for
 this attack, but pressing (UF) instead of (U) will make him leap to the
 opposite wall and perform the attack.
Wall Leap: CD,U+Kick [X Z V]
-Balrog will leap back and push himself off the side of the screen towards his
 opponent. Balrog will always leap to whichever side of the screen he is closest
 to, unless (UF) or (UB) is used at the end of  the motion. After Balrog has
 pushed off the wall, hold Left or Right to slightly move him in the air. The
 following attacks can be used after the Wall Leap:
  []Flying Barcelona Attack: Punch                                    [X Z V]
     -Balrog will slash his arms out below him, hitting opponents on both sides,
      but not directly below him.
  []Izuna Drop (throw): (any direction but Up)+Punch                  [X Z V]
     -Balrog will grab them and perform a powerful suplex. This can only be done
      if Balrog is very close to his opponent.
Scarlet Terror: CDB,F+Kick [V]
-Balrog will backflip and kick while moving slightly forward. The stronger the
 Kick button used, the higher and farther Balrog will flip.
Super Combos
Super Wall Leap: CDB,DF,DB,UF+Kick [X Z]
-A more powerful version of the Wall Leap, Balrog will leap forward and push
 himself off the side of the screen towards his opponent. Balrog will always
 leap towards the opposite side of the screen, unless (UB) is used at the end
 of the motion instead of (UF). After Balrog has pushed off the wall, hold Left
 or Right to slightly move him in the air. The following attacks can be used
 after the Super Wall Leap:
  []Flying Barcelona Special: Punch                                     [X Z]
     -A more powerful version of the Flying Barcelona Attack, Balrog will slash
      his arms out below him, hitting opponents multiple times on both sides,
      but not directly below him.
         Level 1: 2 Hits      Level 2: 3 Hits        Level 3: 4 Hits
  []Rolling Izuna Drop (throw): (any direction but Up)+Punch            [X Z]
     -A more powerful version of the Izuna Drop, Balrog will grab the opponent
      and perform multiple powerful suplexes. This can only be done if Balrog
      is very close to his opponent.
         Level 1: 2 Hits      Level 2: 3 Hits        Level 3: 4 Hits
Scarlet Mirage: CB,F,B,F+Kick [Z]
-A more powerful version of the Scarlet Terror that performs two backflip
 kicks in a row. At Level 3, a third backflip kick is added.
    Level 1: 5 Hits      Level 2: 6 Hits        Level 3: 9 Hits
Red Impact: CB,F,B,F+Punch [Z(LV3)]
-Balrog will perform a short claw swipe, which will toss his opponent into the
 air above him. He will then spin around and impale them with his claw. Balrog
 must be holding his claw to perform this attack.
    Level 3: 2 Hits
The Basics
Which Ism?
You always want to run V on Claw, he has good conversions and guard crush/chip strings with CC.
A-Ism
V-Ism
Recommended
Your Variable Combos are excellent as Anti Airs and Ground pressure.
X-Ism
Avoid it, you only have your Air Command Grab Super Combo and you don't have normals for RFWA.
Advanced Strategy
V-Ism Combos
-Midscreen-
-Anti Air-
VC3:low jab-> roundhouse scarlet terror(db,f+k)->[stand roundhouse-> roundhouse scarlet terror] x n -> in corner[stand fierce-> stand roundhouse-> short backslash(kkk)] x n
-Ground-
VC3: low short-> roundhouse scarlet terror x 2->[stand roundhouse-> roundhouse scarlet terror] x n -> in corner[stand fierce-> stand roundhouse-> short backslash(kkk)] x n
-Crouch cancel-
Counter hit jump attack-> crouch cancel jump activate vc1, crouch cancel jump roundhouse x n -> vc ends-> crouch cancelled jump short x n P1 only.
Note: If you're p2, once you get to the corner you need to do a jumping roundhouse to hit them out of the corner in order to continue in the other direction.
-Corner-
VC2:low forward-> fierce rolling crystal flash(b,f+p) x n Note: it also makes a good block damage vc in the corner.
