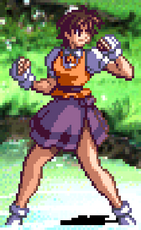
Advanced V.G. 2/Satomi: Difference between revisions

From SuperCombo Wiki
No edit summary
(Added hidden color to color gallery, adjusted width of gallery columns to fit all in one row)
 
(15 intermediate revisions by 3 users not shown)
Line 1: Line 1:
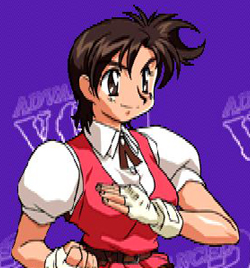
[[File:avg2_satomi.jpg|right|to win, you must punch more gooder]]
{{AVG2 Character Intro|char=satomi|short=sat|content=


== Introduction ==
== Introduction ==
''Satomi is gonna swing her arms around like this, and if you get hit, it's your own fault.''


Satomi is one of the strongest characters in the game thanks to her straightforward, but overwhelmingly effective gameplan. She has some of the most fearsome normals in the game that allow her to bully her opponent in neutral, both sticking hitboxes out for the opponent to run into and being able to tag them for errent pokes with her whiff punish abilities. When the opponent has had enough and finally decides to jump, Satomi can unleash EX Kaenzan, the greatest anti-air in the game for beefy damage. Not only this, but when she gets into the enemy's face she can start a simple mixup with her cr.LK and Gokuensho overhead. While not as flashy as other characters in the game, her simplicity is a benefit because she doesn't require as much meter and thusly will usually have EX Kaenzan on deck.
Satomi is your go-to girl if you're tired of being nice. Sporting fearsome normals, including a HP button that would make CVS2 Sagat shed a tear, an unreactable overhead in {{Tooltip|text=Gokuenshou|hovertext=214K}} and the undisputed best DP in the game in {{Tooltip|text=Kaenzan|hovertext=421P}}, Satomi is a character whose primary goal is to respond to everything the opponent tries to do with a resounding "no", tidily controlling the pace of neutral in the process. However, because her strengths are concentrated in such specific areas of her kit, she has a tendency to be overly linear at times, which can lead to her getting shut down by more patient opponents. This in turn hinders her ability to score meaningful damage, as her combos, while powerful, provide very few situations to confirm into them, forcing her to rely on risky mixups to bring opponents down.


{{StrengthsAndWeaknesses
| intro =  
| intro = [[File:avg2 satomi mini.png|20px]] '''Satomi''' is the resident "gorilla" character who wants to use her strong pokes and powerful defensive tools to bully opponents into submission, allowing her to enforce her unreactable 50/50 mixups.
| pros =
| pros =
* TBD
* '''Incredible Neutral:''' With her 5HP, Kaenzan and even a very strong projectile reflector in {{Tooltip|text=Ouho|hovertext=214P}}, Satomi is able to handle just about any neutral or defensive situation you can throw at her, and then some.
* '''Unassailable Defense:''' Kaenzan really is just that good. A fast DP with generous invincibility, a hitbox that covers both sides of Satomi, and recovery that makes it very difficult to meaningfully punish, Satomi can get away with mashing DP far more than she really should.
* '''Unseeable Mixups:''' Gokuenshou is a lightning-fast overhead that knocks the opponent down on hit, meaning that when she's in range, she can skip the pressure and go straight to running completely unreactable mixups between 2LK and Gokuenshou, all leading to an okizeme situation that sets up the mixup once again.
| cons =
| cons =
* TBD
* '''Linear:''' Satomi has a bunch of strong tools, but her strength being concentrated in such specific parts of her kit means that she's liable to be much more predictable than other characters, and in turn, easier to read and punish.
* '''Limited Opportunites For Big Damage:''' Satomi is capable of some serious damage, but opportunities to score that damage are very limited, thanks to a generally low capacity to confirm hits into meaningful combos, which means Satomi can inadvertently give her opponent more chances to make a comeback than other characters.
}}
}}


== Movelist ==
== Stats ==
----
{{AVG2 Character Data
{{MoveData
| atk = A
|image=
| def = C
|caption=
| djump = Yes
|name=st.LK
| dbrake = No
|data=
| bd = 28F (Throw Invul)
{{AttackData-AVG2
| wkup = 12F
|guard= Mid
|startup=  
|active=-
|recovery=-
|frameAdv=-
|description=  
}}
}}
}}
{{MoveData
|image=
|caption=bonk
|name=st.HP
|data=
{{AttackData-AVG2
|guard= Mid
|startup= 5
|active=-
|recovery=-
|frameAdv=-
|description= The button of all time.
}}
}}
{{MoveData
|image=
|caption=
|name=st.HK
|data=
{{AttackData-AVG2
|guard= Mid
|startup=
|active=-
|recovery=-
|frameAdv=-
|description=
}}
}}
{{MoveData
|image=
|caption=
|name=cr.LP
|data=
{{AttackData-AVG2
|guard= Low
|startup=
|active=-
|recovery=-
|frameAdv=-
|description=
}}
}}
{{MoveData
|image=
|caption=
|name=cr.LK
|data=
{{AttackData-AVG2
|guard= Low
|startup=
|active=-
|recovery=-
|frameAdv=-
|description=
}}
}}
{{MoveData
|image=
|caption=
|name=cr.HP
|data=
{{AttackData-AVG2
|guard= Mid
|startup=
|active=-
|recovery=-
|frameAdv=-
|description=
}}
}}
{{MoveData
|image=
|caption=
|name=cr.HK
|data=
{{AttackData-AVG2
|guard= Low
|startup=
|active=-
|recovery=-
|frameAdv=-
|description=
}}
}}
{{MoveData
|image=
|caption=
|name=j.LP
|data=
{{AttackData-AVG2
|guard=High
|startup=
|active=-
|recovery=-
|frameAdv=-
|description=
}}
}}
{{MoveData
|image=
|caption=
|name=j.LK
|data=
{{AttackData-AVG2
|guard= High
|startup=
|active=-
|recovery=-
|frameAdv=-
|description=
}}
}}
{{MoveData
|image=
|caption=
|name=j.HP
|data=
{{AttackData-AVG2
|guard= High
|startup=
|active=-
|recovery=-
|frameAdv=-
|description=
}}
}}
{{MoveData
|image=
|caption=
|name=j.HK
|data=
{{AttackData-AVG2
|guard= High
|startup=
|active=-
|recovery=-
|frameAdv=-
|description=
}}
}}
'''Target Combos'''<br>
st.LP > (st.HP > st.HK)/(st.HK > st.HP)<br>
st.LP > (cr.LP) > st.LK > (cr.LK) > (st.HP > st.HK)/(st.HK > st.HP)<br>
st.HP > st.HK<br>
cr.LP > cr.HP<br>
cr.LP > (st.LP) > cr.LK > cr.HK<br>
st.LK > cr.LK<br>
j.LP/LK > j.HP/j.HK
'''Guard Cancels'''<br>
LP: st.LP<br>
LK: st.LK<br>
HP: LK Gokuensho<br>
HK: LP Kaenzan<br>
LP has the best reward on hit, but LK is more reliable in more situations, and HP is a good catch-all guard cancel for knockdowns. HK has the best hitbox, but its speed as a guard cancel is strangely slow, making it somewhat unreliable.


=== Special Moves ===
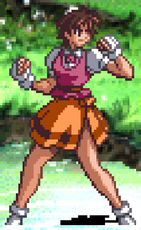
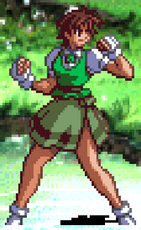
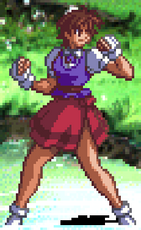
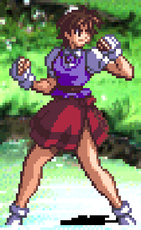
== Color Options ==
{{MoveData
{{ColorGallery | filePrefix=AVG2_Satomi_Color_| imageWidths=187| colors=
|image=AVG2_Satomi_Kaenzan.jpg
  {{ColorGallery/Color|Circletext=Circle (Default) }}
|caption= {{Motion|421}} + {{Icon-Capcom|P}}
  {{ColorGallery/Color|Triangletext=Triangle }}
|name=Kaenzan
  {{ColorGallery/Color|Squaretext=Square }}
|data=
  {{ColorGallery/Color|R1text=R1 }}
{{AttackData-AVG2
  {{ColorGallery/Color|R2text=R2 }}
|version={{Icon-Capcom|LP}}
  {{ColorGallery/Color|Starttext=Start (Hidden) }}
|guard= Mid
|startup=
|active=-
|recovery=-
|frameAdv=-
|description=
}}
{{AttackData-AVG2
|header=no
|version={{Icon-Capcom|HP}}
|guard= Mid
|startup=
|active=-
|recovery=-
|frameAdv=-
|description=
}}
{{AttackData-AVG2
|header=no
|version={{Icon-Capcom|LP}} + {{Icon-Capcom|HP}}
|guard= Mid
|startup=
|active=-
|recovery=-
|frameAdv=-
|description=
}}
}}
{{MoveData
|image=AVG2_Satomi_Gokuensho.jpg
|caption= {{Motion|214}} + {{Icon-Capcom|K}}
|name=Gokuensho
|data=
{{AttackData-AVG2
|version={{Icon-Capcom|LK}}
|guard=
|startup=
|active=-
|recovery=-
|frameAdv=-
|description=
}}
{{AttackData-AVG2
|header=no
|version={{Icon-Capcom|HK}}
|guard=
|startup=
|active=-
|recovery=-
|frameAdv=-
|description=
}}
{{AttackData-AVG2
|header=no
|version={{Icon-Capcom|LK}} + {{Icon-Capcom|HK}}
|guard=
|startup=
|active=-
|recovery=-
|frameAdv=-
|description=
}}
}}
{{MoveData
|image=AVG2_Satomi_Shinku_Karatake_Wari.jpg
|caption= {{Motion|41236}} + {{Icon-Capcom|P}}
|name=Shinku Karatake Wari
|data=
  {{AttackData-AVG2
|version={{Icon-Capcom|LP}}
|guard=
|startup=
  |active=-
|recovery=-
|frameAdv=-
|description=
}}
  {{AttackData-AVG2
|header=no
|version={{Icon-Capcom|HP}}
|guard=
|startup=
  |active=-
|recovery=-
|frameAdv=-
|description=
}}
  {{AttackData-AVG2
|header=no
|version={{Icon-Capcom|LP}} + {{Icon-Capcom|HP}}
|guard=
|startup=
  |active=-
|recovery=-
|frameAdv=-
|description=
}}
}}
{{MoveData
|image=AVG2_Satomi_Ouhou.jpg
|caption= {{Motion|214}} + {{Icon-Capcom|P}}
|name=Ouhou
|data=
  {{AttackData-AVG2
|version={{Icon-Capcom|LP}}
|guard=
|startup=
|active=-
|recovery=-
|frameAdv=-
  |description=  
}}
  {{AttackData-AVG2
|header=no
|version={{Icon-Capcom|HP}}
|guard=
  |startup=  
|active=-
|recovery=-
|frameAdv=-
|description=
}}
  {{AttackData-AVG2
|header=no
|version={{Icon-Capcom|LP}} + {{Icon-Capcom|HP}}
|guard=
|startup=
|active=-
|recovery=-
  |frameAdv=-
|description=
}}
}}
}}


=== Super Moves ===
'''Hissatsu Kyokushinken (f,hcf+K):'''<br>
{{MoveData
|image=AVG2_Satomi_Hissatsu_Kyokushinken .jpg
|caption= {{Motion|6}}{{Motion|41236}} + {{Icon-Capcom|K}}
|name=Hissatsu Kyokushinken
|data=
{{AttackData-AVG2
|guard=
|startup=
|active=-
|recovery=-
|frameAdv=-
|description=
}}
}}
}}
== Combos ==
'''Basic Combos'''<br>
'''Anti-Air Combos'''<br>
'''Guard Break String'''<br>
'''Misc. Combo'''<br>
== Frame Data ==
Soon.


{{Navbox-AVG2}}
{{Navbox-AVG2}}
[[Category:Advanced V.G. 2]]
[[Category:Advanced V.G. 2]]

Latest revision as of 14:49, 8 May 2023

Introduction

Satomi is gonna swing her arms around like this, and if you get hit, it's your own fault.

Satomi is your go-to girl if you're tired of being nice. Sporting fearsome normals, including a HP button that would make CVS2 Sagat shed a tear, an unreactable overhead in Gokuenshou and the undisputed best DP in the game in Kaenzan, Satomi is a character whose primary goal is to respond to everything the opponent tries to do with a resounding "no", tidily controlling the pace of neutral in the process. However, because her strengths are concentrated in such specific areas of her kit, she has a tendency to be overly linear at times, which can lead to her getting shut down by more patient opponents. This in turn hinders her ability to score meaningful damage, as her combos, while powerful, provide very few situations to confirm into them, forcing her to rely on risky mixups to bring opponents down.

Avg2 satomi mini.png Satomi is the resident "gorilla" character who wants to use her strong pokes and powerful defensive tools to bully opponents into submission, allowing her to enforce her unreactable 50/50 mixups.
Pros Cons
  • Incredible Neutral: With her 5HP, Kaenzan and even a very strong projectile reflector in Ouho, Satomi is able to handle just about any neutral or defensive situation you can throw at her, and then some.
  • Unassailable Defense: Kaenzan really is just that good. A fast DP with generous invincibility, a hitbox that covers both sides of Satomi, and recovery that makes it very difficult to meaningfully punish, Satomi can get away with mashing DP far more than she really should.
  • Unseeable Mixups: Gokuenshou is a lightning-fast overhead that knocks the opponent down on hit, meaning that when she's in range, she can skip the pressure and go straight to running completely unreactable mixups between 2LK and Gokuenshou, all leading to an okizeme situation that sets up the mixup once again.
  • Linear: Satomi has a bunch of strong tools, but her strength being concentrated in such specific parts of her kit means that she's liable to be much more predictable than other characters, and in turn, easier to read and punish.
  • Limited Opportunites For Big Damage: Satomi is capable of some serious damage, but opportunities to score that damage are very limited, thanks to a generally low capacity to confirm hits into meaningful combos, which means Satomi can inadvertently give her opponent more chances to make a comeback than other characters.


Stats

Attack Defense Dash Jump Dash Brake Backdash Wakeup Speed
A C Yes No 28F (Throw Invul) 12F

Color Options

Circle (Default)
Triangle
Square
R1
R2
Start (Hidden)
Avg2 satomi.jpg


Game Navigation

General
Controls
HUD
System
Advanced Mechanics
FAQ
Characters
Kyoko
Chiho
Tamao
Yuka
Satomi
Manami
Saki
Ayako
Elirin
Jun
Kaori
Reimi
Boss Characters
Material
Miranda