|
|
| (42 intermediate revisions by 4 users not shown) |
| Line 1: |
Line 1: |
| [[File:avg2_ayako.jpg|right|arara~]]
| | {{AVG2 Character Intro|char=ayako|short=aya|content= |
| | == Introduction == |
| | ''Ayako says she’s all about good times and good vibes -- a lover, not a fighter. But I did see her slap the shit out of this guy one time so I’m not sure about the “not a fighter” part.'' |
|
| |
|
| = Introduction =
| | Ayako, despite her party gal image, is a character who excels at space control and grounded footsies. Sporting great pokes, solid anti-airs and a reliable tool for low-profiling moves in neutral, Ayako has just about everything she needs to play a strong ground game that sets up her terrifying throw mixups. However, despite having an air throw and the unique ability to cancel her aerial blockstun with any attack, her air presence is hampered by a relatively weak set of air normals, and her overall damage output leaves something to be desired, even with her solid meter efficiency. |
| ''Ayako is just straight vibin'.''
| |
|
| |
|
| Ayako is, despite appearances, a character who excels at space control and grounded footsies. Sporting great pokes, solid anti-airs and a reliable tool for low-profiling moves in neutral, Ayako has just about everything she needs to play the ground game, and play it well. However, despite having an air throw, her air presence is hampered by a relatively weak set of air normals, and her overall damage output leaves something to be desired, even with her solid meter efficiency. | | {{StrengthsAndWeaknesses |
| | | intro = [[File:avg2 ayako mini.png|20px]] '''Ayako''' is a footsies-focused character who wants to use her dominant pokes to bully opponents into the corner, where she can enforce her powerful throw game. |
| | | pros = |
| | * '''Powerful Footsies:''' Ayako has some of the strongest grounded normals in the game, allowing her to control space with ease, and just as easily convert into reliable combos. |
| | * '''Terrifying Throw Mixups:''' Ayako's throw is one of the scariest in the game due to how consistently rewarding it is, allowing for a combo follow-up at all screen positions, even if the opponent manages to soften it. |
| | * '''Great Meter Efficiency:''' Ayako has a strong set of widely-applicable EX special moves and supers, which couple well with her strong meter building potential to always have extra power backing up her gameplan. |
| | | cons = |
| | * '''Awkward Aerial Presence:''' Despite an air throw and the ability to guard cancel aerial blockstun for free, Ayako's aerial presence is somewhat on the weak side, due to an underwhelming set of aerial normals, which hurts in a game where aerial exchanges are frequent. |
| | * '''Limited Movement:''' Ayako is one of the few characters in the game that both cannot dash brake or dash jump. This means that her movement has to be much more considered, as anything more than walking carries more commitment than other characters. |
| | * '''Inconsistent Reward From Pokes:''' Ayako's primary confirm changes depending on whether or not the opponent is crouching, which when coupled with her high damage routes being fairly situational, means that she has to rely more on resets to score damage than other characters. |
| | }} |
|
| |
|
| {| | | == Stats == |
| |-style="text-align:left;" | | {{AVG2 Character Data |
| ! Strengths !! Weaknesses
| | | atk = C- |
| |- style="vertical-align:top;text-align:left" | | | def = C |
| | style="width: 50%;"| | | | djump = No |
| *Fantastic grounded space control tools that convert into easy damage
| | | dbrake = No |
| *Scary throw game thanks to a normal throw that starts combos even if the opponent softens it
| | | bd = 26F (No Invul) |
| *Very meter efficient, with plenty of ways to build and spend bar
| | | wkup = 20F |
| | style="width: 50%;"| | | }} |
| *Fairly weak aerial presence, despite having an air throw
| |
| *Lack of solid jump normals means you'll be relying largely on grounded approaches
| |
| *Somewhat low combo damage
| |
| |- | |
| |}
| |
|
| |
|
| = Movelist = | | == Color Options == |
| '''Command Moves'''<br>
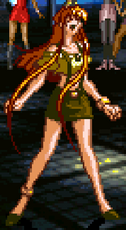
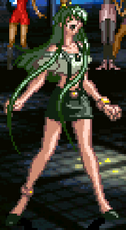
| | {{ColorGallery | filePrefix=AVG2_Ayako_Color_| imageWidths=187| colors= |
| Air Throw: dir.(except u)+HK while airborne
| | {{ColorGallery/Color|Circle| text=Circle (Default) }} |
| | {{ColorGallery/Color|Triangle| text=Triangle }} |
| | {{ColorGallery/Color|Square| text=Square }} |
| | {{ColorGallery/Color|R1| text=R1 }} |
| | {{ColorGallery/Color|R2| text=R2 }} |
| | {{ColorGallery/Color|Start| text=Start (Hidden) }} |
| | }} |
|
| |
|
| '''Target Combos'''<br>
| | }} |
| st.LP > st.LK > st.HP > st.HK<br>
| |
| st.LP > st.LK > cr.HP<br>
| |
| st.LP > st.LK > st.HK > st.HP<br>
| |
| st.LP > st.HP/HK<br>
| |
| cr.LK > cr.LP > cr.HP<br>
| |
| j.LP/LK > j.HP.HK
| |
|
| |
|
| '''Guard Cancels'''<br>
| | {{Navbox-AVG2}} |
| LP: st.LP (cr.LK while crouching)<br>
| |
| LK: st.LK (cr.HK while crouching)<br>
| |
| HP: Mach Spin (qcf+K)<br>
| |
| HK: Rave Storm (qcb+K)<br>
| |
|
| |
|
| Which guard cancel you want to use largely depends on whether or not you're stand or crouch blocking. When stand blocking, you want the LK guard cancel, but you want the LP guard cancel if you're crouching. Both of these lead to a combo into Rave Storm, which makes them your most rewarding options.
| | [[Category: Advanced V.G. 2]] |
| | |
| == Special Moves ==
| |
| '''Mach Spin (qcf+K):''' Despite appearances, it's kind of hard to use as an anti-air. The EX version is Ayako's instant super, giving it some risky offensive and defensive utility outside of also being a situational combo ender.
| |
| | |
| '''SECRET Mach Spin (f,hcf+LK+HK):''' In a word, it's EX Mach Spin without the superflash. Not awful, but it's really just kind of there, so you don't need to worry about it.
| |
| | |
| '''Rave Storm (qcb+K):''' Ayako's primary combo ender -- this is what you'll be defaulting to every time you hit a button in neutral. The EX version can also easily low-profile a lot of attacks, but all versions of the move are horribly unsafe on block. Bear in mind that the third hits of the HK and EX versions do not hit crouching opponents, so you'll need to keep your wits about you so you can pick the right version of the move to combo into.
| |
| | |
| '''Tornado Attack (hcb+P):''' Basically a Demon Flip. Can help with aerial approaches in neutral, but it's also surprisingly useful for mixups.
| |
| | |
| '''-> Slide Kick (hcb+P~no input):'''A slide that knocks down. Quite punishable if it gets blocked, but it very easily leads into a combo on hit in the corner.<br>
| |
| '''-> Fan Chop (hcb+P~K):''' If you input this move just before landing, you essentially get an empty flip without any landing recovery. Since the Fan Chop itself is an overhead, you can set up some very tricky high/low mixups if your opponent is respecting you.<br>
| |
| '''-> Frankensteiner (hcb+P~K directly above opponent):''' Command throw that option selects with the Fan Chop. Since you need to be directly above your opponent for the throw to come out, it won't work on crouching opponents or opponents in the corner.<br>
| |
| | |
| == Super Moves ==
| |
| '''Spiral Dive (f,hcf+K):''' A 1F command throw super. Although it costs two bars, it's an incredibly useful tool to keep in your back pocket. It also doesn't have a whiff animation, so if you're not in range for the throw, you'll just get Mach Spin, which makes it pretty strong against jump-out attempts.
| |
| | |
| '''F・T・I・C (qcb,qcb+P):''' stands for '''Final Tornado Illusion Crisis.''' Although the damage on this attack is huge, the startup is very slow, and because the recovery means that sometimes you can be unsafe on hit, so only use this when you're sure it'll get you the win.
| |
| | |
| = Strategy =
| |
| Ayako thrives at the midrange. You can honestly get a lot of mileage out of basically spamming st.LK, since it's fast, has fantastic range, and chains into itself, allowing you to easily confirm into a combo. If your opponent decides to jump at you, st.HP will very easily swat them out of the air, and since this normal is also a launcher, you'll often be able to convert into a combo even if it trades.<br>
| |
| On defense, you can use EX Mach Spin as a reversal thanks to its speed, but your best bet is to try and land st.HP anti-airs, since most characters will try to start offense with jumping normal chains.<br>
| |
| Ayako is also able to very easily punish throw techs with her st.HP, and combined with her ability to combo after her throw in the corner, this gives her an unexpectedly scary throw game. Learn the timing for st.HP after a throw tech so you don't have to react to it.
| |
| | |
| == Combos ==
| |
| '''Basic Combos'''<br>
| |
| st.LK x1-3 xx Rave Storm<br>
| |
| ''You can cancel Rave Storm into EX Rave Storm if you want to cash out some meter. If you want even more damage, cancel EX Rave Storm into EX Mach Spin or FTIC.''
| |
| | |
| cr.LK > cr.LP > cr.HP xx Rave Storm<br>
| |
| (corner) Throw, st.LK xx HK Rave Storm<br>
| |
| (anti-air) st.HP, sj.LK > j.HK, dash st.HK xx EX Mach Spin<br>
| |
| ''You can also use this combo to punish throw techs.''
| |
| | |
| = Frame Data =
| |
| Soon.
| |
| | |
| {{Template:Advanced V.G. 2}}
| |
| | |
| [[Category:Advanced V.G. 2]] | |
