

Ryu
Ryu learned his Ansatsuken martial art alongside his rival-become-"friend" Ken. Ryu was always the more serious student, resulting in a far superior mastery of fireballs and spinning hurricane kicks.
After defeating Sagat at the Street Fighter 1 tournament in an staggering display of deception skill, Ryu went on to tour the globe with no shoes on. Yearning to learn the meaning of "fight" and to find ever stronger combatants, Ryu became famous for leaving tournaments just before the ceremonies, leaving podium photographs missing the #1 place (much to the chagrin of the organisers).
In a nutshell
Ryu is probably the best character in Hyper Fighting. His moveset covers all the bases, with an excellent projectile, several invincible moves, fantastic anti-airs, and also has very potent combos to cover many situations. He outright dominates E.Honda outside of knockdowns, and only has a couple of bad matchups.
Character Specific Information
Color Options
| Default | Start |
 |

|
Moves List
Normal Moves
- Standing Normal Moves (st.)
- Close Standing Normal Moves (cl.)
- Crouching Normal Moves (cr.)
- Jumping Normal Moves (nj.)
- Diagonal Jumping Normal Moves (j.)
Throws
Special Moves
The Basics
Ryu is powerful, yet predictable. If you've played Fighting Games before, there will rarely be a time where you won't understand a Ryu Player's approach.
- Poke in neutral with cr. MK and cr. HK
- Throw lots of Fireballs. They're always safe on block in Hyper Fighting.
- Anti Air with HK, cr. HP, and Shoryuken!
Pros
- Very consistent. Ryu has an answer for practically everything.
- Most damaging projectile. Jumping attacks easily lead to stun.
Cons
- Hurricane Kick struggles against Shoto Fireballs because of its low invincibility.
- No gimmicks outside of Fireball Traps and Tick Throws. Expect to play lots of neutral with this character.
Advanced Strategy
Fireball counter
Ryu's Tatsumaki Senpuu Kyaku is completely invulnerable during start-up and recovery (11f, 12f). You can use the move to pass through projectiles on reaction during the move's start-up and punish them for using projectiles from close to mid distance, depending on the recovery of their projectile. This completely nullifies Ken's projectile game, for instance.
Air Tatsumaki Senpu Kyaku
The added Air version of his Hurricane Kick isn't great, you can only combo it with a tall character. But is a good pressure tool and also a corner escape. Shotos can whiff cancel into Tatsu from any of their aerial normals. I like to cancel from a move with a better hitbox (nj. HK) for a slight mixup and priority.
Fireball Trap
https://youtu.be/XndyclmjjnU?t=138 Example is from ST, but works similarly in HF. Note Ryu's Fireballs in HF are always safe if blocked.
Tomo Tape
Combos
Bread And Butter
- j.HK, s.HP xx QCF+HP
- cr.MK xx QCF+HP (crouching opponents and safe 2-in-1 option)
- close HP xx f,d,df+LP (Jab Shoryuken) (not deadly as Ken but good for standing opponents)
Meaty Combos
- meaty cr.MP, cr.MK xx QCP+HP
CPS1 Chains
- cr.LK x1~3 xx cl. HP (CPS1 Chain) xx QCP+HP
Redizzy
- crossup j.HK, cr.LK, cr.LK, cps1 chain s.HP xx QCF+HP
- cr.LK, cr.LK, cr.LK, cps1 chain s.HP xx QCF+HP (char specific) [unverified]
Match-ups
Vs. Balrog (Boxer)
Your Air Tatsumaki is a great air to air tool, but be careful about throwing fireballs. Boxer can now evade it with a quick TAP, sweep him.
Vs. Blanka
Now you need to take care about his Vertical Roll,SRK him if he use it, there is no much changes but try to use your Air Hurricane Kick for escape in corner if he wants to trap you with Electricity.
Vs. Chun-Li
Another not changed matchup, but remember you had a better projectile than her,but be careful with her air SBK if she wants to escape,she can evade your Hadokens easily, but be careful to jump in her now, her sweep its still strong, and combined with Kikoken traps can be risky, in close combat the best option is to Shoryuken her to trade hits with Lightning Legs.
Vs. Dhalsim
Against Sim, you don't want to throw a bazillion fireballs. You just want to throw enough to get him into a fireball contest so you can do a random hurricane kick and knock him down, and then follow up with c.LK/cross-up/tick-throw shenanigans. (SweetJohnnyV)
Compared to ST, HF Dhalsim feels like an incomplete character. At this point in Street Fighter history, there were very few command normals. To get access to his best pokes, Dhalsim needs to move in and use close normals- Quite tough given how lethal zoning can be in this game. Yoga Fire's startup is two frames slower than Hadouken, and despite knocking down from fullscreen it isn't actually that strong. Teleport lacks utility and is often sweepable.
cr. LK is so fast and high priority that it beats, trades, or low profiles every one of Dhalsim's far normals except for st. MP. If the Dhalsim player adapts, Ryu can switch to cr. MP instead. cr. MP actually contains a small option select, where Dhalsim's normals can actually put Ryu into proximity guard long before they would actually hit. This means mashing cr. MP can be COMPLETELY SAFE. Ryu will either beat Dhalsim's normal, or recover in time to OS Block.
Dhalsim's only way to mount offense from this position is a Drill, Fireball, or a Yoga Flame, and all three carry a bit of commitment. When the Dhalsim player loses their patience and over commits, be ready with a DP. Dhalsim's life is hell on knockdowns: No offensive reversals and no throw teching make him nearly free to meaties.
TL;DR
You're a better zoner! Throw out Jab DPs and HP Fireballs in neutral to keep Dhalsim from pressing. Neutralize his throw game and most of his grounded pokes by mashing cr. LK. When you inevitably get a knockdown, tick throw him to death.
--Goofball
Vs. E. Honda
Ryu only needs two moves to win this match, jab fireball and crouching roundhouse. Ryu wants to make sure that he is at a distance against E. Honda, so he can do jab fireballs (which E. Honda can't jump straight up over). When E. Honda jumps forward from the fireball, just before his feet touch the ground, you can sweep him, and begin the fireball trap again. E. Honda's only move out of this is his butt slam (which has to be timed right to pass through the fireball), other than that, Ryu shouldn't have much problem with this match, as long as he is distanced away from E. Honda. If E. Honda gets close to Ryu, Ryu can hurricane kick away to get some distance and begin the pattern again.
Notes from multiple sets vs 2L84U (HF Honda Specialist)
This matchup is very explosive for Honda. In L8's words: "He's a Grappler without an SPD." Honda has multiple Safe Jumps, incredible multi-hit meaties (cr. HK), and other mix off of his hold- So letting him get close is a terrible idea.
- Butt Slam is punishable on hit if it fails to knock down.
- LP and MP grant ridiculous frame advantage, Honda uses them for pressure or to tick into throws. MP Throw grants him slight corner carry at the cost of mix.
- Because MP/HP Headbutt has startup invincibility and grants a hard knockdown, Ryu has very few safe meaties against Honda. Opt for Fireballs.
--Goofball
Vs. Guile
Ryu has a hard time fighting Guile in CE/HF imo. Hurricane kicks only work so often against a good guile and you would have to take a leap of faith when you do those anti-boom hurricanes. When Guile starts to throw booms it's really hard to turn the table over, since if you jump at him, he can hit you in multiple ways, jump straight up and you eat a guaranteed low forward as you land or try to do a air hurricane kick on the way down but Guile recovers safely after the low forward attemp at landing. Jumping backwards ont in Ryu favor either. Blocking the boom is the best option here and I think the best strat for Ryu against Guile is to get a knock down somehow and then doing bunch of safe jump in -> walk up low short XX short hurricane/dp/throw mixups.
--laugh
Ryu vs Guile requires one key skill that to date I have only seen maybe a few people master. when Guile whiffs a cr.MK, Ryu can trip it clean with cr.HK. This is one hell of a reaction to learn and way back in the day, I could do it 100%. When you specifically look for this and stay at a distance where Guile will try to do a cr.MK to gain ground advantage, try to take a step back with Ryu so it whiffs and you can counter. This is seriously one of the main keys to this fight that I have no seen anyone do for the longest time. Ryu can never jump at Guile either, he has too many options. Air throw, cr.MP into ground throw (i.e. gamepro strats lol), s.HK is really really good for anti air, then last but not least, cr.MK or cr.HK from a distance cause there is no trip guard in real SF games.
--Watson
Vs. Ken
Simply you need to send him Hadoken and watch out with jump in him,he had a better Shoryuken and Air Tatsumaki Senpuukyaku.
Vs. M. Bison (dictator)
He is nerfed,anyway you need to Shoryuken his Psycho Crusher or Stomp, block his Psycho Crusher isn't dangerous now,but now he can Throw you easily, instead of spam Hadouken try to provoque him for a Shoryuken or use yor Hurricane Kick to trade hits with his standing pokes, don't use your Air Hurricane Kick only for corner escape.
Vs. Ryu (self)
The best Ryu must use his fireball wisely and also his air Tatsumaki to escape corner.
Vs. Sagat
Projectile match,your Air TSK its great against him because you can combo him with a Jumping Roundhouse.
Vs. Vega (claw)
Air Tatsumaki its now a great alternative against his Barcelona,also be careful with his updated Rolling Crystal Flash and Shoryuken him.
Vs. Zangief
Your Hadoken must be used wisely, its now a bit unfair match due that Zangief can Quick Lariat to evade fireballs, sweep him when its near to you.
Hitboxes
Standing Normals
- Standing LP:
| Damage | 6 |  |
 |
 |

|
| Stun | 1~7 | ||||
| Stun Timer | 40 | ||||
| Chain Cancel | Yes | ||||
| Special Cancel | Yes | ||||
| Frame Advantage | +6 | ||||
| Frame Count | 1+2 | 4 | 4 | 1 | |
| Simplified | 3 | 4 | 5 | ||
- Standing MP:
| Damage | 16 |  |
 |
 |
 |
 |

|
| Stun | 5~11 | ||||||
| Stun Timer | 60 | ||||||
| Chain Cancel | No | ||||||
| Special Cancel | Yes | ||||||
| Frame Advantage | +10 | ||||||
| Frame Count | 1+1 | 2 | 4 | 3 | 3 | 1 | |
| Simplified | 4 | 4 | 7 | ||||
- Standing HP:
| Damage | 26 |  |
 |
 |
 |
 |

|
| Stun | 11~17 | ||||||
| Stun Timer | 80 | ||||||
| Chain Cancel | No | ||||||
| Special Cancel | No | ||||||
| Frame Advantage | -6 | ||||||
| Frame Count | 1+3 | 2 | 6 | 10 | 12 | 1 | |
| Simplified | 6 | 6 | 23 | ||||
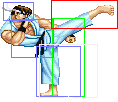
- Standing LK:
| Damage | 8 |  |
 |
 |
 |

|
| Stun | 1~7 | |||||
| Stun Timer | 40 | |||||
| Chain Cancel | Yes | |||||
| Special Cancel | No | |||||
| Frame Advantage | +3 | |||||
| Frame Count | 1+3 | 3 | 8 | 4 | 1 | |
| Simplified | 7 | 8 | 5 | |||
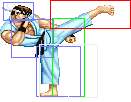
- Standing MK:
| Damage | 16 |  |
 |
 |
 |

|
| Stun | 5~11 | |||||
| Stun Timer | 60 | |||||
| Chain Cancel | No | |||||
| Special Cancel | No | |||||
| Frame Advantage | +1 | |||||
| Frame Count | 1+5 | 6 | 12 | 6 | 1 | |
| Simplified | 12 | 12 | 7 | |||
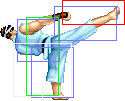
- Standing HK:
| Damage | 22 |  |
 |
 |
 |

|
| Stun | 11~17 | |||||
| Stun Timer | 80 | |||||
| Chain Cancel | No | |||||
| Special Cancel | No | |||||
| Frame Advantage | -2 | |||||
| Frame Count | 1+2 | 4 | 8 | 10 | 7 | |
| Simplified | 3 | 12 | 17 | |||
Close Standing Normals
- Close Standing LP:
| Damage | 6 |  |
 |

|
| Stun | 1~7 | |||
| Stun Timer | 40 | |||
| Chain Cancel | Yes | |||
| Special Cancel | Yes | |||
| Frame Advantage | +6 | |||
| Frame Count | 1+2 | 4 | 5 | |
| Simplified | 3 | 4 | 5 | |
- Close Standing MP:
| Damage | 16 |  |
 |
 |
 |
 |
 |

|
| Stun | 5~11 | |||||||
| Stun Timer | 60 | |||||||
| Chain Cancel | No | |||||||
| Special Cancel | Yes | |||||||
| Frame Advantage | +2 | |||||||
| Frame Count | 1+1 | 2 | 2 | 6 | 4 | 3 | 4 | |
| Simplified | 4 | 2 | 17 | |||||
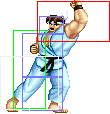
- Close Standing HP:
| Damage | 22 |  |
 |
 |
 |

|
| Stun | 11~17 | |||||
| Stun Timer | 80 | |||||
| Chain Cancel | No | |||||
| Special Cancel | Yes | |||||
| Frame Advantage | -8 | |||||
| Frame Count | 1+3 | 2 | 6 | 10 | 13 | |
| Simplified | 4 | 8 | 23 | |||
- Close Standing LK:
| Damage | 8 |  |
 |
 |
 |

| |
| Stun | 1~7 | ||||||
| Stun Timer | 40 | ||||||
| Chain Cancel | Yes | ||||||
| Special Cancel | Yes | ||||||
| Frame Advantage | +5 | ||||||
| Frame Count | 1+2 | 3 | 6 | 3 | 1 | ||
| Simplified | 6 | 6 | 4 | ||||
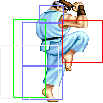
- Close Standing MK:
| Damage | 16 |  |
 |
 |
 |
 |

|
| Stun | 5~11 | ||||||
| Stun Timer | 60 | ||||||
| Chain Cancel | No | ||||||
| Special Cancel | Yes | ||||||
| Frame Advantage | +6 | ||||||
| Frame Count | 1+1 | 2 | 6 | 4 | 4 | 1 | |
| Simplified | 4 | 6 | 9 | ||||
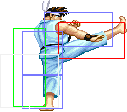
- Close Standing HK:
| Damage | 24,6 |  |
 |
 |
 |
 |

|
| Stun | 11~17 | ||||||
| Stun Timer | 80 | ||||||
| Chain Cancel | No | ||||||
| Special Cancel | No | ||||||
| Frame Advantage | +8 | ||||||
| Frame Count | 1+3 | 4 | 8 | 4 | 10 | 1 | |
| Simplified | 8 | 12 | 11 | ||||
Crouching Normals
- Crouching LP:
| Damage | 6 |  |
 |
 |

|
| Stun | 1~7 | ||||
| Stun Timer | 40 | ||||
| Chain Cancel | Yes | ||||
| Special Cancel | Yes | ||||
| Frame Advantage | +6 | ||||
| Frame Count | 1+2 | 4 | 4 | 1 | |
| Simplified | 3 | 4 | 5 | ||
- Crouching MP:
| Damage | 14 |  |
 |
 |
 |
 |

|
| Stun | 5~11 | ||||||
| Stun Timer | 60 | ||||||
| Chain Cancel | No | ||||||
| Special Cancel | Yes | ||||||
| Frame Advantage | +10 | ||||||
| Frame Count | 1+1 | 2 | 4 | 3 | 3 | 1 | |
| Simplified | 4 | 4 | 7 | ||||
- Crouching HP:
| Damage | 22 |  |
 |
 |
 |
 |

|
| Stun | 11~17 | ||||||
| Stun Timer | 80 | ||||||
| Chain Cancel | No | ||||||
| Special Cancel | Yes | ||||||
| Frame Advantage | -11 | ||||||
| Frame Count | 1+3 | 3 | 8 | 10 | 12 | 1 | |
| Simplified | 4 | 11 | 23 | ||||
- Crouching LK:
| Damage | 6 |  |
 |
 |

|
| Stun | 1~7 | ||||
| Stun Timer | 40 | ||||
| Chain Cancel | Yes | ||||
| Special Cancel | Yes | ||||
| Frame Advantage | +6 | ||||
| Frame Count | 1+2 | 4 | 4 | 1 | |
| Simplified | 3 | 4 | 5 | ||
- Crouching MK:
| Damage | 14 |  |
 |
 |
 |
 |

|
| Stun | 5~11 | ||||||
| Stun Timer | 60 | ||||||
| Chain Cancel | No | ||||||
| Special Cancel | Yes | ||||||
| Frame Advantage | +6 | ||||||
| Frame Count | 1+1 | 2 | 6 | 4 | 4 | 1 | |
| Simplified | 4 | 6 | 9 | ||||
- Crouching HK:
| Damage | 22 |  |
 |
 |
 |

|
| Stun | 11~17 | |||||
| Stun Timer | 80 | |||||
| Chain Cancel | No | |||||
| Special Cancel | Yes | |||||
| Frame Advantage | +2 | |||||
| Frame Count | 1+3 | 6 | 6 | 8 | 11 | |
| Simplified | 4 | 6 | 25 | |||
Aerial Normals
- Neutral Jumping LP:
| Damage | 10 |  |

|
| Stun | 1~7 | ||
| Stun Timer | 40 | ||
| Frame Count | 2 | ∞ | |
- Diagonal Jumping LP:
| Damage | 8 |  |

|
| Stun | 1~7 | ||
| Stun Timer | 40 | ||
| Frame Count | 2 | ∞ | |
- Neutral/Diagonal Jumping MP:
| Damage | 16 |  |
 |
 |
 |
 |
 |

|
| Stun | 5~11 | |||||||
| Stun Timer | 50 | |||||||
| Frame Count | 2 | 2 | 20 | 4 | 4 | 4 | ∞ | |
| Simplified | 4 | 20 | ∞ | |||||
- Neutral Jumping HP:
| Damage | 24 |  |
 |
 |
 |
 |
 |

|
| Stun | 11~17 | |||||||
| Stun Timer | 60 | |||||||
| Frame Count | 2 | 2 | 20 | 4 | 4 | 4 | ∞ | |
| Simplified | 4 | 20 | ∞ | |||||
- Diagonal Jumping HP:
| Damage | 22 |  |
 |
 |
 |
 |
 |

|
| Stun | 11~17 | |||||||
| Stun Timer | 60 | |||||||
| Frame Count | 2 | 2 | 8 | 4 | 4 | 4 | ∞ | |
| Simplified | 4 | 8 | ∞ | |||||
- Neutral Jumping LK:
| Damage | 10 |  |
 |

|
| Stun | 1~7 | |||
| Stun Timer | 40 | |||
| Frame Count | 3 | 40 | ∞ | |
- Diagonal Jumping LK:
| Damage | 8 |  |
 |

|
| Stun | 1~7 | |||
| Stun Timer | 40 | |||
| Frame Count | 2 | 3 | ∞ | |
| Simplified | 5 | ∞ | ||
- Neutral Jumping MK:
| Damage | 16 |  |
 |
 |
 |

|
| Stun | 5~11 | |||||
| Stun Timer | 50 | |||||
| Frame Count | 5 | 13 | 6 | 6 | ∞ | |
| Simplified | 5 | 13 | ∞ | |||
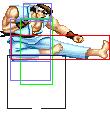
- Diagonal Jumping MK:
| Damage | 16 |  |
 |
 |
 |
 |
 |

|
| Stun | 5~11 | |||||||
| Stun Timer | 50 | |||||||
| Frame Count | 2 | 3 | 13 | 3 | 3 | 3 | ∞ | |
| Simplified | 5 | 13 | ∞ | |||||
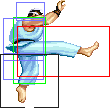
- Neutral Jumping HK:
| Damage | 24 |  |
 |
 |
 |
 |
 |

|
| Stun | 11~17 | |||||||
| Stun Timer | 60 | |||||||
| Frame Count | 2 | 4 | 4 | 3 | 3 | 3 | ∞ | |
| Simplified | 2 | 8 | ∞ | |||||
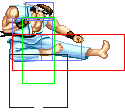
- Diagonal Jumping HK:
| Damage | 22 |  |
 |
 |
 |
 |
 |

|
| Stun | 11~17 | |||||||
| Stun Timer | 60 | |||||||
| Frame Count | 2 | 3 | 7 | 3 | 3 | 3 | ∞ | |
| Simplified | 5 | 7 | ∞ | |||||
Throws
- Seoi Nage: (←/→ + HP) and Tomoe Nage: (←/→ + HK)
| Damage | 32 | 
| |
| Duration | 130 | ||
| Stun | 7~13 | ||
| Stun Timer | 100 | ||
| Range (from axis) | 48 | ||
| Range advantage | 19 | ||
Special Moves
- Hadoken: (↓↘→ + P)
Startup:
 |
 |
 |

| |
| Frame Count | 2 | 6 | 1 | 1 |
Active:
LP version:
| Damage | 12 |  |
 |
 |

|
| Stun | 13~19 | ||||
| Stun Timer | 120 | ||||
| Frame Advantage | - | ||||
| Frame Count | 1 | 1 | 2 | 2.. | |
| Simplified | 40 | ||||
MP version:
| Damage | 14 |  |
 |
 |

|
| Stun | 13~19 | ||||
| Stun Timer | 120 | ||||
| Frame Advantage | - | ||||
| Frame Count | 1 | 1 | 2 | 2.. | |
| Simplified | 40 | ||||
HP version:
| Damage | 16 |  |
 |
 |

|
| Stun | 13~19 | ||||
| Stun Timer | 120 | ||||
| Frame Advantage | - | ||||
| Frame Count | 1 | 1 | 2 | 2.. | |
| Simplified | 40 | ||||
One of the best projectiles in the game, isn't the Guile's Sonic Boom or Sagat's Tiger Shots but you had a better recovery compared than Ken or the added Chun Li's one, that means the mixups tool of the new special moves of E.Honda and Blanka it can be stopped.
- Shoryuken: →↓↘ + Punch
Startup:
| Damage | 32 |  |
 |
 |
 |
 |

|
| Stun | 13~19 | ||||||
| Stun Timer | 120 | ||||||
| Frame Advantage | -18/-26/-40 | ||||||
| Jab | 4 | 4 | 14 | 6 | 11 | 5 | |
| Strong | 4 | 4 | 22 | 6 | 14 | 5 | |
| Fierce | 4 | 4 | 26 | 6 | 21 | 5 | |
It's still a regular anti air compared to Ken,Sagat and Guile ones but a good answer against Blanka's Vertical Roll or E.Honda Sumo Splash after an Hadoken.
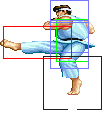
- Tatsumaki Senpuu Kyaku: ↓↙← + Kick
Startup:
| Damage | 22 |  |
 |
|
| Stun | 13~19 | |||
| Stun Timer | 120 | |||
| Frame Advantage | -1 | |||
| Frame Count | 4 | 4 | 3 | |
Active:
 |
 |
 |

| |
| Frame Count | 3 | 3 | 3 | 3 |
Short: 1 Time
Foward: 2 Times
Rounhouse: 3 Times
Recovery:
 |
 |
 |

| |
| Frame Count | 4 | 4 | 4 | 0 |
Still a heavy hitter and 2-in-1 standing ender with crouching Forward, but useful to approach to your opponent with the LK version.
- Kuchuu Tatsumaki Senpuu Kyaku: During Jump ↓↙← + Kick
Recovery:
 |
 |
 |
 |

| |
| Frame Count | 4 | 4 | 4 | 4 | 4 |
It have the same properties of ground one, but will be your tall hitbox character's offensive tool and 2-in-1 air combo ender against them.
Misc Animations
| Walk back | Neutral | Walk Fwd | Crouch |
 |
 |
 |

|
- Standing reel:
 |
 |
 |

|
- Standing gut reel:
 |
 |
 |

|
- Crouching reel:
 |
 |

|
- Dizzy:
 |
 |

|


