Lichmassacre (talk | contribs) m (Navbox added.) |
|||
| Line 345: | Line 345: | ||
= The Basics = | = The Basics = | ||
< | == Beginner Overview == | ||
<youtube>A1AmrRu1YhQ</youtube> | |||
== Combos == | |||
'''(Launch,SJ LP,LK,MP,MK, ...)''' | '''(Launch,SJ LP,LK,MP,MK, ...)''' | ||
Revision as of 15:55, 19 September 2021


Introduction
Morrigan Aensland, arguably the main character of Capcom's Darkstalkers series, has been present in Capcom's vs series since Marvel vs Capcom 1. She is also the first Darkstalker to appear as a playable character in any vs game.
Popular in casual play in MvC2, she is considered by most to be upper-mid tier. Morrigan is similar in gameplay to a shoto with improved air maneuverability and above average rushdown.
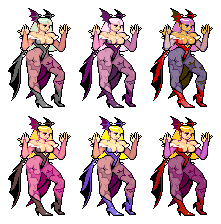
Colors
First row: LP, HP, A1. Second row: LK, HK, A2.
Moves List
Normal Moves
Morrigan's normals can all cancel into a full magic series. Of special note are her j.lp, which is generally her best rushdown tool, and c.db+hp, which is her only ground-based heavy normal that's safe on block by itself, and has good range, startup, and recovery to boot.
| Standing Normals: | |||||
| Startup | Visual Description | Hits high/low | Safe on Block? | SJ Cancel? | |
| s.lp | 2 frames | hits with her hair | yes | ||
| s.lk | 2 frames | short-range kick | yes | yes | |
| s.mp | 6 frames | yes | yes | ||
| s.mk | 5 frames | yes | |||
| s.hp | 8 frames | no | yes | ||
| s.hk | 7 frames | no | yes | ||
| s.f+hk | 11 frames | no | no | ||
| Crouching Normals: | |||||
| Startup | Visual Description | Hits high/low | Safe on Block? | SJ Cancel? | |
| c.lp | 3 frames | yes | |||
| c.lk | 4 frames | low | yes | ||
| c.mp | 3 frames | yes | |||
| c.mk | 6 frames | low | yes | ||
| c.db+hp | 6 frames | long range swing | yes | no | |
| c.df+hp | 6 frames | launcher | no | yes | |
| c.hk | 9 frames | sweep | low | no | yes |
| Jumping Normals: | |||||
| Startup | Visual Description | Hits high/low | Safe on Block? | ||
| j.lp | 2 frames | diagonal spike | high | yes | |
| j.lk | 3 frames | high | yes | ||
| j.mp | 6 frames | high | yes | ||
| j.mk | 6 frames | high | yes | ||
| j.hp | 10 frames | high | yes | ||
| j.hk | 6 frames | high | yes | ||
| j.d+hk | 10 frames | shell pierce | high | only in unfly mode | |
Command Normals
s.f+hk: A multi-hitting flip-kick. This move is COMPLETELY USELESS. It has the longest startup of all her normals, it looks like it hits high but it DOESN'T, and it has terrible range. It's not cancelable into specials or supers either. Avoid at all costs.
c.db+hp: One of Morrigan's best all-around normals. Good horizontal range, good startup, good priority, and excellent recovery. This is her ONLY ground-based heavy normal that's safe on block by itself. It also combos fairly easily into silhouette blade.
c.df+hp: Morrigan's launcher. Decent range, average priority. NOT SAFE ON BLOCK unless you cancel into something or have an assist covering you.
j.d+hk: Her Shell Pierce. Travels straight down. Without unfly mode, it recovers in normal jump mode with the action used up. If you have unfly mode, it recovers in normal jump mode with an action avaiable. EXCELLENT RECOVERY if you have unfly. In fact, it recovers early enough to be linked into another combo if you're quick. If you don't have unfly, you can still make the recovery safe(r) by canceling it into qcb+k before you bounce away from the opponent, or into qcf+p after you bounce away.
Special Moves
Morrigan has a shoto-like collection of special moves. Each is useful in its way.
Snapback: qcf + A1 or A2
4 frame startup. Tied with several characters as having the 3rd fastest snapback in the game. Decent horizontal range, iffy vertical range, hits OTG. Recovers quickly enough to punish an assist with a double-snap followed by relaunch to death, but the timing is difficult.
Tag in: lp+lk or hp+hk
16 frame startup. Tied with several characters as having the 2nd fastest tag in in the game. Unfortunately, the range isn't too great.
Super Moves
Assist Moves
The Basics
Beginner Overview
Combos
(Launch,SJ LP,LK,MP,MK, ...)
End with HP or HK for better positioning or Soul Fist for slightly better damage. In the corner you can finish with HP,HK and try to OTG your opponent with a LP on your way down. Followups to the OTG will be listed in the advanced strategies section. I know these are basic air combos, but it's her best option without assists or supers.
(Launch+Ironman AAA,SJ HK XX DI)
Other AAAs work as well.
(LP, MP XX SHB)
The most reliable way to combo into super on her own.
(C.LK,db+HP XX SF XX SE)
You have to be close for this to work. Easier in the corner, but works from midscreen as well.
(C.LK+Projectile assist,C.MK,HK XX SE)
Tron assist works best becuase of the damage, Storm and Gambit assist work great too. (many others)
Advanced Strategy
Infinites
[normal jump, j.lp, j.lk, j.mp, j.mk, j.hp, land] repeat brackets
Her basic standing Sentinel infinite. Other variations also work. If you're getting too far away from Sentinal, you can dash forward in between reps to get closer.
[launch, sj, sj.lk, sj.d+hk XX qcb+k, land, walk forward, s.lp] repeat brackets
This works on Doom, Tron, Collosus, Storm, Venom, Bison, Silver Samurai, Anarkis, Zangief, Sabretooth, Ruby, and Amingo. You can also do one cycle to set stuff up on the Hulk, Sentinal and Juggernaut. This and her standing Sentinal infinite are her only really usefull infinites.
With opponent at normal jump height near corner [jump forward, j.lp, j.lk, j.mk, j.hp, qcb+k, land] repeat brackets
Difficult to setup, difficult to perform, unreliable, poor damage.
With opponent standing [dash in s.hp, sj cancel, adf, sj.lp, sj.mp, sj.hk, land] repeat brackets
Difficult to perform, but this one might actually be useful if your timing is good enough. Works on any character from anywhere, decent damage, good resetability and comboable into SE or DI.
Throw Setups
Morrigan's throws are best accompanied by an assist. Depending on which assist you are using, though, you may want to use a different throw.
After a flying screen OTG in the corner (see "B&B combos" in the "Basics" section):
(normal jump, j.lp, j.lk, j.mp, j.hp, j.hk, land, ...)
After this combo, the following events will occur, in this order:
Morrigan can grab them at any point after they recover, even before the bounce (though the timing is VERY difficult). For an easier throw setup, you can jump forward, wait for the bounce, and air throw them. Alternately, you can stay on the ground, wait for the bounce, and tick throw with (s.lp,walk forward, throw). Don't forget to call the appropriate assist for each throw.
Resets
Character Specific Strategies
Against Storm:
Against Sentinal:
Against Cable:
Against Magneto:


