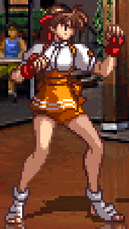
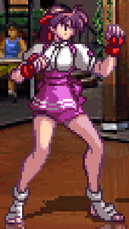
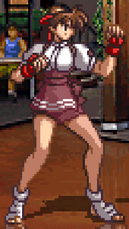
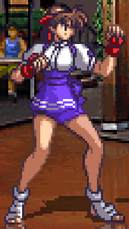
|
|
| (11 intermediate revisions by 3 users not shown) |
| Line 1: |
Line 1: |
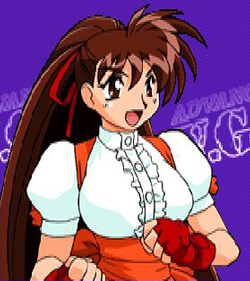
| [[File:avg2_yuka.jpg|right|the face of someone who just realised they don't have to be in any h-scenes this time around]]
| | {{AVG2 Character Intro|char=yuka|short=yka|content= |
|
| |
|
| = Introduction = | | == Introduction == |
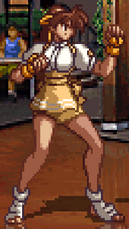
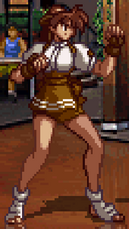
| ''After winning the last VG tournament, Yuka took some time to herself in order to train and reflect. She still hasn't figured out what martial arts has to do with running a maid cafe.'' | | ''After winning the last VG tournament, Yuka took some time to herself in order to train and reflect. She still hasn't figured out what martial arts has to do with running a maid cafe.'' |
|
| |
|
| Cute girl Ryu
| | The protagonist of previous V.G. titles, Yuka is a straightforward shoto archetype who will feel familiar to just about anyone with experience in the genre. Along with the sacred trio of a fireball, reversal uppercut and rushing kick move, Yuka makes herself known for a fearsome offense, sporting a strong aerial presence (including one of the game's few four-hit aerial chains), high combo damage and powerful corner lockdown. These strengths are held in check, however, by a middling set of grounded anti-airs, preventing her from being able to utilise the classic fireball traps that her archetype normally excels at, as well as a slightly larger aerial hurtbox that puts her at a disadvantage in some air-to-air exchanges. If you're looking for an aggressive shoto with flashy combos, Yuka just might be your gal. |
|
| |
|
| {{StrengthsAndWeaknesses | | {{StrengthsAndWeaknesses |
| | intro = | | | intro = [[File:avg2 yuka mini.png|20px]] '''Yuka''' is an aggressive shoto character who excels at locking opponents down and converting frame traps into powerful juggle combos. |
| | pros = | | | pros = |
| * TBD | | * '''Strong Aerial Options:''' With fantastic air normals and one of the game's few four-hit air chains, Yuka has great options for scrapping and controlling space in the air. |
| * TBD | | * '''Powerful Lockdown:''' Yuka's aerial options, combined with her {{Tooltip|text=Kikoudan|hovertext=236P}} fireball and {{Tooltip|text=Souryugeki|hovertext=623P}} uppercut, give her fearsome capacity to push opponents to the corner and keep them there. |
| * TBD | | * '''Consistent Damage:''' Yuka is able to pretty consistently score fairly high damage juggle combos, giving her high reward for landing hits, even without meter. |
| | cons = | | | cons = |
| * TBD | | * '''Weak Anti-Airs:''' You'd think that the shoto would have a suite of strong anti-airs, but aside from Souryugeki, Yuka is surprisingly lacking in this department, meaning that aside from uppercut, her most consistent way to punish aerial approaches is by taking to the skies herself. |
| * TBD | | * '''Large Aerial Hurtbox:''' Despite her four-hit aerial chain and strong air normals, Yuka does take on a bit of extra risk when jumping compared to other characters, as her large hurtbox while airborne means that she is more susceptible to her opponent's anti-airs, and can potentially more easily lose out in airborne scramble situations. |
| * TBD
| |
| }} | | }} |
|
| |
|
| = Movelist = | | == Stats == |
| {{MoveData
| | {{AVG2 Character Data |
| |image=AVG2_Yuka_stLP.jpg
| | | atk = C |
| |caption=
| | | def = C |
| |name=st.{{Icon-Capcom|LP}}
| | | djump = Yes |
| |data=
| | | dbrake = Yes |
| {{AttackData-AVG2
| | | bd = 28F (Throw Invul) |
| |damage=9
| | | wkup = 12F |
| |guard= Mid
| |
| |startup= 3
| |
| |active=-
| |
| |recovery=-
| |
| |frameAdv=-+2
| |
| |description=
| |
| }}
| |
| }} | | }} |
| ----
| |
| {{MoveData
| |
| |image=AVG2_Yuka_stLK.jpg
| |
| |caption=
| |
| |name=st.{{Icon-Capcom|LK}}
| |
| |data=
| |
| {{AttackData-AVG2
| |
| |damage=13
| |
| |guard= Mid
| |
| |startup= 8
| |
| |active=-
| |
| |recovery=-
| |
| |frameAdv=--6
| |
| |description=
| |
| }}
| |
| }}
| |
| ----
| |
| {{MoveData
| |
| |image=AVG2_Yuka_stHP.jpg
| |
| |caption=
| |
| |name=st.{{Icon-Capcom|HP}}
| |
| |data=
| |
| {{AttackData-AVG2
| |
| |damage=28
| |
| |guard= Mid
| |
| |startup=6
| |
| |active=-
| |
| |recovery=-
| |
| |frameAdv=--3
| |
| |description=
| |
| }}
| |
| }}
| |
| ----
| |
| {{MoveData
| |
| |image=AVG2_Yuka_stHK.jpg
| |
| |caption=
| |
| |name=st.{{Icon-Capcom|HK}}
| |
| |data=
| |
| {{AttackData-AVG2
| |
| |damage=32
| |
| |guard= Mid
| |
| |startup= 7
| |
| |active=-
| |
| |recovery=-
| |
| |frameAdv=--16
| |
| |description=
| |
| }}
| |
| }}
| |
| ----
| |
| {{MoveData
| |
| |image=AVG2_Yuka_crLP.jpg
| |
| |caption=
| |
| |name=cr.{{Icon-Capcom|LP}}
| |
| |data=
| |
| {{AttackData-AVG2
| |
| |damage=9
| |
| |guard= Low
| |
| |startup= 3
| |
| |active=-
| |
| |recovery=-
| |
| |frameAdv=-+4
| |
| |description=
| |
| }}
| |
| }}
| |
| ----
| |
| {{MoveData
| |
| |image=AVG2_Yuka_crLK.jpg
| |
| |caption=
| |
| |name=cr.{{Icon-Capcom|LK}}
| |
| |data=
| |
| {{AttackData-AVG2
| |
| |damage=13
| |
| |guard= Low
| |
| |startup= 6
| |
| |active=-
| |
| |recovery=-
| |
| |frameAdv=-0
| |
| |description=
| |
| }}
| |
| }}
| |
| ----
| |
| {{MoveData
| |
| |image=AVG2_Yuka_crHP.jpg
| |
| |caption=
| |
| |name=cr.{{Icon-Capcom|HP}}
| |
| |data=
| |
| {{AttackData-AVG2
| |
| |damage=28
| |
| |guard= Mid
| |
| |startup=
| |
| |active=-5
| |
| |recovery=-
| |
| |frameAdv=--3
| |
| |description=
| |
| }}
| |
| }}
| |
| ----
| |
| {{MoveData
| |
| |image=AVG2_Yuka_crHK.jpg
| |
| |caption=
| |
| |name=cr.{{Icon-Capcom|HK}}
| |
| |data=
| |
| {{AttackData-AVG2
| |
| |damage=32
| |
| |guard= Low
| |
| |startup= 6/32
| |
| |active=-
| |
| |recovery=-
| |
| |frameAdv=--5
| |
| |description=
| |
| }}
| |
| }}
| |
| ----
| |
| {{MoveData
| |
| |image=AVG2_Yuka_jLP.jpg
| |
| |caption=
| |
| |name=j.{{Icon-Capcom|LP}}
| |
| |data=
| |
| {{AttackData-AVG2
| |
| |damage=9
| |
| |guard=High
| |
| |startup= 4
| |
| |active=-
| |
| |recovery=-
| |
| |frameAdv=-
| |
| |description=
| |
| }}
| |
| }}
| |
| ----
| |
| {{MoveData
| |
| |image=AVG2_Yuka_jLK.jpg
| |
| |caption=
| |
| |name=j.{{Icon-Capcom|LK}}
| |
| |data=
| |
| {{AttackData-AVG2
| |
| |damage=13
| |
| |guard= High
| |
| |startup= 6
| |
| |active=-
| |
| |recovery=-
| |
| |frameAdv=-
| |
| |description=
| |
| }}
| |
| }}
| |
| ----
| |
| {{MoveData
| |
| |image=AVG2_Yuka_jHP.jpg
| |
| |caption=
| |
| |name=j.{{Icon-Capcom|HP}}
| |
| |data=
| |
| {{AttackData-AVG2
| |
| |damage=28
| |
| |guard= High
| |
| |startup= 6
| |
| |active=-
| |
| |recovery=-
| |
| |frameAdv=-
| |
| |description=
| |
| }}
| |
| }}
| |
| ----
| |
| {{MoveData
| |
| |image=AVG2_Yuka_jHK.jpg
| |
| |caption=
| |
| |name=j.{{Icon-Capcom|HK}}
| |
| |data=
| |
| {{AttackData-AVG2
| |
| |damage=32
| |
| |guard= High
| |
| |startup= 6
| |
| |active=-
| |
| |recovery=-
| |
| |frameAdv=-
| |
| |description=
| |
| }}
| |
| }}
| |
| ----
| |
| '''Command Normals'''<br>
| |
| {{MoveData
| |
| |image=AVG2_Yuka_4HP.jpg
| |
| |caption=
| |
| |name={{Motion|4}}+{{Icon-Capcom|HP}}
| |
| |data=
| |
| {{AttackData-AVG2
| |
| |damage=28
| |
| |guard= High
| |
| |startup= 6
| |
| |active=-
| |
| |recovery=-
| |
| |frameAdv=--4
| |
| |description=
| |
| }}
| |
| }}
| |
| ----
| |
| {{MoveData
| |
| |image=AVG2_Yuka_4HK.jpg
| |
| |caption=
| |
| |name={{Motion|4}}+{{Icon-Capcom|HK}}
| |
| |data=
| |
| {{AttackData-AVG2
| |
| |damage=32
| |
| |guard= High
| |
| |startup= 6
| |
| |active=-
| |
| |recovery=-
| |
| |frameAdv=--10
| |
| |description=
| |
| }}
| |
| }}
| |
| ----
| |
| {{MoveData
| |
| |image=AVG2_Yuka_j2HK.jpg
| |
| |caption=
| |
| |name=j.{{Motion|2}}+{{Icon-Capcom|HK}}
| |
| |data=
| |
| {{AttackData-AVG2
| |
| |damage=30
| |
| |guard= High
| |
| |startup= 6
| |
| |active=-
| |
| |recovery=-
| |
| |frameAdv=-
| |
| |description=
| |
| }}
| |
| }}
| |
| ----
| |
| '''Target Combos'''<br>
| |
| st.LP > (st.HP > st.HK)/(st.HK > st.HP)<br>
| |
| st.LP > st.LK > (st.HP > st.HK)/(st.HK > st.HP)<br>
| |
| cl.HP/b+HP > st.HK/cr.HK<br>
| |
| cr.HP > cr.HK<br>
| |
|
| |
| (j.LP > j.LK)/(j.LK > j.LP) > (j.HP > j.HK)/(j.HK > j.HP)<br>
| |
| j.HP > j.HK<br>
| |
| j.HK > j.HP<br>
| |
| j.d+HK > j.HP<br>
| |
|
| |
|
| '''Guard Cancels'''<br>
| | == Color Options == |
| LP: <br>
| | {{ColorGallery | filePrefix=AVG2_Yuka_Color_| imageWidths=187| colors= |
| LK: <br>
| | {{ColorGallery/Color|Circle| text=Circle (Default) }} |
| HP: <br>
| | {{ColorGallery/Color|Triangle| text=Triangle }} |
| HK: <br>
| | {{ColorGallery/Color|Square| text=Square }} |
| | | {{ColorGallery/Color|R1| text=R1 }} |
| == Special Moves == | | {{ColorGallery/Color|R2| text=R2 }} |
| {{MoveData | | {{ColorGallery/Color|Start| text=Start (Hidden) }} |
| |image=AVG2_Yuka_Kikoudan.jpg | |
| |caption= {{Motion|236}} + {{Icon-Capcom|P}}
| |
| |name=Kikoudan
| |
| |data= | |
| {{AttackData-AVG2 | |
| |version={{Icon-Capcom|LP}} | |
| |damage=26 | |
| |guard= Mid
| |
| |startup= 12 | |
| |active=- | |
| |recovery=-
| |
| |frameAdv=--11 | |
| |description=Legally mandated shoto fireball. Incredibly solid.
| |
| }}
| |
| {{AttackData-AVG2 | |
| |header=no
| |
| |version={{Icon-Capcom|HP}} | |
| |damage=28 | |
| |guard= Mid
| |
| |startup= 14
| |
| |active=-
| |
| |recovery=-
| |
| |frameAdv=--15
| |
| |description= | |
| }}
| |
| {{AttackData-AVG2 | |
| |header=no
| |
| |version={{Icon-Capcom|LP}} + {{Icon-Capcom|HP}}
| |
| |damage=41 (3x) | |
| |guard= Mid
| |
| |startup= 1
| |
| |active=-
| |
| |recovery=-
| |
| |frameAdv=--7
| |
| |description=
| |
| }}
| |
| }} | | }} |
| ----
| |
| {{MoveData
| |
| |image=AVG2_Yuka_Soryugeki.jpg
| |
| |caption= {{Motion|623}} + {{Icon-Capcom|P}}
| |
| |name=Soryugeki
| |
| |data=
| |
| {{AttackData-AVG2
| |
| |version={{Icon-Capcom|LP}}
| |
| |damage=28
| |
| |guard= Mid
| |
| |startup= 4
| |
| |active=-
| |
| |recovery=-
| |
| |frameAdv=--36
| |
| |description=Legally mandated shoto uppercut. Probably the best meterless DP in the game.
| |
| }}
| |
| {{AttackData-AVG2
| |
| |header=no
| |
| |version={{Icon-Capcom|HP}}
| |
| |damage=32 (2x)
| |
| |guard= Mid
| |
| |startup= 4
| |
| |active=-
| |
| |recovery=-
| |
| |frameAdv=--43
| |
| |description=
| |
| }}
| |
| {{AttackData-AVG2
| |
| |header=no
| |
| |version={{Icon-Capcom|LP}} + {{Icon-Capcom|HP}}
| |
| |damage=30 (8x)
| |
| |guard= Mid
| |
| |startup= 0
| |
| |active=-
| |
| |recovery=-
| |
| |frameAdv=--37
| |
| |description=
| |
| }}
| |
| }}
| |
| ----
| |
| {{MoveData
| |
| |image=AVG2_Yuka_Idatensoku.jpg
| |
| |caption= {{Motion|214}} + {{Icon-Capcom|K}}
| |
| |name=Idatensoku
| |
| |data=
| |
| {{AttackData-AVG2
| |
| |version={{Icon-Capcom|LK}}
| |
| |damage=28
| |
| |guard= Mid
| |
| |startup= 12
| |
| |active=-
| |
| |recovery=-
| |
| |frameAdv=--21
| |
| |description=Legally mandated Diet Tatsu attack. Yuka quickly dashes forward with a fierce kick when she gets in range.
| |
| }}
| |
| {{AttackData-AVG2
| |
| |header=no
| |
| |version={{Icon-Capcom|HK}}
| |
| |damage=37
| |
| |guard= Mid
| |
| |startup= 12
| |
| |active=-
| |
| |recovery=-
| |
| |frameAdv=--18
| |
| |description=
| |
| }}
| |
| {{AttackData-AVG2
| |
| |header=no
| |
| |version={{Icon-Capcom|LK}} + {{Icon-Capcom|HK}}
| |
| |damage=71
| |
| |guard= Mid
| |
| |startup= 1
| |
| |active=-
| |
| |recovery=-
| |
| |frameAdv=--18
| |
| |description=
| |
| }}
| |
| }}
| |
| ----
| |
|
| |
|
| == Super Moves ==
| |
| {{MoveData
| |
| |image=AVG2_Yuka_Kyukyoku_Kikoudan.jpg
| |
| |caption={{Motion|6}}{{Motion|41236}} + {{Icon-Capcom|P}}
| |
| |name=Kyukyoku Kikoudan
| |
| |data=
| |
| {{AttackData-AVG2
| |
| |damage=20 (21x)
| |
| |guard= Mid
| |
| |startup=0
| |
| |active=-
| |
| |recovery=-
| |
| |frameAdv=--32
| |
| |description=
| |
| }}
| |
| }} | | }} |
| ----
| |
| {{MoveData
| |
| |image=AVG2_Yuka_Kiryu_Idatengeki.jpg
| |
| |caption={{Motion|6}}{{Motion|41236}} + {{Icon-Capcom|K}}
| |
| |name=Kiryu Idatengeki
| |
| |data=
| |
| {{AttackData-AVG2
| |
| |damage=28, 20, 20 (8x)
| |
| |guard= Mid
| |
| |startup=1
| |
| |active=-
| |
| |recovery=-
| |
| |frameAdv=--49
| |
| |description=
| |
| }}
| |
| }}
| |
| ----
| |
|
| |
| = Combos =
| |
| '''Basic Combos'''<br>
| |
|
| |
| '''Throw Combos'''<br>
| |
|
| |
| '''Misc. Combos'''<br>
| |
|
| |
|
| {{Navbox-AVG2}} | | {{Navbox-AVG2}} |
|
| |
|
| [[Category:Advanced V.G. 2]] | | [[Category:Advanced V.G. 2]] |
