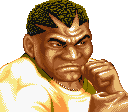
(→Balrog) |
(cl.HP really *does* have awful damage. Suspect typo in the rom data.) |
||
| (12 intermediate revisions by 4 users not shown) | |||
| Line 8: | Line 8: | ||
{{Nutshell| | {{Nutshell| | ||
Boxer is one of the weaker characters in Hyper Fighting, with no particularly viable reversal move and little ability to fight at range. His Turn Around Punch gains invincibility and gives him some mobility and can be used as a counter to fireballs, and his throw is a great setup into mixups or back into more throws. Decent combos and a bit of fun-factor make him popular with some players, but being competitive with Boxer is a slightly uphill battle. | Boxer is one of the weaker characters in Hyper Fighting, with no particularly viable reversal move and little ability to fight at range. His Turn Around Punch gains invincibility and gives him some mobility and can be used as a {{counter}} to fireballs, and his {{throw}} is a great setup into mixups or back into more throws. Decent combos and a bit of fun-factor make him popular with some players, but being competitive with Boxer is a slightly uphill battle. | ||
}} | }} | ||
| Line 33: | Line 33: | ||
==Moves List== | ==Moves List== | ||
All frame data taken from [ | All frame data taken from [http://nki.combovideos.com/flame.html T.Akiba's data]. Will independently verify soon. | ||
===Normal Moves=== | ===Normal Moves=== | ||
* | *'''Standing Normal Moves (st.)''' | ||
{{SF2HFMoveListHeader}} | {{SF2HFMoveListHeader}} | ||
{{SF2HFMoveListRow | Standing Light Punch | lp | 4 | [[ | {{SF2HFMoveListRow | Standing Light Punch | {{lp}} | 4 | [[Damage Scaling (HF)#0x020|0x020]] | 4 | 40 | 5 | 4 | 5 | +5/+6 | {{rpdfire}} {{specialcancel}} }} | ||
{{SF2HFMoveListRow | Standing Medium Punch | mp | 14 | [[ | {{SF2HFMoveListRow | Standing Medium Punch | {{mp}} | 14 | [[Damage Scaling (HF)#0x020|0x020]] | 8 | 60 | 8 | 4 | 7 | +8/+9 | }} | ||
{{SF2HFMoveListRow | Standing Hard Punch | hp | 22 | [[ | {{SF2HFMoveListRow | Standing Hard Punch | {{hp}} | 22 | [[Damage Scaling (HF)#0x020|0x020]] | 14 | 80 | 10 | 6 | 15 | +2/+3 | }} | ||
{{SF2HFMoveListRow | Standing Light Kick | lk | 4 | [[ | {{SF2HFMoveListRow | Standing Light Kick | {{lk}} | 4 | [[Damage Scaling (HF)#0x020|0x020]] | 4 | 40 | 5 | 4 | 5 | +5/+6 | {{specialcancel}} }} | ||
{{SF2HFMoveListRow | Standing Medium Kick | mk | 14 | [[ | {{SF2HFMoveListRow | Standing Medium Kick | {{mk}} | 14 | [[Damage Scaling (HF)#0x020|0x020]] | 8 | 60 | 7 | 4 | 7 | +8/+9 | }} | ||
{{SF2HFMoveListRow | Standing Hard Kick | hk | 22 | [[ | {{SF2HFMoveListRow | Standing Hard Kick | {{hk}} | 22 | [[Damage Scaling (HF)#0x020|0x020]] | 14 | 80 | 10 | 6 | 15 | +2/+3 | }} | ||
{{MoveListFooter}} | {{MoveListFooter}} | ||
* | *'''Close Standing Normal Moves (cl.)''' | ||
{{SF2HFMoveListHeader}} | {{SF2HFMoveListHeader}} | ||
{{SF2HFMoveListRow | Close Medium Punch | (near opponent) mp | 16 | [[ | {{SF2HFMoveListRow | Close Medium Punch | (near opponent) {{mp}} | 16 | [[Damage Scaling (HF)#0x080|0x080]] | 8 | 60 | 7 | 4 | 7 | +8/+9 | }} | ||
{{SF2HFMoveListRow | Close Hard Punch | (near opponent) hp | | {{SF2HFMoveListRow | Close Hard Punch | (near opponent) {{hp}} | 4 | [[Damage Scaling (HF)#0x080|0x080]] | 14 | 80 | 10 | 6 | 15 | +2/+3 | }} | ||
{{SF2HFMoveListRow | Close Medium Kick | (near opponent) mk | 16 | [[ | {{SF2HFMoveListRow | Close Medium Kick | (near opponent) {{mk}} | 16 | [[Damage Scaling (HF)#0x080|0x080]] | 8 | 60 | 6 | 4 | 7 | +8/+9 | }} | ||
{{SF2HFMoveListRow | Close Hard Kick | (near opponent) hk | 24 | [[ | {{SF2HFMoveListRow | Close Hard Kick | (near opponent) {{hk}} | 24 | [[Damage Scaling (HF)#0x080|0x080]] | 14 | 80 | 8 | 6 | 15 | +2/+3 | }} | ||
{{MoveListFooter}} | {{MoveListFooter}} | ||
* | *'''Crouching Normal Moves (cr.)''' | ||
{{SF2HFMoveListHeader}} | {{SF2HFMoveListHeader}} | ||
{{SF2HFMoveListRow | Crouching Light Punch | d + lp | 6 | [[ | {{SF2HFMoveListRow | Crouching Light Punch | {{d}} + {{lp}} | 6 | [[Damage Scaling (HF)#0x020|0x020]] | 4 | 40 | 4 | 4 | 4 | +6/+7 | {{rpdfire}} {{specialcancel}} }} | ||
{{SF2HFMoveListRow | Crouching Medium Punch | d + mp | 14 | [[ | {{SF2HFMoveListRow | Crouching Medium Punch | {{d}} + {{mp}} | 14 | [[Damage Scaling (HF)#0x020|0x020]] | 8 | 60 | 6 | 4 | 7 | +9/+8 | }} | ||
{{SF2HFMoveListRow | Crouching Hard Punch | d + hp | 20 | [[ | {{SF2HFMoveListRow | Crouching Hard Punch | {{d}} + {{hp}} | 20 | [[Damage Scaling (HF)#0x020|0x020]] | 14 | 80 | 5 | 8 | 15 | +1,+2 | }} | ||
{{SF2HFMoveListRow | Crouching Light Kick | d + lk | 6 | [[ | {{SF2HFMoveListRow | Crouching Light Kick | {{d}} + {{lk}} | 6 | [[Damage Scaling (HF)#0x020|0x020]] | 4 | 40 | 4 | 4 | 4 | +6/+7 | {{rpdfire}} {{specialcancel}} }} | ||
{{SF2HFMoveListRow | Crouching Medium Kick | d + mk | 14 | [[ | {{SF2HFMoveListRow | Crouching Medium Kick | {{d}} + {{mk}} | 14 | [[Damage Scaling (HF)#0x020|0x020]] | 8 | 60 | 6 | 4 | 7 | +9/+8 | }} | ||
{{SF2HFMoveListRow | Crouching Hard Kick | d + hk | 18 | [[ | {{SF2HFMoveListRow | Crouching Hard Kick | {{d}} + {{hk}} | 18 | [[Damage Scaling (HF)#0x020|0x020]] | 14 | 80 | 7 | 6 | 15 | KD/+2 | }} | ||
{{MoveListFooter}} | {{MoveListFooter}} | ||
* | *'''Neutral/Diagonal Jumping Normal Moves (j.)''' | ||
{{SF2HFMoveListHeader}} | {{SF2HFMoveListHeader}} | ||
{{SF2HFMoveListRow | Jump Light Punch/Kick | ub / u / uf + lp / lk | 10 | [[ | {{SF2HFMoveListRow | Jump Light Punch/Kick | {{ub}} / {{u}} / {{uf}} + {{lp}} / {{lk}} | 10 | [[Damage Scaling (HF)#0x020|0x020]] | 4 | 40 | 1 | 4 | 4 | - | }} | ||
{{SF2HFMoveListRow | Jump Medium Punch/Kick | ub / u / uf + mp / mk | 14/16 | [[ | {{SF2HFMoveListRow | Jump Medium Punch/Kick | {{ub}} / {{u}} / {{uf}} + {{mp}} / {{mk}} | 14/16 | [[Damage Scaling (HF)#0x020|0x020]] | 8 | 60 | 2 | 15 | 7 | - | }} | ||
{{SF2HFMoveListRow | Jump Hard Punch/Kick | ub / u / uf + hp / hk | 18/20 | [[ | {{SF2HFMoveListRow | Jump Hard Punch/Kick | {{ub}} / {{u}} / {{uf}} + {{hp}} / {{hk}} | 18/20 | [[Damage Scaling (HF)#0x020|0x020]] | 14 | 80 | 3 | 8 | 15 | - | }} | ||
{{MoveListFooter}} | {{MoveListFooter}} | ||
===Throws=== | ===Throws=== | ||
{{SF2HFMoveListHeader}} | {{SF2HFMoveListHeader}} | ||
{{SF2HFMoveListRow | Head Bomber | b / f + hp | 20+(4*n) | - | 8 | 60 | - | - | - | - | throw}} | {{SF2HFMoveListRow | Head Bomber | {{b}} / {{f}} + {{hp}} | 20+(4*n) | - | 8 | 60 | - | - | - | - | throw}} | ||
{{MoveListFooter}} | {{MoveListFooter}} | ||
===Special Moves=== | ===Special Moves=== | ||
{{SF2HFMoveListHeader}} | {{SF2HFMoveListHeader}} | ||
{{SF2HFMoveListRow | Dash Straight | b (charge), f + lp | 28 | [[ | {{SF2HFMoveListRow | Dash Straight | {{b}} (charge), {{f}} + {{lp}} | 28 | [[Damage Scaling (HF)#0x040|0x040]] | 16 | 120 | 3 | 52+ | 0 | KD/-23 | {{hardknockdown}} Requires 69f of charge. 0f recovery if whiffed, 40f of hitting bounceback if blocked/hit.<br>Requires 5 button presses}} | ||
{{SF2HFMoveListRow | Dash Straight | b (charge), f + mp | 32 | [[ | {{SF2HFMoveListRow | Dash Straight | {{b}} (charge), {{f}} + {{mp}} | 32 | [[Damage Scaling (HF)#0x040|0x040]] | 16 | 120 | 5 | 34+ | 0 | KD/-4 | {{hardknockdown}} Requires 69f of charge. 0f recovery if whiffed, 40f of hitting bounceback if blocked/hit.<br>Requires 5 button presses}} | ||
{{SF2HFMoveListRow | Dash Straight | b (charge), f + hp| 36 | [[ | {{SF2HFMoveListRow | Dash Straight | {{b}} (charge), {{f}} + hp| 36 | [[Damage Scaling (HF)#0x040|0x040]] | 16 | 120 | 7 | 25+ | 0 | KD/+9 | {{hardknockdown}} Requires 69f of charge. 0f recovery if whiffed, 40f of hitting bounceback if blocked/hit.<br>Requires 5 button presses}} | ||
{{SF2HFMoveListRow | Dash Upper | b (charge), f + lk | 22 | [[ | {{SF2HFMoveListRow | Dash Upper | {{b}} (charge), {{f}} + {{lk}} | 22 | [[Damage Scaling (HF)#0x040|0x040]] | 16 | 120 | 0 | 25 | 0/40 | -17/-16 | Requires 39f of charge. 0f recovery if whiffed, 40f of hitting bounceback if blocked/hit.}} | ||
{{SF2HFMoveListRow |Dash Upper | b (charge), f + mk | 24 | [[ | {{SF2HFMoveListRow |Dash Upper | {{b}} (charge), {{f}} + {{mk}} | 24 | [[Damage Scaling (HF)#0x040|0x040]] | 16 | 120 | 0 | 25 | 0/40 | -17/-16 | Requires 39f of charge. 0f recovery if whiffed, 40f of hitting bounceback if blocked/hit.}} | ||
{{SF2HFMoveListRow | Dash Upper | b (charge), f + hk | 26 | [[ | {{SF2HFMoveListRow | Dash Upper | {{b}} (charge), {{f}} + {{hk}} | 26 | [[Damage Scaling (HF)#0x040|0x040]] | 16 | 120 | 0 | ∞ | 0/40 | -17/-16 | Requires 39f of charge. 0f recovery if whiffed, 40f of hitting bounceback if blocked/hit.}} | ||
{{SF2HFMoveListRow | Turn Punch | 3p / 3k | 13,21,30,40,51,64 | [[ | {{SF2HFMoveListRow | Turn Punch | {{3p}} / {{3k}} | 13,21,30,40,51,64 | [[Damage Scaling (HF)#0x040|0x040]] | 16 | 120 | 27 | 12 | 10 | +1 | }} | ||
{{MoveListFooter}} | {{MoveListFooter}} | ||
| Line 95: | Line 95: | ||
Close standing HP has strangely low base damage, but a high variability in random damage. However, cl.MP has the same random damage and far higher base damage. cl.MP or cl.HK are strongly recommended to use instead. | Close standing HP has strangely low base damage, but a high variability in random damage. However, cl.MP has the same random damage and far higher base damage. cl.MP or cl.HK are strongly recommended to use instead. | ||
'''Pros''' | |||
*Long pokes and CPS1 Chain Boss | |||
*Turn Punch can whiff Projectiles | |||
'''Cons''' | |||
*Easy Sweep Target | |||
*Cross up easy | |||
==Advanced Strategy== | ==Advanced Strategy== | ||
| Line 100: | Line 108: | ||
Balrog is a character that demands to be played aggressively. Keep pressure on the opponent with Dashing Straights and standing Fierce (Dashing Straight, (charge) s.Fierce, Dashing Straight, (charge) s.Fierce, etc.). Charge Turn Punches (PPP or KKK) in the background often while using the other buttons to mount an offense. The more aggressive you are, the more effectively you can bait (Shoryukens) and punish. | Balrog is a character that demands to be played aggressively. Keep pressure on the opponent with Dashing Straights and standing Fierce (Dashing Straight, (charge) s.Fierce, Dashing Straight, (charge) s.Fierce, etc.). Charge Turn Punches (PPP or KKK) in the background often while using the other buttons to mount an offense. The more aggressive you are, the more effectively you can bait (Shoryukens) and punish. | ||
'''Turn Punch''' has a pretty big window of invincibility at the beginning. You can use the invincibility to pass through attacks such as: | |||
<UL><LI>Fireballs - All character fireballs can be passed through. Guile's slow Sonic Boom is more difficult.</LI> | <UL><LI>Fireballs - All character fireballs can be passed through. Guile's slow Sonic Boom is more difficult.</LI> | ||
| Line 109: | Line 117: | ||
</UL> | </UL> | ||
'''Another good tactic''', once you've got the opponent on the defensive, is to rush with Dashing Uppercuts (B, F + K) that whiffs overhead against crouching opponents. Immediately after the whiff, follow with a throw. | |||
After a successful throw, hold towards the opponent to pass under them as they fall back to the ground. You can cross-up with a normal or tick into another throw. | After a successful throw, hold towards the opponent to pass under them as they fall back to the ground. You can cross-up with a normal or tick into another throw. | ||
'''Standing Fierce''' connects with some crouching opponents but whiffs overhead against others. Known whiffs include: | |||
<UL> | <UL> | ||
<LI>Ryu</LI> | <LI>Ryu</LI> | ||
| Line 138: | Line 146: | ||
===Meaty Combos=== | ===Meaty Combos=== | ||
*Meaty TAP, dash upper or dash straight | *Meaty TAP, dash upper or dash straight | ||
===CPS1 Chains=== | |||
*cr.LK x1~3 xx st HP | |||
===Redizzy=== | ===Redizzy=== | ||
| Line 147: | Line 158: | ||
--Apoc | --Apoc | ||
==Match-ups== | |||
===Vs. Balrog (boxer) (self)=== | |||
Remember that your Turn Punch its now invincible at startup and also you can charge it now...beign a good poking its the key yourself. | |||
== | ===Vs. Blanka=== | ||
Its a decent matchup for him,anyway your main disadvantange will be sweeps and electricity mixups. | |||
If he use Horizontal Roll ,punish him with Dash Straight, but beware with his Vertical one, try a Dash Upper for counter it. | |||
===Vs. Chun-Li=== | |||
A regular matchup...she is quick and have better low pokes than Boxer, if she its jumping around use Dash Upper,if she throws the Kikoken due to your short jump you can safe hold her or use your jumping roundhouse , Spinning Bird Kick its easily punished with a crouch Fierce or crouch Roundhouse. | |||
===Vs. | ===Vs. Dhalsim=== | ||
Drills can be countered easily with a hold, try to use Turn Punch against Yoga Fire and also Yoga Teleport can be easily have a meaty hit Standing Fierce or Dash Punch or hold. | |||
Its a slightly fair matchup but Balrog its the best at close distance, use Dash Upper and Straight randomly to force Dhalsim to Teleport. | |||
===Vs. E. Honda | ===Vs. E. Honda=== | ||
Another decent matchup, Balrog objective will be poke him to the limit or trade hits in standing position , your standing Jab defeat Sumo Headbutt easily, but the new mind game of Sumo Splash can trade hits with a Dash Upper, jump him its a bad idea because her standing Strong can punish you. | |||
===Vs. Guile | ===Vs. Guile=== | ||
Possibly Rog's hardest matchup. You can't TAP through sonic booms, Guile's recovery is too fast and you'll eat a backfist, which will push you back into the boom, and then you're dizzy. Also, Rog's jump makes it difficult to jump straight up over sonic booms, and Guile's anti-airs are too strong for this to be very useful anyway. You absolutely need to get in, but that's a very hard task. | Possibly Rog's hardest matchup. You can't TAP through sonic booms, Guile's recovery is too fast and you'll eat a backfist, which will push you back into the boom, and then you're dizzy. Also, Rog's jump makes it difficult to jump straight up over sonic booms, and Guile's anti-airs are too strong for this to be very useful anyway. You absolutely need to get in, but that's a very hard task. | ||
===Vs. Ken | ===Vs. Ken=== | ||
A unfair matchup, but his Hadoken its weaker than Ryu and also use your new advantage of Turn Punch startup invincible frames. | |||
Remember that Hurricane Kicks can be countered with crouching attacks,watch out with Shoryukens, don't jump him close it. | |||
===Vs. | ===Vs. M. Bison (dictator)=== | ||
Another fair match up with some Bison advantage, remember to use Dash Straight and Upper to get close to him, you have a better hold and also you can punish his Headstomp with Jumping Fierce and Throws, standing block it and then Hold him as punish for those bad recovery. | |||
===Vs. | ===Vs. Ryu=== | ||
T.A.P. can evade Hadoken, but remember you still have a lot of disadvantage, try to jump and make fail him a Shoryuken for a crouching RFWA to Dash Punch, its still easy to beat his Hurricane Kick with crouching attack. | |||
===Vs. Zangief | ===Vs. Sagat=== | ||
He its a bit nerfed in Tiger Shots , you can evade high ones with crouching and then use Dash Straight, Tiger Uppercut its still deadly don't jump so much. | |||
===Vs. Vega (claw)=== | |||
He had better and faster pokes than you, Dash Upper its a good option against his jumping tactics, or you can use Crouching Fierce or Standing Strong if he use Barcelona, its a air poke vs ground rush matchup, Rolling Attack can be punished with your little jumping attack as an overhead, if he is a Backdash turtler punish him with a Hold. | |||
===Vs. Zangief=== | |||
Boxer can try to keep Gief out with standing LP, cr.HP, s.MP, kick dash upper, or cr.HK for anti-air and cr.HK and the occasional kick dash upper on the ground. It doesn't work most of the time, but it works sometimes. <br /> | Boxer can try to keep Gief out with standing LP, cr.HP, s.MP, kick dash upper, or cr.HK for anti-air and cr.HK and the occasional kick dash upper on the ground. It doesn't work most of the time, but it works sometimes. <br /> | ||
| Line 195: | Line 213: | ||
==Standing Normals== | ==Standing Normals== | ||
* | *'''Standing LP:''' | ||
{| border="1em" cellspacing="0" style="border: 1px solid #999;" | {| border="1em" cellspacing="0" style="border: 1px solid #999;" | ||
|- valign="bottom" | |- valign="bottom" | ||
| Line 215: | Line 233: | ||
|} | |} | ||
* | *'''Standing MP:''' | ||
{| border="1em" cellspacing="0" style="border: 1px solid #999;" | {| border="1em" cellspacing="0" style="border: 1px solid #999;" | ||
|- valign="bottom" | |- valign="bottom" | ||
| Line 235: | Line 253: | ||
|} | |} | ||
* | *'''Standing HP:''' | ||
{| border="1em" cellspacing="0" style="border: 1px solid #999;" | {| border="1em" cellspacing="0" style="border: 1px solid #999;" | ||
|- valign="bottom" | |- valign="bottom" | ||
| Line 255: | Line 273: | ||
|} | |} | ||
* | *'''Standing LK:''' | ||
{| border="1em" cellspacing="0" style="border: 1px solid #999;" | {| border="1em" cellspacing="0" style="border: 1px solid #999;" | ||
|- valign="bottom" | |- valign="bottom" | ||
| Line 275: | Line 293: | ||
|} | |} | ||
* | *'''Standing MK:''' | ||
{| border="1em" cellspacing="0" style="border: 1px solid #999;" | {| border="1em" cellspacing="0" style="border: 1px solid #999;" | ||
|- valign="bottom" | |- valign="bottom" | ||
| Line 295: | Line 313: | ||
|} | |} | ||
* | *'''Standing HK:''' | ||
{| border="1em" cellspacing="0" style="border: 1px solid #999;" | {| border="1em" cellspacing="0" style="border: 1px solid #999;" | ||
|- valign="bottom" | |- valign="bottom" | ||
| Line 317: | Line 335: | ||
==Close Standing Normals== | ==Close Standing Normals== | ||
* | *'''Close MP:''' | ||
{| border="1em" cellspacing="0" style="border: 1px solid #999;" | {| border="1em" cellspacing="0" style="border: 1px solid #999;" | ||
|- valign="bottom" | |- valign="bottom" | ||
| Line 337: | Line 355: | ||
|} | |} | ||
* | *'''Close HP:''' | ||
{| border="1em" cellspacing="0" style="border: 1px solid #999;" | {| border="1em" cellspacing="0" style="border: 1px solid #999;" | ||
|- valign="bottom" | |- valign="bottom" | ||
| Line 357: | Line 375: | ||
|} | |} | ||
* | *'''Close MK:''' | ||
{| border="1em" cellspacing="0" style="border: 1px solid #999;" | {| border="1em" cellspacing="0" style="border: 1px solid #999;" | ||
|- valign="bottom" | |- valign="bottom" | ||
| Line 377: | Line 395: | ||
|} | |} | ||
* | *'''Close HK:''' | ||
{| border="1em" cellspacing="0" style="border: 1px solid #999;" | {| border="1em" cellspacing="0" style="border: 1px solid #999;" | ||
|- valign="bottom" | |- valign="bottom" | ||
| Line 401: | Line 419: | ||
==Crouching Normals== | ==Crouching Normals== | ||
* | *'''Crouching LP/LK:''' | ||
{| border="1em" cellspacing="0" style="border: 1px solid #999;" | {| border="1em" cellspacing="0" style="border: 1px solid #999;" | ||
|- valign="bottom" | |- valign="bottom" | ||
| Line 421: | Line 439: | ||
|} | |} | ||
* | *'''Crouching MP:''' | ||
{| border="1em" cellspacing="0" style="border: 1px solid #999;" | {| border="1em" cellspacing="0" style="border: 1px solid #999;" | ||
|- valign="bottom" | |- valign="bottom" | ||
| Line 441: | Line 459: | ||
|} | |} | ||
* | *'''Crouching HP:''' | ||
{| border="1em" cellspacing="0" style="border: 1px solid #999;" | {| border="1em" cellspacing="0" style="border: 1px solid #999;" | ||
|- valign="bottom" | |- valign="bottom" | ||
| Line 461: | Line 479: | ||
|} | |} | ||
* | *'''Crouching LK:''' | ||
See Crouching LP. | See Crouching LP. | ||
* | *'''Crouching MK:''' | ||
{| border="1em" cellspacing="0" style="border: 1px solid #999;" | {| border="1em" cellspacing="0" style="border: 1px solid #999;" | ||
|- valign="bottom" | |- valign="bottom" | ||
| Line 485: | Line 503: | ||
The same frame and attack data as cr.Strong, except with less range and lower hit/hurt boxes. | The same frame and attack data as cr.Strong, except with less range and lower hit/hurt boxes. | ||
* | *'''Crouching HK:''' | ||
{| border="1em" cellspacing="0" style="border: 1px solid #999;" | {| border="1em" cellspacing="0" style="border: 1px solid #999;" | ||
|- valign="bottom" | |- valign="bottom" | ||
| Line 507: | Line 525: | ||
==Aerial Normals== | ==Aerial Normals== | ||
* | *'''Neutral/Diagonal Jumping LP/LK:''' | ||
{| border="1em" cellspacing="0" style="border: 1px solid #999;" | {| border="1em" cellspacing="0" style="border: 1px solid #999;" | ||
|- valign="bottom" | |- valign="bottom" | ||
| Line 521: | Line 539: | ||
|} | |} | ||
* | *'''Neutral/Diagonal Jumping MP/MK:''' | ||
{| border="1em" cellspacing="0" style="border: 1px solid #999;" | {| border="1em" cellspacing="0" style="border: 1px solid #999;" | ||
|- valign="bottom" | |- valign="bottom" | ||
| Line 535: | Line 553: | ||
|} | |} | ||
* | *'''Neutral/Diagonal Jumping HP/HK:''' | ||
{| border="1em" cellspacing="0" style="border: 1px solid #999;" | {| border="1em" cellspacing="0" style="border: 1px solid #999;" | ||
|- valign="bottom" | |- valign="bottom" | ||
| Line 550: | Line 568: | ||
==Throws== | ==Throws== | ||
* | *'''Headbutt:''' (←/→ + Strong or Fierce) | ||
{| border="1em" cellspacing="0" style="border: 1px solid #999;" | {| border="1em" cellspacing="0" style="border: 1px solid #999;" | ||
| align="center" | Damage || align="center" | 22+(4*n) || align="center" rowspan="6" | [[File:Sf2hf-rog-throw.png]] | | align="center" | Damage || align="center" | 22+(4*n) || align="center" rowspan="6" | [[File:Sf2hf-rog-throw.png]] | ||
| Line 567: | Line 585: | ||
== Special Moves == | == Special Moves == | ||
* | *'''Dashing Straight''': (Charge ←, →, P) [charge time: 69f] | ||
{| border="1em" cellspacing="0" style="border: 1px solid #999;" | {| border="1em" cellspacing="0" style="border: 1px solid #999;" | ||
| align="center" | Damage (Jab) || align="center" | 22 || align="center" rowspan="7" | [[File:Sf2hf-balrog-ds1.png]] || align="center" rowspan="7" | [[File:Sf2hf-balrog-ds2.png]] || align="center" rowspan="7" | [[File:Sf2hf-balrog-ds3.png]] || align="center" rowspan="7" | [[File:Sf2hf-balrog-ds4.png]] || align="center" rowspan="7" | [[File:Sf2hf-balrog-ds5.png]] | | align="center" | Damage (Jab) || align="center" | 22 || align="center" rowspan="7" | [[File:Sf2hf-balrog-ds1.png]] || align="center" rowspan="7" | [[File:Sf2hf-balrog-ds2.png]] || align="center" rowspan="7" | [[File:Sf2hf-balrog-ds3.png]] || align="center" rowspan="7" | [[File:Sf2hf-balrog-ds4.png]] || align="center" rowspan="7" | [[File:Sf2hf-balrog-ds5.png]] | ||
| Line 575: | Line 593: | ||
| align="center" | Damage (Fierce) || align="center" | 26 | | align="center" | Damage (Fierce) || align="center" | 26 | ||
|- | |- | ||
| align="center" | Random dmg table || align="center" | [[ | | align="center" | Random dmg table || align="center" | [[Damage Scaling (HF)#0x080|0x080]] | ||
|- | |- | ||
| align="center" | Stun || align="center" | 13~19 | | align="center" | Stun || align="center" | 13~19 | ||
| Line 589: | Line 607: | ||
Startup is 4 frames for all versions point blank, stronger punches can travel further (and thus can have longer startup). | Startup is 4 frames for all versions point blank, stronger punches can travel further (and thus can have longer startup). | ||
The only difference with Champition Edition, its that can hit crouching characters like SF2 Dash version. | |||
* | *'''Dashing Uppercut''': (Charge ←, →, K) [charge time: 39f] | ||
{| border="1em" cellspacing="0" style="border: 1px solid #999;" | {| border="1em" cellspacing="0" style="border: 1px solid #999;" | ||
| align="center" | Damage (Short) || align="center" | 20 || align="center" rowspan="7" | [[File:Sf2hf-balrog-du1.png]] || align="center" rowspan="7" | [[File:Sf2hf-balrog-du2.png]] || align="center" rowspan="7" | [[File:Sf2hf-balrog-du3.png]] || align="center" rowspan="7" | [[File:Sf2hf-balrog-du4.png]] | | align="center" | Damage (Short) || align="center" | 20 || align="center" rowspan="7" | [[File:Sf2hf-balrog-du1.png]] || align="center" rowspan="7" | [[File:Sf2hf-balrog-du2.png]] || align="center" rowspan="7" | [[File:Sf2hf-balrog-du3.png]] || align="center" rowspan="7" | [[File:Sf2hf-balrog-du4.png]] | ||
| Line 598: | Line 617: | ||
| align="center" | Damage (Roundhouse) || align="center" | 26 | | align="center" | Damage (Roundhouse) || align="center" | 26 | ||
|- | |- | ||
| align="center" | Random dmg table || align="center" | [[ | | align="center" | Random dmg table || align="center" | [[Damage Scaling (HF)#0x080|0x080]] | ||
|- | |- | ||
| align="center" | Stun || align="center" | 13~19 | | align="center" | Stun || align="center" | 13~19 | ||
| Line 614: | Line 633: | ||
* | *'''Turn Around Punch (lvl 1 & 2)''': Hold all 3 Punch or Kick buttons for at least 30f (lvl1) or 120f (lvl2), then release. | ||
'''Startup''' | |||
{| border="1em" cellspacing="0" style="border: 1px solid #999;" | {| border="1em" cellspacing="0" style="border: 1px solid #999;" | ||
| align="center" | || align="center" | [[File:Sf2hf-balrog-tap-1-4.png]] || align="center" | [[File:Sf2hf-balrog-tap-5-8.png]] || align="center" | [[File:Sf2hf-balrog-tap-9-12.png]] || align="center" | [[File:Sf2hf-balrog-tap-13-19.png]] || align="center" | [[File:Sf2hf-balrog-tap-20-21.png]] || align="center" | [[File:Sf2hf-balrog-tap-22-23.png]] || align="center" | [[File:Sf2hf-balrog-tap-24-25.png]] || align="center" | [[File:Sf2hf-balrog-tap-26-27.png]] | | align="center" | || align="center" | [[File:Sf2hf-balrog-tap-1-4.png]] || align="center" | [[File:Sf2hf-balrog-tap-5-8.png]] || align="center" | [[File:Sf2hf-balrog-tap-9-12.png]] || align="center" | [[File:Sf2hf-balrog-tap-13-19.png]] || align="center" | [[File:Sf2hf-balrog-tap-20-21.png]] || align="center" | [[File:Sf2hf-balrog-tap-22-23.png]] || align="center" | [[File:Sf2hf-balrog-tap-24-25.png]] || align="center" | [[File:Sf2hf-balrog-tap-26-27.png]] | ||
| Line 623: | Line 642: | ||
| align="center" | Simplified || align="center" colspan="8" | 27 | | align="center" | Simplified || align="center" colspan="8" | 27 | ||
|} | |} | ||
'''Active/Recovery''' | |||
{| border="1em" cellspacing="0" style="border: 1px solid #999;" | {| border="1em" cellspacing="0" style="border: 1px solid #999;" | ||
| align="center" | Damage (lvl1) || align="center" | 22 || align="center" rowspan="7" | [[File:Sf2hf-balrog-tap-a.png]] || align="center" rowspan="7" | [[File:Sf2hf-balrog-ds4.png]] || align="center" rowspan="7" | [[File:Sf2hf-balrog-ds5.png]] | | align="center" | Damage (lvl1) || align="center" | 22 || align="center" rowspan="7" | [[File:Sf2hf-balrog-tap-a.png]] || align="center" rowspan="7" | [[File:Sf2hf-balrog-ds4.png]] || align="center" rowspan="7" | [[File:Sf2hf-balrog-ds5.png]] | ||
| Line 646: | Line 665: | ||
* | *'''Turn Around Punch (lvl 3,4,5,6,7,final)''': Hold all 3 Punch or Kick buttons for at least 240f (lvl3), 480f (lvl4), 960f (lvl5), 1440f (lvl6), 1920f (lvl7), or 2400f (final), then release. | ||
'''Startup''' | |||
{| border="1em" cellspacing="0" style="border: 1px solid #999;" | {| border="1em" cellspacing="0" style="border: 1px solid #999;" | ||
| align="center" | || align="center" | [[File:Sf2hf-balrog-tap3-1-4.png]] || align="center" | [[File:Sf2hf-balrog-tap3-5-8.png]] || align="center" | [[File:Sf2hf-balrog-tap3-9-12.png]] || align="center" | [[File:Sf2hf-balrog-tap3-13-19.png]] || align="center" | [[File:Sf2hf-balrog-tap3-20-21.png]] || align="center" | [[File:Sf2hf-balrog-tap3-22-23.png]] || align="center" | [[File:Sf2hf-balrog-tap-24-25.png]] || align="center" | [[File:Sf2hf-balrog-tap-26-27.png]] | | align="center" | || align="center" | [[File:Sf2hf-balrog-tap3-1-4.png]] || align="center" | [[File:Sf2hf-balrog-tap3-5-8.png]] || align="center" | [[File:Sf2hf-balrog-tap3-9-12.png]] || align="center" | [[File:Sf2hf-balrog-tap3-13-19.png]] || align="center" | [[File:Sf2hf-balrog-tap3-20-21.png]] || align="center" | [[File:Sf2hf-balrog-tap3-22-23.png]] || align="center" | [[File:Sf2hf-balrog-tap-24-25.png]] || align="center" | [[File:Sf2hf-balrog-tap-26-27.png]] | ||
| Line 655: | Line 674: | ||
| align="center" | Simplified || align="center" colspan="8" | 27 | | align="center" | Simplified || align="center" colspan="8" | 27 | ||
|} | |} | ||
'''Active/Recovery''' | |||
{| border="1em" cellspacing="0" style="border: 1px solid #999;" | {| border="1em" cellspacing="0" style="border: 1px solid #999;" | ||
| align="center" | Damage || align="center" | 28 || align="center" rowspan="10" | [[File:Sf2hf-balrog-tap-a.png]] || align="center" rowspan="10" | [[File:Sf2hf-balrog-ds4.png]] || align="center" rowspan="10" | [[File:Sf2hf-balrog-ds5.png]] | | align="center" | Damage || align="center" | 28 || align="center" rowspan="10" | [[File:Sf2hf-balrog-tap-a.png]] || align="center" rowspan="10" | [[File:Sf2hf-balrog-ds4.png]] || align="center" rowspan="10" | [[File:Sf2hf-balrog-ds5.png]] | ||
| Line 682: | Line 701: | ||
|} | |} | ||
Level 3 and above TAPs lose startup invincibility. Higher levels travel further, and do more damage. | Level 3 and above TAPs lose startup invincibility. Higher levels travel further, and do more damage. | ||
==Misc Animations== | ==Misc Animations== | ||
| Line 694: | Line 711: | ||
|} | |} | ||
* | *'''Standing reel:''' | ||
{| border="1em" cellspacing="0" style="border: 1px solid #999;" | {| border="1em" cellspacing="0" style="border: 1px solid #999;" | ||
| align="center" | [[File:Sf2hf-rog-hr1.png]] || align="center" | [[File:Sf2hf-rog-hr2.png]] || align="center" | [[File:Sf2hf-rog-hr3.png]] | | align="center" | [[File:Sf2hf-rog-hr1.png]] || align="center" | [[File:Sf2hf-rog-hr2.png]] || align="center" | [[File:Sf2hf-rog-hr3.png]] | ||
|- | |- | ||
|} | |} | ||
* | *'''Standing gut reel:''' | ||
{| border="1em" cellspacing="0" style="border: 1px solid #999;" | {| border="1em" cellspacing="0" style="border: 1px solid #999;" | ||
| align="center" | [[File:Sf2hf-rog-gr1.png]] || align="center" | [[File:Sf2hf-rog-gr2.png]] || align="center" | [[File:Sf2hf-rog-gr3.png]] | | align="center" | [[File:Sf2hf-rog-gr1.png]] || align="center" | [[File:Sf2hf-rog-gr2.png]] || align="center" | [[File:Sf2hf-rog-gr3.png]] | ||
|- | |- | ||
|} | |} | ||
* | *'''Crouching reel:''' | ||
{| border="1em" cellspacing="0" style="border: 1px solid #999;" | {| border="1em" cellspacing="0" style="border: 1px solid #999;" | ||
| align="center" | [[File:Sf2hf-rog-cr1.png]] || align="center" | [[File:Sf2hf-rog-cr2.png]] || align="center" | [[File:Sf2hf-rog-cr3.png]] | | align="center" | [[File:Sf2hf-rog-cr1.png]] || align="center" | [[File:Sf2hf-rog-cr2.png]] || align="center" | [[File:Sf2hf-rog-cr3.png]] | ||
| Line 710: | Line 727: | ||
|} | |} | ||
* | *'''Dizzy:''' | ||
{| border="1em" cellspacing="0" style="border: 1px solid #999;" | {| border="1em" cellspacing="0" style="border: 1px solid #999;" | ||
| align="center" | [[File:Sf2hf-rog-dizzy3.png]] || align="center" | [[File:Sf2hf-rog-dizzy2.png]] || align="center" | [[File:Sf2hf-rog-dizzy1.png]] | | align="center" | [[File:Sf2hf-rog-dizzy3.png]] || align="center" | [[File:Sf2hf-rog-dizzy2.png]] || align="center" | [[File:Sf2hf-rog-dizzy1.png]] | ||
| Line 716: | Line 733: | ||
|} | |} | ||
{{ | {{Navbox-SF2HF}} | ||
[[Category:Street Fighter 2: Hyper Fighting]] | [[Category:Street Fighter 2: Hyper Fighting]] | ||
[[Category:Hyper Street Fighter 2]] | [[Category:Hyper Street Fighter 2]] | ||
Latest revision as of 19:29, 30 May 2024


Balrog
A Boxer who decided it's not about the play anymore, but the paper.
Strangely apt at video editing and searching documents in filing cabinets, all without taking off his gloves. Balrog is a strong asset to the Shadaloo crime organisation, and is the first of the Boss characters in SF2:HF.
In a nutshell
Boxer is one of the weaker characters in Hyper Fighting, with no particularly viable reversal move and little ability to fight at range. His Turn Around Punch gains invincibility and gives him some mobility and can be used as a ![]() to fireballs, and his
to fireballs, and his ![]() is a great setup into mixups or back into more throws. Decent combos and a bit of fun-factor make him popular with some players, but being competitive with Boxer is a slightly uphill battle.
is a great setup into mixups or back into more throws. Decent combos and a bit of fun-factor make him popular with some players, but being competitive with Boxer is a slightly uphill battle.
Character Specific Information
Color Options
| Default | Start |
 |

|
Moves List
All frame data taken from T.Akiba's data. Will independently verify soon.
Normal Moves
- Standing Normal Moves (st.)
- Close Standing Normal Moves (cl.)
- Crouching Normal Moves (cr.)
- Neutral/Diagonal Jumping Normal Moves (j.)
Throws
Special Moves
Requires 5 button presses }}
Requires 5 button presses }}
Requires 5 button presses }}
The Basics
Crouching HK is Boxer's only low hitting move. It also knocks down, and is best ranged crouching normal. The startup is fast enough to be comboed into after cr.MP. Also, it's actually at frame advantage on block! Pretty solid move, all considered.
Close standing HP has strangely low base damage, but a high variability in random damage. However, cl.MP has the same random damage and far higher base damage. cl.MP or cl.HK are strongly recommended to use instead.
Pros
- Long pokes and CPS1 Chain Boss
- Turn Punch can whiff Projectiles
Cons
- Easy Sweep Target
- Cross up easy
Advanced Strategy
Balrog is a character that demands to be played aggressively. Keep pressure on the opponent with Dashing Straights and standing Fierce (Dashing Straight, (charge) s.Fierce, Dashing Straight, (charge) s.Fierce, etc.). Charge Turn Punches (PPP or KKK) in the background often while using the other buttons to mount an offense. The more aggressive you are, the more effectively you can bait (Shoryukens) and punish.
Turn Punch has a pretty big window of invincibility at the beginning. You can use the invincibility to pass through attacks such as:
- Fireballs - All character fireballs can be passed through. Guile's slow Sonic Boom is more difficult.
- E. Honda Headbutt - When Balrog rolls just before getting hit, Honda's headbutt recoils in place. As Honda recovers, Balrog's punch comes out and hits.
- Blanka roll - If Turn Punch is timed correctly, Blanka will simply continue through Balrog.
- Psycho Crusher - If Turn Punch is timed correctly, Bison will simply continue through Balrog. Timing must be very close because of Bison's long legs during the Psycho Crusher.
- Most normals - Good counter for Dhalsim limbs and/or sweeps
Another good tactic, once you've got the opponent on the defensive, is to rush with Dashing Uppercuts (B, F + K) that whiffs overhead against crouching opponents. Immediately after the whiff, follow with a throw.
After a successful throw, hold towards the opponent to pass under them as they fall back to the ground. You can cross-up with a normal or tick into another throw.
Standing Fierce connects with some crouching opponents but whiffs overhead against others. Known whiffs include:
- Ryu
- Ken
Known connects include:
- Sagat
- Zangief
- Dhalsim
- Chun Li (?)
Combos
Bread And Butter
- cr.LK, s.LK xx dash upper, cr.HK
- cr.LP, cr.LP, s.LP xx dash straight
- j.HP, cr.LP, cr.LP xx dash straight
- j.HP, s.LK xx dash straight (the only consistent combo vs Blanka)
Meaty Combos
- Meaty TAP, dash upper or dash straight
CPS1 Chains
- cr.LK x1~3 xx st HP
Redizzy
- j.HP, cr.LK, cr.LK, s.LK, dash upper, s.HP (Apoc's Redizzy)
On most characters you'll need to omit one low short making it require one more short or jab to dizzy again but most of the time it just redizzies. If you want to practice this one do it on ken,ryu,chun li, and zangief. This absolutely will not work on blanka ever. Or you can do this combo without jumping in on others just by using 3 low shorts then continue with the rest.
Jump in w/frc., do a c.short, then st.short, link(not 2in1. It won't work if you 2in1.) a dashing short uppercut, then do a standing frc. Note: There is a half sec delay(ok I'm estimating I've never timed it:) between each of the hits. The combo must be done SLOWLY except for the final frc. Doing it slow pushes the opponent back farther & later making him get hit late with the dashing uppercut so that it hits in the last frame making the frc. connect.
--Apoc
Match-ups
Vs. Balrog (boxer) (self)
Remember that your Turn Punch its now invincible at startup and also you can charge it now...beign a good poking its the key yourself.
Vs. Blanka
Its a decent matchup for him,anyway your main disadvantange will be sweeps and electricity mixups.
If he use Horizontal Roll ,punish him with Dash Straight, but beware with his Vertical one, try a Dash Upper for counter it.
Vs. Chun-Li
A regular matchup...she is quick and have better low pokes than Boxer, if she its jumping around use Dash Upper,if she throws the Kikoken due to your short jump you can safe hold her or use your jumping roundhouse , Spinning Bird Kick its easily punished with a crouch Fierce or crouch Roundhouse.
Vs. Dhalsim
Drills can be countered easily with a hold, try to use Turn Punch against Yoga Fire and also Yoga Teleport can be easily have a meaty hit Standing Fierce or Dash Punch or hold.
Its a slightly fair matchup but Balrog its the best at close distance, use Dash Upper and Straight randomly to force Dhalsim to Teleport.
Vs. E. Honda
Another decent matchup, Balrog objective will be poke him to the limit or trade hits in standing position , your standing Jab defeat Sumo Headbutt easily, but the new mind game of Sumo Splash can trade hits with a Dash Upper, jump him its a bad idea because her standing Strong can punish you.
Vs. Guile
Possibly Rog's hardest matchup. You can't TAP through sonic booms, Guile's recovery is too fast and you'll eat a backfist, which will push you back into the boom, and then you're dizzy. Also, Rog's jump makes it difficult to jump straight up over sonic booms, and Guile's anti-airs are too strong for this to be very useful anyway. You absolutely need to get in, but that's a very hard task.
Vs. Ken
A unfair matchup, but his Hadoken its weaker than Ryu and also use your new advantage of Turn Punch startup invincible frames.
Remember that Hurricane Kicks can be countered with crouching attacks,watch out with Shoryukens, don't jump him close it.
Vs. M. Bison (dictator)
Another fair match up with some Bison advantage, remember to use Dash Straight and Upper to get close to him, you have a better hold and also you can punish his Headstomp with Jumping Fierce and Throws, standing block it and then Hold him as punish for those bad recovery.
Vs. Ryu
T.A.P. can evade Hadoken, but remember you still have a lot of disadvantage, try to jump and make fail him a Shoryuken for a crouching RFWA to Dash Punch, its still easy to beat his Hurricane Kick with crouching attack.
Vs. Sagat
He its a bit nerfed in Tiger Shots , you can evade high ones with crouching and then use Dash Straight, Tiger Uppercut its still deadly don't jump so much.
Vs. Vega (claw)
He had better and faster pokes than you, Dash Upper its a good option against his jumping tactics, or you can use Crouching Fierce or Standing Strong if he use Barcelona, its a air poke vs ground rush matchup, Rolling Attack can be punished with your little jumping attack as an overhead, if he is a Backdash turtler punish him with a Hold.
Vs. Zangief
Boxer can try to keep Gief out with standing LP, cr.HP, s.MP, kick dash upper, or cr.HK for anti-air and cr.HK and the occasional kick dash upper on the ground. It doesn't work most of the time, but it works sometimes.
Boxer can use cr.HK and (I think) MK to beat punch lariats, cr.HP and kick rush to beat kick lariats.
--Ultradavid
Hitboxes
Standing Normals
- Standing LP:
| Damage | 4 |  |
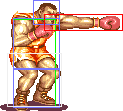 |

|
| Stun | 1~7 | |||
| Stun Timer | 40 | |||
| Chain Cancel | Yes | |||
| Special Cancel | Yes | |||
| Frame Advantage | +5 | |||
| Frame Count | 3 | 4 | 5 | |
| Frame Count | 1+3 | 4 | 5 | |
- Standing MP:
| Damage | 14 |  |
 |
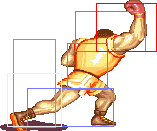 |
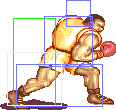 |

|
| Stun | 5~11 | |||||
| Stun Timer | 60 | |||||
| Chain Cancel | No | |||||
| Special Cancel | No | |||||
| Frame Advantage | +6 | |||||
| Frame Count | 3 | 3 | 4 | 3 | 4 | |
| Frame Count | 1+6 | 4 | 7 | |||
- Standing HP:
| Damage | 22 |  |
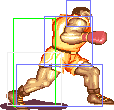 |
 |
 |

|
| Stun | 11~17 | |||||
| Stun Timer | 80 | |||||
| Chain Cancel | No | |||||
| Special Cancel | No | |||||
| Frame Advantage | +2 | |||||
| Frame Count | 5 | 3 | 6 | 9 | 6 | |
| Frame Count | 1+8 | 6 | 15 | |||
- Standing LK:
| Damage | 4 |  |
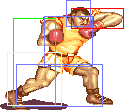 |

|
| Stun | 1~7 | |||
| Stun Timer | 40 | |||
| Chain Cancel | Yes | |||
| Special Cancel | Yes | |||
| Frame Advantage | +5 | |||
| Frame Count | 3 | 4 | 5 | |
| Frame Count | 1+3 | 4 | 5 | |
- Standing MK:
| Damage | 14 | 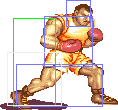 |
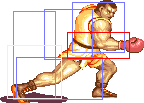 |

|
| Stun | 5~11 | |||
| Stun Timer | 60 | |||
| Chain Cancel | Yes | |||
| Special Cancel | Yes | |||
| Frame Advantage | +8 | |||
| Frame Count | 5 | 4 | 7 | |
| Frame Count | 1+6 | 4 | 7 | |
- Standing HK:
| Damage | 22 |  |
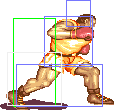 |
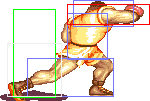 |
 |

|
| Stun | 11~17 | |||||
| Stun Timer | 80 | |||||
| Chain Cancel | No | |||||
| Special Cancel | No | |||||
| Frame Advantage | +2 | |||||
| Frame Count | 5 | 3 | 6 | 9 | 6 | |
| Frame Count | 1+8 | 6 | 15 | |||
Close Standing Normals
- Close MP:
| Damage | 16 |  |
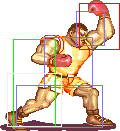 |

|
| Stun | 1~7 | |||
| Stun Timer | 40 | |||
| Chain Cancel | Yes | |||
| Special Cancel | Yes | |||
| Frame Advantage | +6/+5 | |||
| Frame Count | 5 | 4 | 7 | |
| Simplified | 1+5 | 4 | 7 | |
- Close HP:
| Damage | 24 |  |
 |
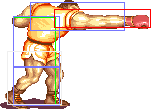 |
 |

|
| Stun | 1~7 | |||||
| Stun Timer | 40 | |||||
| Chain Cancel | Yes | |||||
| Special Cancel | Yes | |||||
| Frame Advantage | +6/+5 | |||||
| Frame Count | 5 | 3 | 6 | 9 | 6 | |
| Simplified | 1+8 | 6 | 15 | |||
- Close MK:
| Damage | 16 |  |
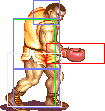 |

|
| Stun | 1~7 | |||
| Stun Timer | 40 | |||
| Chain Cancel | Yes | |||
| Special Cancel | Yes | |||
| Frame Advantage | +6/+5 | |||
| Frame Count | 4 | 4 | 7 | |
| Simplified | 1+4 | 4 | 7 | |
- Close HK:
| Damage | 24 |  |
 |

|
| Stun | 1~7 | |||
| Stun Timer | 40 | |||
| Chain Cancel | Yes | |||
| Special Cancel | Yes | |||
| Frame Advantage | +6/+5 | |||
| Frame Count | 6 | 6 | 15 | |
| Simplified | 1+6 | 6 | 15 | |
Close standing Forward and close standing Roundhouse share the same animation.
Crouching Normals
- Crouching LP/LK:
| Damage | 6 |  |
 |
 |
 |

|
| Stun | 1~7 | |||||
| Stun Timer | 40 | |||||
| Chain Cancel | Yes | |||||
| Special Cancel | Yes | |||||
| Frame Advantage | +6/+7 | |||||
| Frame Count | 1 | 2 | 4 | 2 | 2 | |
| Simplified | 1+3 | 4 | 4 | |||
- Crouching MP:
| Damage | 14 |  |
 |
 |
 |

|
| Stun | 5~11 | |||||
| Stun Timer | 60 | |||||
| Chain Cancel | No | |||||
| Special Cancel | No | |||||
| Frame Advantage | +9/+8 | |||||
| Frame Count | 3 | 2 | 4 | 3 | 4 | |
| Simplified | 1+6 | 4 | 7 | |||
- Crouching HP:
| Damage | 20 |  |
 |
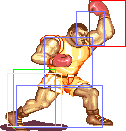 |
 |

|
| Stun | 11~17 | |||||
| Stun Timer | 80 | |||||
| Chain Cancel | No | |||||
| Special Cancel | No | |||||
| Frame Advantage | +1,+2 | |||||
| Frame Count | 4 | 2 | 6 | 9 | 6 | |
| Simplified | 1+4 | 8 | 15 | |||
- Crouching LK:
See Crouching LP.
- Crouching MK:
| Damage | 14 |  |
 |
 |
 |

|
| Stun | 5~11 | |||||
| Stun Timer | 60 | |||||
| Chain Cancel | No | |||||
| Special Cancel | No | |||||
| Frame Advantage | +9/+8 | |||||
| Frame Count | 3 | 2 | 4 | 3 | 4 | |
| Simplified | 1+5 | 4 | 7 | |||
The same frame and attack data as cr.Strong, except with less range and lower hit/hurt boxes.
- Crouching HK:
| Damage | 20 |  |
 |
 |
 |

|
| Stun | 11~17 | |||||
| Stun Timer | 80 | |||||
| Chain Cancel | No | |||||
| Special Cancel | No | |||||
| Frame Advantage | KD/+2 | |||||
| Frame Count | 2 | 4 | 6 | 9 | 6 | |
| Simplified | 1+6 | 6 | 15 | |||
Aerial Normals
- Neutral/Diagonal Jumping LP/LK:
| Damage | 10 |  |
 |
 |
 |

|
| Stun | 1~7 | |||||
| Stun Timer | 40 | |||||
| Frame Count | 1 | 30 | 3 | 3 | ∞ | |
| Simplified | 1 | 30 | ∞ | |||
- Neutral/Diagonal Jumping MP/MK:
| Damage | 14/16 |  |
 |
 |
 |

|
| Stun | 5~11 | |||||
| Stun Timer | 50 | |||||
| Frame Count | 2 | 15 | 3 | 3 | ∞ | |
| Simplified | 2 | 15 | ∞ | |||
- Neutral/Diagonal Jumping HP/HK:
| Damage | 18/20 |  |
 |
 |
 |

|
| Stun | 11~17 | |||||
| Stun Timer | 60 | |||||
| Frame Count | 3 | 8 | 3 | 3 | ∞ | |
| Simplified | 3 | 8 | ∞ | |||
Throws
- Headbutt: (←/→ + Strong or Fierce)
| Damage | 22+(4*n) | 
|
| Duration | 300 | |
| Stun | 1~7 | |
| Stun Timer | 60 | |
| Range (from axis) | 64 | |
| Range advantage | 36 |
Special Moves
- Dashing Straight: (Charge ←, →, P) [charge time: 69f]
| Damage (Jab) | 22 |  |
 |
 |
 |

|
| Damage (Strong) | 24 | |||||
| Damage (Fierce) | 26 | |||||
| Random dmg table | 0x080 | |||||
| Stun | 13~19 | |||||
| Stun Timer | 120 | |||||
| Frame Advantage | +5 | |||||
| Frame Count | 1~8/1~16/1~24 | 3 | 8 | 6 | 4 | |
| Simplified | 4~11/4~19/4~27 | 8 | 10 | |||
Startup is 4 frames for all versions point blank, stronger punches can travel further (and thus can have longer startup).
The only difference with Champition Edition, its that can hit crouching characters like SF2 Dash version.
- Dashing Uppercut: (Charge ←, →, K) [charge time: 39f]
| Damage (Short) | 20 |  |
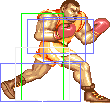 |
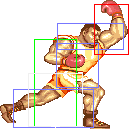 |

| |
| Damage (Forward) | 22 | |||||
| Damage (Roundhouse) | 26 | |||||
| Random dmg table | 0x080 | |||||
| Stun | 13~19 | |||||
| Stun Timer | 120 | |||||
| Frame Advantage | +9 | |||||
| Frame Count | 1~8/1~16/1~24 | 3 | 8 | 6 | ||
| Simplified | 4~11/4~19/4~27 | 8 | 6 | |||
Startup is 4 frames for all versions point blank, stronger kicks can travel further (and thus can have longer startup). VERY short charge time, also amazing frame advantage.
- Turn Around Punch (lvl 1 & 2): Hold all 3 Punch or Kick buttons for at least 30f (lvl1) or 120f (lvl2), then release.
Startup
 |
 |
 |
 |
 |
 |
 |
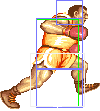
| |
| Frame Count | 4 | 4 | 4 | 7 | 2 | 2 | 2 | 2 |
| Simplified | 27 | |||||||
Active/Recovery
| Damage (lvl1) | 22 |  |
 |

|
| Damage (lvl2) | 28 | |||
| Random dmg (lvl1) | 0 | |||
| Random dmg (lvl2) | 6 | |||
| Stun | 13~19 | |||
| Stun Timer | 120 | |||
| Frame Advantage | +1 | |||
| Frame Count | 12 | 6 | 4 | |
| Simplified | 12 | 10 | ||
Level 2 TAP has higher overall damage (22 vs 34), and slightly more range.
- Turn Around Punch (lvl 3,4,5,6,7,final): Hold all 3 Punch or Kick buttons for at least 240f (lvl3), 480f (lvl4), 960f (lvl5), 1440f (lvl6), 1920f (lvl7), or 2400f (final), then release.
Startup
 |
 |
 |
 |
 |
 |
 |

| |
| Frame Count | 4 | 4 | 4 | 7 | 2 | 2 | 2 | 2 |
| Simplified | 27 | |||||||
Active/Recovery
Level 3 and above TAPs lose startup invincibility. Higher levels travel further, and do more damage.
Misc Animations
| Walk back | Neutral | Walk Fwd | Crouch |
 |
 |
 |

|
- Standing reel:
 |
 |

|
- Standing gut reel:
 |
 |

|
- Crouching reel:
 |
 |

|
- Dizzy:
 |
 |

|
