Capcom vs SNK 2/Geese

From SuperCombo Wiki

Introduction

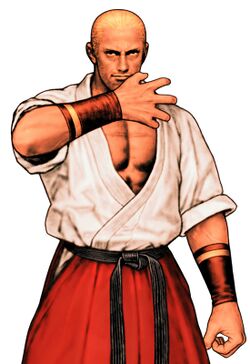
CVS2 Geese SNK Art.jpg
Health (at Ratio 2)
15200 Very High
Stun
70 Average
Dash Length
15 Frames Short
Dash Type
Slide Corpse Hop=No, Proj. Hop=No
Run Speed
7.2 Slow
Roll Distance
140 pixels Long
Roll Duration
28f Long
Wakeup Speed compared to Ryu
1f Below Average

Story

Geese Howard is the infamous villain of the Fatal Fury franchise. Born in South Town, he is the son of a poverish American woman and an Austrian terrorist. Geese's father immediately abandoned him. Once he came of age, Geese worked many jobs to support his mother. Eventually, his mother's health started failing, and she would come to pass when Geese was 15. Enraged at the fact that his very wealthy father never aided them, Geese hunted him down. He found his fathers name, Rudolph Krauser von Stroheim, and would hunt him down in Austria to assassinate him. He was stopped, however, by his half brother Wolfgang Krauser. Humiliated by defeat, Geese quickly learned that power ruled over all. He took to training in martial arts, and started to study under a master named Tung Fu Rue. Tung Fu Rue trained Geese and two other students, Jeff Bogard (who would become Terry's adoptive father) and Cheng Sinzan. The three became known as The Three Brothers of Godly Battle.

Geese could never shake his obsession with power however. Tung Fu Rue knew this, and instead passed the secrets of his martial arts to Jeff Bogard. Enraged, Geese left the dojo, overthrew the local crime bosses, and became the mastermind behind organized crime in South Town. With more and more money flowing in, he started his own business, Howard Connections. He uses this money to fund his plots for revenge and also begin the first ever King of Fighters tournaments, which he used to find new recruits. Geese would eventually start his road to revenge by killing his old training partner and friend, Jeff Bogard, right in front of his two adoptive sons Terry and Andy. The two brothers would chase Geese for years, and eventually put an end to his life by tossing him off the roof of his tower... twice.

Gameplay

Geese is a ridiculously damaging rushdown character. Often ranked in the top tiers or just outside of it, Geese has the ability to rack up damage like nobody else can, and crush guard bars into dust. His infamous Deadly Rave gives him some of the highest damage potential in the game from almost any starter. Great normals for brawling allow Geese to control the close range and threaten massive damage. His neutral isn't entirely anything to scoff at either, with a useful fireball in Reppuken and a few solid normals. His various Atemi counters allow him to call out careless move usage for big damage and a mixup, and while he lacks any sort of reversal without meter, his level 3 Raging Storm is an incredible reversal when he has it. Even if you do end up landing a hit on him, he has one of the highest health values in the game, allowing him to take a few hits and keep going.

Geese can still struggle in some situations however. He's quite tall and somewhat slow, meaning he struggles to escape potent rushdown without calling it out with a mash or counter. His neutral isn't bad, but he lacks any solid ranged poke, and his best anti-air is 2HP which lacks any invinciblity or a knockdown. Geese often has to commit to an approach to maximize his potential, which can be very risky. Still, he has every tool required for this, especially in K-Groove where he truly excels.

Groove Selection

Best - K: It can be hard to justify playing any Geese besides K-Geese. K-Geese has everything he could ever want and more. Just Defend gives Geese a solid and safe way to deal with mindless button pressing in neutral, and thanks to his very stable and damaging combo potential with Jaeiken and Deadly Rave, it often makes the opponent hurt a lot more than they would hurt you. Run and hop give him scary mixup potential that loops into itself as well. Rage makes Geese a true nightmare, giving him access to 80% damage combos and two-touch guard crush strings. If you can get in while Raged with Geese, the round may very well be over, as even without Rage getting Geese off of you is difficult. Lack of a roll basically means nothing, as Geese has no powerful roll cancels, and JD makes up for the lack of it anyway.

Useful - N/P/A: N-Geese is a bit of a lesser K-Geese. He maintains run and hop, with the added benefit of roll. While Geese doesn't need roll, it does give him access to RC Double Reppuken, which is a solid tool overall. A big benefit of N-Geese is that he can utilize Max Mode as if it was a weaker on-command Rage. By waiting until a good moment to capitalize, N-Geese can guarantee having a Deadly Rave to make the punish hurt, while K-Geese can't. Still, Rage is much scarier overall, and without JD Geese struggles a lot more on defense and in neutral. P-Geese is an obviously useful pick, as parries live and die by how well you can punish, and Geese can punish very well. Parries work like a more potent JD as well, giving you all the same strengths but being even more likely to get you a punish. The downside is that you'll rarely have a Deadly Rave to make that punish do good damage, and you lose the guard crush ability. A-Geese gets to use powerful Custom Combos, and he can utilize them fairly well. Roll and Alpha Counter are appreciated defensive tools as well. Custom Combo just doesn't match up in damage to a Raged Deadly Rave cancel however.

Worst - C/S: C-Geese gets very little that A-Geese doesn't get, and A-Geese isn't that good either. While being able to sit on a level 3 for as long as you want is quite nice, Geese gets nothing from a level 2 since level 2 Raging Storm isn't fully startup invincible. If it was, C-Geese would likely be a lot better. He also doesn't abuse level 2 cancels very well, with level 2 Raging Storm into a level 1 Raging Storm being the only thing he really gets. S-Geese is not useful in any way really. Dodge is meaningless to him and his is fairly bad, level 1 Raging Storm isn't very good at all, and not having consistent access to level 3's cuts his damage in half.


Geese is a damage and guard crushing rushdown machine who shines when putting the opponent into scary close-range situations. He can end rounds quick using his powerful Deadly Rave super for massive damage. Arguably no other character synergizes with K-Groove like he does. Geese is best in K-Groove.
Pros Cons
  • Damage: Geese has insane damage output, especially when in Rage, and can easily close out rounds with 2 or 3 solid hits
  • Offense: With multiple ways to put the opponent in blockstun, crush guard, and mix opponents with scary hop mixups, Geese can solidly get in and stay in
  • Zoning: Geese has solid zoning tools, with a good fireball and an air fireball, and a great anti-zoning tool with Double Reppuken
  • Deadly Rave: Deadly Rave is a massive damage super with the ability to link into normals for even higher damage
  • K-Groove King: Geese has everything he could ever want when he's in K-Groove, with JD's making him much better at dealing with keepaway, and Rage skyrocketing his damage
  • Health: Geese has one of the highest health values in the game, meaning he can get hit a lot more than others and keep moving forward
  • Tall and Slow: Geese's mobility isn't the greatest, and he's quite tall. This makes him subject to a lot of pressure that others simply avoid, especially when crouching
  • No Reversal: Without spending a lot of meter for level 3 Raging Storm, which would usually better be spent on a Deadly Rave, Geese lacks any sort of reversal
  • Zoned Out: Like any rushdown, Geese can lack a solid aggressive answer to zoning, and while he can use Double Reppuken it isn't guaranteed or very rewarding


!!!THIS PAGE IS STILL A WIP. IF YOU NEED FRAME DATA NOW, REFER TO THE CVS2 BIBLE OR LOOK THROUGH EDIT HISTORY TO FIND THE LAST EDIT CONTAINING FRAME DATA IF THERE WAS ONE!!!

Normal Moves

Far Normals

5LP

Far Jab
Standing Light Punch
5LP / Far LP
CVS2 Geese 5lp.png
Damage Stun Cancel Guard Parry Startup Active Recovery Total Adv Hit Adv Block Invul
300 4 RF/SP/SU H/L H/L 3 4 6 13 +7 +7 -
  • This is pretty good as far as standing jabs go but it's sort of overshadowed by his low jab as most characters can duck this. One way to use this move is if you know that someone is performing a jumpin parry/just defend, I use this move to take the parry or JD then you can retaliate in some other way like run behind and low fierce in the case of a JD or to do a low fierce/counter right after in the case of a parry

5MP

Far Strong
Far Medium Punch
5MP / Far MP
Version Damage Stun Cancel Guard Parry Startup Active Recovery Total Adv Hit Adv Block Invul
Far Mp.png - - - - - - - - - - - -

Placeholder

5HP

Far Fierce
Far Heavy Punch
5HP / Far HP
Version Damage Stun Cancel Guard Parry Startup Active Recovery Total Adv Hit Adv Block Invul
Far Hp.png - - - - - - - - - - - -

Placeholder

5LK

Far Short
Far Light Kick
5LK / Far LK
Version Damage Stun Cancel Guard Parry Startup Active Recovery Total Adv Hit Adv Block Invul
Far Lk.png - - - - - - - - - - - -

Placeholder

5MK

Far Forward
Far Medium Kick
5MK / Far MK
Version Damage Stun Cancel Guard Parry Startup Active Recovery Total Adv Hit Adv Block Invul
Far Mk.png - - - - - - - - - - - -

Placeholder

5HK

Far Roundhouse
Far Heavy Kick
5HK / Far HK
Version Damage Stun Cancel Guard Parry Startup Active Recovery Total Adv Hit Adv Block Invul
Far Hk.png - - - - - - - - - - - -

Placeholder

Close Standing Normals

clLP

Close Jab
Close Light Punch
cl.LP
Version Damage Stun Cancel Guard Parry Startup Active Recovery Total Adv Hit Adv Block Invul
Close Lp.png - - - - - - - - - - - -

Placeholder

clMP

Close Strong
cl.MP
Version Damage Stun Cancel Guard Parry Startup Active Recovery Total Adv Hit Adv Block Invul
Close Mp.png - - - - - - - - - - - -

Placeholder

clHP

Close Fierce
Close Heavy Punch
cl.HP
Version Damage Stun Cancel Guard Parry Startup Active Recovery Total Adv Hit Adv Block Invul
Close Hp.png - - - - - - - - - - - -

Placeholder

clLK

Close Short
Close Light Kick
cl.LK
Version Damage Stun Cancel Guard Parry Startup Active Recovery Total Adv Hit Adv Block Invul
Close Lk.png - - - - - - - - - - - -

Placeholder

clMK

Close Forward
Close Medium Kick
cl.MK
Version Damage Stun Cancel Guard Parry Startup Active Recovery Total Adv Hit Adv Block Invul
Close Mk.png - - - - - - - - - - - -

Placeholder

clHK

Close Roundhouse
Close Heavy Kick
cl.HK
Version Damage Stun Cancel Guard Parry Startup Active Recovery Total Adv Hit Adv Block Invul
Close Hk.png - - - - - - - - - - - -

Placeholder

Crouching Normals

2LP

Crouch Jab
Crouching Light Punch
2LP / cr.LP
Version Damage Stun Cancel Guard Parry Startup Active Recovery Total Adv Hit Adv Block Invul
D.png+Lp.png - - - - - - - - - - - -

Placeholder

2MP

Crouch Strong
Crouching Medium Punch
2MP / cr.MP
Version Damage Stun Cancel Guard Parry Startup Active Recovery Total Adv Hit Adv Block Invul
D.png+Mp.png - - - - - - - - - - - -

Placeholder

2HP

Crouch Fierce
Crouching Heavy Punch
2HP / cr.HP
Version Damage Stun Cancel Guard Parry Startup Active Recovery Total Adv Hit Adv Block Invul
D.png+Hp.png - - - - - - - - - - - -

Placeholder

2LK

Crouch Short
Crouching Light Kick
2LK / cr.LK
Version Damage Stun Cancel Guard Parry Startup Active Recovery Total Adv Hit Adv Block Invul
D.png+Lk.png - - - - - - - - - - - -

Placeholder

2MK

Crouch Forward
Crouching Medium Kick
2MK / cr.MK
Version Damage Stun Cancel Guard Parry Startup Active Recovery Total Adv Hit Adv Block Invul
D.png+Mk.png - - - - - - - - - - - -

Placeholder

2HK

Crouch Roundhouse
Crouching Heavy Kick
2HK / cr.HK
Version Damage Stun Cancel Guard Parry Startup Active Recovery Total Adv Hit Adv Block Invul
D.png+Hk.png - - - - - - - - - - - -

Jumping Normals

j.LP

Jump Jab
Jumping Light Punch
j.LP
Version Damage Stun Cancel Guard Parry Startup Active Recovery Total Adv Hit Adv Block Invul
Ub.png/U.png/Uf.png+Lp.png - - - - - - - - - - - -

Placeholder

j.MP

Jump Strong
Jumping Medium Punch
j.MP
Version Damage Stun Cancel Guard Parry Startup Active Recovery Total Adv Hit Adv Block Invul
Ub.png/U.png/Uf.png+Mp.png - - - - - - - - - - - -

Placeholder

j.HP

Jump Fierce
Jumping Heavy Punch
j.HP
Version Damage Stun Cancel Guard Parry Startup Active Recovery Total Adv Hit Adv Block Invul
Ub.png/U.png/Uf.png+Hp.png - - - - - - - - - - - -

Placeholder

j.LK

Jump Short
Jumping Light Kick
j.LK
Version Damage Stun Cancel Guard Parry Startup Active Recovery Total Adv Hit Adv Block Invul
Ub.png/U.png/Uf.png+Lk.png - - - - - - - - - - - -

Placeholder

j.MK

Jump Forward
Jumping Medium Kick
j.MK
Version Damage Stun Cancel Guard Parry Startup Active Recovery Total Adv Hit Adv Block Invul
Ub.png/U.png/Uf.png+Mk.png - - - - - - - - - - - -

Placeholder

j.HK

Jump Roundhouse
Jumping Heavy Kick
j.HK
Version Damage Stun Cancel Guard Parry Startup Active Recovery Total Adv Hit Adv Block Invul
Ub.png/U.png/Uf.png+Hk.png - - - - - - - - - - - -

Placeholder

Command Normals

X

Generic Command
Generic Name
Generic Input
Version Damage Stun Cancel Guard Parry Startup Active Recovery Total Adv Hit Adv Block Invul
- - - - - - - - - - - - -

Placeholder

Throws

X

Generic Throw Name
Punch Throw
Near Opponent, 4/6HP
Version Damage Stun Cancel Guard Parry Startup Active Recovery Total Adv Hit Adv Block Invul
Close B.png/F.png+Hp.png - - - - - - - - - - - -

Placeholder

X

Generic Throw Name
Kick Throw
Near Opponent, 4/6HK
Version Damage Stun Cancel Guard Parry Startup Active Recovery Total Adv Hit Adv Block Invul
Close B.png/F.png+Hk.png - - - - - - - - - - - -

Placeholder

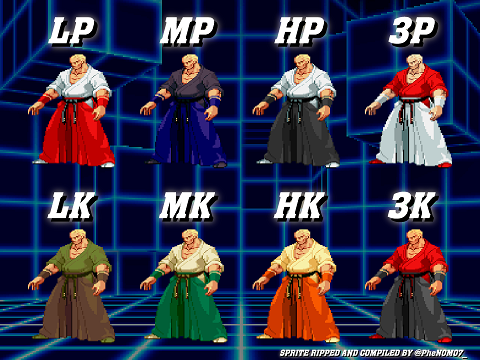
Colors

Geese CvS2 colors.png


CvS2 Wiki Navigation

General
Controls
Notation
HUD
Glossary
System
Roll Cancel
Combo
CvS2 Versions
Netplay/ Training
FAQ
Grooves
Groove Overview
Groove Subsystems
C-Groove
A-Groove
P-Groove
S-Groove
N-Groove
K-Groove
Capcom Characters
Akuma (Gouki)
Balrog (Boxer)
Blanka
Cammy
Chun-Li
Dan
Dhalsim
Eagle
E.Honda
Guile
Ken
Kyosuke
Maki
M. Bison (Dictator)
Morrigan
Rolento
Ryu
Sagat
Sakura
Vega (Claw)
Yun
Zangief
SNK Characters
Athena
Benimaru
Chang
Geese
Haohmaru
Hibiki
Iori
Joe
Kim
King
Kyo
Mai
Nakoruru
Raiden
Rock
Rugal
Ryo
Terry
Todo
Vice
Yamazaki
Yuri
Boss Characters
Shin Akuma
Ultimate Rugal
Evil Ryu
Orochi Iori