Yatagarasu: Attack on Cataclysm/Crow

From SuperCombo Wiki
Crow face.jpg

Introduction

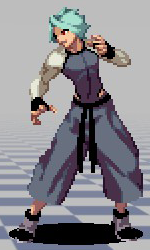
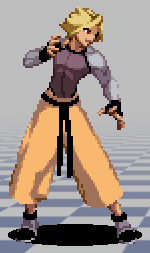
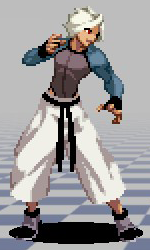
Colors

YataLP.png or YataHP.png YataLK.png or YataHK.png YataHBL.png or YataLBL.png
Crow Punch.png Crow Kick.png Crow Parry.png

-- Gongfuren

Move List

Command Normals

Name
Command
Notes
Sweep
df + hk
low
Elbow Press
f + lp
high
Hopkick
f + hk
cancel

Special Moves

Name
Command
Notes
Ateyumi – Kagebi
qcf + p
Manchuin – Toriuchi
dp + p
Himezori – Yuzuruha
qcb + k

Super Special Moves

Name
Command
Notes
Shahouhassetsu Ukifune
qcf qcf + k
Kasanejyumonji – Kujigarasu
qcb qcb + p
armorbreak

Move Analysis

Normal Moves

Standing Lp.png

<Description here>

Crouching Lp.png

<Description here>

Jumping Lp.png

<Description here>

Standing Lk.png

<Description here>

Crouching Lk.png

<Description here>

Jumping Lk.png

<Description here>

Standing Hp.png

<Description here>

Close Hp.png

<Description here>

Crouching Hp.png

<Description here>

Jumping Hp.png

<Description here>

Standing Hk.png

<Description here>

Crouching Hk.png

<Description here>

Jumping Hk.png

<Description here>

Command Normals

Sweep (Df.png + Hk.png)

<Description here>

Elbow Press(F.png + Lp.png)

<Description here>

Hopkick(F.png + Hk.png)

<Description here>

Special Moves

Ateyumi – Kagebi (Qcf.png + P.png)

<Description here>

Manchuin – Toriuchi (Dp.png + P.png)

<Description here>

Himezori – Yuzuruha (Qcb.png + K.png)

<Description here>

Super Special Moves

Shahouhassetsu Ukifune (Qcf.pngQcf.png + K.png)

<Description here>

Kasanejyumonji – Kujigarasu (Qcb.pngQcb.png + P.png)

<Description here>

Frame Data

Move Name Damage Hit Level Cancel Ability Startup Active Recovery Block Advantage Hit Advantage Total Frames
Stand Snka.gif 2500 HL ch/sp/su 6 4 5 +3 +4 14
Stand Snkb.gif 2800 HL sp/su 8 4 6 +2 +3 17
Stand Snkc.gif 6500 HL su 10 4 15 +1 +4 28
Stand Snkd.gif 6200 HL - 9 4 17 -1 +2 29
Close Snkc.gif 5500 HL sp/su 8 6 14 0 +3 27
Crouch Snka.gif 2200 HL ch/sp/su 5 3 6 +3 +4 13
Crouch Snkb.gif 2000 L ch/sp/su 6 2 10 0 +1 17
Crouch Snkc.gif 5700 HL sp/su 9 7 17 -4 -1 32
Crouch Snkd.gif 5000 L sp/su 9 3 17 -3 -1 28
Jump Snka.gif 2000 - - - 5 11 - - -
Jump Snkb.gif 2000 - - - 7 11 - - -
Jump Snkc.gif 5500 - - - 10 4 - - -
Jump Snkd.gif 5000 - - - 7 5 - - -
Sweep

Df.gif + Snkd.gif

6000 L - 9 3 25 -8 - 36
Throw

Snka.gif + Snkb.gif

6500 - - 4 2 23 - - 28
Overhead

Snka.gif + Snkc.gif

3000 H - 17 11 6 0 0 33
Guard Crush

Snkc.gif + Snkd.gif

6000 HL - 21 3 13 +16 +7 36
Elbow Press

F.gif + Snka.gif

2000x2 H*H - 16 5 16 -2 -0 36
Hopkick

F.gif + Snkd.gif

5000 HL sp/su 15 2 16 +2 +1 32
L Kagebi

Qcf.gif + Snka.gif

2500 HL su 15 - 27 -11 0 42
H Kagebi

Qcf.gif + Snkc.gif

2500 HL su 15 - 27 -11 0 42
EX Kagebi

Qcf.gif + Snka.gifSnkc.gif

2500 HL su 15 72* 21 -5 +6 36
L Toriuchi

Dp.gif + Snka.gif

6000 (5000) HL su 4 15 30 -25 - 48
H Toriuchi

Dp.gif + Snkc.gif

7000 (2500) HL su 4 22 35 -33 - 60
EX Toriuchi

Dp.gif + Snka.gifSnkc.gif

4500*800x3*2000 HL*5 su 7 19 41 -34 - 66
L Yuzuruha

Qcb.gif + Snkb.gif

3000 HL - 13 2 23 -5 - 37
H Yuzuruha

Qcb.gif + Snkd.gif

2000x3 HL - 12 2(10)3(7)3 26 -9 - 62
EX Yuzuruha

Qcb.gif + Snkb.gifSnkd.gif

2500*5000 HL*HL - 4 2(5)2 21 -3 - 41
Shahouhassetsu Ukifune

Qcf.gifQcf.gif + K.png

2800x4*2500 HL*5 - (20)2 9(13)22 47 -45 - 92
Kasanejyumonji – Kujigarasu

Qcb.gifQcb.gif + P.png

9000*2000x2 HL - 1(20)14 3 33 - - 50

Combos

NOTES FOR ALL COMBOS: closeC or 2d can replace 2c as a starter. 2c is Crow's highest damaging starter. "A/C" means either version of Crow's DP, Toriuchi, can be used. 623C ender provides more damage, 623A ender provides better frame advantage. Damage values listed are from C enders. 236A and C have the same damage and start up, doesnt matter which you use.


Meterless

2b 5b 623a/c (9000)

2c 236a/c (7950)

5c 236a/c (7500)

2d 236a/c (7250)

  • will not combo if not close enough

2c 623a/c (12000)

5c 623a/c (11100)

2d 623a/c (11300)

(VS STANDING OPPONENT ONLY):

2b 5b 214d 623a/c (9995)

2c 214b 214d 623a/c (14493)

  • corner carry. Immediate 214d means the 2nd kick will whiff(trivial dmg loss) but is the most consistent route. Delayed 214d can get all 3. Delay 214d versus Aja because shes fat, an immediate 214d means a dropped combo against her!!!

2c 214b closeC 623a/c (16392)

2c 214b 2d 623a/c (16536)

2c 214b 2c 623a/c (17040)


    • IMPORTANT NOTE: the 214b juggles involving 2c, closeC and 2d pick ups require movement forward after 214b if done mid screen. Also note that you want to hit them lower to the ground to get max damage, higher up = less damage!


1/2 Meter

2b5b 214BD (9170)

2c 214bd (12225)

6d 623AC (10807)

  • late cancellable

2d 623AC (12466)

  • late cancellable, great for footsies. Damage dependent on how many hits of ex DP land (spacing dependant).

(VS STANDING OPPONENT ONLY):

2c 214b 214d 623AC (14969)

  • delay 214d so all 3 kicks connect. Adds less than 500 from the meterless combo (that's bad). Only use if you think it will kill and do not have a full bar.

1 Meter

2b 5b 236236b (13433)

2c 214214c 214d 623a/c (21208)

6d 236236b (14464)

  • late cancellable

2c 214b closeC 623c 236236b

2c 214b 2d 623c 236236b

2c 214b 2c 623ac 236236b

214214C (GUARD CRUSH!) 214d 623a/c (8232)

(VS STANDING OPPONENT ONLY):

2c 214b closeC 623C 236236b (19944)

2c 214b 2d 623C 236236b (20533)

2c 214b 2c 623C 236236b (21037)

1 1/2 Meter

2c 214BD 236A 236236b (18371)

  • Almost every starter works, ie;2b,2a,5a,5c,2c,2d, just using 2c as highest damage example. Doesnt matter if you use 236A or C. Don't forget to short cut to super by inputting 236a236b!


2 Meter

2c 214214c 214d 623c 236236b (22627)

Strategy

Matchups

vs. Azure

(No strategies)

vs. Kotaro

(No strategies)

vs. Aja

(No strategies)

vs. Kou

(No strategies)

vs. Hanzo

(No strategies)

vs. Jyuzumaru

(No strategies)

vs. Dark Jyuzumaru

(No strategies)

vs. Hina

(No strategies)

vs. Shimo

(No strategies)

vs. Jet

(No strategies)

vs. Chadha

(No strategies)

vs. Crow

(No strategies)
Yatagarasu: Attack on Cataclysm
General
Characters

AjaAzureChadhaCrowHanzoHinaJetJyuzumaruKotaroKouShimo