Capcom vs SNK 2/E. Honda: Difference between revisions

From SuperCombo Wiki
No edit summary
Line 85: Line 85:
   | version    = Far {{Icon-Capcom|LP}}
   | version    = Far {{Icon-Capcom|LP}}
   | subtitle    =  
   | subtitle    =  
   | damage      = -
   | damage      = 600
   | stun        = -
   | stun        = -
   | cancel      = -
   | cancel      = SP/SU
   | guard      = -
   | guard      = Mid
   | parry      = -
   | parry      = -
   | startup    = -
   | startup    = 4
   | active      = -
   | active      = 6
   | recovery    = -
   | recovery    = 6
   | total      = -
   | total      = 16
   | advHit      = -
   | advHit      = +3
   | advBlock    = -
   | advBlock    = +3
   | invul      = -
   | invul      = -
   | description = Placeholder
   | description = Placeholder
Line 113: Line 113:
   | version    = Far {{Icon-Capcom|MP}}
   | version    = Far {{Icon-Capcom|MP}}
   | subtitle    =
   | subtitle    =
   | damage      = -
   | damage      = 1100
   | stun        = -
   | stun        = -
   | cancel      = -
   | cancel      = SU
   | guard      = -
   | guard      = Mid
   | parry      = -
   | parry      = -
   | startup    = -
   | startup    = 6
   | active      = -
   | active      = 7
   | recovery    = -
   | recovery    = 10
   | total      = -
   | total      = 23
   | advHit      = -
   | advHit      = +3
   | advBlock    = -
   | advBlock    = +3
   | invul      = -
   | invul      = -
   | description = Placeholder
   | description = Placeholder

Revision as of 19:42, 5 October 2022

Introduction

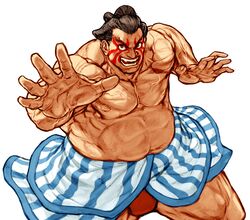
CVS2 Honda CAPCOM Art.jpg
Health (at Ratio 2)
14800 High
Stun
80 High
Dash Length
19 Frames Extremely Long
Dash Type
Hop Corpse Hop=Yes, Proj. Hop=No
Run Speed
6.9 Very Slow
Roll Distance
120 pixels Medium
Roll Duration
27f Long
Wakeup Speed compared to Ryu
4f Slow

Story

E. Honda, full name Edmond Honda, is a dedicated sumo wrestler from Japan. From a young age, Honda trained hard to become a sumo wrestler. He would eventually become incredibly well respected, reaching the high rank of Ozeki, the second highest rank. It's stated that he's skilled enough to be considered a Yokozuna, the highest rank possible, but his strange and outlandish techniques hold him back from qualifying. He began his journey in Street Fighter II: World Warrior, where he traveled the world spreading the art of sumo wrestling. He felt the rest of the world didn't appreciate it, and he would show them what it truly meant. Honda helps with destroying Shadaloo, mostly because of other sumo wrestlers getting biochemical drugs from Shadaloo's dealers. Together with the others, he assists in defeating M. Bison and destroying the Shadaloo base.

Gameplay

E. Honda is the epitome of a turtle character. He has the most immaculate defense, with a stellar anti-air and punish tool in his Headbutts, lots of great normals to stuff the opponent walking forward, and powerful roll cancels to reversal through gaps with. His high health lets him tank plenty of hits and keep going, and his command grab lets him punish opponents with a fast and damaging move. His Hand specials are annoying and powerful neutral tools that make Honda soar forward. They're very safe on block, hard to contest, and if roll cancelled, invincible. His Butt Slam specials are invincible rising specials that are great for punishing errant fireballs or movement, and can set up annoying ambiguous crossups on the opponents wakeup.

Honda doesn't come without weaknesses however. His slow movement makes it hard for him to approach vs characters that zone him out. While roll cancels aid in his normal weakness against projectiles, they aren't a guaranteed answer at all ranges. Being a charge character as well, approaching means sacrificing access to his Headbutts, which weakens his anti-air game significantly. Honda also lacks strong meterless damage, relying on supers to get meaningful damage overall. Honda is great if you want to sit back and annoy opponents into approaching you with his Hands, and then beat any approach option they pick.

Groove Selection

Best - C: C-Honda is a step above all the other Grooves. This gives him everything he needs, from rolls to solid damage output with meter. Honda almost always needs rolls, as they make many of his specials a lot scarier. His level 2 combo is also fairly damaging, allowing him to punish things more meaningfully. Airblock lets him approach from the air more safely, and Alpha Counters give him another powerful defensive tool to add to his arsenal. C-Honda is a great C-Groove pick, he fits the mechanics quite nicely.

Useful - A/N: Both of these Grooves are notably worse than C-Groove for Honda. A-Honda has a majority of the same things C-Honda does, but sacrifices airblock and level 2 supers for Custom Combos. While his CC isn't the worst, it's also not the best, and it is fairly difficult to perform. It does more than decent damage however, but you may find C-Grooves level 2 combos to be more frequent and give him better overall punishes rather than the rare high damage punish. N-Honda gets access to hop and run, which make him a bit more offensive, though he still has very little offensive pressure overall to work with. Namely, he can end a lot more combos in super, which is fairly worthwhile. He still gets access to rolls for RC specials as well.

Worst - S/K/P: These Grooves all have one thing in common: no rolls. Lack of roll means Honda can't do RC Hands, Headbutt, or Command Grab, all of which are powerful reversal and neutral options for him. S-Honda has very little access to meter, and while he doesn't mind charging, he would rather build meter normally through whiffing buttons or Hands pressure. Infinite level 1's doesn't aid him much either. K-Honda is a worse N-Honda. K-Groove is widely known to be offense oriented, and Honda just doesn't do well enough offensively to warrant that. A Raged punish into a level 3 super is scary, and K-Honda does get the benefit of a command grab super threat, but it isn't enough to justify the loss of rolls. P-Honda is essentially useless, as you have to give up charge to parry, which immediately makes you unable to punish whatever you parried in any meaningful way.


E. Honda is a powerful tank character, with some of the best defense in the game. His annoying roll cancelled Hands special forces the opponent to approach or eat a guard crush into a super. Honda's Headbutts can knock out almost any approach option they do in response to this. He just can't approach well at all in exchange. Honda is best in C-Groove.
Pros Cons
  • Defense: Between his powerful pokes, multiple useful sweeps, and great anti-airs with his Headbutts, getting in on a good Honda player is a tough task
  • Neutral: With lots of good pokes, and his annoying Hands and Headbutt specials, Honda is a very powerful character in neutral
  • Hundred Hand Slap: Hundred Hand Slap, often just called Hands, is a multi-hitting move with massive forward distance travelled and is plus on block. Honda can change how many slaps he does, making it hard to parry/JD, and if he roll cancels them he's fully invulnerable. These are very annoying to deal with for even seasoned players
  • Health: Honda is one of the tankier characters in CvS2, and has high stun as well, allowing him to take a lot of hits and keep going
  • Oicho: Oicho is a powerful and fast command grab that can snatch opponents doing something negative on block. Though difficult, you can roll cancel it as well to go through the opponent as a reversal
  • Offense: Though he does have a command grab, it's his only real mixup, and all together Honda has little in the way of mixups or damaging combos
  • Charge: Honda's best punishes require him to have charge built, limiting his ability to threaten a combo as he approaches a lot
  • Damage: Without meter, Honda's damage isn't very high, and even with meter it's often a little below average


!!!THIS PAGE IS STILL A WIP. IF YOU NEED FRAME DATA NOW, REFER TO THE CVS2 BIBLE OR LOOK THROUGH EDIT HISTORY TO FIND AN EDIT CONTAINING FRAME DATA IF THERE WAS ONE!!!

Normal Moves

Far Normals

5LP

Far Jab
Far Light Punch
5LP / Far LP
Version Damage Stun Cancel Guard Parry Startup Active Recovery Total Adv Hit Adv Block Invul
Far Lp.png 600 - SP/SU Mid - 4 6 6 16 +3 +3 -

Placeholder

5MP

Far Strong
Far Medium Punch
5MP / Far MP
Version Damage Stun Cancel Guard Parry Startup Active Recovery Total Adv Hit Adv Block Invul
Far Mp.png 1100 - SU Mid - 6 7 10 23 +3 +3 -

Placeholder

5HP

Far Fierce
Far Heavy Punch
5HP / Far HP
Version Damage Stun Cancel Guard Parry Startup Active Recovery Total Adv Hit Adv Block Invul
Far Hp.png - - - - - - - - - - - -

Placeholder

5LK

Far Short
Far Light Kick
5LK / Far LK
Version Damage Stun Cancel Guard Parry Startup Active Recovery Total Adv Hit Adv Block Invul
Far Lk.png - - - - - - - - - - - -

Placeholder

5MK

Far Forward
Far Medium Kick
5MK / Far MK
Version Damage Stun Cancel Guard Parry Startup Active Recovery Total Adv Hit Adv Block Invul
Far Mk.png - - - - - - - - - - - -

Placeholder

5HK

Far Roundhouse
Far Heavy Kick
5HK / Far HK
Version Damage Stun Cancel Guard Parry Startup Active Recovery Total Adv Hit Adv Block Invul
Far Hk.png - - - - - - - - - - - -

Placeholder

Close Standing Normals

clLP

Close Jab
Close Light Punch
cl.LP
Version Damage Stun Cancel Guard Parry Startup Active Recovery Total Adv Hit Adv Block Invul
Close Lp.png - - - - - - - - - - - -

Placeholder

clMP

Close Strong
cl.MP
Version Damage Stun Cancel Guard Parry Startup Active Recovery Total Adv Hit Adv Block Invul
Close Mp.png - - - - - - - - - - - -

Placeholder

clHP

Close Fierce
Close Heavy Punch
cl.HP
Version Damage Stun Cancel Guard Parry Startup Active Recovery Total Adv Hit Adv Block Invul
Close Hp.png - - - - - - - - - - - -

Placeholder

clLK

Close Short
Close Light Kick
cl.LK
Version Damage Stun Cancel Guard Parry Startup Active Recovery Total Adv Hit Adv Block Invul
Close Lk.png - - - - - - - - - - - -

Placeholder

clMK

Close Forward
Close Medium Kick
cl.MK
Version Damage Stun Cancel Guard Parry Startup Active Recovery Total Adv Hit Adv Block Invul
Close Mk.png - - - - - - - - - - - -

Placeholder

clHK

Close Roundhouse
Close Heavy Kick
cl.HK
Version Damage Stun Cancel Guard Parry Startup Active Recovery Total Adv Hit Adv Block Invul
Close Hk.png - - - - - - - - - - - -

Placeholder

Crouching Normals

2LP

Crouch Jab
Crouching Light Punch
2LP / cr.LP
Version Damage Stun Cancel Guard Parry Startup Active Recovery Total Adv Hit Adv Block Invul
D.png+Lp.png - - - - - - - - - - - -

Placeholder

2MP

Crouch Strong
Crouching Medium Punch
2MP / cr.MP
Version Damage Stun Cancel Guard Parry Startup Active Recovery Total Adv Hit Adv Block Invul
D.png+Mp.png - - - - - - - - - - - -

Placeholder

2HP

Crouch Fierce
Crouching Heavy Punch
2HP / cr.HP
Version Damage Stun Cancel Guard Parry Startup Active Recovery Total Adv Hit Adv Block Invul
D.png+Hp.png - - - - - - - - - - - -

Placeholder

2LK

Crouch Short
Crouching Light Kick
2LK / cr.LK
Version Damage Stun Cancel Guard Parry Startup Active Recovery Total Adv Hit Adv Block Invul
D.png+Lk.png - - - - - - - - - - - -

Placeholder

2MK

Crouch Forward
Crouching Medium Kick
2MK / cr.MK
Version Damage Stun Cancel Guard Parry Startup Active Recovery Total Adv Hit Adv Block Invul
D.png+Mk.png - - - - - - - - - - - -

Placeholder

2HK

Crouch Roundhouse
Crouching Heavy Kick
2HK / cr.HK
Version Damage Stun Cancel Guard Parry Startup Active Recovery Total Adv Hit Adv Block Invul
D.png+Hk.png - - - - - - - - - - - -

Jumping Normals

j.LP

Jump Jab
Jumping Light Punch
j.LP
Version Damage Stun Cancel Guard Parry Startup Active Recovery Total Adv Hit Adv Block Invul
Ub.png/U.png/Uf.png+Lp.png - - - - - - - - - - - -

Placeholder

j.MP

Jump Strong
Jumping Medium Punch
j.MP
Version Damage Stun Cancel Guard Parry Startup Active Recovery Total Adv Hit Adv Block Invul
Ub.png/U.png/Uf.png+Mp.png - - - - - - - - - - - -

Placeholder

j.HP

Jump Fierce
Jumping Heavy Punch
j.HP
Version Damage Stun Cancel Guard Parry Startup Active Recovery Total Adv Hit Adv Block Invul
Ub.png/U.png/Uf.png+Hp.png - - - - - - - - - - - -

Placeholder

j.LK

Jump Short
Jumping Light Kick
j.LK
Version Damage Stun Cancel Guard Parry Startup Active Recovery Total Adv Hit Adv Block Invul
Ub.png/U.png/Uf.png+Lk.png - - - - - - - - - - - -

Placeholder

j.MK

Jump Forward
Jumping Medium Kick
j.MK
Version Damage Stun Cancel Guard Parry Startup Active Recovery Total Adv Hit Adv Block Invul
Ub.png/U.png/Uf.png+Mk.png - - - - - - - - - - - -

Placeholder

j.HK

Jump Roundhouse
Jumping Heavy Kick
j.HK
Version Damage Stun Cancel Guard Parry Startup Active Recovery Total Adv Hit Adv Block Invul
Ub.png/U.png/Uf.png+Hk.png - - - - - - - - - - - -

Placeholder

Command Normals

X

Generic Command
Generic Name
Generic Input
Version Damage Stun Cancel Guard Parry Startup Active Recovery Total Adv Hit Adv Block Invul
- - - - - - - - - - - - -

Placeholder

Throws

X

Generic Throw Name
Punch Throw
Near Opponent, 4/6HP
Version Damage Stun Cancel Guard Parry Startup Active Recovery Total Adv Hit Adv Block Invul
Close B.png/F.png+Hp.png - - - - - - - - - - - -

Placeholder

X

Generic Throw Name
Kick Throw
Near Opponent, 4/6HK
Version Damage Stun Cancel Guard Parry Startup Active Recovery Total Adv Hit Adv Block Invul
Close B.png/F.png+Hk.png - - - - - - - - - - - -

Placeholder

Colors

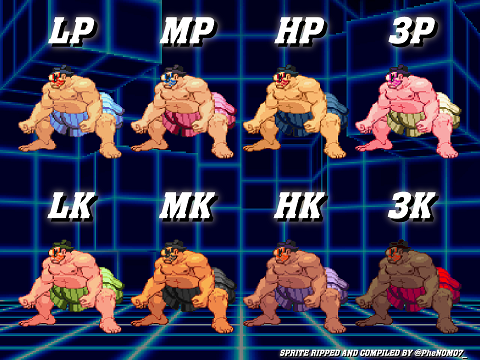
Ehonda CvS2 colors.png


CvS2 Wiki Navigation

General
Controls
Notation
HUD
Glossary
System
Roll Cancel
Combo
CvS2 Versions
Netplay/ Training
FAQ
Grooves
Groove Overview
Groove Subsystems
C-Groove
A-Groove
P-Groove
S-Groove
N-Groove
K-Groove
Capcom Characters
Akuma (Gouki)
Balrog (Boxer)
Blanka
Cammy
Chun-Li
Dan
Dhalsim
Eagle
E.Honda
Guile
Ken
Kyosuke
Maki
M. Bison (Dictator)
Morrigan
Rolento
Ryu
Sagat
Sakura
Vega (Claw)
Yun
Zangief
SNK Characters
Athena
Benimaru
Chang
Geese
Haohmaru
Hibiki
Iori
Joe
Kim
King
Kyo
Mai
Nakoruru
Raiden
Rock
Rugal
Ryo
Terry
Todo
Vice
Yamazaki
Yuri
Boss Characters
Shin Akuma
Ultimate Rugal
Evil Ryu
Orochi Iori