JtheSaltyy (talk | contribs) No edit summary |
JtheSaltyy (talk | contribs) No edit summary |
||
| Line 58: | Line 58: | ||
{{FP Box|header={{Big|'''Anti-Airs'''}}|content= | {{FP Box|header={{Big|'''Anti-Airs'''}}|content= | ||
<center>Eagle has a good set of anti-airs, but you will need to pick and choose which one based on certain jump angles.</center> | |||
<br> | |||
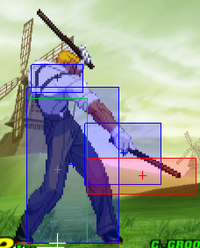
<center>{{Big|'''5MP'''}}</center> | |||
[[File:CVS2 Eagle 5MP2.png|200px|thumb|center]] | |||
<center>Best used against 45 degree jumps, and used at a timing such that the 2nd hit connects. Decent when you read a jump, but against quicker jumps it is trickier to use.</center> | |||
<br> | |||
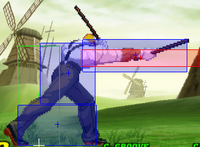
<center>{{Big|'''5HP'''}}</center> | |||
[[File:CVS2 Eagle 5HP.png|200px|thumb|center]] | |||
<center>Used against jumps that are far out from Eagle, when the opponent jumps from fullscreen or around that range and you can pick them from the air with the tip of the attack.</center> | |||
<br> | |||
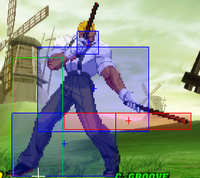
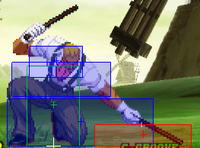
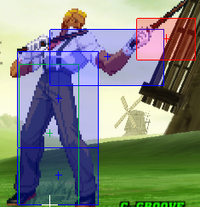
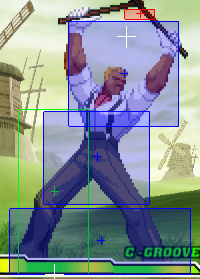
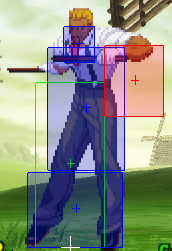
<center>{{Big|'''cl.HP'''}}</center> | |||
[[File:CVS2 Eagle_clHP1.png|200px|thumb|center]] | |||
<center>Despite the tiny hitbox, this move is incredibly consistent at stopping jumps that are close to/on top of Eagle, and it wins clean 9/10 times due to the disjoint.</center> | |||
<br> | |||
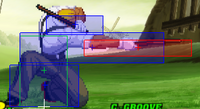
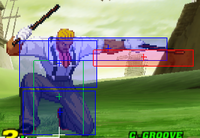
<center>{{Big|'''2MP'''}}</center> | |||
[[File:CVS2 Eagle 2MP1.png|200px|thumb|center]] | |||
<center>Very situational a la Rugal's 2MP. Best used when the opponent is close and near on top of Eagle.</center> | |||
<br> | |||
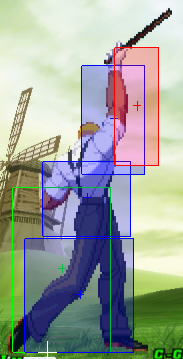
<center>{{Big|'''2HP'''}}</center> | |||
[[File:CVS2 Eagle 2HP2.png|200px|thumb|center]] | |||
<center>Used at a similar range to cl.HP, and though it is not tied to proximity, this anti air trades way more than cl.HP. If you are unsure if cl.HP will come out, use this button.</center> | |||
<br> | |||
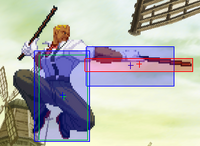
<center>{{Big|'''j.MP'''}}</center> | |||
[[File:CVS2 Eagle jMP.png|200px|thumb|center]] | |||
<center>Probably your only "one-size-fits-all" anti air, as it has amazing range and beats everything. You can use it at really any range but keep in mind it can be airblocked, but is relatively safe if it whiffs and you did a jump back.</center> | |||
<br> | |||
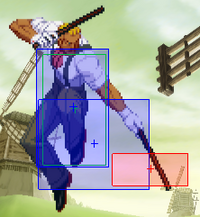
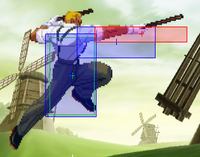
<center>{{Big|'''j.HP'''}}</center> | |||
[[File:CVS2 Eagle jHP.png|200px|thumb|center]] | |||
<center>Similar to j.MP as it has even more range at the cost of startup, so you need to do it much earlier, but you get more damage out of it.</center> | |||
<br> | |||
<center>{{Big|'''Manchester Black'''}}</center> | |||
[[File:CVS2 Eagle 214P2.png|200px|thumb|center]] | |||
<center>Only really useful when RC'd and on the light version. Under those conditions, it is Eagle's most consistent but also his most difficult anti air to perform.</center> | |||
<br> | |||
}} | }} | ||
Latest revision as of 22:00, 15 February 2025
Strategy
Eagle is a character who constantly uses his buttons to deal damage, with some super confirms and throws in between. He rarely uses his specials for anything outside of combos. For an extremely button reliant character, his individual buttons are decent, but not at the level of power that the stronger characters have. Because of this, Eagle's neutral, anti air and pressure game have to be really well played and technically sound in order to pose a threat to a good player. Eagle poses more threats offensively in the CAP grooves as opposed to the SNK grooves, but both contain strong options and tools at Eagle's disposal.
General Strategy
Placeholder
Vs. Eagle
Placeholder
Groove Strategy
C-Eagle is a good character with a great set of tools at his disposal. Level 2 cancels give Eagle a great way to use his meter. As well, Eagle has great synergy with C in general, as he just has to use his pokes and try to keep the opponent away. Along with A, it is his best groove.
| Pros | Cons |
|
|
Playing 
C-Eagle is a decent character. It's his best groove alongside A. The main playstyle with C-Eagle is playing mostly defensive while prodding the opponent with his variable arsenal of pokes. He can push pressure via his great dash, and getting a level 2 combo is the best form of damage that C-Eagle can get in terms of efficiency and meterbuild afterwards. He doesn't have the best pressure, but an empty dash from Eagle still catches many off guard. Most of playing C-Eagle comes from just using his pokes and anti airs correctly. Make sure to learn his combos as well, since it will be the main source of Eagle's damage throughout the round.
Level 2 Cancels
Placeholder
Placeholder: Placeholder
General Strategy
Placeholder
Vs. 
Placeholder
Anti-Roll
Here is the general strategy vs. rolling as Eagle.
Click "Expand" to see the contents.
For rolling, it is very important to gauge the distance where the opponent likes rolling, and the actual distance of the roll itself. If an opponent plays Iori you're going to want to expect a roll from farther a way, whereas if someone plays King, you'd expect that roll more up close since it does not travel nearly as far. It is largely a test of reads and reactions, you have to know when your opponent likes to roll, but the character's roll can also give you a clue as to when to expect it.
If you do get a read, what are your punishes? Well if they're close, you throw them, pretty simple. Throws beat rolls and throws only work up close. When farther away and a throw might not be guaranteed, you want to stick to a normal with a lot of active frames. 2HP and 2MK are your go-to roll punish buttons. If meaty enough, 2HP can net you a combo, but 2MK not so much. Either can give you a super if you really want to tell the opponent that was a bad roll.
Anti-Roll Cancel
Here are the main strategies to fight against Roll Cancels as Eagle. These aren't going to cover every RC individually, however every RC in the game will be countered by at least one of these tactics.
Click "Expand" to see the contents.
- Roll/Dodge: Basically fighting fire with fire. Rolling against a roll cancel works against long RCs, examples include: Claw's Rolling Ball, Sakura's Fireball and Tatsumaki, Eagle's Sticks, Honda's Hands, Chun's Spinning Bird Kick (just hope she doesn't hit you from behind), Yamazaki's Snake Arms, etc. Dodging does not work nearly as well as rolling but it can get you out of sticky situations. It is horrible against fast RCs if you don't commit to a dodge attack as you are vulnerable to a quick throw.
- Throwing: RCs are invincible against everything against throws. Reversal RCs are not technically reversals as throws can beat them on wake-up and in other close-up scenarios. Use it if you are in range and suspect the opponent might try to surprise you with it. When the battle is face-to-face, you might want to stray away from other options since the opponent can do the same things to you.
- Get Out: Jump out of the attack. Works well against moves shown in the roll/dodge bullet point, however for specials that can actually anti-air like Honda's Hands or Yamazaki's Snake Arms, they might not work, however specials like Rock's Elbow and Eagle's Sticks will eat shit once you get out of their range. Not always a recommended tool but it is effective in the right scenario.
- Guard Cancel: Against moves that are difficult to get out of, especially in the corner (Honda RC Hands, Iori RC Rekka), you can spend a little on a guard cancel to get your turn back. This is also going to do wonders for your guard bar. If you aren't in a groove with a guard cancel (basically P or K) then this option won't be available and you have to try something else, most likely just parry or JD the best you can.
General Strategy
Placeholder
Placeholder
| Pros | Cons |
|
|
Playing 
Placeholder
If you want to see Eagle's Custom Combos, refer to the Combos Section
Vs. 
Placeholder
Anti-CC
- Blocked CC: If the A-Groove player either failed to link into or mix into a custom. They will usually do a long blockstring that will tear your guard bar apart. Now, if you are in a groove with Guard Cancel or Counter Movement, then that is great. Just dock them in the face with it if you have the resources. If you don't, then you will either have to hope there's a punishable gap, or in the case of the ShoSho, pray that they drop the custom and get a free punish. Because Sagat is a big guy, certain custom combo mixups are more effective on him as well, so you will have to be ready to block some really weird but true blockstrings. Blocking a CC kinda sucks since you don't really get an opportunity to punish unless you have the resources to Guard Cancel but if that's what has to happen then it's better to do that instead of eating it.
- Roll CC: Oldest trick in the book. Basically roll super but instead it's a CC. If you notice the opponent getting a little roll happy then try to avoid getting greedy and stick with your faster buttons. If they are getting roll happy close to you then throwing is also a great option. Buttons like 2HP can get rolled past and you might eat a custom, but if you simply play it safe and defensively, then you will most likely shut down this attempt.
- Wake-Up CC: Another old trick that catches a lot of players. Generally gets beaten by doing nothing on wakeup and promptly punishing afterwards, though note they still have i-frames after the super freeze so you can't hit them right afterwards. If they immediately attack with something unsafe then get away and punish. If they use something safe just try to run away as best as you can. The most important thing is hitting the opponent so they lose custom. They cannot block, so their best option of avoiding anything is jumping or rolling, and by that point they lost the i-frames to blow through your counterattack.
- Anti-Air Custom: This one is pretty simple. Just don't jump.
- Trip-Guard Custom: Custom Combos that are done by blowing through the jump-in then countering with a low attack that will hit. Most times A-Groove players go for tripguard customs as answers to jumps than actual anti-air customs, since they are a little more difficult to perform. To beat these, just do an empty jump. You will be able to guard whatever hits you on the ground. It's even better if you have a low jump and intend to bait the custom.
- Up Close Custom: Can work as a footsies tool and a mixup tool. Very hard to beat and can be mixed with pokes, throws, and empty movements. To stop this, it's best to not throw out any greedy, unnecessary moves. If the opponent senses you will do something that their CC can tag and follow up with, then it's best to stick to the fast buttons. As well, if they are doing it as an offensive mix-up tool, then you will have to just keep them out as best you can. Jumping is a decent option if they are right on you, but note they can still anti-air you. Rolling can also work, but it may get meatied if they see it in time, and throwing them is extremely risky but it can work.
- Jump-In Custom: Pretty much beats any anti-air in the game. Instead of anti-airing them, try to get out of the jump-in and either air-to-air them, or use 2MK/2HK to punish their lack of tripguard.
Anti-Roll
Here is the general strategy vs. rolling as Sagat.
Click "Expand" to see the contents.
For rolling, it is very important to guage the distance where the opponent likes rolling, and the actual distance of the roll itself. If an opponent plays Iori you're going to want to expect a roll from farther a way, whereas if someone plays King, you'd expect that roll more up close since it does not travel nearly as far. It is largely a test of reads and reactions, you have to know when your opponent likes to roll, but the character's roll can also give you a clue as to when to expect it.
If you do get a read, what are your punishes? Well if they're close, you throw them, pretty simple. Throws beat rolls and throws only work up close. When farther away and a throw might not be guaranteed, you want to stick to a normal with a lot of active frames. 2HP and 2MK are your go-to roll punish buttons. If meaty enough, 2HP can net you a combo, but 2MK not so much. Either can give you a super if you really want to tell the opponent that was a bad roll.
Anti-Roll Cancel
Here are the main strategies to fight against Roll Cancels as Sagat. These aren't going to cover every RC individually, however every RC in the game will be countered by at least one of these tactics.
Click "Expand" to see the contents.
- Roll/Dodge: Basically fighting fire with fire. Rolling against a roll cancel works against long RCs, examples include: Claw's Rolling Ball, Sakura's Fireball and Tatsumaki, Eagle's Sticks, Honda's Hands, Chun's Spinning Bird Kick (just hope she doesn't hit you from behind), Yamazaki's Snake Arms, etc. Dodging does not work nearly as well as rolling but it can get you out of sticky situations. It is horrible against fast RCs if you don't commit to a dodge attack as you are vulnerable to a quick throw.
- Throwing: RCs are invincible against everything against throws. Reversal RCs are not technically reversals as throws can beat them on wake-up and in other close-up scenarios. Use it if you are in range and suspect the opponent might try to surprise you with it. When the battle is face-to-face, you might want to stray away from other options since the opponent can do the same things to you.
- Get Out: Jump out of the attack. Works well against moves shown in the roll/dodge bullet point, however for specials that can actually anti-air like Honda's Hands or Yamazaki's Snake Arms, they might not work, however specials like Rock's Elbow and Eagle's Sticks will eat shit once you get out of their range. Not always a recommended tool but it is effective in the right scenario.
- Guard Cancel: Against moves that are difficult to get out of, especially in the corner (Honda RC Hands, Iori RC Rekka), you can spend a little on a guard cancel to get your turn back. This is also going to do wonders for your guard bar. If you aren't in a groove with a guard cancel (basically P or K) then this option won't be available and you have to try something else, most likely just parry or JD the best you can.
Placeholder
Placeholder
| Pros | Cons |
|
|
Playing 
Placeholder
Parry Punishes
Placeholder
Ground Parry vs. Grounded Opponent
Placeholder
Ground Parry vs. Aerial Opponent
Placeholder
Air Parry vs. Grounded Opponent
Placeholder
Air Parry vs. Aerial Opponent
Placeholder
General Strategy
Placeholder
Vs. 
Placeholder
Anti-Parry
Placeholder
General Strategy
Placeholder
Placeholder
| Pros | Cons |
|
|
Playing 
Placeholder
Power Charge
Here are some situations where you can power charge as Eagle.
Full-Screen: Placeholder
Knockdowns: Placeholder
Neutral: Placeholder
Dodge
Placeholder
Dodge Attacks
Here are how you can use Eagle's dodge attack.
Dodge Punch (5HP): Placeholder
Dodge Kick (5HK): Placeholder
Desperation
Placeholder
General Strategy
Placeholder
Vs. 
Placeholder
Anti-Dodge
Placeholder
Anti-Desperation
Placeholder
Placeholder
| Pros | Cons |
|
|
Playing 
Placeholder
Vs. 
Placeholder
Anti-Roll
Here is the general strategy vs. rolling as Sagat.
Click "Expand" to see the contents.
For rolling, it is very important to guage the distance where the opponent likes rolling, and the actual distance of the roll itself. If an opponent plays Iori you're going to want to expect a roll from farther a way, whereas if someone plays King, you'd expect that roll more up close since it does not travel nearly as far. It is largely a test of reads and reactions, you have to know when your opponent likes to roll, but the character's roll can also give you a clue as to when to expect it.
If you do get a read, what are your punishes? Well if they're close, you throw them, pretty simple. Throws beat rolls and throws only work up close. When farther away and a throw might not be guaranteed, you want to stick to a normal with a lot of active frames. 2HP and 2MK are your go-to roll punish buttons. If meaty enough, 2HP can net you a combo, but 2MK not so much. Either can give you a super if you really want to tell the opponent that was a bad roll.
Anti-Roll Cancel
Here are the main strategies to fight against Roll Cancels as Sagat. These aren't going to cover every RC individually, however every RC in the game will be countered by at least one of these tactics.
Click "Expand" to see the contents.
- Roll/Dodge: Basically fighting fire with fire. Rolling against a roll cancel works against long RCs, examples include: Claw's Rolling Ball, Sakura's Fireball and Tatsumaki, Eagle's Sticks, Honda's Hands, Chun's Spinning Bird Kick (just hope she doesn't hit you from behind), Yamazaki's Snake Arms, etc. Dodging does not work nearly as well as rolling but it can get you out of sticky situations. It is horrible against fast RCs if you don't commit to a dodge attack as you are vulnerable to a quick throw.
- Throwing: RCs are invincible against everything against throws. Reversal RCs are not technically reversals as throws can beat them on wake-up and in other close-up scenarios. Use it if you are in range and suspect the opponent might try to surprise you with it. When the battle is face-to-face, you might want to stray away from other options since the opponent can do the same things to you.
- Get Out: Jump out of the attack. Works well against moves shown in the roll/dodge bullet point, however for specials that can actually anti-air like Honda's Hands or Yamazaki's Snake Arms, they might not work, however specials like Rock's Elbow and Eagle's Sticks will eat shit once you get out of their range. Not always a recommended tool but it is effective in the right scenario.
- Guard Cancel: Against moves that are difficult to get out of, especially in the corner (Honda RC Hands, Iori RC Rekka), you can spend a little on a guard cancel to get your turn back. This is also going to do wonders for your guard bar. If you aren't in a groove with a guard cancel (basically P or K) then this option won't be available and you have to try something else, most likely just parry or JD the best you can.
Anti-Guard Cancel Roll
Placeholder
Placeholder
| Pros | Cons |
|
|
Playing 
Placeholder
Just Defend
Placeholder
Just Defend Frame Advantage Formula
Good to reference for your character to see what kind of returns they can have on a JD.
Click "Expand" to see the contents.
Formula
Adv = G - (Act + Rec)
Adv = New frame advantage estimate from a JD'd attack.
G = Guard Stun. See Guard Stun Estimates.
Act = Active Frames of the JD'd attack.
Rec = Recovery Frames of the JD'd attack.
Guardstun Estimates
Light Normals: 10 Frames
Medium Normals: 14 ~ 16 Frames
Heavy Normals: 18 ~ 20 Frames
Special Moves: 19 ~ 21 Frames
Examples
Rugal 2LP = 10 Frames - (4 Act + 6 Rec) = +0 on JD (+5 Normally)
Eagle 5MK = 14 ~ 16 Frames - (6 Act + 16 Rec) = -6 ~ -8 on JD (+0 Normally)
Sagat 2HP = 18 ~ 20 Frames - (8 Act + 14 Rec) = -4 ~ -2 on JD (+2 Normally)
Rage
Placeholder
General Strategy
Placeholder
Vs. 
Placeholder
Anti-JD
Placeholder
Anti-Rage
Placeholder
