Callie Rose (talk | contribs) |
Callie Rose (talk | contribs) (→Special Moves: Finishing his special moves) |
||
| Line 695: | Line 695: | ||
== Special Moves == | == Special Moves == | ||
<span class="invisible-header">Raijinken</span> | === <span class="invisible-header">Raijinken</span> === | ||
{{MoveData | {{MoveData | ||
| name = Raijinken | | name = Raijinken | ||
| input = 236P | | input = 236P | ||
| subtitle = Electric Ball | | subtitle = Electric Ball, Lightning Fist | ||
| image = | | image = CVS2_Benimaru_236P.PNG | ||
| caption = | | caption = | ||
| linkname = Raijinken | | linkname = Raijinken | ||
| Line 708: | Line 708: | ||
| version = LP | | version = LP | ||
| subtitle = {{Motion|236}} + {{Icon-Capcom|LP}} | | subtitle = {{Motion|236}} + {{Icon-Capcom|LP}} | ||
| damage = | | damage = 800 | ||
| stun = | | stun = 8 | ||
| cancel = | | cancel = None | ||
| guard = | | guard = Mid | ||
| parry = | | parry = High | ||
| startup = | | startup = 14 | ||
| active = | | active = 15~50 | ||
| recovery = | | recovery = 50 | ||
| total = | | total = 64 | ||
| advHit = | | advHit = +1 | ||
| advBlock = | | advBlock = +1 | ||
| invul = | | invul = None | ||
}} | }} | ||
{{AttackData-CvS2 | {{AttackData-CvS2 | ||
| header = no | |||
| version = MP | | version = MP | ||
| subtitle = {{Motion|236}} + {{Icon-Capcom|MP}} | | subtitle = {{Motion|236}} + {{Icon-Capcom|MP}} | ||
| damage = | | damage = 600+300 | ||
| stun = | | stun = 6+3 | ||
| cancel = | | cancel = None | ||
| guard = | | guard = Mid | ||
| parry = | | parry = High | ||
| startup = | | startup = 18 | ||
| active = | | active = 19~52 | ||
| recovery = | | recovery = 52 | ||
| total = | | total = 70 | ||
| advHit = | | advHit = +1 | ||
| advBlock = | | advBlock = +1 | ||
| invul = | | invul = None | ||
* | * | ||
}} | }} | ||
{{AttackData-CvS2 | {{AttackData-CvS2 | ||
| header = no | |||
| version = HP | | version = HP | ||
| subtitle = {{Motion|236}} + {{Icon-Capcom|HP}} | | subtitle = {{Motion|236}} + {{Icon-Capcom|HP}} | ||
| damage = | | damage = 600+200x2 | ||
| stun = | | stun = 6+2+2 | ||
| cancel = | | cancel = None | ||
| guard = Mid | |||
| parry = High | |||
| startup = 22 | |||
| active = 23~54 | |||
| recovery = 54 | |||
| total = 76 | |||
| advHit = +1 | |||
| advBlock = +1 | |||
| invul = None | |||
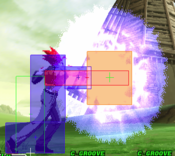
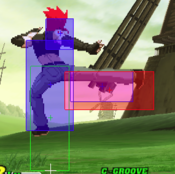
| description = Close range electric punches. At first glance these look like zoning and poking tools, but moreso they're good for pressure and safely ending combos, as Beni is left very vulnerable for a long time if they whiff. If they connect or get blocked, they stop immediately, making them safe and decent chip tools. | |||
* | |||
}} | |||
}} | |||
=== <span class="invisible-header">Anti-Air Raijinken</span> === | |||
{{MoveData | |||
| name = Anti-Air Raijinken | |||
| input = 623P | |||
| subtitle = AA Lighting Fist | |||
| image = CVS2_Benimaru_623P.PNG | |||
| caption = | |||
| linkname = AA Raijinken | |||
| data = | |||
{{AttackData-CvS2 | |||
| header = yes | |||
| version = {{Motion|623}} + {{Icon-Capcom|LP}} | |||
| subtitle = | |||
| damage = 1000 | |||
| stun = 10 | |||
| cancel = None | |||
| guard = Mid | |||
| parry = High | |||
| startup = 10 | |||
| active = 11~42 | |||
| recovery = 42 | |||
| total = 52 | |||
| advHit = - | |||
| advBlock = - | |||
| invul = None | |||
* | |||
}} | |||
{{AttackData-CvS2 | |||
| header = no | |||
| version = {{Motion|623}} + {{Icon-Capcom|MP}} | |||
| subtitle = | |||
| damage = 1100 | |||
| stun = 11 | |||
| cancel = None | |||
| guard = Mid | |||
| parry = High | |||
| startup = 10 | |||
| active = 11~48 | |||
| recovery = 48 | |||
| total = 58 | |||
| advHit = - | |||
| advBlock = - | |||
| invul = None | |||
* | |||
}} | |||
{{AttackData-CvS2 | |||
| header = no | |||
| version = {{Motion|623}} + {{Icon-Capcom|HP}} | |||
| subtitle = | |||
| damage = 1200 | |||
| stun = 12 | |||
| cancel = None | |||
| guard = | | guard = | ||
| parry = | | parry = | ||
| startup = | | startup = 10 | ||
| active = | | active = 11~54 | ||
| recovery = | | recovery = 54 | ||
| total = | | total = 64 | ||
| advHit = | | advHit = - | ||
| advBlock = | | advBlock = - | ||
| invul = | | invul = None | ||
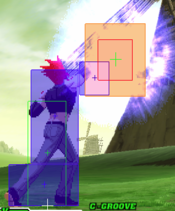
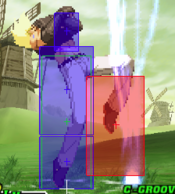
| description = | | description = A Raijinken aimed above Benimaru's head. The hitbox is large but at ten frames it's a bit slow to be a proper anti-air, especially with no invuln. By roll cancelling this move, it becomes a bit better as an anti-air but is still slow. Horrible on whiff as well so if you do it too late prepare to eat a massive punish. If this ever hits an air opponent, you can easily confirm into either 236236P or a Custom Combo. | ||
* | |||
}} | |||
}} | |||
=== <span class="invisible-header">Iai Geri</span> === | |||
{{MoveData | |||
| name = Iai Geri | |||
| input = 236K | |||
| subtitle = Knee | |||
| image = CVS2_Benimaru_236K.PNG | |||
| caption = | |||
| linkname = Knee | |||
| data = | |||
{{AttackData-CvS2 | |||
| header = yes | |||
| version = {{Motion|236}}+{{Icon-Capcom|LK}} | |||
| subtitle = | |||
| damage = 800 | |||
| stun = 8 | |||
| cancel = Into {{Motion|d}}{{Motion|u}}+{{Icon-Capcom|K}} | |||
| guard = Mid | |||
| parry = High | |||
| startup = 6 | |||
| active = 2 | |||
| recovery = 37 | |||
| total = 45 | |||
| advHit = -1 | |||
| advBlock = -1 | |||
| invul = None | |||
* | |||
}} | |||
{{AttackData-CvS2 | |||
| header = no | |||
| version = {{Motion|236}}+{{Icon-Capcom|MK}} | |||
| subtitle = | |||
| damage = 900 | |||
| stun = 9 | |||
| cancel = Into {{Motion|d}}{{Motion|u}}+{{Icon-Capcom|K}} | |||
| guard = Mid | |||
| parry = High | |||
| startup = 9 | |||
| active = 3 | |||
| recovery = 33 | |||
| total = 45 | |||
| advHit = +2 | |||
| advBlock = +2 | |||
| invul = None | |||
* | |||
}} | |||
{{AttackData-CvS2 | |||
| header = no | |||
| version = {{Motion|236}}+{{Icon-Capcom|HK}} | |||
| subtitle = | |||
| damage = 1000 | |||
| stun = 10 | |||
| cancel = Into {{Motion|d}}{{Motion|u}}+{{Icon-Capcom|K}} | |||
| guard = Mid | |||
| parry = High | |||
| startup = 12 | |||
| active = 4 | |||
| recovery = 29 | |||
| total = 45 | |||
| advHit = +5 | |||
| advBlock = +5 | |||
| invul = None | |||
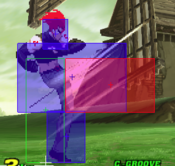
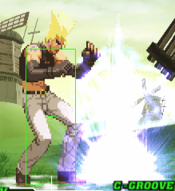
| description = A knee to the chest. Despite not giving a knockdown, this is your most consistent and safest combo ender. Since the heavy version will combo from lights and does the most damage/is the most plus, stick to the heavy version in combos. The followup Inazuma Sandan-Geri gives a knockdown but requires Iai Geri to hit very close. | |||
* | |||
}} | |||
}} | |||
=== <span class="invisible-header">Iai Geri</span> === | |||
{{MoveData | |||
| name = Inazuma Sandan-Geri | |||
| input = After 236K, 28K | |||
| subtitle = Followup Kick | |||
| image = CVS2_Benimaru_5HK.PNG | |||
| caption = Kick Bridge | |||
| image2 = CVS2_Benimaru_623K_Second.PNG | |||
| caption2 = Final hit | |||
| linkname = Kick Followup | |||
| data = | |||
{{AttackData-CvS2 | |||
| version = {{Motion|d}}{{Motion|u}}+{{Icon-Capcom|LK}} | |||
| subtitle = Roundhouse Kick | |||
| damage = 300 | |||
| stun = 3 | |||
| cancel = None | |||
| guard = Mid | |||
| parry = High | |||
| startup = 10 | |||
| active = 4 | |||
| recovery = 15 | |||
| total = 19 | |||
| advHit = - | |||
| advBlock = - | |||
| invul = None | |||
| description = The first hit of the 2 part followup. Does not change depending on button strength used, but the followup DP does change, so this is listed as it's own version! | |||
* | |||
}} | |||
{{AttackData-CvS2 | |||
| version = {{Icon-Capcom|LK}} | |||
| subtitle = Light Finisher | |||
| damage = 400 | |||
| stun = 4 | |||
| cancel = None | |||
| guard = Mid | |||
| parry = High | |||
| startup = 19 | |||
| active = 7 | |||
| recovery = 39 | |||
| total = 65 | |||
| advHit = -DWN | |||
| advBlock = -22 | |||
| invul = 4 (Full) | |||
* | |||
}} | |||
{{AttackData-CvS2 | |||
| header = no | |||
| version = {{Icon-Capcom|MK}} | |||
| subtitle = Medium Finisher | |||
| damage = 500 | |||
| stun = 5 | |||
| cancel = None | |||
| guard = Mid | |||
| parry = High | |||
| startup = 19 | |||
| active = 12 | |||
| recovery = 44 | |||
| total = 75 | |||
| advHit = -DWN | |||
| advBlock = -32 | |||
| invul = 4 (Full) | |||
* | |||
}} | |||
{{AttackData-CvS2 | |||
| header = no | |||
| version = {{Icon-Capcom|HK}} | |||
| subtitle = Heavy Finisher | |||
| damage = 600 | |||
| stun = 6 | |||
| cancel = None | |||
| guard = Mid | |||
| parry = High | |||
| startup = 19 | |||
| active = 12 | |||
| recovery = 51 | |||
| total = 72 | |||
| advHit = -DWN | |||
| advBlock = -39 | |||
| invul = 4 (Full) | |||
| description = The final part of the followup. Knocks down and is generally what you want to end combos with, but you won't always be able to as 236K needs to hit close for it to reach. Very unsafe on both block and whiff, so if you do it from too far or don't confirm the hit you will get punished. Since every version is heavily unsafe, use the heavy version always. | |||
* | |||
}} | |||
}} | |||
=== <span class="invisible-header">Jinrai Kick</span> === | |||
{{MoveData | |||
| name = Super Jinrai Kick | |||
| input = 623K | |||
| subtitle = Dragon Kick, DP | |||
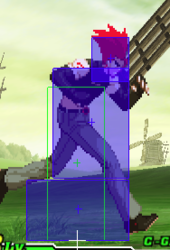
| image = CVS2_Benimaru_623K_First.PNG | |||
| caption = Startup | |||
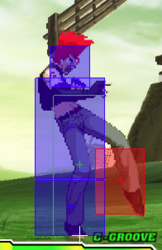
| image2 = CVS2_Benimaru_623K_Second.PNG | |||
| caption2 = First Hitbox | |||
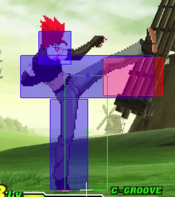
| image3 = CVS2_Benimaru_623K_Third.PNG | |||
| caption3 = Last Hitbox | |||
| linkname = Jinrai Kick | |||
| data = | |||
{{AttackData-CvS2 | |||
| version = {{Motion|623}}+{{Icon-Capcom|LK}} | |||
| subtitle = | |||
| damage = 1300, 700 | |||
| stun = 13, 7 | |||
| cancel = None | |||
| guard = Mid | |||
| parry = High | |||
| startup = 6 | |||
| active = 8 | |||
| recovery = 39 | |||
| total = 53 | |||
| advHit = -DWN | |||
| advBlock = -23 | |||
| invul = 6 (Full) | |||
* | |||
}} | |||
{{AttackData-CvS2 | |||
| header = no | |||
| version = {{Motion|623}}+{{Icon-Capcom|MK}} | |||
| subtitle = | |||
| damage = 1400, 800 | |||
| stun = 14, 8 | |||
| cancel = None | |||
| guard = Mid | |||
| parry = High | |||
| startup = 6 | |||
| active = 12 | |||
| recovery = 44 | |||
| total = 62 | |||
| advHit = -DWN | |||
| advBlock = -39 | |||
| invul = 6 (Full) | |||
* | |||
}} | |||
{{AttackData-CvS2 | |||
| header = no | |||
| version = {{Motion|623}}+{{Icon-Capcom|HK}} | |||
| subtitle = | |||
| damage = 1500, 900 | |||
| stun = 15, 9 | |||
| cancel = None | |||
| guard = Mid | |||
| parry = High | |||
| startup = 6 | |||
| active = 12 | |||
| recovery = 51 | |||
| total = 69 | |||
| advHit = -DWN | |||
| advBlock = -39 | |||
| invul = 6 (Full) | |||
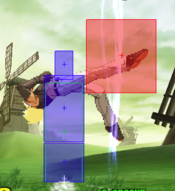
| description = Beni's kick DPs. Not great as anti-airs, despite being faster than 623P, since the first hitbox is low to the ground meaning it's very prone to trading. Just like 623P, roll cancelling can help with that, which is nice since the second hitbox does reach quite high and anti-air well when it can. Just like 623P, a successful anti-air connect can confirm to 236236P or Custom Combo. | |||
* | |||
}} | |||
}} | |||
=== <span class="invisible-header">Shinku Katate Koma</span> === | |||
{{MoveData | |||
| name = Shinku Katate Koma | |||
| input = 63214K (3K to cancel) | |||
| subtitle = Breakdance | |||
| image = CVS2_Benimaru_63214K_First.PNG | |||
| caption = Forward Hitbox | |||
| image2 = CVS2_Benimaru_63214K_Second.PNG | |||
| caption2 = Turnaround | |||
| image3 = CVS2_Benimaru_63214K_Third.PNG | |||
| caption3 = Backward Hitbox | |||
| linkname = Breakdance | |||
| data = | |||
{{AttackData-CvS2 | |||
| version = {{Motion|63214}}+{{Icon-Capcom|LK}} | |||
| subtitle = | |||
| damage = 1000 | |||
| stun = 10 | |||
| cancel = 3K to Cancel | |||
| guard = Mid | |||
| parry = Mid | |||
| startup = 16 | |||
| active = 15 | |||
| recovery = 39 (4) | |||
| total = 68 | |||
| advHit = -DWN | |||
| advBlock = -13 | |||
| invul = None | |||
* | |||
}} | |||
{{AttackData-CvS2 | |||
| header = no | |||
| version = {{Motion|63214}}+{{Icon-Capcom|MK}} | |||
| subtitle = | |||
| damage = 1100 | |||
| stun = 11 | |||
| cancel = 3K to Cancel | |||
| guard = Mid | |||
| parry = Mid | |||
| startup = 16 | |||
| active = 31 | |||
| recovery = 37 (4) | |||
| total = 84 | |||
| advHit = -DWN | |||
| advBlock = -13 | |||
| invul = None | |||
* | |||
}} | |||
{{AttackData-CvS2 | |||
| header = no | |||
| version = {{Motion|63214}}+{{Icon-Capcom|HK}} | |||
| subtitle = | |||
| damage = 1200 | |||
| stun = 12 | |||
| cancel = 3K to Cancel | |||
| guard = Mid | |||
| parry = Mid | |||
| startup = 16 | |||
| active = 47 | |||
| recovery = 37 (4) | |||
| total = 100 | |||
| advHit = -DWN | |||
| advBlock = -13 | |||
| invul = None | |||
| description = Benimaru gets on one hand and spins around quickly. An odd move with little purpose. The hurtbox is low enough to avoid some fireballs but the huge lag makes it hard to use in those situations. It can be used to end combos in a consistent knockdown, but the knockdown sideswaps and sends them very far away, so this is questionably useful for Beni who usually likes to be close. Always cancel this using 3K, as it makes getting oki from it slightly better and makes it a bit harder to punish. | |||
* | |||
}} | |||
}} | |||
=== <span class="invisible-header">Benimaru Collider</span> === | |||
{{MoveData | |||
| name = Benimaru Collider | |||
| input = 632146 | |||
| subtitle = Command Grab | |||
| image = CVS2_Benimaru_632146P.PNG | |||
| caption = | |||
| linkname = Collider | |||
| data = | |||
{{AttackData-CvS2 | |||
| version = {{Motion|63214}}{{Motion|f}}+{{Icon-Capcom|LP}} | |||
| subtitle = | |||
| damage = 1800 | |||
| stun = 0 | |||
| cancel = None | |||
| guard = Grab | |||
| parry = Grab | |||
| startup = 6 | |||
| active = 1 | |||
| recovery = 21 | |||
| total = 28 | |||
| advHit = -DWN | |||
| advBlock = Grab | |||
| invul = None | |||
* | |||
}} | |||
{{AttackData-CvS2 | |||
| header = no | |||
| version = {{Motion|63214}}{{Motion|f}}+{{Icon-Capcom|MP}} | |||
| subtitle = | |||
| damage = 1900 | |||
| stun = 0 | |||
| cancel = None | |||
| guard = Grab | |||
| parry = Grab | |||
| startup = 6 | |||
| active = 1 | |||
| recovery = 21 | |||
| total = 28 | |||
| advHit = -DWN | |||
| advBlock = Grab | |||
| invul = None | |||
* | |||
}} | |||
{{AttackData-CvS2 | |||
| header = no | |||
| version = {{Motion|63214}}{{Motion|f}}+{{Icon-Capcom|HP}} | |||
| subtitle = | |||
| damage = 2000 | |||
| stun = 0 | |||
| cancel = None | |||
| guard = Grab | |||
| parry = Grab | |||
| startup = 6 | |||
| active = 1 | |||
| recovery = 21 | |||
| total = 28 | |||
| advHit = -DWN | |||
| advBlock = Grab | |||
| invul = None | |||
| description = Beni's command grab series. The light version does the least damage but has the most reach, and the heavy version does the most damage but has the least reach. Is a bit slower than his normal throws but can't be teched. If your opponent respects Beni's strike too much this can be useful. | |||
* | * | ||
}} | }} | ||
Revision as of 21:32, 27 May 2022
Introduction
Benimaru Nikaido is many things. He's the son of a rich family, with a Japanese father and American mother. He's a star of the fashion world. He's Kyo Kusanagi's friend and rival. He's an electric wielding martial artist with powerful kicks. Most importantly, though: he's gorgeous. He keeps his hair styled and straight using his electric abilities.
Benimaru in CvS2 is widely regarded as one of the worst characters for a variety of reasons. His health is very low, and his damage output without meter isn't much better either. His longest range options pose no threat to most characters while not even really having that much range. His anti-airs are only strong when you add roll cancels behind them as well. On top of all that, he has one of the absolute floatiest jumps, making anti-airing him a breeze even with his divekick. If you plan on using him, have one or two top tiers on your team to help out, cuz he won't be doing much.
Benimaru's best grooves are A, N, and K. A groove gives him access to rolls, which he needs to be able to approach well, alongside the ability to Custom Combo, though it does make his admittedly good supers less accessible. N groove gives him rolls, Max Mode, and run/hop which aids in his issues with jumping. K groove has no rolls, but JD gives him a much needed defensive tool and rage makes his lackluster pokes more threatening. S groove Benimaru is surprisingly not bad, dodge works well for him and he gets easy access to his level 1 command grab super and damaging level 1 juggles, though he has to play at low health to be a threat and he barely has enough health to risk that. C groove gives him access to more supers as well, and air blocking helps a little with his floaty jump, but he has very little use for level 2 supers as he can only combo from level 2 Rai-Kou Ken which already allows combos with the level 1 version. P groove is essentially useless for Beni.
Normal Moves
Far Standing Normals
5LP
5MP
5HP
5LK
5MK
5HK
Close Normals
Benimaru does not have a difference between the close and far versions of 5LK, 5HP and 5HK.
cl5LP
cl5MP
cl5MK
Crouching Normals
2LP
2MP
2HP
2LK
2MK
2HK
Jumping Normals
8LP
8MP
8HP
8LK
8MK
8HK
Command Normals
Jackknife Kick
Flying Drill
