No edit summary |
(Lore.jpg) |
||
| (40 intermediate revisions by 7 users not shown) | |||
| Line 1: | Line 1: | ||
{{NickBrawl2 Character Intro|char=Rocko |full=Rocko|short=Rocko | {{NickBrawl2 Character Intro|char=Rocko |full=[[File:NASB2_RockoStock.png|x30px]] Rocko|short=Rocko | ||
| franchise = Rocko's Modern Life | | franchise = Rocko's Modern Life | ||
| homestage = | | homestage = Hardcore Chores | ||
| weight = | | weight = Light (0.85) | ||
| fallspeed = | | fallspeed = Average (1.2) | ||
| gravity = | | gravity = Average (1.1) | ||
| runspeed = | | runspeed = Below Average (1.1) | ||
| airspeed = | | airspeed = Average (1.2) | ||
| placeholderone = | | placeholderone = | ||
| placeholdertwo = | | placeholdertwo = | ||
| Line 18: | Line 18: | ||
== About == | == About == | ||
'''''Just your average Joe. Not to be confused with a kangaroo.''''' | |||
Rocko Rama is the title character of ''Rocko's Modern Life.'' A jovial Australian immigrant, Rocko moves to the American city of O-Town with his dog, Spunky. From there, his life becomes a series of (mis)adventures in trying to adapt to his new surroundings, often helped (or not) by his friends, Heffer and Filburt. | |||
== Playstyle == | |||
Rocko is a zoner, and an amazing one at that. While most characters are content getting in your face and getting their combos in, Rocko's not about that life: he'd rather summon Spunky and Jack(the)Hammer using his special attacks and attacking when you least expect it. Rocko possesses amazing stage control abilities and can wall you out better than most. In addition, he has some nasty strong attacks for securing the stock when he's walled you out long enough. | |||
If you like sitting back and controlling the pace of the match, Rocko is the wallaby for you! | |||
== Metagame == | |||
Rocko is ranked 7th out of 29 on the current [[Nickelodeon All-Star Brawl 2/FAQ|tier list]], in the S tier. This is a noticeable improvement over his 12th out of 25 placement in the first [[Nickelodeon All-Star Brawl]]. | |||
Rocko possesses a potent zoning game, with Spunky and Jackhammer allowing him to take control of the stage very quickly. This is further helped by his aerial attacks, with Light Neutral Air allowing him to keep opponents out at a quick pace. Rocko also possesses a very strong edgeguarding game, with Strong Neutral Air killing fairly early, and being able to combo into itself. | |||
However, Rocko does possess some flaws. Notably, his combo game isn't as strong as his other qualities, and he is a lightweight, which means if the opponent gets in on him, he can be knocked out fairly easily. Rocko has also had a historically tough time with bugs, due to his nature as a puppet character. | |||
Rocko has been a consistent character in the metagame all throughout, having strong representation both in online events and offline majors. | |||
|content2= | |content2= | ||
| Line 29: | Line 43: | ||
}} | }} | ||
}} | }} | ||
---- | ---- | ||
{{ProConTable | {{ProConTable | ||
|pros= | |pros= | ||
* ''' | * '''Defensive Beast:''' Rocko has some of the best defensive tools in the game and can control the pace of the match to his content. This is a great contrast to other strong characters in this game who are more offensive than defensive, and makes Rocko a very puzzling character to fight for some players. | ||
* ''' | * '''Zoning:''' Spunky and Jackhammer are some of the best zoning tools in the game. Spunky in particular can be thrown to throw players off your scent. | ||
* ''' | * '''Small:''' Rocko is a short little guy. This means in addition to his wall of projectiles, he is also not the easiest character to hit. | ||
* ''' | * '''Fantastic get off mes:''' Rocko has fantastic aerials and normals to push his opponent away from him if they do happen to get in. | ||
* '''Amazing strong attacks:''' The majority of Rocko's strong attacks are all fast and kill early. In addition, Neutral Strong has a windbox, so even if your opponent blocks, you can pressure them safely. | |||
* '''Safe''': Rocko's biggest strength. A majority of his toolkit is very easy to use and will keep the opponent at bay for the whole match. | |||
|cons= | |cons= | ||
* ''' | * '''Not many combos:''' Don't be mistaken, Rocko has ''some'' combos, many of which are great, but if you're looking for a particularly flashy character that has strong offensive prowess, you might as well go to the left and pick Tigre instead. | ||
* '''Light:''' While Rocko can live for a while due to his safe wall setups, he is quite easy to swat when you eventually do get in on him. | |||
* ''' | * '''Buggy:''' Rocko is occasionally plagued with nasty glitches depending on the patch. This can either alter how he plays significantly or just be a minor problem. | ||
* ''' | |||
}} | }} | ||
---- | ---- | ||
== Moveset == | == Moveset == | ||
| Line 61: | Line 72: | ||
{{MoveData | {{MoveData | ||
|image= NASB2_Rocko_LightNeutral-O-Punch.png | |image= NASB2_Rocko_LightNeutral-O-Punch.png | ||
|caption= | |caption= "GIVE ME BACK MY DOG!" | ||
|name= O-Punch | |name= O-Punch | ||
|input= Light | |input= Light | ||
| Line 72: | Line 83: | ||
|Safety=-0 | |Safety=-0 | ||
|description= | |description= | ||
* | * A quick punch used to fend off approaching opponents. | ||
}} | }} | ||
}}<br> | }}<br> | ||
| Line 79: | Line 89: | ||
{{MoveData | {{MoveData | ||
|image= NASB2_Rocko_LightForward-WallabyKick.png | |image= NASB2_Rocko_LightForward-WallabyKick.png | ||
|caption= | |caption= "Thank goodness they didn't call it the 'kangaroo kick'" | ||
|name= Wallaby Kick | |name= Wallaby Kick | ||
|input= Forward+Light | |input= Forward+Light | ||
| Line 90: | Line 100: | ||
|Safety=-0 | |Safety=-0 | ||
|description= | |description= | ||
* | * Rocko channels his wallaby instincts and kicks the opponent away. One of his best up-close tools. | ||
}} | }} | ||
}}<br> | }}<br> | ||
| Line 97: | Line 106: | ||
{{MoveData | {{MoveData | ||
|image= NASB2_Rocko_LightUp-LosingIt.png | |image= NASB2_Rocko_LightUp-LosingIt.png | ||
|caption= | |caption= "AAAAAAAHHHHH!" | ||
|name= Losing It | |name= Losing It | ||
|input= Up+Light | |input= Up+Light | ||
| Line 108: | Line 117: | ||
|Safety=-0 | |Safety=-0 | ||
|description= | |description= | ||
* | * Rocko gets so scared that his brain pops out of his head. | ||
}} | }} | ||
}}<br> | }}<br> | ||
| Line 115: | Line 123: | ||
{{MoveData | {{MoveData | ||
|image= NASB2_Rocko_LightDown-CleanLovin.png | |image= NASB2_Rocko_LightDown-CleanLovin.png | ||
|caption= | |caption= "Are you dizzy, Spunky!?" | ||
|name= Clean Lovin' | |name= Clean Lovin' | ||
|input= Down+Light | |input= Down+Light | ||
| Line 126: | Line 134: | ||
|Safety=-0 | |Safety=-0 | ||
|description= | |description= | ||
* | * Rocko sweeps the floor with a broom, with Spunky on the end of the broom. If Spunky is on the field, he will be absent during the attack. | ||
}} | }} | ||
}}<br> | }}<br> | ||
| Line 133: | Line 140: | ||
{{MoveData | {{MoveData | ||
|image= NASB2_Rocko_DashAttack-WallabyOnWheels.png | |image= NASB2_Rocko_DashAttack-WallabyOnWheels.png | ||
|caption= | |caption= "Well these rental skates seem very nice" | ||
|name= Wallaby On Wheels | |name= Wallaby On Wheels | ||
|input= Light( | |input= Light (Running) | ||
|data= | |data= | ||
{{AttackData-NickBrawl2 | {{AttackData-NickBrawl2 | ||
| Line 144: | Line 151: | ||
|Safety=-0 | |Safety=-0 | ||
|description= | |description= | ||
* | * Unusually launches opponents behind Rocko, which may make it a surprise reversal option out of the corner. Also keep in mind when using as a burst option. | ||
}} | }} | ||
}}<br> | }}<br> | ||
=== Air Light Attacks === | === Air Light Attacks === | ||
| Line 155: | Line 160: | ||
{{MoveData | {{MoveData | ||
|image= NASB2_Rocko_LightNeutralAir-AbdominalSnowmonkeyDefense101.png | |image= NASB2_Rocko_LightNeutralAir-AbdominalSnowmonkeyDefense101.png | ||
|caption= | |caption= "THE ABDOMINAL SNOWMONKEY!" | ||
|name= Abdominal Snowmonkey Defense 101 | |name= Abdominal Snowmonkey Defense 101 | ||
|input= | |input= Light (Airborne) | ||
|data= | |data= | ||
{{AttackData-NickBrawl2 | {{AttackData-NickBrawl2 | ||
|Damage=00% | |Damage=00% | ||
|Startup= | |Startup=4 | ||
|Active= | |Active=2, 8 | ||
|Total Frames=0 | |Total Frames=0 | ||
|Safety=-0 | |Safety=-0 | ||
|description= | |description= | ||
* | * Rocko swings his rolling pin in a circle around him. | ||
* | * The initial hit is on frames 4-5, and hits in front of and below Rocko. It has a more vertical launch angle than the late hit. | ||
* The late hit is on frames 6-14, and covers a wide arc behind Rocko below, behind, and even above him, going from the ground to above a platform at shorthop height. It has about a 45 degree launch. | |||
* Active frames end before the pin reaches straight above Rocko, leaving a blindspot diagonally above and in front of him | |||
* Because of the disjointed range, wide arc, and active frames of neutral air, it's the go to spacing move for Rocko, especially since his other light aerials don't have huge hitboxes. | |||
* The motion effect as of version 1.1 is currently bugged and does not always display correctly, do not use it as a visual reference when spacing | |||
}} | }} | ||
}}<br> | }}<br> | ||
| Line 173: | Line 182: | ||
{{MoveData | {{MoveData | ||
|image= NASB2_Rocko_LightForwardAir-TailSlap.png | |image= NASB2_Rocko_LightForwardAir-TailSlap.png | ||
|caption= | |caption= "IT'S NOT FUNNY!" | ||
|name= Tail Slap | |name= Tail Slap | ||
|input= | |input= Forward+Light (Airborne) | ||
|data= | |data= | ||
{{AttackData-NickBrawl2 | {{AttackData-NickBrawl2 | ||
| Line 191: | Line 200: | ||
{{MoveData | {{MoveData | ||
|image= NASB2_Rocko_LightBackAir-KarateLesson.png | |image= NASB2_Rocko_LightBackAir-KarateLesson.png | ||
|caption= | |caption= "And if things start to get iffy... kick him in the heiny" | ||
|name= Karate Lesson | |name= Karate Lesson | ||
|input= | |input= Back+Light (Airborne) | ||
|data= | |data= | ||
{{AttackData-NickBrawl2 | {{AttackData-NickBrawl2 | ||
| Line 209: | Line 218: | ||
{{MoveData | {{MoveData | ||
|image= NASB2_Rocko_LightUpAir-TheInsensitiveSelfish.png | |image= NASB2_Rocko_LightUpAir-TheInsensitiveSelfish.png | ||
|caption= | |caption= "You- you big dummyhead!" | ||
|name= The Insensitive Selfish | |name= The Insensitive Selfish | ||
|input= | |input= Up+Light (Airborne) | ||
|data= | |data= | ||
{{AttackData-NickBrawl2 | {{AttackData-NickBrawl2 | ||
| Line 220: | Line 229: | ||
|Safety=-0 | |Safety=-0 | ||
|description= | |description= | ||
* | * Unlike NASB1 no longer a kill move, now a vertical juggling tool. | ||
}} | }} | ||
}}<br> | }}<br> | ||
| Line 227: | Line 235: | ||
{{MoveData | {{MoveData | ||
|image= NASB2_Rocko_LightDownAir-BatBonk.png | |image= NASB2_Rocko_LightDownAir-BatBonk.png | ||
|caption= | |caption= "Hit him harder!" | ||
|name= Bat Bonk | |name= Bat Bonk | ||
|input= | |input= Down+Light (Airborne) | ||
|data= | |data= | ||
{{AttackData-NickBrawl2 | {{AttackData-NickBrawl2 | ||
| Line 242: | Line 250: | ||
}} | }} | ||
}}<br> | }}<br> | ||
=== Ground Strong Attacks === | === Ground Strong Attacks === | ||
| Line 249: | Line 256: | ||
{{MoveData | {{MoveData | ||
|image= NASB2_Rocko_ChargeForward-ShutUp.png | |image= NASB2_Rocko_ChargeForward-ShutUp.png | ||
|caption= | |caption= "You cheap little rotter!" | ||
|name= SHUT UP! | |name= SHUT UP! | ||
|input= Strong | |input= Strong | ||
| Line 260: | Line 267: | ||
|Safety=-0 | |Safety=-0 | ||
|description= | |description= | ||
* | * Very good range (almost as long as a stage platform) and kill power. Has windboxes at the end of its range that may or may not come in handy. | ||
* | * Colloquially known as "Joe Biden" | ||
}} | }} | ||
}}<br> | }}<br> | ||
| Line 267: | Line 274: | ||
{{MoveData | {{MoveData | ||
|image= NASB2_Rocko_ChargeUp-FamilysPogoStick.png | |image= NASB2_Rocko_ChargeUp-FamilysPogoStick.png | ||
|caption= | |caption= "Time to face to music Heff..." | ||
|name= Family's Pogo Stick | |name= Family's Pogo Stick | ||
|input= Up+Strong | |input= Up+Strong | ||
| Line 278: | Line 285: | ||
|Safety=-0 | |Safety=-0 | ||
|description= | |description= | ||
* | * Unusual for an up strong as it launches Rocko into a high jump. There is a powerful initial hit, and weaker hits while ascending and falling. | ||
* | * Rocko can drift freely left or right on the pogo stick to mixup where he lands. | ||
* The move recovers in the air if you fall farther than your initial ground level (i.e. use off a platform and drift off the side). | |||
}} | }} | ||
}}<br> | }}<br> | ||
| Line 285: | Line 293: | ||
{{MoveData | {{MoveData | ||
|image= NASB2_Rocko_ChargeDown-MaintenanceHammer.png | |image= NASB2_Rocko_ChargeDown-MaintenanceHammer.png | ||
|caption= | |caption= "Prepare to feel my wrath!" | ||
|name= Maintenance Hammer | |name= Maintenance Hammer | ||
|input= Down+Strong | |input= Down+Strong | ||
| Line 296: | Line 304: | ||
|Safety=-0 | |Safety=-0 | ||
|description= | |description= | ||
* | * Most situational of Rocko's ground strongs. Powerful spike if hit, and at a VERY specific spacing can hit ledgehangs. | ||
}} | }} | ||
}}<br> | }}<br> | ||
=== Air Strong Attacks === | === Air Strong Attacks === | ||
| Line 307: | Line 313: | ||
{{MoveData | {{MoveData | ||
|image= NASB2_Rocko_ChargeForwardAir-TheScreamFromTheOpening.png | |image= NASB2_Rocko_ChargeForwardAir-TheScreamFromTheOpening.png | ||
|caption= | |caption= "SPUNKYYYYYYY!" | ||
|name= The Scream from the Opening | |name= The Scream from the Opening | ||
|input= | |input= Strong (Airborne) | ||
|data= | |data= | ||
{{AttackData-NickBrawl2 | {{AttackData-NickBrawl2 | ||
| Line 318: | Line 324: | ||
|Safety=-0 | |Safety=-0 | ||
|description= | |description= | ||
* | * '''AAAAAAAHH!!''' This move is great for taking out opponents early, especially as an edgeguarding tool. Also great as a tool to maintain space and keep opponents at bay. | ||
}} | }} | ||
}}<br> | }}<br> | ||
| Line 325: | Line 330: | ||
{{MoveData | {{MoveData | ||
|image= NASB2_Rocko_ChargeUpAir-SadCryingClownInAnIronLung.png | |image= NASB2_Rocko_ChargeUpAir-SadCryingClownInAnIronLung.png | ||
|caption= | |caption= "I've always wanted one" | ||
|name= Sad Crying Clown in an Iron Lung | |name= Sad Crying Clown in an Iron Lung | ||
|input= | |input= Up+Strong (Airborne) | ||
|data= | |data= | ||
{{AttackData-NickBrawl2 | {{AttackData-NickBrawl2 | ||
| Line 336: | Line 341: | ||
|Safety=-0 | |Safety=-0 | ||
|description= | |description= | ||
* | * Rocko pogos in the air. Both the ascending and the descending hit have a different hitbox, with the ascending hit sending up and the descending hit sending away. Be careful using this move near the ledge, as if Rocko doesn't land, he'll fall down into the blastzone. | ||
}} | }} | ||
}}<br> | }}<br> | ||
| Line 343: | Line 347: | ||
{{MoveData | {{MoveData | ||
|image= NASB2_Rocko_ChargeDownAir-GutterBall.png | |image= NASB2_Rocko_ChargeDownAir-GutterBall.png | ||
|caption= | |caption= "How did all this junk get in here?" | ||
|name= Gutter Ball | |name= Gutter Ball | ||
|input= | |input= Down+Strong (Airborne) | ||
|data= | |data= | ||
{{AttackData-NickBrawl2 | {{AttackData-NickBrawl2 | ||
| Line 354: | Line 358: | ||
|Safety=-0 | |Safety=-0 | ||
|description= | |description= | ||
* | * Rocko uses a plunger and drops a ball downward. Great keepaway move that also allows for follow-ups into his light attacks. | ||
}} | }} | ||
}}<br> | }}<br> | ||
=== Special Attacks === | === Special Attacks === | ||
| Line 365: | Line 367: | ||
{{MoveData | {{MoveData | ||
|image= NASB2_Rocko_SpecialNeutral-Spunky.png | |image= NASB2_Rocko_SpecialNeutral-Spunky.png | ||
|caption= | |caption= "Atta boy, Spunky!" | ||
|name= Spunky | |name= Spunky | ||
|input= Special | |input= Special | ||
| Line 377: | Line 379: | ||
|description= | |description= | ||
* Rocko sends out Spunky, who bites any opponent in his way. | * Rocko sends out Spunky, who bites any opponent in his way. | ||
* Press neutral special while Spunky is out to command him to turn around. | |||
* Tip: you can grab Spunky and redirect him with your throws! | * Tip: you can grab Spunky and redirect him with your throws! | ||
* When Spunky runs around on his own, he has a detection box that tells him to pounce when it touches an enemy. If Spunky is grabbed and thrown, he is a constant hitbox instead. | |||
}} | }} | ||
}}<br> | }}<br> | ||
| Line 383: | Line 387: | ||
{{MoveData | {{MoveData | ||
|image= NASB2_Rocko_SpecialForward-Suck-O-Matic.png | |image= NASB2_Rocko_SpecialForward-Suck-O-Matic.png | ||
|caption= | |caption= "It's got a mind of it's own!" | ||
|name= Suck-O-Matic | |name= Suck-O-Matic | ||
|input= Forward+Special | |input= Forward+Special | ||
| Line 395: | Line 399: | ||
|description= | |description= | ||
* Rocko hops on the Suck-O-Matic, an automatic vacuum that pulls opponents in and then launches them away. | * Rocko hops on the Suck-O-Matic, an automatic vacuum that pulls opponents in and then launches them away. | ||
* | * The non-slime version rockets Rocko forward continuously. Press a button to cancel this move at any time while it's active. | ||
* Not a command grab. Sadly. | |||
}} | }} | ||
}}<br> | }}<br> | ||
| Line 401: | Line 406: | ||
{{MoveData | {{MoveData | ||
|image= NASB2_Rocko_SpecialDown-Jackhammer.png | |image= NASB2_Rocko_SpecialDown-Jackhammer.png | ||
|caption= | |caption= "Ride em', Heff!" | ||
|name= Jackhammer | |name= Jackhammer | ||
|input= Down+Special | |input= Down+Special | ||
| Line 414: | Line 419: | ||
* Rocko pulls out his jackhammer, which bounces on the ground repeatedly, dealing damage. | * Rocko pulls out his jackhammer, which bounces on the ground repeatedly, dealing damage. | ||
* Tip: combine Spunky with the Jackhammer to have it move even faster! | * Tip: combine Spunky with the Jackhammer to have it move even faster! | ||
* PATCHED OUT AS OF VERSION 1.3: When Spunky is riding the jackhammer, you can spawn a second Spunky separate from the first. | |||
}} | }} | ||
}}<br> | }}<br> | ||
| Line 419: | Line 425: | ||
{{MoveData | {{MoveData | ||
|image= NASB2_Rocko_SpecialUp-Conglom-ORocket.png | |image= NASB2_Rocko_SpecialUp-Conglom-ORocket.png | ||
|caption= | |caption= "900 bazillion bottles of root beer..." | ||
|name= Conglom-O Rocket | |name= Conglom-O Rocket | ||
|input= Up+Special | |input= Up+Special | ||
| Line 431: | Line 437: | ||
|description= | |description= | ||
* Rocko grabs a rocket and flies up, then quickly plummets diagonally. | * Rocko grabs a rocket and flies up, then quickly plummets diagonally. | ||
* | * This move is extremely easy to accidentally reverse. Input Diagonally Up + Special to avoid SDing offstage. | ||
}} | |||
}}<br> | |||
=== Grab/Throws === | |||
{{MoveData | |||
|image= NASB2_Rocko_Grab.png | |||
|caption= | |||
|name= Grab | |||
|input= Grab | |||
|data= | |||
{{AttackData-NickBrawl2 | |||
|Damage=00% | |||
|Startup=0 | |||
|Active=0-0 | |||
|Total Frames=0 | |||
|Safety=-0 | |||
|description= | |||
* Unique to Rocko is that he dribbles the opponent like a basketball upon grabbing them. He can also do this to Spunky to throw him in a different direction. | |||
}} | |||
}}<br> | |||
{{MoveData | |||
|image= NASB2_Rocko_DashGrab.png | |||
|caption= | |||
|name= Dash Grab | |||
|input= Grab (Running) | |||
|data= | |||
{{AttackData-NickBrawl2 | |||
|Damage=00% | |||
|Startup=0 | |||
|Active=0-0 | |||
|Total Frames=0 | |||
|Safety=-0 | |||
|description= | |||
Rocko's dash grab. | |||
}} | |||
}}<br> | |||
{{MoveData | |||
|image= NASB2_Rocko_Pummel.png | |||
|caption= | |||
|name= Grab Pummel | |||
|input= Light (Grabbing) | |||
|data= | |||
{{AttackData-NickBrawl2 | |||
|Damage=00% | |||
|Startup=0 | |||
|Active=0-0 | |||
|Total Frames=0 | |||
|Safety=-0 | |||
|description= | |||
Rocko dribbles his opponent against the ground. | |||
}} | |||
}}<br> | |||
{{MoveData | |||
|image= NASB2_Rocko_UpThrow.png | |||
|caption= | |||
|name= Up Throw | |||
|input= Up (Grabbing) | |||
|data= | |||
{{AttackData-NickBrawl2 | |||
|Damage=00% | |||
|Startup=0 | |||
|Active=0-0 | |||
|Total Frames=0 | |||
|Safety=-0 | |||
|description= | |||
* Go for a three pointer! Doing this throw with Spunky allows him to be used as a pseudo anti-air. | |||
}} | |||
}}<br> | |||
{{MoveData | |||
|image= NASB2_Rocko_ForwardThrow.png | |||
|caption= | |||
|name= Forward Throw | |||
|input= Forward (Grabbing) | |||
|data= | |||
{{AttackData-NickBrawl2 | |||
|Damage=00% | |||
|Startup=0 | |||
|Active=0-0 | |||
|Total Frames=0 | |||
|Safety=-0 | |||
|description= | |||
}} | |||
}}<br> | |||
{{MoveData | |||
|image= NASB2_Rocko_DownThrow.png | |||
|caption= | |||
|name= Down Throw | |||
|input= Down (Grabbing) | |||
|data= | |||
{{AttackData-NickBrawl2 | |||
|Damage=00% | |||
|Startup=0 | |||
|Active=0-0 | |||
|Total Frames=0 | |||
|Safety=-0 | |||
|description= | |||
}} | }} | ||
}}<br> | }}<br> | ||
{{MoveData | |||
|image= NASB2_Rocko_BackThrow.png | |||
|caption= | |||
|name= Back Throw | |||
|input= Back (Grabbing) | |||
|data= | |||
{{AttackData-NickBrawl2 | |||
|Damage=00% | |||
|Startup=0 | |||
|Active=0-0 | |||
|Total Frames=0 | |||
|Safety=-0 | |||
|description= | |||
}} | |||
}}<br> | |||
=== Super === | === Super === | ||
| Line 441: | Line 567: | ||
{{MoveData | {{MoveData | ||
|image= NASB2_Rocko_Super.png | |image= NASB2_Rocko_Super.png | ||
|caption= | |caption= "YOU'RE FIRED!" | ||
|name= | |name= Super | ||
|input= Slime+Light | |input= Slime+Light | ||
|data= | |data= | ||
| Line 452: | Line 578: | ||
|Safety=-0 | |Safety=-0 | ||
|description= | |description= | ||
* | * Rocko goes mad with power from "Power Trip" and sends the opponent onto the sidewalk, where they get run over by multiple vehicles before being flicked away by a giant hand. | ||
}} | }} | ||
}}<br> | }}<br> | ||
=== Taunts === | === Taunts === | ||
| Line 463: | Line 587: | ||
{{MoveData | {{MoveData | ||
|image= NASB2_Rocko_TauntNeutral.png | |image= NASB2_Rocko_TauntNeutral.png | ||
|caption= | |caption= "Heffer! This isn't coffee!" | ||
|name= | |name= Taunt | ||
|input= Taunt | |input= Taunt | ||
|data= | |data= | ||
| Line 474: | Line 598: | ||
|Safety=-0 | |Safety=-0 | ||
|description= | |description= | ||
* | * Care for a cup? | ||
}} | }} | ||
}}<br> | }}<br> | ||
| Line 481: | Line 604: | ||
{{MoveData | {{MoveData | ||
|image= NASB2_Rocko_TauntDown.png | |image= NASB2_Rocko_TauntDown.png | ||
|caption= | |caption= "Heh heh. Good as new, ey?" | ||
|name= | |name= Down Taunt | ||
|input= Down+Taunt | |input= Down+Taunt | ||
|data= | |data= | ||
| Line 492: | Line 615: | ||
|Safety=-0 | |Safety=-0 | ||
|description= | |description= | ||
* | * Rocko worriedly looks at the player. Isn't he adorable? | ||
}} | }} | ||
}}<br> | }}<br> | ||
| Line 499: | Line 621: | ||
{{MoveData | {{MoveData | ||
|image= NASB2_Rocko_TauntUp.png | |image= NASB2_Rocko_TauntUp.png | ||
|caption= | |caption= "Oh baby, oh baby, oh baby!" | ||
|name= | |name= Up Taunt | ||
|input= Up+Taunt | |input= Up+Taunt | ||
|data= | |data= | ||
| Line 510: | Line 632: | ||
|Safety=-0 | |Safety=-0 | ||
|description= | |description= | ||
* | * Rocko takes a phone call, referencing the infamous scene from "Canned" where he works as a "special phone operator." | ||
}} | }} | ||
}}<br> | }}<br> | ||
---- | |||
== Strategy == | |||
Compared to a lot of other characters, Rocko is fairly unusual to the naked eye. Rocko is not a particularly complex character, but he is unorthodox and simple compared to a lot of the cast. While he is absolutely not without a combo game, he doesn't do anything particularly flashy with his normals, and a lot of them, such as his Jab, Forward Light, and both Neutral Strongs, smack the opponent away rather than keep them in close quarters. This is because Rocko is one of NASB 2's premier zoner characters, and his main goal is to keep his opponent away within a safe distance from him at all times. Rocko is all about space and controlling the tempo of the match. | |||
Spunky is your best friend as Rocko, true to the character. You can use Neutral Special again or hit him to change his direction, grab him and throw him in all 4 directions you are able to as your opponent (you can even pummel him to mix up the timing), or use him at the same time as Down Special to make the jackhammer more unpredictable. Spunky respawns very fast on hit as well, which means Rocko usually has access to an approaching active hitbox at all times against his opponent. The opponent can hit Spunky to knock him out for a short time, but this then leaves them open to being punished by Rocko. | |||
While combos aren't what Rocko is centered around, he isn't without them Rocko's main combo tools are his light aerials, since his grounded lights usually push the opponent away from him (though Down Light is good as a confirm into a combo.) | |||
* Up Air Light is a great juggle tool. Main go-to for combos. | |||
* Down Air Light is capable of pillar comboing from a throw. | |||
* You can also use Spunky to lead into confirms, as mid-combo he's a fairly active hitbox thats useful for restarting. | |||
* | Rocko has some of the most versatile strongs in the game as well: | ||
* | * His Neutral Strong is an extremely powerful kill tool, and even if it whiffs, the windbox on it can still push the opponent away and keep Rocko safe from a counterattack. Similarly, the air version is also very threatening, especially offstage. | ||
* | * Down Air Strong is quite interesting as it also doubles as a projectile: the ball spawns and descends vertically as Rocko uses the move. This means it's extremely useful for edgeguarding, and even maintaining space onstage as it's hard to catch Rocko while he's using it in the air. | ||
* Up Strong launches him in the air and is extremely powerful on the ascent. The descent also has a hitbox, though it's not as powerful. Great for use out of a spotdodge. | |||
The name of the game with Rocko is stage control and defense. Spunky, of course, is his main way of accomplishing this, but also jackhammer. Both are extremely disruptive and make it easier for Rocko to not interact with the opponent. Rocko himself isn't very interactive: you will spend a lot of time running away from your opponent in the air or via wavedashing. Rocko has pretty average stats, so this shouldn't be too much of a problem if you play your cards right. His light aerials and especially strongs aid in walling out the opponent further. | |||
Momentum is also a major factor to consider when playing Rocko. At an advantage, time is very much on your side. If you have the upper hand, it's best to just annoy your opponent with your projectiles and only interact when necessary. However, if you don't have the upper hand, or are down a stock (or more), it can be much more difficult, as Rocko doesn't have a ton of true confirms into any of his strong attacks, which means you might be going into panic mode and lose your cool looking for an option. '''Every neutral win counts.''' | |||
Recovery isn't a huge issue for Rocko, but it is fairly plain and linear, making it predictable, so mixing it up is necessary. Side Special is good after a jump horizontally, or just point blank, and Up Special is his main vertical recovery tool. It doesn't shoot up particularly far, but it is reliable. EX gives it a considerable boost in height, which means if you have a bar, might as well use it. | |||
Speaking of, Rocko's meter usage isn't particularly big. Aside from the recovery as mentioned before, it mostly comes down to the essentials such as Burst. Slime cancelling from his aerials might be useful for you if you need a confirm, but his Specials don't get too much of a boost, and are mostly situational. Rocko's meter build isn't particularly big either due to his nature of not interacting with the opponent. | |||
Overall, Rocko is a very plain defensive zoner. His mantra is simple - "Stay out." Absolute mastery of the character is optimizing his stage control and knowing when its best to engage and (especially) disengage. | |||
---- | ---- | ||
== Techniques == | |||
== | |||
* PLACEHOLDER | * PLACEHOLDER | ||
| Line 557: | Line 676: | ||
== | == Combos == | ||
* PLACEHOLDER | * PLACEHOLDER | ||
| Line 563: | Line 682: | ||
* PLACEHOLDER | * PLACEHOLDER | ||
---- | |||
== Matchups == | |||
{| class="wikitable" | |||
|- | |||
| '''+2''' || | |||
|- | |||
| '''+1''' || | |||
|- | |||
| '''0''' || [[File:NASB2_Sponge_Icon.png|x80px]] [[File:NASB2_Patrick_Icon.png|x80px]] [[File:NASB2_Squidward_Icon.png|x80px]] [[File:NASB2_Plankton_Icon.png|x80px]] [[File:NASB2_ElTigre_Icon.png|x80px]] [[File:NASB2_Rocko_Icon.png|x80px]] [[File:NASB2_Jimmy_Icon.png|x80px]] [[File:NASB2_Lucy_Icon.png|x80px]] [[File:NASB2_Beavers-Daggett_Icon.png|x80px]] [[File:NASB2_Beavers-Norbert_Icon.png|x80px]] [[File:NASB2_Garfield_Icon.png|x80px]] [[File:NASB2_Aang_Icon.png|x80px]] [[File:NASB2_Korra_Icon.png|x80px]] [[File:NASB2_Azula_Icon.png|x80px]] [[File:NASB2_Raphael_Icon.png|x80px]] [[File:NASB2_Donatello_Icon.png|x80px]] [[File:NASB2_April_Icon.png|x80px]] [[File:NASB2_Danny_Icon.png|x80px]] [[File:NASB2_Ember_Icon.png|x80px]] [[File:NASB2_Gertie_Icon.png|x80px]] [[File:NASB2_Gerald_Icon.png|x80px]] [[File:NASB2_Nigel_Icon.png|x80px]] [[File:NASB2_Zim_Icon.png|x80px]] [[File:NASB2_Jenny_Icon.png|x80px]] [[File:NASB2_Reptar_Icon.png|x80px]] [[File:NASB2_RenStimpy_Icon.png|x80px]] [[File:NASB2_Krabs_Icon.png|x80px]] [[File:NASB2_Zuko_Icon.png|x80px]] [[File:NASB2_Rocksteady_Icon.png|x80px]] | |||
|- | |||
| '''1''' || | |||
|- | |||
| '''2''' || | |||
|} | |||
---- | ---- | ||
| Line 572: | Line 707: | ||
* PLACEHOLDER | * PLACEHOLDER | ||
* PLACEHOLDER | * PLACEHOLDER | ||
=== Videos === | |||
PLACEHOLDER | |||
| Line 579: | Line 717: | ||
== Costumes == | == Costumes == | ||
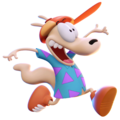
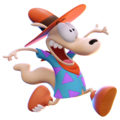
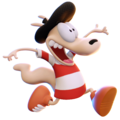
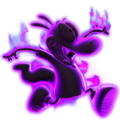
<gallery> | |||
File:NASB2 Rocko Costume00.png|500px|thumb|Rocko's default outfit. | |||
File:NASB2 Rocko Costume01.png|500px|thumb|Rocko wearing his baseball cap from the show's intro. | |||
File:NASB2 Rocko Costume02.png|500px|thumb|Cowboy Rocko from "The Good, The Bad, and The Wallaby". | |||
File:NASB2 Rocko Costume03.png|500px|thumb|French Rocko from "I See London, I See France" (unlocked by having the Ultimate edition of NASB 2). | |||
File:NASB2 Rocko Costume04.png|500px|thumb|Mind controlled Rocko (unlocked by defeating Rocko twice in campaign mode). | |||
File:NASB2 Rocko Costume05.png|500px|thumb|Rocko's Ghost Clone (unlocked by defeating Rocko thrice in campaign mode). | |||
</gallery> | |||
{{Navbox-NickBrawl2}} | {{Navbox-NickBrawl2}} | ||
[[Category:Nickelodeon All-Star Brawl 2]] | [[Category:Nickelodeon All-Star Brawl 2]] | ||
Latest revision as of 00:05, 9 March 2025
About
Just your average Joe. Not to be confused with a kangaroo.
Rocko Rama is the title character of Rocko's Modern Life. A jovial Australian immigrant, Rocko moves to the American city of O-Town with his dog, Spunky. From there, his life becomes a series of (mis)adventures in trying to adapt to his new surroundings, often helped (or not) by his friends, Heffer and Filburt.
Playstyle
Rocko is a zoner, and an amazing one at that. While most characters are content getting in your face and getting their combos in, Rocko's not about that life: he'd rather summon Spunky and Jack(the)Hammer using his special attacks and attacking when you least expect it. Rocko possesses amazing stage control abilities and can wall you out better than most. In addition, he has some nasty strong attacks for securing the stock when he's walled you out long enough.
If you like sitting back and controlling the pace of the match, Rocko is the wallaby for you!
Metagame
Rocko is ranked 7th out of 29 on the current tier list, in the S tier. This is a noticeable improvement over his 12th out of 25 placement in the first Nickelodeon All-Star Brawl.
Rocko possesses a potent zoning game, with Spunky and Jackhammer allowing him to take control of the stage very quickly. This is further helped by his aerial attacks, with Light Neutral Air allowing him to keep opponents out at a quick pace. Rocko also possesses a very strong edgeguarding game, with Strong Neutral Air killing fairly early, and being able to combo into itself.
However, Rocko does possess some flaws. Notably, his combo game isn't as strong as his other qualities, and he is a lightweight, which means if the opponent gets in on him, he can be knocked out fairly easily. Rocko has also had a historically tough time with bugs, due to his nature as a puppet character.
Rocko has been a consistent character in the metagame all throughout, having strong representation both in online events and offline majors.
 | |
| Franchise |
Rocko's Modern Life |
|---|---|
| Home Stage |
Hardcore Chores |
| Weight |
Light (0.85) |
| Fall Speed |
Average (1.2) |
| Gravity |
Average (1.1) |
| Run Speed |
Below Average (1.1) |
| Air Speed |
Average (1.2) |
| Strengths | Weaknesses |
|---|---|
|
|
Moveset
Ground Light Attacks
Light

| Damage | Startup | Active Frames | Total Frames | Safety | |
|---|---|---|---|---|---|
| 00% | 0 | 0-0 | 0 | -0 | |
| |||||
Forward+Light

| Damage | Startup | Active Frames | Total Frames | Safety | |
|---|---|---|---|---|---|
| 00% | 0 | 0-0 | 0 | -0 | |
| |||||
Up+Light

| Damage | Startup | Active Frames | Total Frames | Safety | |
|---|---|---|---|---|---|
| 00% | 0 | 0-0 | 0 | -0 | |
| |||||
Down+Light

| Damage | Startup | Active Frames | Total Frames | Safety | |
|---|---|---|---|---|---|
| 00% | 0 | 0-0 | 0 | -0 | |
| |||||
Light (Running)

| Damage | Startup | Active Frames | Total Frames | Safety | |
|---|---|---|---|---|---|
| 00% | 0 | 0-0 | 0 | -0 | |
| |||||
Air Light Attacks
Light (Airborne)

| Damage | Startup | Active Frames | Total Frames | Safety | |
|---|---|---|---|---|---|
| 00% | 4 | 2, 8 | 0 | -0 | |
| |||||
Forward+Light (Airborne)

| Damage | Startup | Active Frames | Total Frames | Safety | |
|---|---|---|---|---|---|
| 00% | 0 | 0-0 | 0 | -0 | |
| |||||
Back+Light (Airborne)

| Damage | Startup | Active Frames | Total Frames | Safety | |
|---|---|---|---|---|---|
| 00% | 0 | 0-0 | 0 | -0 | |
| |||||
Up+Light (Airborne)

| Damage | Startup | Active Frames | Total Frames | Safety | |
|---|---|---|---|---|---|
| 00% | 0 | 0-0 | 0 | -0 | |
| |||||
Down+Light (Airborne)

| Damage | Startup | Active Frames | Total Frames | Safety | |
|---|---|---|---|---|---|
| 00% | 0 | 0-0 | 0 | -0 | |
| |||||
Ground Strong Attacks
Strong

| Damage | Startup | Active Frames | Total Frames | Safety | |
|---|---|---|---|---|---|
| 00% | 0 | 0-0 | 0 | -0 | |
| |||||
Up+Strong

| Damage | Startup | Active Frames | Total Frames | Safety | |
|---|---|---|---|---|---|
| 00% | 0 | 0-0 | 0 | -0 | |
| |||||
Down+Strong

| Damage | Startup | Active Frames | Total Frames | Safety | |
|---|---|---|---|---|---|
| 00% | 0 | 0-0 | 0 | -0 | |
| |||||
Air Strong Attacks
Strong (Airborne)

| Damage | Startup | Active Frames | Total Frames | Safety | |
|---|---|---|---|---|---|
| 00% | 0 | 0-0 | 0 | -0 | |
| |||||
Up+Strong (Airborne)

| Damage | Startup | Active Frames | Total Frames | Safety | |
|---|---|---|---|---|---|
| 00% | 0 | 0-0 | 0 | -0 | |
| |||||
Down+Strong (Airborne)

| Damage | Startup | Active Frames | Total Frames | Safety | |
|---|---|---|---|---|---|
| 00% | 0 | 0-0 | 0 | -0 | |
| |||||
Special Attacks
Special

| Damage | Startup | Active Frames | Total Frames | Safety | |
|---|---|---|---|---|---|
| 00% | 0 | 0-0 | 0 | -0 | |
| |||||
Forward+Special

| Damage | Startup | Active Frames | Total Frames | Safety | |
|---|---|---|---|---|---|
| 00% | 0 | 0-0 | 0 | -0 | |
| |||||
Down+Special

| Damage | Startup | Active Frames | Total Frames | Safety | |
|---|---|---|---|---|---|
| 00% | 0 | 0-0 | 0 | -0 | |
| |||||
Up+Special

| Damage | Startup | Active Frames | Total Frames | Safety | |
|---|---|---|---|---|---|
| 00% | 0 | 0-0 | 0 | -0 | |
| |||||
Grab/Throws
Grab

| Damage | Startup | Active Frames | Total Frames | Safety | |
|---|---|---|---|---|---|
| 00% | 0 | 0-0 | 0 | -0 | |
| |||||
Grab (Running)

| Damage | Startup | Active Frames | Total Frames | Safety | |
|---|---|---|---|---|---|
| 00% | 0 | 0-0 | 0 | -0 | |
|
Rocko's dash grab. | |||||
Light (Grabbing)

| Damage | Startup | Active Frames | Total Frames | Safety | |
|---|---|---|---|---|---|
| 00% | 0 | 0-0 | 0 | -0 | |
|
Rocko dribbles his opponent against the ground. | |||||
Up (Grabbing)

| Damage | Startup | Active Frames | Total Frames | Safety | |
|---|---|---|---|---|---|
| 00% | 0 | 0-0 | 0 | -0 | |
| |||||
Forward (Grabbing)

| Damage | Startup | Active Frames | Total Frames | Safety |
|---|---|---|---|---|
| 00% | 0 | 0-0 | 0 | -0 |
Down (Grabbing)

| Damage | Startup | Active Frames | Total Frames | Safety |
|---|---|---|---|---|
| 00% | 0 | 0-0 | 0 | -0 |
Back (Grabbing)

| Damage | Startup | Active Frames | Total Frames | Safety |
|---|---|---|---|---|
| 00% | 0 | 0-0 | 0 | -0 |
Super
Slime+Light

| Damage | Startup | Active Frames | Total Frames | Safety | |
|---|---|---|---|---|---|
| 00% | 0 | 0-0 | 0 | -0 | |
| |||||
Taunts
Taunt

| Damage | Startup | Active Frames | Total Frames | Safety | |
|---|---|---|---|---|---|
| 00% | 0 | 0-0 | 0 | -0 | |
| |||||
Down+Taunt

| Damage | Startup | Active Frames | Total Frames | Safety | |
|---|---|---|---|---|---|
| 00% | 0 | 0-0 | 0 | -0 | |
| |||||
Up+Taunt

| Damage | Startup | Active Frames | Total Frames | Safety | |
|---|---|---|---|---|---|
| 00% | 0 | 0-0 | 0 | -0 | |
| |||||
Strategy
Compared to a lot of other characters, Rocko is fairly unusual to the naked eye. Rocko is not a particularly complex character, but he is unorthodox and simple compared to a lot of the cast. While he is absolutely not without a combo game, he doesn't do anything particularly flashy with his normals, and a lot of them, such as his Jab, Forward Light, and both Neutral Strongs, smack the opponent away rather than keep them in close quarters. This is because Rocko is one of NASB 2's premier zoner characters, and his main goal is to keep his opponent away within a safe distance from him at all times. Rocko is all about space and controlling the tempo of the match.
Spunky is your best friend as Rocko, true to the character. You can use Neutral Special again or hit him to change his direction, grab him and throw him in all 4 directions you are able to as your opponent (you can even pummel him to mix up the timing), or use him at the same time as Down Special to make the jackhammer more unpredictable. Spunky respawns very fast on hit as well, which means Rocko usually has access to an approaching active hitbox at all times against his opponent. The opponent can hit Spunky to knock him out for a short time, but this then leaves them open to being punished by Rocko.
While combos aren't what Rocko is centered around, he isn't without them Rocko's main combo tools are his light aerials, since his grounded lights usually push the opponent away from him (though Down Light is good as a confirm into a combo.)
- Up Air Light is a great juggle tool. Main go-to for combos.
- Down Air Light is capable of pillar comboing from a throw.
- You can also use Spunky to lead into confirms, as mid-combo he's a fairly active hitbox thats useful for restarting.
Rocko has some of the most versatile strongs in the game as well:
- His Neutral Strong is an extremely powerful kill tool, and even if it whiffs, the windbox on it can still push the opponent away and keep Rocko safe from a counterattack. Similarly, the air version is also very threatening, especially offstage.
- Down Air Strong is quite interesting as it also doubles as a projectile: the ball spawns and descends vertically as Rocko uses the move. This means it's extremely useful for edgeguarding, and even maintaining space onstage as it's hard to catch Rocko while he's using it in the air.
- Up Strong launches him in the air and is extremely powerful on the ascent. The descent also has a hitbox, though it's not as powerful. Great for use out of a spotdodge.
The name of the game with Rocko is stage control and defense. Spunky, of course, is his main way of accomplishing this, but also jackhammer. Both are extremely disruptive and make it easier for Rocko to not interact with the opponent. Rocko himself isn't very interactive: you will spend a lot of time running away from your opponent in the air or via wavedashing. Rocko has pretty average stats, so this shouldn't be too much of a problem if you play your cards right. His light aerials and especially strongs aid in walling out the opponent further.
Momentum is also a major factor to consider when playing Rocko. At an advantage, time is very much on your side. If you have the upper hand, it's best to just annoy your opponent with your projectiles and only interact when necessary. However, if you don't have the upper hand, or are down a stock (or more), it can be much more difficult, as Rocko doesn't have a ton of true confirms into any of his strong attacks, which means you might be going into panic mode and lose your cool looking for an option. Every neutral win counts.
Recovery isn't a huge issue for Rocko, but it is fairly plain and linear, making it predictable, so mixing it up is necessary. Side Special is good after a jump horizontally, or just point blank, and Up Special is his main vertical recovery tool. It doesn't shoot up particularly far, but it is reliable. EX gives it a considerable boost in height, which means if you have a bar, might as well use it.
Speaking of, Rocko's meter usage isn't particularly big. Aside from the recovery as mentioned before, it mostly comes down to the essentials such as Burst. Slime cancelling from his aerials might be useful for you if you need a confirm, but his Specials don't get too much of a boost, and are mostly situational. Rocko's meter build isn't particularly big either due to his nature of not interacting with the opponent.
Overall, Rocko is a very plain defensive zoner. His mantra is simple - "Stay out." Absolute mastery of the character is optimizing his stage control and knowing when its best to engage and (especially) disengage.
Techniques
- PLACEHOLDER
- PLACEHOLDER
- PLACEHOLDER
Combos
- PLACEHOLDER
- PLACEHOLDER
- PLACEHOLDER
Matchups
| +2 | |
| +1 | |
| 0 | |
| 1 | |
| 2 |
Other Resources
- PLACEHOLDER
- PLACEHOLDER
- PLACEHOLDER
Videos
PLACEHOLDER
Costumes

Rocko's default outfit.
Rocko wearing his baseball cap from the show's intro.
Cowboy Rocko from "The Good, The Bad, and The Wallaby".
French Rocko from "I See London, I See France" (unlocked by having the Ultimate edition of NASB 2).

Mind controlled Rocko (unlocked by defeating Rocko twice in campaign mode).
Rocko's Ghost Clone (unlocked by defeating Rocko thrice in campaign mode).


