m (Scanman moved page Chun-Li (CvS2) to Capcom vs SNK 2/Chun-Li: moving CvS2 Chun-Li page to be a subpage) |
|||
| (25 intermediate revisions by 6 users not shown) | |||
| Line 1: | Line 1: | ||
[[File: | == Introduction == | ||
{{CvS2 Character Subnav|char=Chun-Li|short=Chun-Li}} | |||
<div> | |||
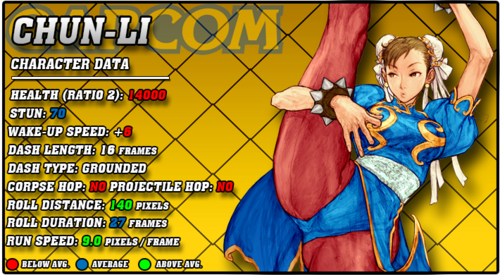
[[File:CVS2_Chun_Data.png|right|500px]] | |||
== Story == | |||
'''Chun-Li''' is an Interpol officer in the narcotics division from China. She's a highly trained martial artist, and is notable for being the female protagonist of the Street Fighter series and the first female fighting game character ever, debuting in the original Street Fighter II: World Warrior. Her father taught her martial arts at a young age, as he was also a highly trained martial artist and Interpol officer. One day, he disappeared, which launched Chun-Li into a passion for law. She became a detective at 18 before joining Interpol, becoming the main head of their Shadaloo investigations. She learned from her old teacher, Gen, that her father had been dealing with M. Bison before his disappearance. She confronted M. Bison, asking him what had happened to her father. Bison laughs, and quickly defeats her in combat. He says that if they ever fight again, he will kill her just like he killed her father, and he escapes away. Chun-Li is still hunting Bison to this day. | |||
== Gameplay == | |||
Chun-Li is a solid and neutral focused character. Her buttons make for great pokes and space controlling tools, and her high walkspeed and fast jumps let her position wherever she wants to. Buttons like 2MK, 2MP, 5MP, 5HP, and 2HK can keep the opponent out and give her a chance to confirm into her powerful super, Houyokusen. Her super is key to her gameplan, as it gives her massive damage and a very strong mixup afterwards. She also has a useful fireball for zoning, and her signature Lightning Legs for combos and pressure. | |||
Chun-Li isn't without weaknesses. Her health is quite low, meaning that a few good hits spells the end of the round for her. This is exacerbated by her weak defense, as she has no meterless reversal and no safe super to reversal with. She has stellar jabs for mashing, but this is a risk still. She also struggles to get any meaningful meterless damage, as her specials aren't very combo friendly, and even when she can combo into them, none of her specials give her a knockdown. | |||
Regardless, she's a powerful high tier character, especially in C-Groove. She likely has the best level 2 combo in the game, with massive damage and a powerful mixup afterwards that allows her to take rounds off any solid poke with meter. If you don't mind the weak meterless damage and below average defense, Chun-Li is a solid pick. | |||
= | === Groove Selection === | ||
'''Best - C:''' C-Groove is easily Chun-Li's best Groove. Her level 2 combos with Houyokusen are likely the best C-Groove level 2 combos in the game, with massive damage potential and the chance for a mixup afterwards that leads into even worse situations for the opponent. C-Chun-Li can easily steamroll rounds away with meter. Roll Cancels aren't entirely important to her, but RC Legs are fairly strong, and rolls give her a powerful neutral tool and escape option. Alpha Counter and airblock aid her defense a lot as well, making her overall a lot more well rounded. | |||
'''Useful - K/N/S:''' K-Chun-Li loses rolls for access to JD's, and Rage level 3 Houyokusen. One good JD with Rage can lead into massive damage and a mixup, and her neutral is still just as scary. Hop and run make her even more mobile as well, but the damage potential with Rage doesn't match up to the more consistent level 2 damage with C-Groove. N-Groove gets access to run, hop, and roll, alongside counter rolls which are useful escape tools. You can also basically always threaten a hitconfirm or whiff punish into level 1 Houyokusen, which isn't as high damage but is still a threat nonetheless. Lower damage ceiling and lack of any other really powerful tools holds N-Chun-Li back a bit compared to other Grooves however. S-Chun-Li is actually quite fitting, as Chun-Li can charge without much worry and infinite level 1 Houyokusen is very scary overall as every mixup afterwards leads into another super. S-Chun-Li has a great comeback factor, but has to deal with the weak mechanics of S-Groove. | |||
'''Worst - A/P:''' A-Chun-Li is a much weaker version of C-Chun-Li. While A-Groove is still powerful, and her Custom Combo is no joke, her poking threat becomes much worse as she would always rather whiff punish into Houyokusen than use a Custom Combo. Everything else A-Groove has, C-Groove also has, and C-Groove has airblock as well. P-Groove is weak for a similar reason, as Chun-Li basically never has a super to make her pokes or punishes actually threatening. A good parry vs a P-Chun-Li with full bar will hurt, but it'll hurt less than a K-Groove JD with Rage, and hurt a lot less than a C-Groove level 2 combo. | |||
= | {{StrengthsAndWeaknesses | ||
|intro= | |||
--------------------------- | |||
'''Chun-Li''' is a neutral monster who can turn any poke into big damage and a scary mixup with her Houyokusen super. She has long reach, great mobility, and suprisingly solid mixups. She pays for this with weak meterless punishes and low health. Chun-Li is best in '''C-Groove'''. | |||
'''Difficulty''': Medium<br>'''Tier''': A | |||
|pros= | |||
* '''Buttons:''' Most of Chun-Li's buttons are long reaching and fast, with great ability to stuff the opponents movement or their buttons | |||
* '''Super:''' Chun-Li's Houyokusen is a fast and high damage super than can be super jump cancelled, which allows her to end in an air combo and a standing mixup for massive damage sequences | |||
* '''Mixup:''' She has surprisingly good mixups, between a good low confirm, great crossup, a command normal that can ambiguously crossup, and a damaging throw with a great knockdown | |||
* '''Neutral:''' Between her amazing buttons, unique fireball that recovers very fast, and situational but solid anti-airs, Chun-Li can wall opponents out for entire rounds | |||
|cons= | |||
* '''Meterless:''' Without meter, Chun-Li gets very little reward from her hits, making her very reliant on having a super stored for future use | |||
* '''Defense:''' While she has a stellar 2 frame 2LP, she can't do it on wakeup. Chun-Li has no meterless reversal, and she would rather save the meter to whiff punish with, leading her to often hold pressure on a knockdown | |||
* '''Low Health:''' Chun-Li has lower health than average, meaning a few good hits can take her out quickly | |||
}} | |||
=== | === Players to Watch === | ||
{| class="wikitable" | |||
{| | |||
|- | |- | ||
! Name !! Country !! Groove !! Accounts !! Notes | |||
|- | |- | ||
| | | S-Zawa || Japan || C-Groove || Twitter: @Cvs2Fukuoka || Not only is his Chun fundamentally world class, but he pulls off level 2 combos you'd find in combo videos with consistency. <br> [https://youtu.be/BEJSfCfhnFI?t=318 Sample Match] | ||
| | |||
| | |||
| | |||
|- | |- | ||
| | | Kiku || Japan || C-Groove || N/A || Plays a near perfect Chun. When he has a groove going it's impossible to stop his Chun from wreaking havoc. Rollin'pic 2023 champion.<br> [https://youtu.be/wfCMAaRVOq4?t=130 Sample Match] | ||
| | |||
| | |||
| | |||
|- | |- | ||
| | | Daidouraku || Japan || N/A-Groove || Twitter: @DAIDOURAKU || Plays a more hit and run play style with Chun. Very skilled in both N-Groove and A-Groove. <br> [https://youtu.be/tmTzCdJqge0?t=392 N-Groove Sample Match] <br> [https://youtu.be/K39Ld6fZ1bA?t=207 A-Groove Sample Match] | ||
| | |||
| | |||
| | |||
|- | |- | ||
| | | Tsugunosuke || Japan || N-Groove || N/A || A more fundamental based Chun despite having more offensive friendly tools. Gets the job done nonetheless.<br> [https://youtu.be/PQyzhC8mRNc?t=237 Sample Match] | ||
| | |||
| | |||
| | |||
|- | |- | ||
| | | Pinokio || Japan || K-Groove || N/A || A very aggressive Chun play style. Uses runstop pressure very effectively and is just hard to stop up close. <br> [https://www.youtube.com/watch?v=rcqRBeE9spk&ab_channel=Lionx Sample Match] | ||
| | |||
| | |||
| | |||
|- | |- | ||
|} | |} | ||
<br><br> | |||
== Normal Moves == | |||
=== Far Normals === | |||
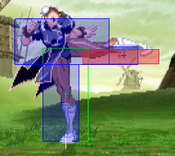
=== <span class="invisible-header">5LP</span> === | |||
{{MoveData | |||
| name = Far Jab | |||
| input = 5LP / Far LP | |||
| subtitle = Far Light Punch | |||
| image = CVS2_Chun_5LP.png | |||
| caption = | |||
| linkname = 5LP | |||
| data = | |||
{{AttackData-CvS2 | |||
| version = Far {{Icon-Capcom|LP}} | |||
| subtitle = | |||
| damage = 200 | |||
| stun = 2 | |||
| cancel = RF/SP/SU | |||
| guard = Mid | |||
| parry = Mid | |||
| startup = 2 | |||
| active = 4 | |||
| recovery = 9 | |||
| total = 15 | |||
| advHit = +4 | |||
| advBlock = +4 | |||
| invul = None | |||
| description = Placeholder | |||
}} | |||
}} | |||
=== <span class="invisible-header">5MP</span> === | |||
{{MoveData | |||
| name = Far Strong | |||
| input = 5MP / Far MP | |||
| subtitle = Far Medium Punch | |||
| image = CVS2_Chun_5MP.png | |||
| caption = | |||
| linkname = 5MP | |||
| data = | |||
{{AttackData-CvS2 | |||
| version = Far {{Icon-Capcom|MP}} | |||
| subtitle = | |||
| damage = 800 | |||
| stun = 8 | |||
| cancel = SP/SU | |||
| guard = Mid | |||
| parry = High | |||
| startup = 5 | |||
| active = 8 | |||
| recovery = 13 | |||
| total = 26 | |||
| advHit = +1 | |||
| advBlock = +1 | |||
| invul = None | |||
| description = Placeholder | |||
}} | |||
}} | |||
=== <span class="invisible-header">5HP</span> === | |||
{{MoveData | |||
| name = Far Fierce | |||
| input = 5HP / Far HP | |||
| subtitle = Far Heavy Punch | |||
| image = CVS2_Chun_5HP.png | |||
| caption = | |||
| linkname = 5HP | |||
| data = | |||
{{AttackData-CvS2 | |||
| version = Far {{Icon-Capcom|HP}} | |||
| subtitle = | |||
| damage = 1100 | |||
| stun = 11 | |||
| cancel = None | |||
| guard = Mid | |||
| parry = High | |||
| startup = 11 | |||
| active = 8 | |||
| recovery = 21 | |||
| total = 40 | |||
| advHit = -3 | |||
| advBlock = -3 | |||
| invul = None | |||
| description = Placeholder | |||
}} | |||
}} | |||
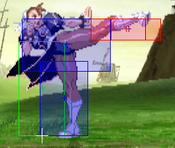
=== <span class="invisible-header">5LK</span> === | |||
{{MoveData | |||
| name = Far Short | |||
| input = 5LK / Far LK | |||
| subtitle = Far Light Kick | |||
| image = CVS2_Chun_5LK.png | |||
| caption = | |||
| linkname = 5LK | |||
| data = | |||
{{AttackData-CvS2 | |||
| version = Far {{Icon-Capcom|LK}} | |||
| subtitle = | |||
| damage = 300 | |||
| stun = 3 | |||
| cancel = SP/SU | |||
| guard = Mid | |||
| parry = High | |||
| startup = 5 | |||
| active = 4 | |||
| recovery = 13 | |||
| total = 22 | |||
| advHit = -2 | |||
| advBlock = -2 | |||
| invul = None | |||
| description = Placeholder | |||
}} | |||
}} | |||
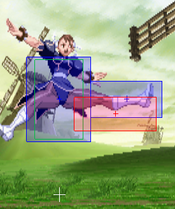
=== <span class="invisible-header">5MK</span> === | |||
{{MoveData | |||
| name = Far Forward | |||
| input = 5MK / Far MK | |||
| subtitle = Far Medium Kick | |||
| image = CVS2_Chun_5MK.png | |||
| caption = | |||
| linkname = 5MK | |||
| data = | |||
{{AttackData-CvS2 | |||
| version = Far {{Icon-Capcom|MK}} | |||
| subtitle = | |||
| damage = 800 | |||
| stun = 8 | |||
| cancel = SU | |||
| guard = Mid | |||
| parry = High | |||
| startup = 6 | |||
| active = 6 | |||
| recovery = 19 | |||
| total = 31 | |||
| advHit = -3 | |||
| advBlock = -3 | |||
| invul = None | |||
| description = Placeholder | |||
}} | |||
}} | |||
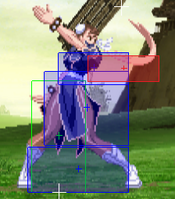
=== | === <span class="invisible-header">5HK</span> === | ||
{{MoveData | |||
| name = Far Roundhouse | |||
| input = 5HK / Far HK | |||
| subtitle = Far Heavy Kick | |||
| image = CVS2_Chun_5HK.png | |||
| caption = | |||
| linkname = 5HK | |||
| data = | |||
{{AttackData-CvS2 | |||
| version = Far {{Icon-Capcom|HK}} | |||
| subtitle = | |||
| damage = 1100 | |||
| stun = 11 | |||
| cancel = None | |||
| guard = Mid | |||
| parry = High | |||
| startup = 11 | |||
| active = 3 | |||
| recovery = 25 | |||
| total = 39 | |||
| advHit = -4 | |||
| advBlock = -4 | |||
| invul = None | |||
| description = Placeholder | |||
}} | |||
}} | |||
=== Close Standing Normals === | |||
=== <span class="invisible-header">clLP</span> === | |||
{{MoveData | |||
| name = Close Jab | |||
| input = cl.LP | |||
| subtitle = Close Light Punch | |||
| image = CVS2_Chun_5LP.png | |||
| caption = | |||
| linkname = cl.LP | |||
| data = | |||
{{AttackData-CvS2 | |||
| version = Close {{Icon-Capcom|LP}} | |||
| subtitle = | |||
| damage = 200 | |||
| stun = 2 | |||
| cancel = RF/SP/SU | |||
| guard = Mid | |||
| parry = High | |||
| startup = 2 | |||
| active = 4 | |||
| recovery = 9 | |||
| total = 15 | |||
| advHit = +4 | |||
| advBlock = +4 | |||
| invul = None | |||
| description = Placeholder | |||
}} | |||
}} | |||
=== <span class="invisible-header">clMP</span> === | |||
{{MoveData | |||
| name = Close Strong | |||
| input = cl.MP | |||
| subtitle = Close Medium Punch | |||
| image = CVS2_clMP.png | |||
| linkname = cl.MP | |||
| data = | |||
{{AttackData-CvS2 | |||
| version = Close {{Icon-Capcom|MP}} | |||
| subtitle = | |||
| damage = 500+500 | |||
| stun = 5+5 | |||
| cancel = SP/SU | |||
| guard = Mid | |||
| parry = High | |||
| startup = 4 | |||
| active = 2(16)2 | |||
| recovery = 22 | |||
| total = 46 | |||
| advHit = -2 | |||
| advBlock = -2 | |||
| invul = None | |||
| description = Placeholder | |||
}} | |||
}} | |||
=== <span class="invisible-header">clHP</span> === | |||
{{MoveData | |||
| name = Close Fierce | |||
| input = cl.HP | |||
| subtitle = Close Heavy Punch | |||
| image = CVS2_Chun_clHP.png | |||
| caption = | |||
| linkname = cl.HP | |||
| data = | |||
{{AttackData-CvS2 | |||
| version = Close {{Icon-Capcom|HP}} | |||
| subtitle = | |||
| damage = 1000 | |||
| stun = 10 | |||
| cancel = SP/SU | |||
| guard = Mid | |||
| parry = High | |||
| startup = 3 | |||
| active = 8 | |||
| recovery = 20 | |||
| total = 31 | |||
| advHit = -2 | |||
| advBlock = -2 | |||
| invul = None | |||
| description = Placeholder | |||
}} | |||
}} | |||
=== <span class="invisible-header">clLK</span> === | |||
{{MoveData | |||
| name = Close Short | |||
| input = cl.LK | |||
| subtitle = Close Light Kick | |||
| image = CVS2_Chun_clLK.png | |||
| caption = | |||
| linkname = cl.LK | |||
| data = | |||
{{AttackData-CvS2 | |||
| version = Close {{Icon-Capcom|LK}} | |||
| subtitle = | |||
| damage = 400 | |||
| stun = 4 | |||
| cancel = SP/SU | |||
| guard = Mid | |||
| parry = Mid | |||
| startup = 3 | |||
| active = 5 | |||
| recovery = 9 | |||
| total = 17 | |||
| advHit = +3 | |||
| advBlock = +3 | |||
| invul = None | |||
| description = Placeholder | |||
}} | |||
}} | |||
=== <span class="invisible-header">clMK</span> === | |||
{{MoveData | |||
| name = Close Forward | |||
| input = cl.MK | |||
| subtitle = Close Medium Kick | |||
| image = CVS2_Chun_clMK.png | |||
| caption = | |||
| linkname = cl.MK | |||
| data = | |||
{{AttackData-CvS2 | |||
| version = Close {{Icon-Capcom|MK}} | |||
| subtitle = | |||
| damage = 900 | |||
| stun = 9 | |||
| cancel = SP/SU | |||
| guard = Mid | |||
| parry = High | |||
| startup = 9 | |||
| active = 7 | |||
| recovery = 14 | |||
| total = 30 | |||
| advHit = +2 | |||
| advBlock = +2 | |||
| invul = None | |||
| description = Placeholder | |||
}} | |||
}} | |||
=== <span class="invisible-header">clHK</span> === | |||
{{MoveData | |||
| name = Close Roundhouse | |||
| input = cl.HK | |||
| subtitle = Close Heavy Kick | |||
| image = CVS2_Chun_clHK.png | |||
| caption = | |||
| linkname = cl.HK | |||
| data = | |||
{{AttackData-CvS2 | |||
| version = Close {{Icon-Capcom|HK}} | |||
| subtitle = | |||
| damage = 1200 | |||
| stun = 12 | |||
| cancel = SJ/SP/SU | |||
| guard = Mid | |||
| parry = High | |||
| startup = 4 | |||
| active = 9 | |||
| recovery = 22 | |||
| total = 35 | |||
| advHit = -5 | |||
| advBlock = -5 | |||
| invul = None | |||
| description = Placeholder | |||
}} | |||
}} | |||
===Crouching Normals=== | === Crouching Normals === | ||
=== <span class="invisible-header">2LP</span> === | |||
{{MoveData | |||
| name = Crouch Jab | |||
| input = 2LP / cr.LP | |||
| subtitle = Crouching Light Punch | |||
| image = CVS2_Chun_2LP.png | |||
| caption = | |||
| linkname = 2LP | |||
| data = | |||
{{AttackData-CvS2 | |||
| version = {{Motion|d}}+{{Icon-Capcom|LP}} | |||
| subtitle = | |||
| damage = 400 | |||
| stun = 4 | |||
| cancel = SP/SU | |||
| guard = Mid | |||
| parry = Mid | |||
| startup = 2 | |||
| active = 4 | |||
| recovery = 7 | |||
| total = 13 | |||
| advHit = +6 | |||
| advBlock = +6 | |||
| invul = None | |||
| description = Placeholder | |||
}} | |||
}} | |||
=== <span class="invisible-header">2MP</span> === | |||
{{MoveData | |||
| name = Crouch Strong | |||
| input = 2MP / cr.MP | |||
| subtitle = Crouching Medium Punch | |||
| image = CVS2_Chun_2MP.png | |||
| caption = | |||
| linkname = 2MP | |||
| data = | |||
{{AttackData-CvS2 | |||
| version = {{Motion|d}}+{{Icon-Capcom|MP}} | |||
| subtitle = | |||
| damage = 800 | |||
| stun = 8 | |||
| cancel = SP/SU | |||
| guard = Low | |||
| parry = Low | |||
| startup = 4 | |||
| active = 9 | |||
| recovery = 17 | |||
| total = 30 | |||
| advHit = -1 | |||
| advBlock = -1 | |||
| invul = None | |||
| description = Placeholder | |||
}} | |||
}} | |||
=== <span class="invisible-header">2HP</span> === | |||
{{MoveData | |||
| name = Crouch Fierce | |||
| input = 2HP / cr.HP | |||
| subtitle = Crouching Heavy Punch | |||
| image = CVS2_Chun_2HP.png | |||
| caption = | |||
| linkname = 2HP | |||
| data = | |||
{{AttackData-CvS2 | |||
| version = {{Motion|d}}+{{Icon-Capcom|HP}} | |||
| subtitle = | |||
| damage = 1200 | |||
| stun = 12 | |||
| cancel = SU | |||
| guard = Mid | |||
| parry = Low | |||
| startup = 7 | |||
| active = 11 | |||
| recovery = 20 | |||
| total = 38 | |||
| advHit = -7 | |||
| advBlock = -7 | |||
| invul = None | |||
| description = Placeholder | |||
}} | |||
}} | |||
=== <span class="invisible-header">2LK</span> === | |||
{{MoveData | |||
| name = Crouch Short | |||
| input = 2LK / cr.LK | |||
| subtitle = Crouching Light Kick | |||
| image = CVS2_Chun_2LK.png | |||
| caption = | |||
| linkname = 2LK | |||
| data = | |||
{{AttackData-CvS2 | |||
| version = {{Motion|d}}+{{Icon-Capcom|LK}} | |||
| subtitle = | |||
| damage = 300 | |||
| stun = 3 | |||
| cancel = SP/SU | |||
| guard = Low | |||
| parry = Low | |||
| startup = 4 | |||
| active = 4 | |||
| recovery = 11 | |||
| total = 19 | |||
| advHit = +2 | |||
| advBlock = +2 | |||
| invul = None | |||
| description = Placeholder | |||
}} | |||
}} | |||
=== <span class="invisible-header">2MK</span> === | |||
{{MoveData | |||
| name = Crouch Forward | |||
| input = 2MK / cr.MK | |||
| subtitle = Crouching Medium Kick | |||
| image = CVS2_Chun_2MK.png | |||
| caption = | |||
| linkname = 2MK | |||
| data = | |||
{{AttackData-CvS2 | |||
| version = {{Motion|d}}+{{Icon-Capcom|MK}} | |||
| subtitle = | |||
| damage = 700 | |||
| stun = 7 | |||
| cancel = None | |||
| guard = Low | |||
| parry = Low | |||
| startup = 8 | |||
| active = 4 | |||
| recovery = 14 | |||
| total = 26 | |||
| advHit = +2 | |||
| advBlock = +2 | |||
| invul = None | |||
| description = Placeholder | |||
}} | |||
}} | |||
=== <span class="invisible-header">2HK</span> === | |||
{{MoveData | |||
| name = Crouch Roundhouse | |||
| input = 2HK / cr.HK | |||
| subtitle = Crouching Heavy Kick | |||
| image = CVS2_Chun_2HK.png | |||
| caption = | |||
| linkname = 2HK | |||
| data = | |||
{{AttackData-CvS2 | |||
| version = {{Motion|d}}+{{Icon-Capcom|HK}} | |||
| subtitle = | |||
| damage = 1000 | |||
| stun = 10 | |||
| cancel = SU | |||
| guard = Low | |||
| parry = Low | |||
| startup = 7 | |||
| active = 8 | |||
| recovery = 27 | |||
| total = 42 | |||
| advHit = DWN | |||
| advBlock = -11 | |||
| invul = None | |||
| description = Placeholder | |||
}} | |||
}} | |||
=== Jumping Normals === | |||
=== <span class="invisible-header">j.LP</span> === | |||
{{MoveData | |||
cancel | | name = Jump Jab | ||
| input = j.LP | |||
| subtitle = Jumping Light Punch | |||
| image = CVS2_Chun_jLP.png | |||
| caption = | |||
| linkname = j.LP | |||
| data = | |||
{{AttackData-CvS2 | |||
| version = {{Motion|ub}}/{{Motion|u}}/{{Motion|uf}}+{{Icon-Capcom|LP}} | |||
| subtitle = | |||
| damage = 500 | |||
| stun = 5 | |||
| cancel = - | |||
| guard = High | |||
| parry = High | |||
| startup = 3 | |||
| active = 22 | |||
| recovery = - | |||
| total = 25 | |||
| advHit = - | |||
| advBlock = - | |||
| invul = None | |||
| description = Placeholder | |||
}} | |||
}} | |||
=== <span class="invisible-header">j.MP</span> === | |||
{{MoveData | |||
| name = Jump Strong | |||
| input = j.MP | |||
| subtitle = Jumping Medium Punch | |||
| image = CVS2_Chun_jMP.png | |||
| caption = | |||
| linkname = j.MP | |||
| data = | |||
{{AttackData-CvS2 | |||
| version = {{Motion|ub}}/{{Motion|u}}/{{Motion|uf}}+{{Icon-Capcom|MP}} | |||
| subtitle = | |||
| damage = 800 | |||
| stun = 8 | |||
| cancel = - | |||
| guard = High | |||
| parry = High | |||
| startup = 4 | |||
| active = 15 | |||
| recovery = - | |||
| total = 19 | |||
| advHit = - | |||
| advBlock = - | |||
| invul = None | |||
| description = Placeholder | |||
}} | |||
}} | |||
=== | === <span class="invisible-header">j.HP</span> === | ||
{{MoveData | |||
| name = Jump Fierce | |||
| input = j.HP | |||
| subtitle = Jumping Heavy Punch | |||
| image = Chun_jHP.png | |||
| caption = | |||
| linkname = j.HP | |||
| data = | |||
{{AttackData-CvS2 | |||
| version = {{Motion|ub}}/{{Motion|u}}/{{Motion|uf}}+{{Icon-Capcom|HP}} | |||
| subtitle = | |||
| damage = 1200 | |||
| stun = 12 | |||
| cancel = HP | |||
| guard = High | |||
| parry = High | |||
| startup = 5 | |||
| active = 8 | |||
| recovery = - | |||
| total = 13 | |||
| advHit = - | |||
| advBlock = - | |||
| invul = None | |||
| description = Placeholder | |||
}} | |||
}} | |||
=== <span class="invisible-header">j.LK</span> === | |||
{{MoveData | |||
| name = Jump Short | |||
| input = j.LK | |||
| subtitle = Jumping Light Kick | |||
| image = CVS2_Chun_njLK.png | |||
| caption = Neutral Jump | |||
| image2 = CVS2_Chun_jLK.png | |||
| caption2 = Diagonal Jump | |||
| linkname = j.LK | |||
| data = | |||
{{AttackData-CvS2 | |||
| version = {{Motion|u}}+{{Icon-Capcom|LK}} | |||
| subtitle = | |||
| damage = 600 | |||
| stun = 6 | |||
| cancel = - | |||
| guard = High | |||
| parry = High | |||
| startup = 5 | |||
| active = 22 | |||
| recovery = - | |||
| total = 27 | |||
| advHit = - | |||
| advBlock = - | |||
| invul = None | |||
| description = Placeholder | |||
}} | |||
{{AttackData-CvS2 | |||
| version = {{Motion|ub}}/{{Motion|uf}}+{{Icon-Capcom|LK}} | |||
| subtitle = | |||
| damage = 400 | |||
| stun = 4 | |||
| cancel = - | |||
| guard = High | |||
| parry = High | |||
| startup = 3 | |||
| active = 26 | |||
| recovery = - | |||
| total = 29 | |||
| advHit = - | |||
| advBlock = - | |||
| invul = None | |||
| description = Placeholder | |||
}} | |||
}} | |||
=== <span class="invisible-header">j.MK</span> === | |||
{{MoveData | |||
| name = Jump Forward | |||
| input = j.MK | |||
| subtitle = Jumping Medium Kick | |||
| image = CVS2_Chun_njLK.png | |||
| caption = Neutral Jump | |||
| image2 = CVS2_Chun_jMK.png | |||
| caption2 = Diagonal Jump | |||
| linkname = j.MK | |||
| data = | |||
{{AttackData-CvS2 | |||
| version = {{Motion|u}}+{{Icon-Capcom|MK}} | |||
| subtitle = | |||
| damage = 900 | |||
| stun = 9 | |||
| cancel = - | |||
| guard = High | |||
| parry = High | |||
| startup = 6 | |||
| active = 10 | |||
| recovery = - | |||
| total = 16 | |||
| advHit = - | |||
| advBlock = - | |||
| invul = None | |||
| description = Placeholder | |||
}} | |||
{{AttackData-CvS2 | |||
| version = {{Motion|ub}}/{{Motion|uf}}+{{Icon-Capcom|MK}} | |||
| subtitle = | |||
| damage = 700 | |||
| stun = 7 | |||
| cancel = - | |||
| guard = High | |||
| parry = High | |||
| startup = 4 | |||
| active = 12 | |||
| recovery = - | |||
| total = 16 | |||
| advHit = - | |||
| advBlock = - | |||
| invul = None | |||
| description = Placeholder | |||
}} | |||
}} | |||
=== <span class="invisible-header">j.HK</span> === | |||
{{MoveData | |||
| name = Jump Roundhouse | |||
| input = j.HK | |||
damage | | subtitle = Jumping Heavy Kick | ||
| image2 = CVS2_Chun_njLK.png | |||
| caption2 = First Hit | |||
| image3 = CVS2_Chun_jHK.png | |||
| caption3 = Second Hit | |||
| image = CVS2_Chun_njHK.png | |||
| caption = Neutral Jump | |||
| linkname = j.HK | |||
| data = | |||
{{AttackData-CvS2 | |||
| version = {{Motion|u}}+{{Icon-Capcom|HK}} | |||
| subtitle = | |||
| damage = 1100 | |||
| stun = 11 | |||
| cancel = - | |||
| guard = High | |||
| parry = High | |||
| startup = 9 | |||
| active = 8 | |||
| recovery = - | |||
| total = 17 | |||
| advHit = - | |||
| advBlock = - | |||
| invul = None | |||
| description = Placeholder | |||
}} | |||
{{AttackData-CvS2 | |||
| version = {{Motion|ub}}/{{Motion|uf}}+{{Icon-Capcom|HK}} | |||
| subtitle = | |||
| damage = 700+600 | |||
| stun = 7+6 | |||
| cancel = - | |||
| guard = High | |||
| parry = High | |||
| startup = 5 | |||
| active = 6(9)10 | |||
| recovery = - | |||
| total = 30 | |||
| advHit = - | |||
| advBlock = - | |||
| invul = None | |||
| description = Placeholder | |||
}} | |||
}} | |||
== Command Normals == | |||
=== <span class="invisible-header">Yokusenkyaku</span> === | |||
{{MoveData | |||
| name = Yokusenkyaku | |||
| input = 6LK | |||
| subtitle = | |||
| image = | |||
| caption = | |||
| linkname = X | |||
| data = | |||
{{AttackData-CvS2 | |||
| version = {{Motion|f}} + {{Icon-Capcom|LK}} | |||
| subtitle = | |||
| damage = 1100 | |||
| stun = 11 | |||
| cancel = None | |||
| guard = Mid | |||
| parry = High | |||
| startup = 11 | |||
| active = 3 | |||
| recovery = 25 | |||
| total = 39 | |||
| advHit = -4 | |||
| advBlock = -4 | |||
| invul = None | |||
| description = Placeholder | |||
}} | |||
}} | |||
=== <span class="invisible-header">Kakusenshu</span> === | |||
{{MoveData | |||
| name = Kakusenshu | |||
| input = 6MK | |||
| subtitle = | |||
| image = | |||
| caption = | |||
| linkname = X | |||
| data = | |||
{{AttackData-CvS2 | |||
| version = {{Motion|f}} + {{Icon-Capcom|MK}} | |||
| subtitle = | |||
| damage = 800 | |||
| stun = 8 | |||
| cancel = None | |||
| guard = Mid | |||
| parry = High | |||
| startup = 15 | |||
| active = 4 | |||
| recovery = 15 | |||
| total = 34 | |||
| advHit = +5 | |||
| advBlock = +5 | |||
| invul = None | |||
| description = Placeholder | |||
}} | |||
}} | |||
=== <span class="invisible-header">Kakukyakuraku</span> === | |||
{{MoveData | |||
| name = Kakukyakuraku | |||
| input = 3LK | |||
| subtitle = | |||
| image = | |||
| caption = | |||
| linkname = X | |||
| data = | |||
{{AttackData-CvS2 | |||
| version = {{Motion|3}} + {{Icon-Capcom|LK}} | |||
| subtitle = | |||
| damage = 1000 | |||
| stun = 10 | |||
| cancel = None | |||
| guard = High | |||
| parry = High | |||
| startup = 36 | |||
| active = 6 | |||
| recovery = 8 | |||
| total = 50 | |||
| advHit = DWN | |||
| advBlock = +6 | |||
| invul = None | |||
| description = Placeholder | |||
}} | |||
}} | |||
=== | === <span class="invisible-header">Yosokyaku</span> === | ||
{{MoveData | |||
| name = Yosokyaku | |||
| input = j.2MK | |||
| subtitle = | |||
| image = | |||
| caption = | |||
| linkname = X | |||
| data = | |||
{{AttackData-CvS2 | |||
| version = In Air, {{Motion|2}} + {{Icon-Capcom|MK}} | |||
| subtitle = | |||
| damage = 900 | |||
| stun = 9 | |||
| cancel = - | |||
| guard = High | |||
| parry = High | |||
| startup = 4 | |||
| active = 10 | |||
| recovery = - | |||
| total = 14 | |||
| advHit = - | |||
| advBlock = - | |||
| invul = None | |||
| description = Placeholder | |||
}} | |||
}} | |||
=== <span class="invisible-header">Chudanrenshu</span> === | |||
{{MoveData | |||
| name = Chudanrenshu | |||
| input = Far LK LK | |||
| subtitle = | |||
| image = | |||
| caption = | |||
| linkname = X | |||
| data = | |||
{{AttackData-CvS2 | |||
| version = Far {{Icon-Capcom|LK}}, {{Icon-Capcom|LK}} | |||
| subtitle = | |||
| damage = 300 | |||
| stun = 3 | |||
| cancel = SP/SU | |||
| guard = Mid | |||
| parry = Mid | |||
| startup = 2 | |||
| active = 4 | |||
| recovery = 13 | |||
| total = 19 | |||
| advHit = -2 | |||
| advBlock = -2 | |||
| invul = None | |||
| description = Placeholder | |||
}} | |||
}} | |||
=== <span class="invisible-header">Yoshiken</span> === | |||
{{MoveData | |||
| name = Yoshiken | |||
| input = j.HP HP | |||
| subtitle = | |||
| image = | |||
| caption = | |||
| linkname = X | |||
| data = | |||
{{AttackData-CvS2 | |||
| version = In Air, {{Icon-Capcom|HP}}, {{Icon-Capcom|HP}} | |||
| subtitle = | |||
| damage = 500 | |||
| stun = 5 | |||
| cancel = | |||
| guard = High | |||
| parry = High | |||
| startup = 5 | |||
| active = 10 | |||
| recovery = - | |||
| total = 15 | |||
| advHit = - | |||
| advBlock = - | |||
| invul = None | |||
| description = Placeholder | |||
}} | |||
}} | |||
== Throws == | |||
=== <span class="invisible-header">Punch Throw</span> === | |||
{{MoveData | |||
| name = Koshuto | |||
| input = Near Opponent, 4/6HP | |||
| subtitle = Punch Throw | |||
| image = | |||
| caption = | |||
| linkname = Punch Throw Name | |||
| data = | |||
{{AttackData-CvS2 | |||
| version = Close {{Motion|b}}/{{Motion|f}}+{{Icon-Capcom|HP}} | |||
| subtitle = | |||
| damage = 1600 | |||
| stun = 0 | |||
| cancel = - | |||
| guard = Grab | |||
| parry = - | |||
| startup = 3 | |||
| active = 1 | |||
| recovery = 13 | |||
| total = 17 | |||
| advHit = - | |||
| advBlock = - | |||
| invul = None | |||
| description = Placeholder | |||
}} | |||
}} | |||
== | === <span class="invisible-header">Kick Throw</span> === | ||
{{MoveData | |||
------ | | name = Kirinshu | ||
| input = Near Opponent, 4/6HK | |||
| subtitle = Kick Throw | |||
| image = | |||
| caption = | |||
| linkname = Kick Throw Name | |||
| data = | |||
{{AttackData-CvS2 | |||
| version = Close {{Motion|b}}/{{Motion|f}}+{{Icon-Capcom|HK}} | |||
| subtitle = | |||
| damage = 1800 | |||
| stun = 0 | |||
| cancel = - | |||
| guard = Grab | |||
| parry = - | |||
| startup = 5 | |||
| active = 1 | |||
| recovery = 13 | |||
| total = 19 | |||
| advHit = - | |||
| advBlock = - | |||
| invul = None | |||
| description = Placeholder | |||
}} | |||
}} | |||
=== | === <span class="invisible-header">Air Punch Throw</span> === | ||
{{MoveData | |||
| name = Ryuseiraku | |||
| input = In Air Near Opponent, 4/6HP | |||
| subtitle = Air Punch Throw | |||
| image = | |||
| caption = | |||
| linkname = Punch Throw Name | |||
| data = | |||
{{AttackData-CvS2 | |||
| version = Air Close {{Motion|b}}/{{Motion|f}}+{{Icon-Capcom|HP}} | |||
| subtitle = | |||
| damage = 1800 | |||
| stun = 0 | |||
| cancel = - | |||
| guard = Grab | |||
| parry = - | |||
| startup = 0 | |||
| active = 1 | |||
| recovery = - | |||
| total = 1 | |||
| advHit = - | |||
| advBlock = - | |||
| invul = None | |||
| description = Placeholder | |||
}} | |||
}} | |||
== Special Moves == | |||
=== <span class="invisible-header">Sankakutobi</span> === | |||
{{MoveData | |||
| name = Sankakutobi | |||
| input = In Air Near Wall, 9 | |||
| subtitle = Walljump | |||
| image = | |||
| caption = | |||
| linkname = | |||
| data = | |||
{{AttackData-CvS2 | |||
| header = | |||
| version = In Air, {{Motion|9}} | |||
| subtitle = | |||
| damage = | |||
| stun = | |||
| cancel = | |||
| guard = | |||
| parry = | |||
| startup = | |||
| active = | |||
| recovery = | |||
| total = | |||
| advHit = | |||
| advBlock = | |||
| invul = | |||
| description = Placeholder | |||
}} | |||
}} | |||
=== | === <span class="invisible-header">Hyakuretsukyaku</span> === | ||
{{MoveData | |||
| name = Hyakuretsukyaku | |||
| input = Mash K | |||
| subtitle = Lightning Legs | |||
| image = | |||
| caption = | |||
| linkname = | |||
| data = | |||
{{AttackData-CvS2 | |||
| version = Mash {{Icon-Capcom|LK}} | |||
| subtitle = | |||
| damage = 300xN | |||
| stun = 3xN | |||
| cancel = None | |||
| guard = Mid | |||
| parry = High | |||
| startup = 5 | |||
| active = 31 (Minimum) | |||
| recovery = 20 | |||
| total = 56 (Minimum) | |||
| advHit = 0 | |||
| advBlock = 0 | |||
| invul = None | |||
}} | |||
{{AttackData-CvS2 | |||
| header = no | |||
| version = Mash {{Icon-Capcom|MK}} | |||
| subtitle = | |||
| damage = 300xN | |||
| stun = 3xN | |||
| cancel = None | |||
| guard = Mid | |||
| parry = High | |||
| startup = 5 | |||
| active = 28 (Minimum) | |||
| recovery = 20 | |||
| total = 53 (Minimum) | |||
| advHit = +3 | |||
| advBlock = -6 | |||
| invul = None | |||
}} | |||
{{AttackData-CvS2 | |||
| header = no | |||
| version = Mash {{Icon-Capcom|HK}} | |||
| subtitle = | |||
| damage = 300xN | |||
| stun = 3xN | |||
| cancel = None | |||
| guard = Mid | |||
| parry = High | |||
| startup = 5 | |||
| active = 25 (Minimum) | |||
| recovery = 19 | |||
| total = 49 (Minimum) | |||
| advHit = +6 | |||
| advBlock = -3 | |||
| invul = None | |||
| description = Placeholder | |||
}} | |||
}} | |||
=== <span class="invisible-header">Spinning Bird Kick</span> === | |||
{{MoveData | |||
| name = Spinning Bird Kick | |||
| input = [2]8K | |||
| subtitle = | |||
| image = | |||
| caption = | |||
| linkname = | |||
| data = | |||
{{AttackData-CvS2 | |||
| version = Charge {{Motion|2}}, {{Motion|8}} + {{Icon-Capcom|LK}} | |||
| subtitle = | |||
| damage = 500x2 | |||
| stun = 5x2 | |||
| cancel = None | |||
| guard = Mid | |||
| parry = High | |||
| startup = 20 | |||
| active = 2(6)2 | |||
| recovery = 24 | |||
| total = 54 | |||
| advHit = -2 | |||
| advBlock = | |||
| invul = None | |||
}} | |||
{{AttackData-CvS2 | |||
| header = no | |||
| version = Charge {{Motion|2}}, {{Motion|8}} + {{Icon-Capcom|MK}} | |||
| subtitle = | |||
| damage = 300x4 | |||
| stun = 3x4 | |||
| cancel = None | |||
| guard = Mid | |||
| parry = High | |||
| startup = 20 | |||
| active = 2(6)2(6)2(6)2 | |||
| recovery = 24 | |||
| total = 70 | |||
| advHit = -2 | |||
| advBlock = | |||
| invul = None | |||
}} | |||
{{AttackData-CvS2 | |||
| header = no | |||
| version = Charge {{Motion|2}}, {{Motion|8}} + {{Icon-Capcom|HK}} | |||
| subtitle = | |||
| damage = 300x3, 200x3 | |||
| stun = 3x2, 2x3 | |||
| cancel = None | |||
| guard = Mid | |||
| parry = High | |||
| startup = 20 | |||
| active = 2(6)2(6)2(6)2(6)2(6)2 | |||
| recovery = 24 | |||
| total = 86 | |||
| advHit = -2 | |||
| advBlock = | |||
| invul = None | |||
| description = Placeholder | |||
}} | |||
}} | |||
=== <span class="invisible-header">Kikoken</span> === | |||
{{MoveData | |||
=== | | name = Kikoken | ||
| input = 41236P | |||
| subtitle = | |||
| image = | |||
| caption = | |||
| linkname = | |||
| data = | |||
{{AttackData-CvS2 | |||
| version = {{Motion|41236}} + {{Icon-Capcom|LP}} | |||
| subtitle = | |||
| damage = 700 | |||
| stun = 7 | |||
| cancel = None | |||
| guard = Mid | |||
| parry = High | |||
| startup = 19 | |||
| active = | |||
| recovery = 40 | |||
| total = 59 | |||
| advHit = -11 | |||
| advBlock = -11 | |||
| invul = None | |||
}} | |||
{{AttackData-CvS2 | |||
| header = no | |||
| version = {{Motion|41236}} + {{Icon-Capcom|MP}} | |||
| subtitle = | |||
| damage = 800 | |||
| stun = 8 | |||
| cancel = None | |||
| guard = Mid | |||
| parry = High | |||
| startup = 15 | |||
| active = | |||
| recovery = 38 | |||
| total = 53 | |||
| advHit = -9 | |||
| advBlock = -9 | |||
| invul = None | |||
}} | |||
{{AttackData-CvS2 | |||
| header = no | |||
| version = {{Motion|41236}} + {{Icon-Capcom|HP}} | |||
| subtitle = | |||
| damage = 900 | |||
| stun = 9 | |||
| cancel = None | |||
| guard = Mid | |||
| parry = High | |||
| startup = 11 | |||
| active = | |||
| recovery = 36 | |||
| total = 47 | |||
| advHit = -7 | |||
| advBlock = -7 | |||
| invul = None | |||
| description = Placeholder | |||
}} | |||
}} | |||
== Super Moves == | == Super Moves == | ||
===Kikosho=== | === <span class="invisible-header">Kikosho</span> === | ||
{{MoveData | |||
| name = Kikosho | |||
| input = 236236P | |||
| subtitle = | |||
| image = | |||
| caption = | |||
| linkname = | |||
| data = | |||
{{AttackData-CvS2 | |||
| version = {{Motion|236}}{{Motion|236}} + {{Icon-Capcom|LP}} | |||
| subtitle = | |||
| damage = 2700 | |||
| stun = 0 | |||
| cancel = None | |||
| guard = Mid | |||
| parry = High | |||
| startup = 4:6 | |||
| active = 11 | |||
| recovery = 38 | |||
| total = 59 | |||
| advHit = DWN | |||
| advBlock = -18 | |||
| invul = 8 (Full) | |||
}} | |||
{{AttackData-CvS2 | |||
| header = no | |||
| version = {{Motion|236}}{{Motion|236}} + {{Icon-Capcom|MP}} | |||
| subtitle = | |||
| damage = 3700 | |||
| stun = 0 | |||
| cancel = SP/SU | |||
| guard = Mid | |||
| parry = High | |||
| startup = 4:6 | |||
| active = 15 | |||
| recovery = 38 | |||
| total = 64 | |||
| advHit = DWN | |||
| advBlock = -18 | |||
| invul = 14 (Full) | |||
}} | |||
{{AttackData-CvS2 | |||
| header = no | |||
| version = {{Motion|236}}{{Motion|236}} + {{Icon-Capcom|HP}} | |||
| subtitle = | |||
| damage = 4400 | |||
| stun = 0 | |||
| cancel = None | |||
| guard = Mid | |||
| parry = High | |||
| startup = 4:6 | |||
| active = 19 | |||
| recovery = 38 | |||
| total = 68 | |||
| advHit = DWN | |||
| advBlock = -18 | |||
| invul = 22 (Full) | |||
| description = Placeholder | |||
}} | |||
}} | |||
=== <span class="invisible-header">Hoyokusen</span> === | |||
{{MoveData | |||
| name = Hoyokusen | |||
| input = 236236K | |||
| subtitle = | |||
| image = | |||
| caption = | |||
| linkname = | |||
| data = | |||
{{AttackData-CvS2 | |||
| version = {{Motion|236}}{{Motion|236}} + {{Icon-Capcom|LK}} | |||
| subtitle = | |||
| damage = 3000 | |||
| stun = 0 | |||
| cancel = Jump | |||
| guard = Mid | |||
| parry = High | |||
| startup = 4:13 | |||
| active = 74 | |||
| recovery = 27 | |||
| total = 118 | |||
| advHit = DWN | |||
| advBlock = -17 | |||
| invul = 8 (Full) | |||
}} | |||
{{AttackData-CvS2 | |||
| header = no | |||
| version = {{Motion|236}}{{Motion|236}} + {{Icon-Capcom|MK}} | |||
| subtitle = | |||
| damage = 4200 | |||
| stun = 0 | |||
| cancel = SP/SU/Jump | |||
| guard = Mid | |||
| parry = High | |||
| startup = 4:13 | |||
| active = 98 | |||
| recovery = 27 | |||
| total = 142 | |||
| advHit = DWN | |||
| advBlock = -17 | |||
| invul = 14 (Full) | |||
}} | |||
{{AttackData-CvS2 | |||
| header = no | |||
| version = {{Motion|236}}{{Motion|236}} + {{Icon-Capcom|HK}} | |||
| subtitle = | |||
| damage = 5400 | |||
| stun = 0 | |||
| cancel = Jump | |||
| guard = Mid | |||
| parry = High | |||
| startup = 4:13 | |||
| active = 122 | |||
| recovery = 27 | |||
| total = 166 | |||
| advHit = DWN | |||
| advBlock = -17 | |||
| invul = 22 (Full) | |||
| description = Placeholder | |||
}} | |||
}} | |||
== Colors == | |||
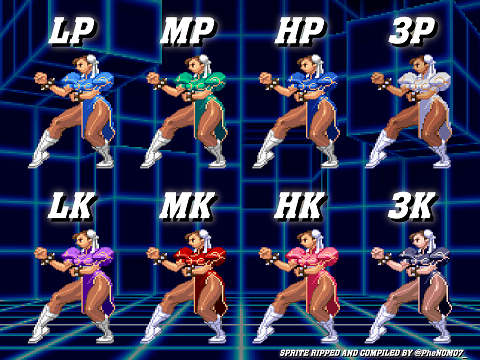
[[File:Chunli_CvS2_colors.png]] | |||
{{Navbox-CvS2}} | |||
[[Category: Capcom vs. SNK 2]] | |||
[[Category: Chun-Li]] | |||
Latest revision as of 11:24, 1 September 2024
Introduction
Story
Chun-Li is an Interpol officer in the narcotics division from China. She's a highly trained martial artist, and is notable for being the female protagonist of the Street Fighter series and the first female fighting game character ever, debuting in the original Street Fighter II: World Warrior. Her father taught her martial arts at a young age, as he was also a highly trained martial artist and Interpol officer. One day, he disappeared, which launched Chun-Li into a passion for law. She became a detective at 18 before joining Interpol, becoming the main head of their Shadaloo investigations. She learned from her old teacher, Gen, that her father had been dealing with M. Bison before his disappearance. She confronted M. Bison, asking him what had happened to her father. Bison laughs, and quickly defeats her in combat. He says that if they ever fight again, he will kill her just like he killed her father, and he escapes away. Chun-Li is still hunting Bison to this day.
Gameplay
Chun-Li is a solid and neutral focused character. Her buttons make for great pokes and space controlling tools, and her high walkspeed and fast jumps let her position wherever she wants to. Buttons like 2MK, 2MP, 5MP, 5HP, and 2HK can keep the opponent out and give her a chance to confirm into her powerful super, Houyokusen. Her super is key to her gameplan, as it gives her massive damage and a very strong mixup afterwards. She also has a useful fireball for zoning, and her signature Lightning Legs for combos and pressure.
Chun-Li isn't without weaknesses. Her health is quite low, meaning that a few good hits spells the end of the round for her. This is exacerbated by her weak defense, as she has no meterless reversal and no safe super to reversal with. She has stellar jabs for mashing, but this is a risk still. She also struggles to get any meaningful meterless damage, as her specials aren't very combo friendly, and even when she can combo into them, none of her specials give her a knockdown.
Regardless, she's a powerful high tier character, especially in C-Groove. She likely has the best level 2 combo in the game, with massive damage and a powerful mixup afterwards that allows her to take rounds off any solid poke with meter. If you don't mind the weak meterless damage and below average defense, Chun-Li is a solid pick.
Groove Selection
Best - C: C-Groove is easily Chun-Li's best Groove. Her level 2 combos with Houyokusen are likely the best C-Groove level 2 combos in the game, with massive damage potential and the chance for a mixup afterwards that leads into even worse situations for the opponent. C-Chun-Li can easily steamroll rounds away with meter. Roll Cancels aren't entirely important to her, but RC Legs are fairly strong, and rolls give her a powerful neutral tool and escape option. Alpha Counter and airblock aid her defense a lot as well, making her overall a lot more well rounded.
Useful - K/N/S: K-Chun-Li loses rolls for access to JD's, and Rage level 3 Houyokusen. One good JD with Rage can lead into massive damage and a mixup, and her neutral is still just as scary. Hop and run make her even more mobile as well, but the damage potential with Rage doesn't match up to the more consistent level 2 damage with C-Groove. N-Groove gets access to run, hop, and roll, alongside counter rolls which are useful escape tools. You can also basically always threaten a hitconfirm or whiff punish into level 1 Houyokusen, which isn't as high damage but is still a threat nonetheless. Lower damage ceiling and lack of any other really powerful tools holds N-Chun-Li back a bit compared to other Grooves however. S-Chun-Li is actually quite fitting, as Chun-Li can charge without much worry and infinite level 1 Houyokusen is very scary overall as every mixup afterwards leads into another super. S-Chun-Li has a great comeback factor, but has to deal with the weak mechanics of S-Groove.
Worst - A/P: A-Chun-Li is a much weaker version of C-Chun-Li. While A-Groove is still powerful, and her Custom Combo is no joke, her poking threat becomes much worse as she would always rather whiff punish into Houyokusen than use a Custom Combo. Everything else A-Groove has, C-Groove also has, and C-Groove has airblock as well. P-Groove is weak for a similar reason, as Chun-Li basically never has a super to make her pokes or punishes actually threatening. A good parry vs a P-Chun-Li with full bar will hurt, but it'll hurt less than a K-Groove JD with Rage, and hurt a lot less than a C-Groove level 2 combo.
|
Chun-Li is a neutral monster who can turn any poke into big damage and a scary mixup with her Houyokusen super. She has long reach, great mobility, and suprisingly solid mixups. She pays for this with weak meterless punishes and low health. Chun-Li is best in C-Groove. Difficulty: MediumTier: A |
|
| Pros | Cons |
|
|
Players to Watch
| Name | Country | Groove | Accounts | Notes |
|---|---|---|---|---|
| S-Zawa | Japan | C-Groove | Twitter: @Cvs2Fukuoka | Not only is his Chun fundamentally world class, but he pulls off level 2 combos you'd find in combo videos with consistency. Sample Match |
| Kiku | Japan | C-Groove | N/A | Plays a near perfect Chun. When he has a groove going it's impossible to stop his Chun from wreaking havoc. Rollin'pic 2023 champion. Sample Match |
| Daidouraku | Japan | N/A-Groove | Twitter: @DAIDOURAKU | Plays a more hit and run play style with Chun. Very skilled in both N-Groove and A-Groove. N-Groove Sample Match A-Groove Sample Match |
| Tsugunosuke | Japan | N-Groove | N/A | A more fundamental based Chun despite having more offensive friendly tools. Gets the job done nonetheless. Sample Match |
| Pinokio | Japan | K-Groove | N/A | A very aggressive Chun play style. Uses runstop pressure very effectively and is just hard to stop up close. Sample Match |
