Neutral
midrange/close
Deejay's normals are strongest when playing around his great walkspeed and stronger pokes. Most of his good neutral pokes lose to Drive Impact(DI) but when Deejay uses that in combined with his walkspeed, feints, and powerful specials it can make it risky for an opponent to attempt that.
Drive Rush
5LK
2HP
2MK

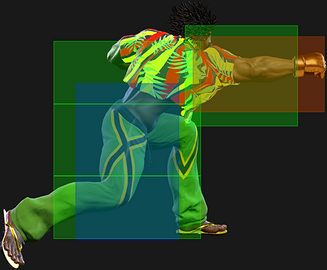
5MK
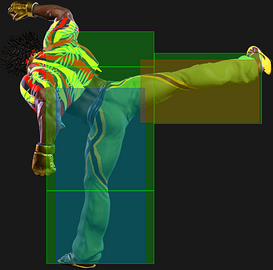
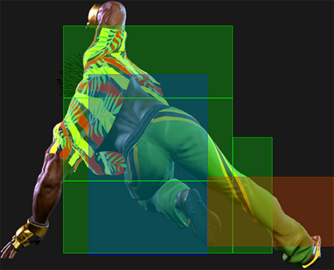
5HK
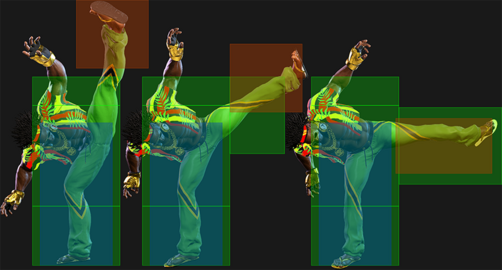
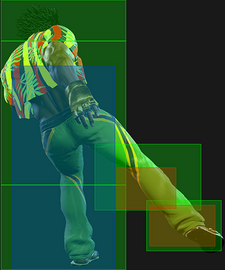
6MK


To get a good idea of how to use his normals it may help to get a good understanding of what buttons have the most range.
| range | least to most range | |||||
|---|---|---|---|---|---|---|
| move | 5LK | 2HP | 2MK | 5MK | 5HK | 6MK |
| startup | 5 | 8 | 8 | 9 | 12 | 19(21) |
| recovery | 12 | 20 | 19 | 16 | 26 | 16 |
| block | -2 | -2 | -6 | -1 | -5 | +2 |
| hit | +5 | +6 | KD | +6 | +1 | +1(+2) |
- Drive Rush
- One of the strongest drive rushes in the game makes this an integral tool for Deejay's neutral. Several of his moves become safe with some even being plus after Drive rush. There is a lot of distance covered by his drive rush making it a scary neutral tool at most ranges. Even though Dee Jay has a lot of strength with his drive rush, it can still be interrupted by opponents who are looking out for it. The real strength of it lies in combining it with the rest of his neutral tools.
- 5LK
- Fast poke that is special cancelable making this a great poke when up close. Canceling into drive Rush or Jus Cool(214K) are some of the go to options for starting pressure
- 2HP
- At 8 frame startup and the lack of this being special cancelable makes this a strange normal. It still has usage over medium kicks due to the reward he gets from punish counter but it should be used sparingly as the recovery can be easy to punish.
- 2MK
- 2MK is one of the weirdest in the game as it is not special cancelable, is not safe on block, and knocks down on hit. Even though this is the case this is an extremely powerful move. It may be -6 on block but at most ranges it cannot be punished making this a great move to use in neutral. The move is fast and the recovery is fairly low with the great upside of Dee jay starting his pressure if the move connects. This move is extremely potent after drive rush as it can often catch opponents trying to interrupt Dee Jay's Drive rush.
- 5MK
- Go to neutral poke as it has great range, fast at 9 frames, safe on block, and low recovery. This can help check a lot of buttons in neutral even though this is not special cancelable. The low recovery makes it hard to drive impact which makes it one of the best non-special cancelable moves to use in neutral.
- 5HK
- 2nd farthest reaching poke with it being +18 on Punish Counter. This move should be used sparingly as it has a lot of recovery but can be useful in certain matchups where Deejay otherwise gets outranged.
- 6MK
- Although slow, it's Deejays farthest reaching normal. Combined with it being plus on block and having low recovery makes this a surprisingly powerful neutral tool. One of the risks with this is due to the high startup it can be interrupted by several things with the biggest mention being Drive Impact. Even with these risks it is good to use to make your opponent respect or force them to try and throw out more buttons. If an opponent likes to block these frequently, this gives Dee Jay free reign to pressure his opponent which the rest of his normals and specials.
Offense
Frame Traps
Light Chains -
5MP -
6MK -
Jus Cool (214K) -
Okizeme and Mixups
Jackknife Maximum ([2]8K) - Generally risky but with the reward of resetting pressure makes it a powerful tool when used sparingly. If it's interrupted it will give a good idea of what your opponent likes to do to try and interrupt it. If they are using DP it is best to use Jus Cool(214K) instead and see what the opponent will do. If they like to press buttons, setting up frame traps will help discourage the opponent for trying to attack. There are more options but the best idea is to see what your opponent likes to do and react to their options.
Knockdown Advantage: all scenarios assume that opponent will Back Rise midscreen when possible, unless otherwise stated
| Knockdown | KD Adv. | Oki/Notes |
|---|---|---|
| Forward Throw | +34 |
|
| Back Throw | +22 |
|
| Drive Impact (No Crumple) |
+35 | ? |
| Drive Reversal | +23 | ? |
| 2MK | +29 | ? |
| 2HK | HKD +33(+42) HKD +52~61 (CH/PC) |
Slide; last active frame hit in paranthesis |
| [2]8HK (HK Jackknife Maximum) |
+42 | ? |
| [2]8MK, [2]8HK | +37 | ? |
| 236MK (MK Rolling Sobat) |
+34 | ? |
| 236KK (OD Rolling Sobat) |
+39 | ? |
| 214K > MK | HKD +27(+28) | crouching hit in parenthesis |
| 214KK > HK, 236HK | +37 | ? |
| 214KK > HK, DR 5HP > 214HP | +43 | ? |
| SA1 - 236236K (The Greatest Sobat) |
HKD +32 Crumple +54 (CH) Crumple +67 (PC) |
? |
| SA2~HP - 236236P... (Climactic Strike) |
HKD +24(18) | ? |
| SA2~HK - 236236P... (Encore Beat) |
HKD +34(37) | ? |
| SA3 - 214214P (Weekend Pleasure) |
HKD +26 | ? |
| CA - 214214P (Weekend Pleasure) |
HKD +22 | ? |
Safe Jumps: All safe jumps are -2 or -3 if the opponent does wakeup perfect parry (not punishable).
| KD Adv. | Safe jump | Notes |
|---|---|---|
| +36 - +37 | 9, j.2LK | ? |
| +39 - +40 | [2]8LK, j.2LK | ? |
| +41 - +42 | 9, j.X | ? |
| +42 - +43 | 9, dl.j.2LK | ? |
| +43 - +44 | [2]8LK, j.X | ? |
vs. Burnout
Drive Rush
When canceling a normal into Drive Rush on block and following it up with another normal, there may be an interruptible gap in the blockstring. The following table lists these blockstring gaps when performed at the fastest possible timing.
| Gap Value | Meaning |
|---|---|
| 0 | True Blockstring (no gap) if input with fastest button timing; can still lose to Drive Reversal |
| 1 to 4 | Small blockstring gap; opponent can interrupt with an invincible reversal; a 4f gap can trade with 4f normal attack |
| 5+ | Large blockstring gap; opponent can interrupt without an invincible attack |
| 5LP | 5LK/2LP/2LK | 2MP | 5MP/4HK | 2MK/2HP | 5MK/5HP | 5HK | 2HK | 6MK | |
|---|---|---|---|---|---|---|---|---|---|
| 5LP~DRC | 6 | 7 | 8 | 9 | 10 | 11 | 14 | 16 | 23 |
| 5HP~DRC | 0 | 0 | 0 | 0 | 0 | 0 | 2 | 4 | 11 |
| 5LK~DRC | 3 | 4 | 5 | 6 | 7 | 8 | 11 | 13 | 20 |
| 2LP~DRC | 4 | 5 | 6 | 7 | 8 | 9 | 12 | 14 | 21 |
| 2MP~DRC | 0 | 0 | 0 | 0 | 1 | 2 | 5 | 7 | 14 |
| 4HK(1)~DRC | 0 | 0 | 0 | 0 | 1 | 2 | 5 | 7 | 14 |
| 4HK(2)~DRC | 0 | 0 | 0 | 1 | 2 | 3 | 6 | 8 | 15 |
The following table lists the general BnB combo routes when canceling a button into Drive Rush on hit.
| Starter | Hit Adv. | Combo Route |
|---|---|---|
| 5LP~DRC | +3 | No combo without Counter-hit or Punish Counter |
| 5LK~DRC | +5 | 2LP, 2HP, 2MP ... |
| 2LP~DRC | ||
| 2MP~DRC | +12 | 5MP, 2HP, 2MP ... 5HP > 214HP/214PP |
| 4HK(2)~DRC | ||
| 5HP~DRC | +17 | ? |
| 4HK(1)~DRC |
Defense
Reversals
- OD Jackknife Maximum ([2]8KK) - Fully invincible with fast startup and great horizontal range. At point blank, may whiff under opponents that neutral jump to bait your throw.
- SA2 (236236P) - Fully invincible with good horizontal range, but the slow startup makes it susceptible to meaty light normals. Dee Jay's primary reversal option when in Burnout.
- SA3/CA (214214P) - Faster and fully invincible. Useful in all-or-nothing scenarios where the extra damage can secure the win, or if you think the opponent is using a safe jab to bait your SA2.
Anti-Airs
- 4HK - The 2nd hit has a great vertical hitbox against closer jumps (but not cross-ups). If it lands as a Punish Counter, it will also put the opponent into a juggle state.
- 2HK - A slide with an anti-air hitbox near Dee Jay's feet. Much more rewarding if it lands as a Counter-hit/Punish Counter, granting an easy juggle follow-up. Because Dee Jay is also building down charge during the animation, he can perform HK Jackknife Maximum if he whiffs the slide and the opponent jumps over him.
- HK Jackknife Maximum ([2]8HK) - Fast and invincible to air attacks. The crouching charge input allows you to delay it until right before the opponent lands. Good against mid-range and close/cross-up jumps.
- SA3/CA (214214P) - Extends a huge invincible hitbox straight upward. Dee Jay's most reliable close range anti-air without down charge.
- j.MP~j.HP - A good air-to-air knockdown, particularly if you don't have down charge and the opponent is trying to jump over your head.
Anti-Projectile
- SA2 (236236P) - Good horizontal range and tons of invincibility, letting Dee Jay punish projectiles on reaction from around half screen. Fireballs with fast recovery like Sonic Boom are difficult to punish with this Super.
- j.2LK - Altering his jump trajectory allows him to navigate over fireballs more consistently than a standard jump.
- Air Slasher ([4]6P) - Controlling the screen with your own fireball is the best way to avoid the opponent's projectile game. The MP version acts like a standard fireball with average recovery, the HP version shoots 2 fireballs that can blow through meterless projectiles and control the screen, and the OD version is an excellent screen control tool that will immediately win almost any projectile war.
- Juggling Dash (214K~6P) - Not very useful as a direct fireball counter, but Dee Jay can dash through projectiles from his Jus Cool sway. If you try to start with Jus Cool on reaction to a fireball, Dee Jay will generally be unsafe after the dash, though it may catch the opponent off guard.
Fighting vs. Dee Jay