

Introduction
| Pros | Cons |
|---|---|
|
|
Move List
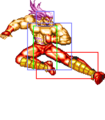
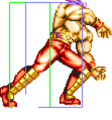
General Hurtboxes
Note: Attacks that hit Krauser's head hurtbox (when present) will do 25% more damage (rounded down)
| Weak Point | Standing | Walking | Crouching | Jumping | Taunting |
 |
 |
 |
 |
  |

|
| Head hurtbox (flashing) takes extra damage. | Begins tall | Rising and falling boxes. 54F (4+47+3) duration. | Body is invincibile when his close arm is raised. |
Close Standing Normals
c5A
Death Claw/デスクロー

| Damage | Stun | Guard | Startup | Active | Recovery | Total | Hit Adv | Block Adv | Property | |
|---|---|---|---|---|---|---|---|---|---|---|
| 8 | 2 | Mid | 13 | 3 | 3 | 18 | +10 | +11 | Kara Cancel | |
| ||||||||||
c5B
Low Kick/ローキック

| Damage | Stun | Guard | Startup | Active | Recovery | Total | Hit Adv | Block Adv | Property | |
|---|---|---|---|---|---|---|---|---|---|---|
| 10 | 2 | Mid | 6 | 6 | 5 | 16 | +5 | +6 | Kara Cancel | |
| ||||||||||
c5C
Double Death Claw/ダブルデスクロー

| Damage | Stun | Guard | Startup | Active | Recovery | Total | Hit Adv | Block Adv | Property | |
|---|---|---|---|---|---|---|---|---|---|---|
| 12 | 4 | Mid | 6 | 13 | 9 | 27 | +2 | +1 | Kara Cancel | |
| ||||||||||
c5D
High Kick/ハイキック

| Damage | Stun | Guard | Startup | Active | Recovery | Total | Hit Adv | Block Adv | Property | |
|---|---|---|---|---|---|---|---|---|---|---|
| 20 | 4 | Mid | 12 | 14 | 25 | 50 | -15 | -16 | Kara Cancel | |
| ||||||||||
Far Standing Normals
f5A
Vertical Hook/バーチカルフック

| Damage | Stun | Guard | Startup | Active | Recovery | Total | Hit Adv | Block Adv | Property | |
|---|---|---|---|---|---|---|---|---|---|---|
| 6 | 2 | Mid | 8 | 5 | 17 | 29 | -6 | -5 | Kara Cancel | |
| ||||||||||
f5B
Side Kick/サイドキック

| Damage | Stun | Guard | Startup | Active | Recovery | Total | Hit Adv | Block Adv | Property | |
|---|---|---|---|---|---|---|---|---|---|---|
| 8 | 2 | Mid | 4 | 6 | 4 | 13 | +6 | +7 | Kara Cancel | |
| ||||||||||
f5C
Submarine Upper/サブマリンアッパー

| Damage | Stun | Guard | Startup | Active | Recovery | Total | Hit Adv | Block Adv | Property | |
|---|---|---|---|---|---|---|---|---|---|---|
| 16 | 4 | Mid | 11 | 10 | 22 | 42 | -9 | -10 | / | |
| ||||||||||
f5D
Middle Kick/ミドルキック

| Damage | Stun | Guard | Startup | Active | Recovery | Total | Hit Adv | Block Adv | Property | |
|---|---|---|---|---|---|---|---|---|---|---|
| 18 | 4 | Mid | 8 | 10 | 12 | 29 | +1 | 0 | / | |
| ||||||||||
Crouching Normals
2A
Derate Cutter/ディレートカッター

| Damage | Stun | Guard | Startup | Active | Recovery | Total | Hit Adv | Block Adv | Property | |
|---|---|---|---|---|---|---|---|---|---|---|
| 6 | 2 | Mid | 6 | 11 | 0 | 16 | +5 | +6 | Kara Cancel | |
| ||||||||||
2B
Derate Kick/ディレートキック

| Damage | Stun | Guard | Startup | Active | Recovery | Total | Hit Adv | Block Adv | Property | |
|---|---|---|---|---|---|---|---|---|---|---|
| 8 | 2 | Low | 6 | 7 | 6 | 18 | +3 | +4 | Kara Cancel | |
| ||||||||||
2C
Grand Cutter/グランドカッター

| Damage | Stun | Guard | Startup | Active | Recovery | Total | Hit Adv | Block Adv | Property | |
|---|---|---|---|---|---|---|---|---|---|---|
| 16 | 4 | Mid | 9 | 6 | 9 | 23 | +9 | +8 | Kara Cancel | |
| ||||||||||
2D
Grand Kick/グランドキック

| Damage | Stun | Guard | Startup | Active | Recovery | Total | Hit Adv | Block Adv | Property | |
|---|---|---|---|---|---|---|---|---|---|---|
| 16 | 4 | Low | 11 | 9 | 18 | 37 | KD | -4 | Kara Cancel | |
| ||||||||||
Jumping Normals
jA


| Version | Damage | Stun | Guard | Startup | Active | Recovery | Total | Hit Adv | Block Adv | Property | |
|---|---|---|---|---|---|---|---|---|---|---|---|
| Diagonal Jump | 8 | 2 | Overhead | 19 | ∞ | - | - | - | - | - | |
| |||||||||||
| Neutral Jump | 8 | 2 | Overhead | 6 | ∞ | - | - | - | - | - | |
| |||||||||||
jB

- Crosses up.
| Version | Damage | Stun | Guard | Startup | Active | Recovery | Total | Hit Adv | Block Adv | Property | |
|---|---|---|---|---|---|---|---|---|---|---|---|
| Diagonal Jump | 10 | 2 | Overhead | 6 | ∞ | - | - | - | - | - | |
| |||||||||||
| Neutral Jump | 10 | 2 | Overhead | 6 | ∞ | - | - | - | - | - | |
| |||||||||||

jC
| Version | Damage | Stun | Guard | Startup | Active | Recovery | Total | Hit Adv | Block Adv | Property | |
|---|---|---|---|---|---|---|---|---|---|---|---|
| Diagonal Jump | 18 | 4 | Overhead | 19 | 19 | - | - | - | - | - | |
| |||||||||||
| Neutral Jump | 18 | 4 | Overhead | 6 | 16 | - | - | - | - | - | |
| |||||||||||
jD
- Crosses up.
- Alternates between a large and small hitbox.
Active Frames 5-7, 11-13
| Version | Damage | Stun | Guard | Startup | Active | Recovery | Total | Hit Adv | Block Adv | Property |
|---|---|---|---|---|---|---|---|---|---|---|
| Diagonal Jump | 20 | 4 | Overhead | 9 | 16 | - | - | - | - | - |
| Neutral Jump | 20 | 4 | Overhead | 6 | 16 | - | - | - | - | - |
Universal Mechanics
Lane Blast (CD)
Krauser Cutter/クラウザーカッター
C+D


| Version | Damage | Stun | Guard | Startup | Active | Recovery | Total | Hit Adv | Block Adv | Property | |
|---|---|---|---|---|---|---|---|---|---|---|---|
| Front Lane | 22 | 5 | Mid | 13 | 9 | 8 | 29 | KD | +2 | Cancel, Lane Shift | |
| |||||||||||
| Back Lane | 22 | 5 | Mid | 13 | 8 | 11 | 31 | KD | 0 | Cancel, Lane Shift | |
| |||||||||||
Lane Attack
A/B/C/D from opposite lane


| Version | Damage | Stun | Guard | Startup | Active | Recovery | Total | Hit Adv | Block Adv | Property | |
|---|---|---|---|---|---|---|---|---|---|---|---|
| A/B | 20 | 2 | Overhead | 5 | - | 4 | - | - | - | / | |
| |||||||||||
| C/D | 20 | 4 | Overhead | 5 | - | 4 | - | - | - | / | |
| |||||||||||
Dodge Attack
6A during proximity guard

| Damage | Stun | Guard | Startup | Active | Recovery | Total | Hit Adv | Block Adv | Property | |
|---|---|---|---|---|---|---|---|---|---|---|
| 11 | 5 | Mid | 12 | 7 | 14 | 30 | Air Reset | -2 | Kara Cancel, Upper-Body Invuln 1-18F | |
| ||||||||||


Throws
- All of Krauser's throws have the same range.
Knee Smasher (4/6C)
close 4/6C

| Damage | Stun | Guard | Startup | Active | Recovery | Total | Hit Adv | Block Adv | Property | |
|---|---|---|---|---|---|---|---|---|---|---|
| 26 | 3 | Throw | 1 | 1 | / | - | KD | / | / | |
| ||||||||||

Lift Hang Blow (3C)
close 3C

| Damage | Stun | Guard | Startup | Active | Recovery | Total | Hit Adv | Block Adv | Property | |
|---|---|---|---|---|---|---|---|---|---|---|
| 26 | 3 | Throw | 1 | 1 | / | - | KD | / | / | |
| ||||||||||

Neck Hang Blow (4/6D)
close 4/6D

| Damage | Stun | Guard | Startup | Active | Recovery | Total | Hit Adv | Block Adv | Property | |
|---|---|---|---|---|---|---|---|---|---|---|
| 20~48 (4 x 5~12) | 0 | Throw | 1 | 1 | / | - | KD | / | / | |
| ||||||||||

Special Moves
High Blitz Ball (214P)
214A/C

| Version | Damage | Stun | Guard | Startup | Active | Recovery | Total | Hit Adv | Block Adv | Property | |
|---|---|---|---|---|---|---|---|---|---|---|---|
| A | 15 (3) | 3 | Mid | 16 | - | 28 | 43 | KD | +2 | / | |
| |||||||||||
| C | 22 (5) | 6 | Mid | 19 | - | 37 | 55 | KD | -3 | / | |
| |||||||||||
Low Blitz Ball (214K)
214B/D

| Version | Damage | Stun | Guard | Startup | Active | Recovery | Total | Hit Adv | Block Adv | Property | |
|---|---|---|---|---|---|---|---|---|---|---|---|
| B | 15 (3) | 3 | Mid | 16 | - | 28 | 43 | KD | +6 | / | |
| |||||||||||
| D | 22 (5) | 6 | Mid | 19 | - | 37 | 55 | KD | -7 | / | |
| |||||||||||
Leg Tomahawk (23K)
23B/D


| Version | Damage | Stun | Guard | Startup | Active | Recovery | Total | Hit Adv | Block Adv | Property | |
|---|---|---|---|---|---|---|---|---|---|---|---|
| B | 16 (4) | 3 | Mid | 13 | 12 | 20 | 44 | -11 | -14 | - | |
| |||||||||||
| D | 22 (5) | 6 | Mid | 17 | 16 | 20 | 52 | -7 | -14 | - | |
| |||||||||||
Atemi Nage (41236P)
41236A/C

Recovery
Activation


| Version | Damage | Stun | Guard | Startup | Active | Recovery | Total | Hit Adv | Block Adv | Property | |
|---|---|---|---|---|---|---|---|---|---|---|---|
| A | 18 | 3 | / | 1 | 12 | 17 | 29 | KD | / | / | |
| |||||||||||
| C | 18 | 6 | / | 1 | 12 | 17 | 29 | KD | / | / | |
Desperation Move
Kaiser Wave ([4]9A+C)
When health is flashing
[4]9A+C

| Damage | Stun | Guard | Startup | Active | Recovery | Total | Hit Adv | Block Adv | Property | |
|---|---|---|---|---|---|---|---|---|---|---|
| 40 (10) | 4 | Mid | 36 | - | 39 | 73 | KD | +3 | / | |
| ||||||||||


Combos
- 2C/c5C/c5D 214B
- 2C > 23B
- c5A > c5C > 23B
- (Frame perfect glitch, unblockable as P1) Last-frame 2A x 5 > f5C or CD
Strategy
The Basics
Krauser plays like a pure defensive wall that keeps his opponent in check with his array of fireballs and long reaching normals. The fast startup and recovery of his Blitzball gives him incredible spatial control and forces even other defense-centric characters such as Joe and Jubei to change their normal gameplan and go on offense against him. Unlike a traditional zoner, however, Krauser does not have an invulnerable anti-air/reversal move, having to rely on his normals, Leg Tomahawk and dodge attack to stop jump-ins instead. Good spacing is essential to playing Krauser effectively.
You have 4 different versions of the Blitzball in your arsenal, but most of the time you'll want to stick to the B version, as high Blitzballs whiff against all crouching characters (save for Bear), and heavy Blitzballs are riskier to throw as they have longer recovery. Your go-to normals are 5B; a fast side kick that also functions as an anti-air from the right distance, 2A/2C; a cancelable chop with decent reach, and 5C; a punch with massive range that often catches people off guard thanks to its reach. Avoid overusing his crouching kicks; while still useful in many situations, they have rather poor frame data and you're better off using his other normals whenever possible. You'll generally want to cancel all your pokes into B Blitzball both on hit and block to keep your pressure going while also dealing chip damage.
Leg Tomahawk is your most reliable anti-air if you predict a jump, but the long startup makes it near impossible to use on reaction. Realistically you'll be using either 5B, 5C or dodge attack to stop jump-ins most of the time, depending on the distance between you and your opponent. Close D can also function as an anti-air in some situations, but the long startup makes it somewhat risky.
Krauser has his own variant of Geese's trademark Atemi Nage counter, but unlike Geese, Krauser can use this only to counter mid attacks, making it useless against jumps, lows and specials. The damage from landing it isn't terribly high but the move is still occasionally worth going for as it throws your opponent all the way to the corner of a stage even when landed midscreen, allowing you to start your deadly corner pressure. Always use the C version of the move as it deals more stun damage; both versions are identical otherwise.
Once you've managed to corner your opponent, poke them with a fast normal like 5B or 2A, cancel into B Blitzball, rinse and repeat. This blockstring is simple but very tricky to get out of without an invulnerable reversal, so try to go for it whenever possible. Even if your opponent manages to eventually break free, they'll most likely take a good chunk of chip damage in the process.
Advanced Strategy
Krauser's super, Kaiser Wave, requires a back charge; down-back is not a valid charge direction for the move. A Krauser on low health simply walking away from his opponent is usually a telltale sign he's going for a super, so it's much better to "mask" the charge by throwing out some safe normals such as 5B while you're completing the charge. Despite its huge size, Kaiser Wave still has the properties of a normal projectile in this game and disappears upon colliding with another projectile, even Jubei's senbeis.
Player 1 Krauser can make his Blitzball unblockable after a knockdown or air reset by whiffing 2A so that the projectile hits during its last active frame. This is thanks to a bug, and can be set up after a f5B anti-air (do immediately), 3C throw (needs delay), anti-air 23D, 41236P, or even a Blitzball knockdown in specific circumstances. Although the trick is frame perfect, Krauser loses nothing if he mistimes it. This bug can also just be used for unblockable 2A oki into glitch combos.
Matchups
Vs. Andy Bogard
4 - 6
A tricky matchup as Andy has good tools to deal with your fireball pressure. Use pre-emptive 5Bs to keep his Zaneiken in check; don't underestimate the speed of the move as it can easily hit you out of the startup of a badly timed Blitzball. Both versions of Kuuha Dan can be used to fly past your low Blitzballs, so try not to spam them mindlessly and occasionally mix them up with high Blitzballs, which will stop both the Zaneiken and Kuuha Dan when timed right. 5B and dodge attack are great against light Kuuha Dan; for the heavy version, I recommend first gaining some distance with a backstep before attempting to punish the move.
Vs. Axel Hawk
6 - 4
High Blitzballs don't collide with Axel's Tornadoes and hit him before he's able to recover, making them an excellent counter against the move. Since Krauser wins the projectile war easily, Axel is forced to slowly inch his way towards you with his poor mobility. The matchup is still far from a free win, though, as Axel can utilize his excellent dodge attack to slip past your fireballs and his faster than average jump can be tricky to react to. Don't let him get up close as Axel can deal quite a bit of damage from chip alone. Axel's "sweep" (2D) is fast and beats all of your main pokes, so avoid needless button pressing if you're in its range.
Vs. Big Bear
5 - 5
You'd think this would an extremely lopsided matchup: the fastest fireball spammer in the game against the huge, cumbersome grappler especially in a game this old? On the contrary, I'd say Bear possibly has a minor advantage here. Thanks to the massive invulnerability of his Giant Bomb tackle, Bear simply zips past your zoning with minimal effort. As Krauser, this matchup is all about reacting to whatever Bear does as he absolutely dictates the flow of the match. Dodge attack is your best tool against tackles, but being able to discern between its light and heavy versions is vital as you need to change your timing accordingly. 2B and 2D can also be used to hit Bear out of his tackle, but timing is again crucial. On the positive side, Bear can't crouch under high Blitzballs so you might as well stick to only using the A version during this matchup as it's the hardest one to avoid... Whenever Bear isn't tackle-spamming, that is.
Vs. Billy Kane
5 - 5
Atemi Nage is pretty useful here as it will beat Billy's frequent 5A and 2C pokes. Watch out for his Sansetsukon special though as it has a projectile hitbox. Don't let Billy cheese you with his Kyoushuu Hishoukon; you can hit this move during its startup with a well timed high Blitz, or anti-air it with 5C as Billy lands.
Vs. Cheng Sinzan
6 - 4
Cheng's main tool against fireballs is his balloon special, so try not to get caught off guard by the move. You can simply block and punish it with a 5C, or with good enough reactions dodge attack it and avoid taking chip damage altogether. Krauser's 5D is actually a guaranteed punish against Cheng's light Hagan Geki roll, but only if you block the move standing... for whatever reason.
Vs. Duck King
6 - 4
Duck poses no threat to you unless he's right in your face, so try to keep him out at all costs. Be careful whenever you're in the range of his Needle Low slide as it can go under even low Blitzballs and allows him to start his oppressive blockstring pressure on hit. You can punish the slide on block with 2A or a throw if he's close enough to you. If Duck does manage to get in, try not to challenge his light normals with your own as they're far faster than anything you've got; it's much better to simply backstep out of the situation or possibly go for Atemi Nage if you notice a suitable gap in his blockstring.
Vs. Geese Howard
5 - 5
One of the rare matchups where you might want to switch to a rushdown playstyle and keep your opponent close. Geese's Reppuken doesn't pose a huge threat to Krauser as both high Blitzball and Leg Tomahawk beat it easily; the much bigger issue here is the air fireball Shippuken, as it's very hard to slip past due to Krauser's tall hurtboxes. Ideally you'll want to knock Geese out of the air with a jump kick or Leg Tomahawk before he gets the chance to throw a Shippuken but this'll require a hard read on your part. It's possible to avoid Shippuken with a dodge attack, but the timing is severe.
Once you get close enough, chip his health away with the usual 5B/2A -> B Blitz x n blockstrings. If your opponent keeps going for Atemi Nage, substitute 5B with 2B or 2D instead as Geese doesn't have a counter for lows.
Vs. Joe Higashi
4 - 6
Just like in the Axel matchup, high Blitzball is the key to winning against Hurricane spam. The biggest problem in this matchup is Joe's slide kick, which low profiles even your low Blitzball and beats your key normals such as 5B and 5C. Fortunately, the slide is very unsafe on block, so you can simply bait and punish it - I personally like to go for a throw after a blocking a slide. Try to keep him out of slide range and chip him to death with fireballs.
Vs. Jubei Yamada
4 - 6
The most frustrating thing about this matchup: 5B, your most reliable poke, whiffs against crouching Jubei by a pixel, and while 5A, 2A and 2C all hit low enough they tend to lose against just about any move Jubei can throw out. This leads to you doing almost nothing but spamming B Blitzball during neutral and maybe occasionally going for a sweep if you feel brave enough. Jubei's options here are to either A: go for a jump-in, which you can AA with either 5B or 5C depending on your spacing, or B: slip past the Blitzball with a slide kick. The slide, unless perfectly spaced, is unsafe on block but 2A cancelled into B Blitz for extra chip damage is about the best punish you can get.
Avoid getting cornered against Jubei at all costs and keep your distance as his fast normals and strike/throw mixups are extremely hard to deal with as Krauser. 5C anti-air often trades against Jubei but unless you have no health left it's a trade worth taking as you don't want him pressing buttons right in your face.
Heavy Leg Tomahawk can be used to punish badly timed Senbei Shurikens, but be careful as it whiffs if Jubei is crouching and leaves you open for a big combo.
Vs. Kim Kaphwan
3 - 7
Tough but manageable. Standard Blitzball spam keepaway tactics don't work here due to Kim's amazing mobility, so you're going to have to alter your playstyle accordingly and throw projectiles with extreme caution. Kim's divekick is too fast to consistently react to, so pre-emptive anti-airs are your friend. Neutral jump B, 5B and dodge attack are invaluable here. Thankfully, the divekick's hitbox isn't all that strong and you can sometimes manage to anti-air it even with 2A or 2C. Since Kim will be jumping a lot, you can often land stray hits with Leg Tomahawk, but don't get too predictable with it.
Vs. Laurence Blood
6 - 4
Unlike other characters with a slide kick, Laurence is too tall to low profile B Blitzball with his 2D which makes the matchup much more manageable compared to someone like Jubei. Instead he'll try to work his way to mid range, poke you with his far reaching normals and chip away at your health with Bloody Spin. Its heavy version is minus on block, but don't mash buttons after blocking a light Spin as Laurence can easily frame trap you with his 5D afterwards. Make use of 5B as it beats Bloody Spin clean. Laurence may also attempt to use Bloody Cutter to get past your fireballs, but you can simply bait and punish it with a throw as it's highly minus on block.
Vs. Mai Shiranui
5 - 5
Projectile war matchup. You can punish Mai's Kachosen with a well timed Leg Tomahawk, which is generally better than going for a jump-in as it's much harder to react to and Mai can deal some serious damage just with a single AA Ryuenbu. Mai can fly past your low Blitzball with Hissatsu Shinobibachi, but the move is minus on block unless it hits meaty and loses against high Blitzballs. Her Musasabi no Mai also functions as an anti-projectile attack, although it behaves differently depending what stage you're on: normally Mai dives off a wall which can be easily stopped with your 5B, but on Mai's stage she performs the move off the flagpoles in the background which is much harder to avoid. Your best bet against that is a dodge attack, but your spacing has to be correct or the move will whiff.
Vs. Ryo Sakazaki
Vs. Terry Bogard
6.5 - 3.5
Power Wave shrinks Terry's hitbox vertically so you can't use high Blitz to punish it like Geese's Reppukens, but Leg Tomahawk still works wonders against the move. His jump-ins from close range are hard for Krauser to deal with, so try to keep enough distance that you can stop jump attempts with your 5B. Keep an eye out for heavy Crack Shoot as it can fly past low Blitzballs, and it sometimes even hits twice dealing huge damage due to Krauser's size.
Vs. Tung Fu Rue
6 - 4
One of the easier matchups for Krauser; like the Duck King matchup, there's not much Tung can do unless he's right in your face, and he doesn't have any dedicated anti-fireball specials to watch out for either. However, if he DOES manage to get in, the situation is completely reversed as Tung's fast normals stuff out all of your moves in close range. Keep your distance with backsteps, avoid getting trapped in a corner and abuse the hell out of Blitzballs.
Vs. Wolfgang Krauser
5 - 5
Possibly my all time favorite mirror match in the history of fighting games as there's room for some amazing mind games here. High and low Blitzballs naturally don't collide with each other, so heavy high Blitz beats light low and vice versa. Since Leg Tomahawk also goes past low Blitzballs it may seem like sticking to high Blitz is the better choice, but the important piece of tech to know here is that Krauser can actually duck under high Blitz, though only if you let go of block as his crouch block animation is just tall enough to take chip damage from the move.
Since Krauser's main pokes all hit mid, you can make good use of Atemi Nage here. If your opponent keeps catching your pokes with the move, start using occasional 2Bs and 2Ds to throw them off. The winner of this MU is often the Krauser who manages to corner his opponent first, so keep your blockstring pressure tight. If you happen to get cornered, you can try to create a gap in the pressure with a backstep or grab their 5B with an Atemi.


