


Introduction
| Pros | Cons |
|---|---|
|
|
Move List
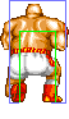
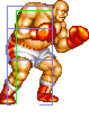
Note: Attacks that hit Axel's stomach hurtbox (when present) will do 25% more damage (rounded down)
| Standing/Walking | Crouching | Jumping | Taunting |
 |
 |
  |

|
| Flashing hurtbox takes extra damage. | 50F (4+43+3) duration. |
Close Standing Normals
c5A
Body/ボディ

| Damage | Stun | Guard | Startup | Active | Recovery | Total | Hit Adv | Block Adv | Property | |
|---|---|---|---|---|---|---|---|---|---|---|
| 12 | 2 | Mid | 6 | 5 | 7 | 17 | +4 | +5 | Kara Cancel | |
| ||||||||||


c5B
Hook/フック


| Damage | Stun | Guard | Startup | Active | Recovery | Total | Hit Adv | Block Adv | Property | |
|---|---|---|---|---|---|---|---|---|---|---|
| 8x2 | 2x2 | Mid | 6, 10 | 4+7 | 8 | 24 | +1 | +4 | Kara Cancel | |
| ||||||||||


c5C
Under Punch/アンダーパンチ

| Damage | Stun | Guard | Startup | Active | Recovery | Total | Hit Adv | Block Adv | Property | |
|---|---|---|---|---|---|---|---|---|---|---|
| 20 | 4 | Mid | 7 | 7 | 18 | 31 | -1 | -2 | Kara Cancel | |
| ||||||||||


c5D
Upper/アッパー

| Damage | Stun | Guard | Startup | Active | Recovery | Total | Hit Adv | Block Adv | Property | |
|---|---|---|---|---|---|---|---|---|---|---|
| 16 | 4 | Mid | 6 | 14 | 23 | 42 | -13 | -14 | Kara Cancel | |
| ||||||||||


Far Standing Normals
f5A
Straight/ストレート

| Damage | Stun | Guard | Startup | Active | Recovery | Total | Hit Adv | Block Adv | Property | |
|---|---|---|---|---|---|---|---|---|---|---|
| 10 | 2 | Mid | 6 | 9 | 6 | 20 | +1 | +2 | Kara Cancel | |
| ||||||||||

f5B
Strike Hook/ストライクフック

| Damage | Stun | Guard | Startup | Active | Recovery | Total | Hit Adv | Block Adv | Property | |
|---|---|---|---|---|---|---|---|---|---|---|
| 6 | 2 | Mid | 3 | 12 | 27 | 41 | -23 | -22 | Kara Cancel | |
| ||||||||||


f5C
Slash Punch/スラッシュパンチ

| Damage | Stun | Guard | Startup | Active | Recovery | Total | Hit Adv | Block Adv | Property | |
|---|---|---|---|---|---|---|---|---|---|---|
| 18 | 4 | Mid | 6 | 9 | 27 | 41 | -13 | -14 | / | |
| ||||||||||


f5D
Step Upper/ステップアッパー

| Damage | Stun | Guard | Startup | Active | Recovery | Total | Hit Adv | Block Adv | Property | |
|---|---|---|---|---|---|---|---|---|---|---|
| 14 | 4 | Mid | 8 | 11 | 27 | 45 | -15 | -16 | / | |
| ||||||||||


Crouching Normals
2A
Low Light Upper/ローライトアッパー

| Damage | Stun | Guard | Startup | Active | Recovery | Total | Hit Adv | Block Adv | Property | |
|---|---|---|---|---|---|---|---|---|---|---|
| 6 | 2 | Mid | 5 | 6 | 5 | 15 | +5 | +6 | Kara Cancel | |
| ||||||||||
2B
Ducking Jab/ダッキングジャブ

| Damage | Stun | Guard | Startup | Active | Recovery | Total | Hit Adv | Block Adv | Property | |
|---|---|---|---|---|---|---|---|---|---|---|
| 8 | 2 | Low | 5 | 7 | 8 | 19 | +1 | +2 | Kara Cancel | |
| ||||||||||
2C
Wing Upper/ウイングアッパー

| Damage | Stun | Guard | Startup | Active | Recovery | Total | Hit Adv | Block Adv | Property | |
|---|---|---|---|---|---|---|---|---|---|---|
| 14 | 4 | Mid | 8 | 16 | 18 | 41 | -10 | -11 | Kara Cancel | |
| ||||||||||

2D
Ducking Jab/ダッキングジャブ
| Damage | Stun | Guard | Startup | Active | Recovery | Total | Hit Adv | Block Adv | Property | |
|---|---|---|---|---|---|---|---|---|---|---|
| 16 | 4 | Low | 6 | 11 | 11 | 27 | KD | +1 | Kara Cancel | |
| ||||||||||
Jumping Normals
jA/B
Kangaroo Hook/カンガルーフック


| Version | Damage | Stun | Guard | Startup | Active | Recovery | Total | Hit Adv | Block Adv | Property | |
|---|---|---|---|---|---|---|---|---|---|---|---|
| Diagonal & Neutral Jump | 8 | 2 | Overhead, Overhead | 5, 12 | 7 + ∞ | - | - | - | - | - | |
| |||||||||||
jC
Double Kangaroo Punch/ダブルカンガルーパンチ
| Version | Damage | Stun | Guard | Startup | Active | Recovery | Total | Hit Adv | Block Adv | Property | |
|---|---|---|---|---|---|---|---|---|---|---|---|
| Diagonal & Neutral Jump | 10x2 | 4x2 | Overhead, Overhead | 5, 16 | 11+8 | - | - | - | - | - | |
| |||||||||||

jD
Double Kangaroo Punch/ダブルカンガルーパンチ

| Version | Damage | Stun | Guard | Startup | Active | Recovery | Total | Hit Adv | Block Adv | Property | |
|---|---|---|---|---|---|---|---|---|---|---|---|
| Diagonal Jump | 10x2 | 4x2 | Overhead, Overhead | 10, 21 | 11+8 | - | - | - | - | - | |
| |||||||||||
| Neutral Jump | 10x2 | 4x2 | Overhead, Overhead | 5, 16 | 11+8 | - | - | - | - | - | |
| |||||||||||
Universal Mechanics
Lane Blast
Atomic Bomber/アトミックボンバー
C+D


| Version | Damage | Stun | Guard | Startup | Active | Recovery | Total | Hit Adv | Block Adv | Property | |
|---|---|---|---|---|---|---|---|---|---|---|---|
| Front Lane | 22 | 5 | Mid | 9 | 8 | 14 | 30 | KD | -3 | Cancel, Lane Shift | |
| |||||||||||
| Back Lane | 22 | 5 | Mid | 12 | 8 | 8 | 27 | KD | +3 | Cancel, Lane Shift | |
| |||||||||||


Lane Attack
A/B/C/D from opposite lane


Front Lane Attack Recovery
Back Lane Attack Recovery

| Version | Damage | Stun | Guard | Startup | Active | Recovery | Total | Hit Adv | Block Adv | Property | |
|---|---|---|---|---|---|---|---|---|---|---|---|
| A/B | 20 | 2 | Overhead | 13 | - | 4 | - | - | - | / | |
| |||||||||||
| C/D | 20 | 4 | Overhead | 13 | - | 4 | - | - | - | / | |
| |||||||||||
Dodge Attack
6A during proximity guard

| Damage | Stun | Guard | Startup | Active | Recovery | Total | Hit Adv | Block Adv | Property | |
|---|---|---|---|---|---|---|---|---|---|---|
| 11 | 5 | Mid | 14 | 8 | 11 | 32 | Air Reset | 0 | Kara Cancel, Invuln Above Knees 1-13F, Invuln Above Waist 14-21F | |
| ||||||||||


Throws
- All of Axel's throws have the same range.
6D Throw
close 6D

| Damage | Stun | Guard | Startup | Active | Recovery | Total | Hit Adv | Block Adv | Property | |
|---|---|---|---|---|---|---|---|---|---|---|
| 16~32 (4 x 4~8) | 0 | Throw | 1 | 1 | / | - | KD/Air reset | / | / | |
| ||||||||||

4D Throw
close 4D
| Damage | Stun | Guard | Startup | Active | Recovery | Total | Hit Adv | Block Adv | Property | |
|---|---|---|---|---|---|---|---|---|---|---|
| 16~32 (4 x 4~8) | 0 | Throw | 1 | 1 | / | - | KD/Air reset | / | / | |
| ||||||||||

9D Throw
close 9D

| Damage | Stun | Guard | Startup | Active | Recovery | Total | Hit Adv | Block Adv | Property | |
|---|---|---|---|---|---|---|---|---|---|---|
| 24~52 (4 x 6~13) | 0 | Throw | 1 | 1 | / | - | KD/Air reset | / | / | |
| ||||||||||

Special Moves
Tornado Upper (236P)
236A/C


| Version | Damage | Stun | Guard | Startup | Active | Recovery | Total | Hit Adv | Block Adv | Property | |
|---|---|---|---|---|---|---|---|---|---|---|---|
| A | 16 (4) | 3 | Mid | 15 | - | 43 | 57 | -10 | -13 | / | |
| |||||||||||
| C | 22 (5) | 6 | Mid | 21 | - | 49 | 69 | -8 | -15 | / | |
| |||||||||||
Smash Bomber ([1]6P)
[1]6A/C


| Version | Damage | Stun | Guard | Startup | Active | Recovery | Total | Hit Adv | Block Adv | Property | |
|---|---|---|---|---|---|---|---|---|---|---|---|
| A | 18 (4) | 3 | Mid | 17 | 17 | 12 | 45 | Air Reset | -7 | - | |
| |||||||||||
| C | 24 (6) | 6 | Mid | 28 | 25 | 12 | 64 | KD | -19 | - | |
| |||||||||||
Axel Dance (Mash P)
Mash A/C
| Version | Damage | Stun | Guard | Startup | Active | Recovery | Total | Hit Adv | Block Adv | Property | |
|---|---|---|---|---|---|---|---|---|---|---|---|
| A | 12xN (3xN) | 3 | / | 7, 18, 29, 41 ... | 4 (7) 4 (7) 4 (8) 2 ... | 4 | 46+ | -6 | 0 | / | |
| |||||||||||
| C | 18xN (4xN) | 6 | / | 11, 24 ... | 4 (9) 4 ... | 12 | 39+ | +15 | +8 | / | |
| |||||||||||


Desperation Move
Axel Rush (4632149BC)
When health is flashing
4632149B+C

| Damage | Stun | Guard | Startup | Active | Recovery | Total | Hit Adv | Block Adv | Property | |
|---|---|---|---|---|---|---|---|---|---|---|
| 48 (12x2) | 4 | Mid | 27, 37, 53 | 6 (4) 10 (6) 10 | 15 | 77 | KD | -11 | / | |
| ||||||||||


Combos
- jC/D, 2A > Mash A
The Dance will get 2 hits if you jump from the front, or 3 hits if the combo is a crossup.
- c5B > Mash A/C
- 2C > [1]6A
- c5C > 236A
- Lane Attack > c5A > Mash A
The Basics
Axel's kit, with its strong projectile and slew of good anti-air moves, is geared towards defensive play and has all the necessary tools for keeping your opponent at bay. However, his Tornado Upper has more recovery than your average projectile, which means that Axel often has to switch to offense when playing against characters who can turtle better than him. This can prove challenging, as Axel's walk speed is atrocious and he doesn't have any anti-projectile tools unique to him. However, his faster than average jump and excellent Dodge Attack make up for most of his flaws and allow him to get in against even the strongest zoners in the game when used correctly.
Axel's normals are an extremely mixed bag, having both some of the best and some of the worst buttons in the game. You'll mostly be using the following moves in neutral:
- 5B: an excellent poke with good reach and a hitbox that even makes it a strong anti-air. You'll always want to cancel the move into a special both on hit and block, though, as the recovery is poor otherwise.
- CD can similarly function both as a poke and anti-air, dealing good damage especially on 1-lane stages and giving great oki on hit.
- 2D: a very fast low with good reach that gives a knockdown on hit, and can be cancelled into specials on block.
- 2C makes for a great anti-air against close range jumps.
Axel's Dodge Attack has by far the best reach in the game and properly utilizing the move is essential to his gameplan. Always do the move with a 46A input, as you might get an accidental Smash Bomber if you do it out of crouch block.
Despite not having many links at all, Axel's combo damage can be explosive up close. None of Axel's combo enders knock down on hit, though, so try to maximize the stun value of your combo and always go for an Axel Dance if you land a jump-in. The heavy version in particular will do a massive amount of stun if it hits twice (6 x 2 = 12 points of stun!). Once your opponent is dizzy, you can go for another combo or Axel's high damage 9D throw. If your jump-in gets blocked, go for light Axel Dance as it's safer and better for dealing chip damage. It's also great for okizeme as Axel can't be grabbed out of it, making it safe against just about everything except for invulnerable reversals.
Axel's super has one of the trickiest inputs in the game but it's worth mastering as the movement boost he gets from it complements his otherwise poor mobility very well. While not quite as spammable as Kim's super, for example, it can be made safe on block if done from the correct distance or if it hits meaty. It hits twice when blocked, so it makes for a good chip kill move as well.
Keep in mind that unlike other characters Axel can't throw with the C button; all of his 3 throws are performed using the D button instead. Axel's throw range is poor, but he's also a bit harder to grab than your average character.
Advanced Strategy
Close B will whiff against most opponents if they're dizzy. To make Axel's 9D throw easier to land, you can buffer it during a whiffed cl.B to avoid accidental jumps.
On Axel's stage, crouch walking past your opponent while they're knocked into the background by your Lane Blast will cause Axel's sprite to rapidly flicker left and right in a glitchy manner. It's customary to use this to style on your enemy and cause psychological damage.
Match-ups
Vs. Andy Bogard
3 - 7
Vs. Axel Hawk
5 - 5
Vs. Big Bear
6 - 4
Vs. Billy Kane
3 - 7
Vs. Cheng Sinzan
4 - 6
Vs. Duck King
6 - 4
Vs. Geese Howard
3 - 7
Vs. Joe Higashi
3 - 7
Vs. Jubei Yamada
4 - 6
Vs. Kim Kaphwan
3.5 - 6.5
Vs. Laurence Blood
4 - 6
Vs. Mai Shiranui
4.5 - 5.5
Vs. Ryo Sakazaki
Vs. Terry Bogard
4 - 6
Vs. Tung Fu Rue
6 - 4
Vs. Wolfgang Krauser
4 - 6


