

Introduction
| Pros | Cons |
|---|---|
|
|
Move List
Note: Attacks that hit Krauser's head hurtbox (when present) will do 25% more damage (rounded down)
| Standing | Walking | Crouching | Jumping | Taunting |
 |
 |
 |
  |

|
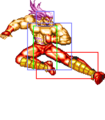
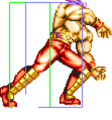
| Flashing hurtbox takes extra damage. | Rising and falling boxes. 54F duration. | Body is invincibile when his close arm is raised. |
Close Standing Normals
c5A

| Damage | Stun | Guard | Startup | Active | Recovery | Total | Hit Adv | Block Adv | Property |
|---|---|---|---|---|---|---|---|---|---|
| 8 | 2 | Mid | 13 | 3 | 3 | 18 | +10 | +11 | Cancel |
c5B

| Damage | Stun | Guard | Startup | Active | Recovery | Total | Hit Adv | Block Adv | Property |
|---|---|---|---|---|---|---|---|---|---|
| 10 | 2 | Mid | 6 | 6 | 5 | 16 | +5 | +6 | Cancel |
c5C

| Damage | Stun | Guard | Startup | Active | Recovery | Total | Hit Adv | Block Adv | Property |
|---|---|---|---|---|---|---|---|---|---|
| 12 | 4 | Mid | 6 | 13 | 9 | 27 | +2 | +1 | Cancel |
c5D

| Damage | Stun | Guard | Startup | Active | Recovery | Total | Hit Adv | Block Adv | Property |
|---|---|---|---|---|---|---|---|---|---|
| 20 | 4 | Mid | 12 | 14 | 25 | 50 | -15 | -16 | Cancel |
Far Standing Normals
f5A

| Damage | Stun | Guard | Startup | Active | Recovery | Total | Hit Adv | Block Adv | Property |
|---|---|---|---|---|---|---|---|---|---|
| 6 | 2 | Mid | 8 | 5 | 17 | 29 | -6 | -5 | Cancel |
f5B

| Damage | Stun | Guard | Startup | Active | Recovery | Total | Hit Adv | Block Adv | Property |
|---|---|---|---|---|---|---|---|---|---|
| 8 | 2 | Mid | 4 | 6 | 4 | 13 | +6 | +7 | Cancel |
f5C

| Damage | Stun | Guard | Startup | Active | Recovery | Total | Hit Adv | Block Adv | Property |
|---|---|---|---|---|---|---|---|---|---|
| 16 | 4 | Mid | 11 | 10 | 22 | 42 | -9 | -10 | / |
f5D

| Damage | Stun | Guard | Startup | Active | Recovery | Total | Hit Adv | Block Adv | Property |
|---|---|---|---|---|---|---|---|---|---|
| 18 | 4 | Mid | 8 | 10 | 12 | 29 | +1 | 0 | / |
Crouching Normals
2A

| Damage | Stun | Guard | Startup | Active | Recovery | Total | Hit Adv | Block Adv | Property |
|---|---|---|---|---|---|---|---|---|---|
| 6 | 2 | Mid | 6 | 11 | 0 | 16 | +5 | +6 | Cancel |
2B

| Damage | Stun | Guard | Startup | Active | Recovery | Total | Hit Adv | Block Adv | Property |
|---|---|---|---|---|---|---|---|---|---|
| 8 | 2 | Low | 6 | 7 | 6 | 18 | +3 | +4 | Cancel |
2C

| Damage | Stun | Guard | Startup | Active | Recovery | Total | Hit Adv | Block Adv | Property |
|---|---|---|---|---|---|---|---|---|---|
| 16 | 4 | Mid | 9 | 6 | 9 | 23 | +9 | +8 | Cancel |
2D

| Damage | Stun | Guard | Startup | Active | Recovery | Total | Hit Adv | Block Adv | Property |
|---|---|---|---|---|---|---|---|---|---|
| 16 | 4 | Low | 11 | 9 | 18 | 37 | KD | -4 | Cancel |
Jumping Normals
jA


| Version | Damage | Stun | Guard | Startup | Active | Recovery | Total | Hit Adv | Block Adv | Property | |
|---|---|---|---|---|---|---|---|---|---|---|---|
| Diagonal Jump | 8 | 2 | Overhead | 19 | ∞ | - | - | - | - | - | |
| |||||||||||
| Neutral Jump | 8 | 2 | Overhead | 6 | ∞ | - | - | - | - | - | |
| |||||||||||
jB

- Crosses up.
| Version | Damage | Stun | Guard | Startup | Active | Recovery | Total | Hit Adv | Block Adv | Property | |
|---|---|---|---|---|---|---|---|---|---|---|---|
| Diagonal Jump | 10 | 2 | Overhead | 6 | ∞ | - | - | - | - | - | |
| |||||||||||
| Neutral Jump | 10 | 2 | Overhead | 6 | ∞ | - | - | - | - | - | |
| |||||||||||

jC
| Version | Damage | Stun | Guard | Startup | Active | Recovery | Total | Hit Adv | Block Adv | Property | |
|---|---|---|---|---|---|---|---|---|---|---|---|
| Diagonal Jump | 18 | 4 | Overhead | 19 | 19 | - | - | - | - | - | |
| |||||||||||
| Neutral Jump | 18 | 4 | Overhead | 6 | 16 | - | - | - | - | - | |
| |||||||||||
jD
- Crosses up.
- Alternates between a large and small hitbox.
Active Frames 5-7, 11-13
| Version | Damage | Stun | Guard | Startup | Active | Recovery | Total | Hit Adv | Block Adv | Property |
|---|---|---|---|---|---|---|---|---|---|---|
| Diagonal Jump | 20 | 4 | Overhead | 9 | 16 | - | - | - | - | - |
| Neutral Jump | 20 | 4 | Overhead | 6 | 16 | - | - | - | - | - |
System Normals
Lane Blast
C+D


| Version | Damage | Stun | Guard | Startup | Active | Recovery | Total | Hit Adv | Block Adv | Property |
|---|---|---|---|---|---|---|---|---|---|---|
| Front Lane | 22 | 5 | Mid | 13 | 9 | 8 | 29 | KD | +2 | Cancel, Lane Shift |
| Back Lane | 22 | 5 | Mid | 13 | 8 | 11 | 31 | KD | 0 | Cancel, Lane Shift |
Lane Attack
A/B/C/D from opposite lane


| Version | Damage | Stun | Guard | Startup | Active | Recovery | Total | Hit Adv | Block Adv | Property | |
|---|---|---|---|---|---|---|---|---|---|---|---|
| A/B | 20 | 2 | Overhead | 5 | - | 4 | - | - | - | / | |
| |||||||||||
| C/D | 20 | 4 | Overhead | 5 | - | 4 | - | - | - | / | |
| |||||||||||
Dodge Attack
6A during proximity guard

| Damage | Stun | Guard | Startup | Active | Recovery | Total | Hit Adv | Block Adv | Property | |
|---|---|---|---|---|---|---|---|---|---|---|
| 11 | 5 | Mid | 12 | 7 | 14 | 30 | Air Reset | -2 | Cancel, Upper-Body Invuln 1-18F | |
| ||||||||||


Throws
- All of Krauser's throws have the same range.
C Throw
close 4/6C

| Damage | Stun | Guard | Startup | Active | Recovery | Total | Hit Adv | Block Adv | Property | |
|---|---|---|---|---|---|---|---|---|---|---|
| 26 | 3 | Throw | 1 | 1 | / | - | KD | / | / | |
| ||||||||||

3C Throw
close 3C

| Damage | Stun | Guard | Startup | Active | Recovery | Total | Hit Adv | Block Adv | Property | |
|---|---|---|---|---|---|---|---|---|---|---|
| 26 | 3 | Throw | 1 | 1 | / | - | KD | / | / | |
| ||||||||||

D Throw
close 6D

| Damage | Stun | Guard | Startup | Active | Recovery | Total | Hit Adv | Block Adv | Property | |
|---|---|---|---|---|---|---|---|---|---|---|
| 20~48 (4 x 5~12) | 0 | Throw | 1 | 1 | / | - | KD | / | / | |
| ||||||||||

Special Moves
High Blitz Ball (214P)
214A/C

| Version | Damage | Stun | Guard | Startup | Active | Recovery | Total | Hit Adv | Block Adv | Property | |
|---|---|---|---|---|---|---|---|---|---|---|---|
| A | 15 (3) | 3 | Mid | 16 | - | 28 | 43 | KD | +2 | / | |
| |||||||||||
| C | 22 (5) | 6 | Mid | 19 | - | 37 | 55 | KD | -3 | / | |
| |||||||||||
Low Blitz Ball (214K)
214B/D

| Version | Damage | Stun | Guard | Startup | Active | Recovery | Total | Hit Adv | Block Adv | Property | |
|---|---|---|---|---|---|---|---|---|---|---|---|
| B | 15 (3) | 3 | Mid | 16 | - | 28 | 43 | KD | +6 | / | |
| |||||||||||
| D | 22 (5) | 6 | Mid | 19 | - | 37 | 55 | KD | -7 | / | |
| |||||||||||
Leg Tomahawk (23K)
23B/D


| Version | Damage | Stun | Guard | Startup | Active | Recovery | Total | Hit Adv | Block Adv | Property | |
|---|---|---|---|---|---|---|---|---|---|---|---|
| B | 16 (4) | 3 | Mid | 13 | 12 | 20 | 44 | -11 | -14 | - | |
| |||||||||||
| D | 22 (5) | 6 | Mid | 17 | 16 | 20 | 52 | -7 | -14 | - | |
| |||||||||||
Atemi Nage (41236P)
41236A/C

Recovery
Activation


| Version | Damage | Stun | Guard | Startup | Active | Recovery | Total | Hit Adv | Block Adv | Property | |
|---|---|---|---|---|---|---|---|---|---|---|---|
| A | 18 | 3 | / | 1 | 12 | 17 | 29 | KD | / | / | |
| |||||||||||
| C | 18 | 6 | / | 1 | 12 | 17 | 29 | KD | / | / | |
Desperation Move
Kaiser Wave ([4]9A+C)
When health is flashing
[4]9A+C

| Damage | Stun | Guard | Startup | Active | Recovery | Total | Hit Adv | Block Adv | Property | |
|---|---|---|---|---|---|---|---|---|---|---|
| 40 (10) | 4 | Mid | 36 | - | 39 | 73 | KD | +3 | / | |
| ||||||||||


Combos
- 2C/c5C/c5D 214B
- 2C > 23B
- c5A > c5C > 23B
- (1P only glitch, has to be frame perfect) Meaty 2A x 5 > f5C or CD
Strategy
The Basics
Krauser plays like a pure defensive wall that keeps his opponent in check with his array of fireballs and long reaching normals. The fast startup and recovery of his Blitzball gives him incredible spatial control and forces even other defense-centric characters such as Joe and Jubei to change their normal gameplan and go on offense against him. Unlike a traditional zoner, however, Krauser does not have an invulnerable anti-air/reversal move, having to rely on his normals, Leg Tomahawk and dodge attack to stop jump-ins instead. Good spacing is essential to playing Krauser effectively.
You have 4 different versions of the Blitzball in your arsenal, but most of the time you'll want to stick to the B version, as high Blitzballs whiff against all crouching characters (save for Bear), and heavy Blitzballs are riskier to throw as they have longer recovery. Your go-to normals are 5B; a fast side kick that also functions as an anti-air from the right distance, 2A/2C; a cancelable chop with decent reach, and 5C; a punch with massive range that often catches people off guard thanks to its reach. Avoid overusing his crouching kicks; while still useful in many situations, they have rather poor frame data and you're better off using his other normals whenever possible. You'll generally want to cancel all your pokes into B Blitzball both on hit and block to keep your pressure going while also dealing chip damage.
Leg Tomahawk is your most reliable anti-air if you predict a jump, but the long startup makes it near impossible to use on reaction. Realistically you'll be using either 5B, 5C or dodge attack to stop jump-ins most of the time, depending on the distance between you and your opponent. Close D can also function as an anti-air in some situations, but the long startup makes it somewhat risky.
Krauser has his own variant of Geese's trademark Atemi Nage counter, but unlike Geese, Krauser can use this only to counter mid attacks, making it useless against jumps, lows and specials. The damage from landing it isn't terribly high but the move is still occasionally worth going for as it throws your opponent all the way to the corner of a stage even when landed midscreen, allowing you to start your deadly corner pressure. Always use the C version of the move as it deals more stun damage; both versions are identical otherwise.
Once you've managed to corner your opponent, poke them with a fast normal like 5B or 2A, cancel into B Blitzball, rinse and repeat. This blockstring is simple but very tricky to get out of without an invulnerable reversal, so try to go for it whenever possible. Even if your opponent manages to eventually break free, they'll most like take a good chunk of chip damage in the process.
Advanced Strategy
Krauser's super, Kaiser Wave, requires a back charge; down-back is not a valid charge direction for the move. A Krauser on low health simply walking away from his opponent is usually a telltale sign he's going for a super, so it's much better to "mask" the charge by throwing out some safe normals such as 5B while you're completing the charge. Despite its huge size, Kaiser Wave still has the properties of a normal projectile in this game and disappears upon colliding with another projectile, even Jubei's senbeis.
Krauser's 2A has an interesting bug: if done by 1P with frame perfect timing on opponent's wakeup, it becomes unblockable and you'll be able to rapid fire chain the move into itself in a way which isn't normally possible. The timing is severe but it opens up the possibility for some neat trick combos on a character with otherwise very limited combo potential, so it's worth practicing.


