mNo edit summary |
(movelist + frame data + hitboxes + numpad + readyyyyy) |
||
| Line 19: | Line 19: | ||
|} | |} | ||
== | ==Move List== | ||
{| border="1em" cellspacing="0" style="border: 1px solid #999;" | |||
| align="center" | Standing || align="center" | Walking || align="center" | Crouching || align="center" | Jumping || align="center" | Taunting | |||
{| border="1em | |||
| | |||
| | |||
| | |||
| | |||
| | |||
| | |||
|- | |- | ||
| | | align="center"; valign="bottom" | [[File:FFS Bear Stand.png|bottom]] || align="center"; valign="bottom" | [[File:FFS Bear Walk.png|bottom]] || align="center"; valign="bottom" | [[File:FFS Bear Crouch.png|bottom]] || align="center"; valign="bottom" | [[File:FFS Bear Jump.png|bottom]] || align="center"; valign="bottom" | [[File:FFS Bear Taunt.gif|bottom]] | ||
|- | |- | ||
| align="center" | || align="center" | || align="center" | || align="center" | 46F (4+39+3) duration, the fastest jump in the game. || align="center" | | |||
|} | |} | ||
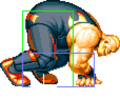
===Close Standing Normals=== | |||
===== <span class="invisible-header">c5A</span> ===== | |||
<font style="visibility:hidden" size="0"></font> | |||
{{MoveData | |||
|image=FFS_Bear_c5A.png | |||
|subtitle=Elbow/エルボー | |||
|caption= | |||
|name=c5A | |||
|data= | |||
{{AttackData-FFS | |||
|Damage=9 | |||
|Stun=2 | |||
|Guard=Mid | |||
|Startup=7 | |||
|Active=7 | |||
|Recovery=6 | |||
|Total=19 | |||
|Hit Adv=+3 | |||
|Block Adv=+4 | |||
|Property= | |||
|description= | |||
}} | |||
}} | |||
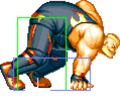
===== <span class="invisible-header">c5B</span> ===== | |||
<font style="visibility:hidden" size="0"></font> | |||
{{MoveData | |||
|image=FFS_Bear_c5B.png | |||
|subtitle=Knee Attack/ニーアタック | |||
|caption= | |||
|name=c5B | |||
|data= | |||
{{AttackData-FFS | |||
|Damage=12 | |||
|Stun=2 | |||
|Guard=Mid | |||
|Startup=8 | |||
|Active=9 | |||
|Recovery=10 | |||
|Total=26 | |||
|Hit Adv=-3 | |||
|Block Adv=-2 | |||
|Property= | |||
|description= | |||
}} | |||
}} | |||
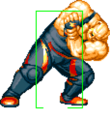
===== <span class="invisible-header">c5C</span> ===== | |||
<font style="visibility:hidden" size="0"></font> | |||
{{MoveData | |||
|image=FFS_Bear_c5A.png | |||
|subtitle=Elbow/エルボー | |||
|caption= | |||
|name=c5C | |||
|data= | |||
{{AttackData-FFS | |||
|Damage=22 | |||
|Stun=4 | |||
|Guard=Mid | |||
|Startup=12 | |||
|Active=10 | |||
|Recovery=8 | |||
|Total=29 | |||
|Hit Adv=+6 | |||
|Block Adv=+5 | |||
|Property= | |||
|description= | |||
}} | |||
}} | |||
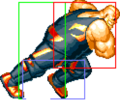
===== <span class="invisible-header">c5D</span> ===== | |||
<font style="visibility:hidden" size="0"></font> | |||
{{MoveData | |||
|image=FFS_Bear_c5D 1.png | |||
|subtitle=Stomping/ストンピング | |||
|caption= | |||
|name=c5D | |||
|data= | |||
{{AttackData-FFS | |||
|Damage=24 | |||
|Stun=4 | |||
|Guard=Mid | |||
|Startup=13 | |||
|Active=10 | |||
|Recovery=9 | |||
|Total=31 | |||
|Hit Adv=+5 | |||
|Block Adv=+4 | |||
|Property= | |||
|description= | |||
<gallery class="mw-collapsible"> | |||
FFS Bear c5D.png| | |||
FFS Bear c5D 1.png| | |||
</gallery> | |||
}} | |||
}} | |||
===Far Standing Normals=== | |||
===== <span class="invisible-header">f5A</span> ===== | |||
<font style="visibility:hidden" size="0"></font> | |||
{{MoveData | |||
|image=FFS_Bear_f5A.png | |||
|subtitle=Jab/ジャブ | |||
|caption= | |||
|name=f5A | |||
|data= | |||
{{AttackData-FFS | |||
|Damage=7 | |||
|Stun=2 | |||
|Guard=Mid | |||
|Startup=6 | |||
|Active=8 | |||
|Recovery=7 | |||
|Total=20 | |||
|Hit Adv=+1 | |||
|Block Adv=+2 | |||
|Property= | |||
|description= | |||
}} | |||
}} | |||
===== <span class="invisible-header">f5B</span> ===== | |||
<font style="visibility:hidden" size="0"></font> | |||
{{MoveData | |||
|image=FFS_Bear_f5B.png | |||
|subtitle=前蹴り | |||
|caption= | |||
|name=f5B | |||
|data= | |||
{{AttackData-FFS | |||
|Damage=10 | |||
|Stun=2 | |||
|Guard=Mid | |||
|Startup=10 | |||
|Active=8 | |||
|Recovery=10 | |||
|Total=27 | |||
|Hit Adv=-2 | |||
|Block Adv=-1 | |||
|Property= | |||
|description= | |||
}} | |||
}} | |||
===== <span class="invisible-header">f5C</span> ===== | |||
<font style="visibility:hidden" size="0"></font> | |||
{{MoveData | |||
|image=FFS_Bear_f5C.png | |||
|subtitle=ナックルパート | |||
|caption= | |||
|name=f5C | |||
|data= | |||
{{AttackData-FFS | |||
|Damage=20 | |||
|Stun=4 | |||
|Guard=Mid | |||
|Startup=12 | |||
|Active=11 | |||
|Recovery=12 | |||
|Total=34 | |||
|Hit Adv=-5 | |||
|Block Adv=-6 | |||
|Property= | |||
|description= | |||
}} | |||
}} | |||
===== <span class="invisible-header">f5D</span> ===== | |||
<font style="visibility:hidden" size="0"></font> | |||
{{MoveData | |||
|image=FFS_Bear_f5D 2.png | |||
|subtitle=Dropkick/ドロップキック | |||
|caption= | |||
|name=f5D | |||
|data= | |||
{{AttackData-FFS | |||
|Damage=23 | |||
|Stun=4 | |||
|Guard=Mid | |||
|Startup=16 | |||
|Active=12 | |||
|Recovery=11 | |||
|Total=38 | |||
|Hit Adv=-5 | |||
|Block Adv=-6 | |||
|Property=Throw Invincible 16-27F | |||
|description= | |||
<gallery class="mw-collapsible"> | |||
FFS Bear c5D.png| | |||
FFS Bear f5D 1.png| | |||
FFS Bear f5D 2.png| | |||
FFS Bear f5D 1.png| | |||
FFS Bear f5D 4.png| | |||
</gallery> | |||
}} | |||
}} | |||
===Crouching Normals=== | |||
===== <span class="invisible-header">2A</span> ===== | |||
<font style="visibility:hidden" size="0"></font> | |||
{{MoveData | |||
|image=FFS_Bear_2A.png | |||
|subtitle=しゃがみストレート | |||
|caption= | |||
|name=2A | |||
|data= | |||
{{AttackData-FFS | |||
|Damage=7 | |||
|Stun=2 | |||
|Guard=Mid | |||
|Startup=6 | |||
|Active=8 | |||
|Recovery=7 | |||
|Total=20 | |||
|Hit Adv=+1 | |||
|Block Adv=+2 | |||
|Property= | |||
|description= | |||
}} | |||
}} | |||
===== <span class="invisible-header">2B</span> ===== | |||
<font style="visibility:hidden" size="0"></font> | |||
{{MoveData | |||
|image=FFS_Bear_2B.png | |||
|subtitle=Slide Kick/スライドキック | |||
|caption= | |||
|name=2B | |||
|data= | |||
{{AttackData-FFS | |||
|Damage=10 | |||
|Stun=2 | |||
|Guard=Low | |||
|Startup=8 | |||
|Active=9 | |||
|Recovery=10 | |||
|Total=26 | |||
|Hit Adv=-3 | |||
|Block Adv=-2 | |||
|Property= | |||
|description= | |||
}} | |||
}} | |||
===== <span class="invisible-header">2C</span> ===== | |||
<font style="visibility:hidden" size="0"></font> | |||
{{MoveData | |||
|image=FFS Bear 2A.png | |||
|subtitle=しゃがみストレート | |||
|caption= | |||
|name=2C | |||
|data= | |||
{{AttackData-FFS | |||
|Damage=20 | |||
|Stun=4 | |||
|Guard=Mid | |||
|Startup=10 | |||
|Active=13 | |||
|Recovery=10 | |||
|Total=32 | |||
|Hit Adv=+1 | |||
|Block Adv=0 | |||
|Property= | |||
|description= | |||
}} | |||
}} | |||
===== <span class="invisible-header">2D</span> ===== | |||
<font style="visibility:hidden" size="0"></font> | |||
{{MoveData | |||
|image=FFS_Bear_2D.png | |||
|subtitle=Slide Kick/スライドキック | |||
|caption= | |||
|name=2D | |||
|data= | |||
{{AttackData-FFS | |||
|Damage=23 | |||
|Stun=4 | |||
|Guard=Low | |||
|Startup=11 | |||
|Active=13 | |||
|Recovery=21 | |||
|Total=44 | |||
|Hit Adv=KD (+28) | |||
|Block Adv=-11 | |||
|Property= | |||
|description= | |||
}} | |||
}} | |||
===Jumping Normals=== | |||
===== <span class="invisible-header">jA</span> ===== | |||
<font style="visibility:hidden" size="0"></font> | |||
{{MoveData | |||
|image=FFS_Bear_jA.png | |||
|subtitle=Albatross Chop/アルバトロスチョップ | |||
|caption= | |||
|name=jA | |||
|data= | |||
{{AttackData-FFS | |||
|version=Diagonal Jump | |||
|Damage=9 | |||
|Stun=2 | |||
|Guard=Overhead | |||
|Startup=6 | |||
|Active=∞ | |||
|Recovery=/ | |||
|Total=/ | |||
|Hit Adv= | |||
|Block Adv= | |||
|Property= | |||
|description= | |||
}} | |||
{{AttackData-FFS | |||
|header=no | |||
|version=Neutral Jump | |||
|Damage=9 | |||
|Stun=2 | |||
|Guard=Overhead | |||
|Startup=8 | |||
|Active=∞ | |||
|Recovery=/ | |||
|Total=/ | |||
|Hit Adv= | |||
|Block Adv= | |||
|Property= | |||
|description= | |||
}} | |||
}} | |||
===== <span class="invisible-header">jB</span> ===== | |||
<font style="visibility:hidden" size="0"></font> | |||
{{MoveData | |||
|image=FFS_Bear_jB.png | |||
|subtitle=Stamp Kick/スタンプキック | |||
|caption= | |||
|name=jB | |||
|data= | |||
{{AttackData-FFS | |||
|version=Diagonal Jump | |||
|Damage=12 | |||
|Stun=2 | |||
|Guard=Overhead | |||
|Startup=8 | |||
|Active=∞ | |||
|Recovery=/ | |||
|Total=/ | |||
|Hit Adv= | |||
|Block Adv= | |||
|Property= | |||
|description= | |||
}} | |||
{{AttackData-FFS | |||
|header=no | |||
|version=Neutral Jump | |||
|Damage=12 | |||
|Stun=2 | |||
|Guard=Overhead | |||
|Startup=5 | |||
|Active=∞ | |||
|Recovery=/ | |||
|Total=/ | |||
|Hit Adv= | |||
|Block Adv= | |||
|Property= | |||
|description= | |||
}} | |||
}} | |||
===== <span class="invisible-header">jC</span> ===== | |||
<font style="visibility:hidden" size="0"></font> | |||
{{MoveData | |||
|image=FFS_Bear_jA.png | |||
|subtitle=Albatross Chop/アルバトロスチョップ | |||
|caption= | |||
|name=jC | |||
|data= | |||
{{AttackData-FFS | |||
|version=Diagonal Jump | |||
|Damage=22 | |||
|Stun=4 | |||
|Guard=Overhead | |||
|Startup=11 | |||
|Active=18 | |||
|Recovery=/ | |||
|Total=/ | |||
|Hit Adv= | |||
|Block Adv= | |||
|Property= | |||
|description= | |||
}} | |||
{{AttackData-FFS | |||
|header=no | |||
|version=Neutral Jump | |||
|Damage=22 | |||
|Stun=4 | |||
|Guard=Overhead | |||
|Startup=11 | |||
|Active=17 | |||
|Recovery=/ | |||
|Total=/ | |||
|Hit Adv= | |||
|Block Adv= | |||
|Property= | |||
|description= | |||
}} | |||
}} | |||
===== <span class="invisible-header">jD</span> ===== | |||
<font style="visibility:hidden" size="0"></font> | |||
{{MoveData | |||
|image=FFS_Bear_j9D.png | |||
|image2=FFS_Bear_jB.png | |||
|subtitle= | |||
|caption=Diagonal Jump | |||
|caption2=Neutral Jump | |||
|name=jD | |||
|data= | |||
{{AttackData-FFS | |||
|version=Diagonal Jump | |||
|subtitle=Flying Dropkick/フライングドロップキック | |||
|Damage=24 | |||
|Stun=4 | |||
|Guard=Overhead | |||
|Startup=13 | |||
|Active=18 | |||
|Recovery=/ | |||
|Total=/ | |||
|Hit Adv= | |||
|Block Adv= | |||
|Property= | |||
|description= | |||
}} | |||
{{AttackData-FFS | |||
|header=no | |||
|version=Neutral Jump | |||
|subtitle=Stamp Kick/スタンプキック | |||
|Damage=24 | |||
|Stun=4 | |||
|Guard=Overhead | |||
|Startup=13 | |||
|Active=18 | |||
|Recovery=/ | |||
|Total=/ | |||
|Hit Adv= | |||
|Block Adv= | |||
|Property= | |||
|description= | |||
}} | |||
}} | |||
===Universal Mechanics=== | |||
===== <span class="invisible-header">Lane Blast (CD)</span> ===== | |||
<font style="visibility:hidden" size="0"></font> | |||
{{MoveData | |||
|image=FFS_Bear_CD_Front.png | |||
|image2=FFS_Bear_CD_Back.png | |||
|subtitle=Outstep Kick/アウトステップキック | |||
|caption=Front Lane | |||
|caption2=Back Lane | |||
|name=Lane Blast | |||
|input=C+D | |||
|data= | |||
{{AttackData-FFS | |||
|version=Front Lane | |||
|Damage=22 | |||
|Stun=5 | |||
|Guard=Mid | |||
|Startup=15 | |||
|Active=12 | |||
|Recovery=8 | |||
|Total=24 | |||
|Hit Adv=KD | |||
|Block Adv=-1 | |||
|Property=Cancel, Lane Shift | |||
|description= | |||
}} | |||
{{AttackData-FFS | |||
|header=no | |||
|version=Back Lane | |||
|Damage=22 | |||
|Stun=5 | |||
|Guard=Mid | |||
|Startup=15 | |||
|Active=12 | |||
|Recovery=15 | |||
|Total=41 | |||
|Hit Adv=KD | |||
|Block Adv=-8 | |||
|Property=Cancel, Lane Shift | |||
|description= | |||
}} | |||
}} | |||
===== <span class="invisible-header">Lane Attack</span> ===== | |||
<font style="visibility:hidden" size="0"></font> | |||
{{MoveData | |||
|image=FFS_Bear_Lane_Attack_Front.png | |||
|image2=FFS Bear Lane Attack Back.png | |||
|subtitle=Flying Dropkick/フライングドロップキック | |||
|caption=Front Lane | |||
|caption2=Back Lane | |||
|name=Lane Attack | |||
|input=A/B/C/D from opposite lane | |||
|data= | |||
{{AttackData-FFS | |||
|version=A/B | |||
|Damage=20 | |||
|Stun=2 | |||
|Guard=Overhead | |||
|Startup= | |||
|Active= | |||
|Recovery=4 | |||
|Total= | |||
|Hit Adv= | |||
|Block Adv= | |||
|Property=/ | |||
|description= * Straight and fast lane attack. | |||
}} | |||
{{AttackData-FFS | |||
|header=no | |||
|version=C/D | |||
|Damage=20 | |||
|Stun=4 | |||
|Guard=Overhead | |||
|Startup= | |||
|Active= | |||
|Recovery=4 | |||
|Total= | |||
|Hit Adv= | |||
|Block Adv= | |||
|Property=/ | |||
|description= * Slower high-angle lane attack. | |||
}} | |||
}} | |||
===== <span class="invisible-header">Dodge Attack</span> ===== | |||
<font style="visibility:hidden" size="0"></font> | |||
{{MoveData | |||
|image=FFS_Bear_Dodge_Attack 3.png | |||
|subtitle=Bear Claw/ベアクロー | |||
|caption= | |||
|name=Dodge Attack | |||
|input=6A during proximity guard | |||
|data= | |||
{{AttackData-FFS | |||
|Damage=11 | |||
|Stun=5 | |||
|Guard=Mid | |||
|Startup=20 | |||
|Active=11 | |||
|Recovery=9 | |||
|Total=39 | |||
|Hit Adv=Air Reset (+20) | |||
|Block Adv=-1 | |||
|Property=Cancel, Upper-Body Invuln 1-39F | |||
|description= * Slow to start up but keeps its invincibility through recovery, unlike other dodge attacks. | |||
<gallery class="mw-collapsible"> | |||
FFS_Bear_Dodge_Attack.png| | |||
FFS Bear Dodge Attack 1.png| | |||
FFS Bear Dodge Attack 2.png| | |||
FFS Bear Dodge Attack 3.png| | |||
FFS Bear Dodge Attack 1.png| | |||
</gallery> | |||
}} | |||
}} | |||
===Throws=== | |||
===== <span class="invisible-header">Power Bomb (6C)</span> ===== | |||
<font style="visibility:hidden" size="0"></font> | |||
{{MoveData | |||
|image=FFS_Bear_C Throw.png | |||
|caption= | |||
|name=Power Bomb | |||
|input=close 6C | |||
|data= | |||
{{AttackData-FFS | |||
|Damage=26 | |||
|Stun=3 | |||
|Guard=Throw | |||
|Startup=1 | |||
|Active=1 | |||
|Recovery=/ | |||
|Hit Adv=KD (+78) | |||
|Block Adv=/ | |||
|Property=/ | |||
|description= * Same damage as Bear Bomber and has a more advantageous knockdown. | |||
<gallery class="mw-collapsible"> | |||
FFS Bear 6C Throw 1.png| | |||
</gallery> | |||
}} | |||
}} | |||
===== <span class="invisible-header">Back Drop (4C)</span> ===== | |||
<font style="visibility:hidden" size="0"></font> | |||
{{MoveData | |||
|image=FFS_Bear_C Throw.png | |||
|caption= | |||
|name=Back Drop | |||
|input=close 4C | |||
|data= | |||
{{AttackData-FFS | |||
|Damage=26 | |||
|Stun=3 | |||
|Guard=Throw | |||
|Startup=1 | |||
|Active=1 | |||
|Recovery=/ | |||
|Hit Adv=KD (+79) | |||
|Block Adv=/ | |||
|Property=/ | |||
|description= * Switches sides. | |||
<gallery class="mw-collapsible"> | |||
FFS Bear 4C Throw 1.png| | |||
</gallery> | |||
}} | |||
}} | |||
===== <span class="invisible-header">Lariat Drop (3C)</span> ===== | |||
<font style="visibility:hidden" size="0"></font> | |||
{{MoveData | |||
|image=FFS_Bear_3C Throw.png | |||
|caption= | |||
|name=Lariat Drop | |||
|input=close 3C | |||
|data= | |||
{{AttackData-FFS | |||
|Damage=26 | |||
|Stun=3 | |||
|Guard=Throw | |||
|Startup=1 | |||
|Active=1 | |||
|Recovery=/ | |||
|Hit Adv=KD (+18) | |||
|Block Adv=/ | |||
|Property=/ | |||
|description= * Switches sides. | |||
* Very poor advantage. | |||
<gallery class="mw-collapsible"> | |||
FFS Bear 3C Throw 1.png| | |||
</gallery> | |||
}} | |||
}} | |||
===== <span class="invisible-header">Neck Hang (6D)</span> ===== | |||
<font style="visibility:hidden" size="0"></font> | |||
{{MoveData | |||
|image=FFS_Bear_D Throw.png | |||
|caption= | |||
|name=Neck Hang | |||
|input=close 6D | |||
|data= | |||
{{AttackData-FFS | |||
|Damage=4x8 | |||
|Stun=0 | |||
|Guard=Throw | |||
|Startup=1 | |||
|Active=1 | |||
|Recovery=/ | |||
|Hit Adv=+29 | |||
|Block Adv=/ | |||
|Property=/ | |||
|description= | |||
<gallery class="mw-collapsible"> | |||
FFS Bear 6D Throw 1.png| | |||
</gallery> | |||
}} | |||
}} | |||
===== <span class="invisible-header">Headbutt (4D)</span> ===== | |||
<font style="visibility:hidden" size="0"></font> | |||
{{MoveData | |||
|image=FFS_Bear_D Throw.png | |||
|caption= | |||
|name=Headbutt | |||
|input=close 4D | |||
|data= | |||
{{AttackData-FFS | |||
|Damage=4x8 | |||
|Stun=0 | |||
|Guard=Throw | |||
|Startup=1 | |||
|Active=1 | |||
|Recovery=/ | |||
|Hit Adv=+28 | |||
|Block Adv=/ | |||
|Property=/ | |||
|description= | |||
<gallery class="mw-collapsible"> | |||
FFS Bear 4D Throw 1.png| | |||
</gallery> | |||
}} | |||
}} | |||
===== <span class="invisible-header">Lift Up Throw (3D)</span> ===== | |||
<font style="visibility:hidden" size="0"></font> | |||
{{MoveData | |||
|image=FFS_Bear_3D Throw.png | |||
|caption= | |||
|name=Lift Up Throw | |||
|input=close 3D | |||
|data= | |||
{{AttackData-FFS | |||
|Damage=26 | |||
|Stun=3 | |||
|Guard=Throw | |||
|Startup=1 | |||
|Active=1 | |||
|Recovery=/ | |||
|Hit Adv=KD (+39) | |||
|Block Adv=/ | |||
|Property=/ | |||
|description= * Switches sides. | |||
<gallery class="mw-collapsible"> | |||
FFS Bear 3D Throw 1.png| | |||
</gallery> | |||
}} | |||
}} | |||
===== <span class="invisible-header">Bear Hug (9D)</span> ===== | |||
<font style="visibility:hidden" size="0"></font> | |||
{{MoveData | |||
|image=FFS_Bear_9D Throw.png | |||
|caption= | |||
|name=Bear Hug | |||
|input=close 9D | |||
|data= | |||
{{AttackData-FFS | |||
|Damage=4x12 | |||
|Stun=0 | |||
|Guard=Throw | |||
|Startup=1 | |||
|Active=1 | |||
|Recovery=/ | |||
|Hit Adv=+30 | |||
|Block Adv=/ | |||
|Property=/ | |||
|description= | |||
<gallery class="mw-collapsible"> | |||
FFS Bear 9D Throw 1.png| | |||
</gallery> | |||
}} | |||
}} | |||
===Special Moves=== | ===Special Moves=== | ||
{| | ===== <span class="invisible-header">Giant Bomb ([1]6P)</span> ===== | ||
|- | {{MoveData | ||
| | | name = Giant Bomb | ||
|- | | input = [1]6P | ||
| | | subtitle = | ||
|- | | image = FFS Bear 16P 2.png | ||
| | | caption = | ||
|- | | data = ※Recovery on whiff. | ||
| Bear Bomber || | <gallery class="mw-collapsible"> | ||
| | FFS Bear 16P.png| | ||
| | FFS Bear 16P 1.png| | ||
< | FFS Bear 16P 2.png| | ||
FFS Bear 16P 3.png|Invincible during recovery on contact | |||
</gallery> | |||
{{AttackData-FFS | |||
| version = A | |||
| subtitle = | |||
| Damage = 16 (4) | |||
| Stun = 3 | |||
| Guard = Mid | |||
| Startup = 37 | |||
| Active = 12 | |||
| Recovery = 2※ | |||
| Total = 50 | |||
| Hit Adv = KD (+41) | |||
| Block Adv = +2 | |||
| Property = Invincible 1-25F, Upper-Body Invuln 26-48F, Throw Invincible | |||
| description = Travels 3/4ths of the screen. | |||
* Charge time: 45F. | |||
}} | |||
{{AttackData-FFS | |||
| header = no | |||
| version = C | |||
| subtitle = | |||
| Damage = 22 (5) | |||
| Stun = 6 | |||
| Guard = Mid | |||
| Startup = 57 | |||
| Active = 16 | |||
| Recovery = 2※ | |||
| Total = 74 | |||
| Hit Adv = KD (+74) | |||
| Block Adv = -4 | |||
| Property = Invincible 1-45F, Upper-Body Invuln 46-73F, Throw Invincible | |||
| description = Travels fullscreen. | |||
* Charge time: 60F. | |||
}} | |||
}} | |||
===== <span class="invisible-header">Super Drop Kick ([D])</span> ===== | |||
{{MoveData | |||
| name = Super Drop Kick | |||
| input = Hold D | |||
| subtitle = | |||
| image = FFS Bear HoldD 2.png | |||
| caption = | |||
| data = An advancing move that grows more powerful the longer the D button is held. The D button can begin charging during the match's intro, but the charge is reset between rounds. | |||
* Pressing D immediately after releasing the charge will cause Bear to execute a D normal or D throw instead of the dropkick. | |||
<gallery class="mw-collapsible mw-collapsed" data-expandtext="show detailed hitboxes" data-collapsetext="hide detailed hitboxes"> | |||
FFS Bear c5D.png| | |||
FFS Bear f5D 1.png| | |||
FFS Bear HoldD 2.png| | |||
FFS Bear f5D 1.png| | |||
FFS Bear HoldD 4.png| | |||
FFS Bear HoldD 5.png| | |||
FFS Bear f5D 1.png| | |||
FFS Bear c5D.png| | |||
</gallery> | |||
{{AttackData-FFS | |||
| version = 300F+ Charge | |||
| subtitle = 5+ Second Charge | |||
| Damage = 13 (3) | |||
| Stun = 3 | |||
| Guard = Mid | |||
| Startup = 21 | |||
| Active = 11 | |||
| Recovery = 12 | |||
| Total = 43 | |||
| Hit Adv = KD (+77) | |||
| Block Adv = -1 | |||
| Property = Invincible 1-11F, Foot Invuln after frame 18, Throw Invincible | |||
| description = | |||
}} | |||
{{AttackData-FFS | |||
| header = no | |||
| version = 720F+ Charge | |||
| subtitle = 12+ Second Charge | |||
| Damage = 33 (8) | |||
| Stun = 3 | |||
| Guard = Mid | |||
| Startup = 23 | |||
| Active = 11 | |||
| Recovery = 12 | |||
| Total = 45 | |||
| Hit Adv = KD (+77) | |||
| Block Adv = -1 | |||
| Property = Foot Invuln after frame 20, Throw Invincible | |||
| description = | |||
}} | |||
{{AttackData-FFS | |||
| header = no | |||
| version = 1200F+ Charge | |||
| subtitle = 20+ Second Charge | |||
| Damage = 53 (13) | |||
| Stun = 3 | |||
| Guard = Mid | |||
| Startup = 25 | |||
| Active = 11 | |||
| Recovery = 12 | |||
| Total = 47 | |||
| Hit Adv = KD (+77) | |||
| Block Adv = -1 | |||
| Property = Foot Invuln after frame 22, Throw Invincible | |||
| description = | |||
}} | |||
{{AttackData-FFS | |||
| header = no | |||
| version = 2400F+ Charge | |||
| subtitle = 40+ Second Charge | |||
| Damage = 73 (18) | |||
| Stun = 3 | |||
| Guard = Mid | |||
| Startup = 27 | |||
| Active = 11 | |||
| Recovery = 12 | |||
| Total = 49 | |||
| Hit Adv = KD (+77) | |||
| Block Adv = -1 | |||
| Property = Foot Invuln after frame 24, Throw Invincible | |||
| description = | |||
}} | |||
}} | |||
===== <span class="invisible-header">Bear Bomber (6428C)</span> ===== | |||
{{MoveData | |||
| name = Bear Bomber | |||
| input = 6428C | |||
| subtitle = | |||
| image = FFS Bear 6428C.png | |||
| caption = | |||
| data = | |||
{{AttackData-FFS | |||
| Damage = 26 | |||
| Stun = 3 | |||
| Guard = Throw | |||
| Startup = 1 | |||
| Active = 1 | |||
| Recovery = / | |||
| Total = / | |||
| Hit Adv = KD (+71) | |||
| Block Adv = / | |||
| Property = | |||
| description = A throw with average damage but immensely large range. | |||
* Can input 642A8C as an option select to get 2A instead of a jump when whiffed. If the opponent is in Bomber range, 2A will kara cancel to grab them. | |||
<gallery class="mw-collapsible"> | |||
FFS Bear 6428C 1.png| | |||
</gallery> | |||
}} | |||
}} | |||
=== | ===Desperation Move=== | ||
{| | ===== <span class="invisible-header">Fire Breath (63216BC)</span> ===== | ||
| | {{MoveData | ||
| | | name = Fire Breath | ||
|- | | input = 63216BC | ||
| | | subtitle = When health is flashing | ||
|- | | image = FFS Bear 63216BC 5.png | ||
| caption = | |||
| data = | |||
{{AttackData-FFS | |||
| Damage = 48 (12) | |||
| Stun = 4 | |||
| Guard = Mid | |||
| Startup = 30 | |||
| Active = 96 | |||
| Recovery = 16 | |||
| Total = 141 | |||
| Hit Adv = KD | |||
| Block Adv = +12 | |||
| Property = | |||
| description = * Flame is not full size until frame 36. | |||
<gallery class="mw-collapsible mw-collapsed" data-expandtext="show detailed hitboxes" data-collapsetext="hide detailed hitboxes"> | |||
FFS Bear 63216BC.png| | |||
FFS Bear 63216BC 1.png| | |||
FFS Bear 63216BC 2.png| | |||
FFS Bear 63216BC 3.png|30-32F (first active) | |||
FFS Bear 63216BC 4.png|33-35F | |||
FFS Bear 63216BC 5.png|36-38F, 45-47F, etc. (cycles) | |||
FFS Bear 63216BC 6.png|39-41F, 48-50F, etc. (cycles) | |||
FFS Bear 63216BC 7.png|42-44F, 51-53F, etc. (cycles) | |||
</gallery> | |||
}} | |||
}} | |||
==Combos== | ==Combos== | ||
Revision as of 03:39, 4 January 2025


Introduction
| Pros | Cons |
|---|---|
|
|
Move List
| Standing | Walking | Crouching | Jumping | Taunting |
 |
 |
 |
 |

|
| 46F (4+39+3) duration, the fastest jump in the game. |
Close Standing Normals
c5A
c5A
Elbow/エルボー
Elbow/エルボー

| Damage | Stun | Guard | Startup | Active | Recovery | Total | Hit Adv | Block Adv | Property |
|---|---|---|---|---|---|---|---|---|---|
| 9 | 2 | Mid | 7 | 7 | 6 | 19 | +3 | +4 | - |
c5B
c5B
Knee Attack/ニーアタック
Knee Attack/ニーアタック

| Damage | Stun | Guard | Startup | Active | Recovery | Total | Hit Adv | Block Adv | Property |
|---|---|---|---|---|---|---|---|---|---|
| 12 | 2 | Mid | 8 | 9 | 10 | 26 | -3 | -2 | - |
c5C
c5C
Elbow/エルボー
Elbow/エルボー
| Damage | Stun | Guard | Startup | Active | Recovery | Total | Hit Adv | Block Adv | Property |
|---|---|---|---|---|---|---|---|---|---|
| 22 | 4 | Mid | 12 | 10 | 8 | 29 | +6 | +5 | - |
c5D
c5D
Stomping/ストンピング
Stomping/ストンピング

| Damage | Stun | Guard | Startup | Active | Recovery | Total | Hit Adv | Block Adv | Property | |
|---|---|---|---|---|---|---|---|---|---|---|
| 24 | 4 | Mid | 13 | 10 | 9 | 31 | +5 | +4 | - | |
|
| ||||||||||

Far Standing Normals
f5A
f5A
Jab/ジャブ
Jab/ジャブ

| Damage | Stun | Guard | Startup | Active | Recovery | Total | Hit Adv | Block Adv | Property |
|---|---|---|---|---|---|---|---|---|---|
| 7 | 2 | Mid | 6 | 8 | 7 | 20 | +1 | +2 | - |
f5B
f5B
前蹴り
前蹴り

| Damage | Stun | Guard | Startup | Active | Recovery | Total | Hit Adv | Block Adv | Property |
|---|---|---|---|---|---|---|---|---|---|
| 10 | 2 | Mid | 10 | 8 | 10 | 27 | -2 | -1 | - |
f5C
f5C
ナックルパート
ナックルパート

| Damage | Stun | Guard | Startup | Active | Recovery | Total | Hit Adv | Block Adv | Property |
|---|---|---|---|---|---|---|---|---|---|
| 20 | 4 | Mid | 12 | 11 | 12 | 34 | -5 | -6 | - |
f5D
f5D
Dropkick/ドロップキック
Dropkick/ドロップキック

| Damage | Stun | Guard | Startup | Active | Recovery | Total | Hit Adv | Block Adv | Property | |
|---|---|---|---|---|---|---|---|---|---|---|
| 23 | 4 | Mid | 16 | 12 | 11 | 38 | -5 | -6 | Throw Invincible 16-27F | |
|
| ||||||||||


Crouching Normals
2A
2A
しゃがみストレート
しゃがみストレート

| Damage | Stun | Guard | Startup | Active | Recovery | Total | Hit Adv | Block Adv | Property |
|---|---|---|---|---|---|---|---|---|---|
| 7 | 2 | Mid | 6 | 8 | 7 | 20 | +1 | +2 | - |
2B
2B
Slide Kick/スライドキック
Slide Kick/スライドキック

| Damage | Stun | Guard | Startup | Active | Recovery | Total | Hit Adv | Block Adv | Property |
|---|---|---|---|---|---|---|---|---|---|
| 10 | 2 | Low | 8 | 9 | 10 | 26 | -3 | -2 | - |
2C
2C
しゃがみストレート
しゃがみストレート
| Damage | Stun | Guard | Startup | Active | Recovery | Total | Hit Adv | Block Adv | Property |
|---|---|---|---|---|---|---|---|---|---|
| 20 | 4 | Mid | 10 | 13 | 10 | 32 | +1 | 0 | - |
2D
2D
Slide Kick/スライドキック
Slide Kick/スライドキック

| Damage | Stun | Guard | Startup | Active | Recovery | Total | Hit Adv | Block Adv | Property |
|---|---|---|---|---|---|---|---|---|---|
| 23 | 4 | Low | 11 | 13 | 21 | 44 | KD (+28) | -11 | - |
Jumping Normals
jA
jA
Albatross Chop/アルバトロスチョップ
Albatross Chop/アルバトロスチョップ

| Version | Damage | Stun | Guard | Startup | Active | Recovery | Total | Hit Adv | Block Adv | Property |
|---|---|---|---|---|---|---|---|---|---|---|
| Diagonal Jump | 9 | 2 | Overhead | 6 | ∞ | / | / | - | - | - |
| Neutral Jump | 9 | 2 | Overhead | 8 | ∞ | / | / | - | - | - |
jB
jB
Stamp Kick/スタンプキック
Stamp Kick/スタンプキック

| Version | Damage | Stun | Guard | Startup | Active | Recovery | Total | Hit Adv | Block Adv | Property |
|---|---|---|---|---|---|---|---|---|---|---|
| Diagonal Jump | 12 | 2 | Overhead | 8 | ∞ | / | / | - | - | - |
| Neutral Jump | 12 | 2 | Overhead | 5 | ∞ | / | / | - | - | - |
jC
jC
Albatross Chop/アルバトロスチョップ
Albatross Chop/アルバトロスチョップ
| Version | Damage | Stun | Guard | Startup | Active | Recovery | Total | Hit Adv | Block Adv | Property |
|---|---|---|---|---|---|---|---|---|---|---|
| Diagonal Jump | 22 | 4 | Overhead | 11 | 18 | / | / | - | - | - |
| Neutral Jump | 22 | 4 | Overhead | 11 | 17 | / | / | - | - | - |
jD
jD

| Version | Damage | Stun | Guard | Startup | Active | Recovery | Total | Hit Adv | Block Adv | Property |
|---|---|---|---|---|---|---|---|---|---|---|
| Diagonal Jump Flying Dropkick/フライングドロップキック |
24 | 4 | Overhead | 13 | 18 | / | / | - | - | - |
| Neutral Jump Stamp Kick/スタンプキック |
24 | 4 | Overhead | 13 | 18 | / | / | - | - | - |
Universal Mechanics
Lane Blast (CD)
Lane Blast
Outstep Kick/アウトステップキック
C+D
Outstep Kick/アウトステップキック
C+D


| Version | Damage | Stun | Guard | Startup | Active | Recovery | Total | Hit Adv | Block Adv | Property |
|---|---|---|---|---|---|---|---|---|---|---|
| Front Lane | 22 | 5 | Mid | 15 | 12 | 8 | 24 | KD | -1 | Cancel, Lane Shift |
| Back Lane | 22 | 5 | Mid | 15 | 12 | 15 | 41 | KD | -8 | Cancel, Lane Shift |
Lane Attack
Lane Attack
Flying Dropkick/フライングドロップキック
A/B/C/D from opposite lane
Flying Dropkick/フライングドロップキック
A/B/C/D from opposite lane


| Version | Damage | Stun | Guard | Startup | Active | Recovery | Total | Hit Adv | Block Adv | Property | |
|---|---|---|---|---|---|---|---|---|---|---|---|
| A/B | 20 | 2 | Overhead | - | - | 4 | - | - | - | / | |
| |||||||||||
| C/D | 20 | 4 | Overhead | - | - | 4 | - | - | - | / | |
| |||||||||||
Dodge Attack
Dodge Attack
Bear Claw/ベアクロー
6A during proximity guard
Bear Claw/ベアクロー
6A during proximity guard

| Damage | Stun | Guard | Startup | Active | Recovery | Total | Hit Adv | Block Adv | Property | |
|---|---|---|---|---|---|---|---|---|---|---|
| 11 | 5 | Mid | 20 | 11 | 9 | 39 | Air Reset (+20) | -1 | Cancel, Upper-Body Invuln 1-39F | |
| ||||||||||


Throws
Power Bomb (6C)
Power Bomb
close 6C
close 6C

| Damage | Stun | Guard | Startup | Active | Recovery | Total | Hit Adv | Block Adv | Property | |
|---|---|---|---|---|---|---|---|---|---|---|
| 26 | 3 | Throw | 1 | 1 | / | - | KD (+78) | / | / | |
| ||||||||||

Back Drop (4C)
Back Drop
close 4C
close 4C
| Damage | Stun | Guard | Startup | Active | Recovery | Total | Hit Adv | Block Adv | Property | |
|---|---|---|---|---|---|---|---|---|---|---|
| 26 | 3 | Throw | 1 | 1 | / | - | KD (+79) | / | / | |
| ||||||||||

Lariat Drop (3C)
Lariat Drop
close 3C
close 3C

| Damage | Stun | Guard | Startup | Active | Recovery | Total | Hit Adv | Block Adv | Property | |
|---|---|---|---|---|---|---|---|---|---|---|
| 26 | 3 | Throw | 1 | 1 | / | - | KD (+18) | / | / | |
| ||||||||||

Neck Hang (6D)
Neck Hang
close 6D
close 6D

| Damage | Stun | Guard | Startup | Active | Recovery | Total | Hit Adv | Block Adv | Property | |
|---|---|---|---|---|---|---|---|---|---|---|
| 4x8 | 0 | Throw | 1 | 1 | / | - | +29 | / | / | |
|
| ||||||||||

Headbutt (4D)
Headbutt
close 4D
close 4D
| Damage | Stun | Guard | Startup | Active | Recovery | Total | Hit Adv | Block Adv | Property | |
|---|---|---|---|---|---|---|---|---|---|---|
| 4x8 | 0 | Throw | 1 | 1 | / | - | +28 | / | / | |
|
| ||||||||||

Lift Up Throw (3D)
Lift Up Throw
close 3D
close 3D

| Damage | Stun | Guard | Startup | Active | Recovery | Total | Hit Adv | Block Adv | Property | |
|---|---|---|---|---|---|---|---|---|---|---|
| 26 | 3 | Throw | 1 | 1 | / | - | KD (+39) | / | / | |
| ||||||||||

Bear Hug (9D)
Bear Hug
close 9D
close 9D

| Damage | Stun | Guard | Startup | Active | Recovery | Total | Hit Adv | Block Adv | Property | |
|---|---|---|---|---|---|---|---|---|---|---|
| 4x12 | 0 | Throw | 1 | 1 | / | - | +30 | / | / | |
|
| ||||||||||

Special Moves
Giant Bomb ([1]6P)
Giant Bomb
[1]6P
[1]6P

※Recovery on whiff.
Invincible during recovery on contact


| Version | Damage | Stun | Guard | Startup | Active | Recovery | Total | Hit Adv | Block Adv | Property | |
|---|---|---|---|---|---|---|---|---|---|---|---|
| A | 16 (4) | 3 | Mid | 37 | 12 | 2※ | 50 | KD (+41) | +2 | Invincible 1-25F, Upper-Body Invuln 26-48F, Throw Invincible | |
|
Travels 3/4ths of the screen.
| |||||||||||
| C | 22 (5) | 6 | Mid | 57 | 16 | 2※ | 74 | KD (+74) | -4 | Invincible 1-45F, Upper-Body Invuln 46-73F, Throw Invincible | |
|
Travels fullscreen.
| |||||||||||
Super Drop Kick ([D])
Super Drop Kick
Hold D
Hold D

An advancing move that grows more powerful the longer the D button is held. The D button can begin charging during the match's intro, but the charge is reset between rounds.
- Pressing D immediately after releasing the charge will cause Bear to execute a D normal or D throw instead of the dropkick.


| Version | Damage | Stun | Guard | Startup | Active | Recovery | Total | Hit Adv | Block Adv | Property |
|---|---|---|---|---|---|---|---|---|---|---|
| 300F+ Charge 5+ Second Charge |
13 (3) | 3 | Mid | 21 | 11 | 12 | 43 | KD (+77) | -1 | Invincible 1-11F, Foot Invuln after frame 18, Throw Invincible |
| 720F+ Charge 12+ Second Charge |
33 (8) | 3 | Mid | 23 | 11 | 12 | 45 | KD (+77) | -1 | Foot Invuln after frame 20, Throw Invincible |
| 1200F+ Charge 20+ Second Charge |
53 (13) | 3 | Mid | 25 | 11 | 12 | 47 | KD (+77) | -1 | Foot Invuln after frame 22, Throw Invincible |
| 2400F+ Charge 40+ Second Charge |
73 (18) | 3 | Mid | 27 | 11 | 12 | 49 | KD (+77) | -1 | Foot Invuln after frame 24, Throw Invincible |
Bear Bomber (6428C)
Bear Bomber
6428C
6428C

| Damage | Stun | Guard | Startup | Active | Recovery | Total | Hit Adv | Block Adv | Property | |
|---|---|---|---|---|---|---|---|---|---|---|
| 26 | 3 | Throw | 1 | 1 | / | / | KD (+71) | / | - | |
|
A throw with average damage but immensely large range.
| ||||||||||

Desperation Move
Fire Breath (63216BC)
Fire Breath
When health is flashing
63216BC
When health is flashing
63216BC

| Damage | Stun | Guard | Startup | Active | Recovery | Total | Hit Adv | Block Adv | Property | |
|---|---|---|---|---|---|---|---|---|---|---|
| 48 (12) | 4 | Mid | 30 | 96 | 16 | 141 | KD | +12 | - | |
| ||||||||||


Combos
- cr.C > Super Drop Kick (5 sec. version only)
- Meaty close D > cr.C


