m (→Throws: consistency) |
|||
| Line 996: | Line 996: | ||
===The Basics=== | ===The Basics=== | ||
If you're the type of player to gravitate towards traditional grapplers like Zangief, picking up Big Bear in FFS is a no-brainer. Regardless of matchup, your gameplan revolves around getting into throw range and then threatening your opponent with your powerful strike/throw mixups. In a game with several strong zoners, getting into close range is a task easier said than done, but fortunately Bear is equipped with several good tools to deal with projectiles. His '''Giant Bomb''' ([1]6P) is an upper body invulnerable tackle that allows Bear to go past any projectile that doesn't hit his feet. The light version of the move is slightly plus on block to boot, making it possible to go for a throw attempt even if the move gets blocked. '''Super Drop Kick''' (charge D and release) on the other hand is an advancing move with lower body invulnerability, making it ideal for punishing lows and projectiles that travel on ground like Terry's Power Wave. Bear's dodge attack is excellent for avoiding projectiles as well, as it retains its invulnerability even during recovery. | |||
Bear's most useful normals are: | |||
*5A: Decently fast jab with good reach. It's possible to option select between this move and a dodge attack when input as 46A. | |||
*2A/2C: Crouching punch with a strong hitbox. 2C is one of the very few moves Bear can combo off of. | |||
*5B/CD: Good long reaching pokes, ideal for stopping the opponent's advancing moves. | |||
*2B: Solid low kick that makes for a good tick throw button. | |||
While Bear comes with a massive number of throws, you mainly need to just remember two of them: his command grab, '''Bear Bomber''' (6428C), and '''Bear Hug''' (9D). Bear Bomber has more range than any other throw in the game, allowing Bear to grab his opponent from a slight distance without the risk of being counter-grabbed. Bear Hug, on the other hand, has much less range but does immense damage, making it the optimal throw to go for if you're right next to your enemy. Since Bear has almost no combo potential, 9D is also generally the best move to go for if you happen to stun your opponent. | |||
===Advanced Strategy=== | ===Advanced Strategy=== | ||
| Line 1,002: | Line 1,014: | ||
====Vs. Andy Bogard==== | ====Vs. Andy Bogard==== | ||
4 - 6 | |||
====Vs. Axel Hawk==== | ====Vs. Axel Hawk==== | ||
4 - 6 | |||
====Vs. Big Bear==== | ====Vs. Big Bear==== | ||
5 - 5 | |||
====Vs. Billy Kane==== | ====Vs. Billy Kane==== | ||
3.5 - 6.5 | |||
====Vs. Cheng Sinzan==== | ====Vs. Cheng Sinzan==== | ||
3 - 7 | |||
====Vs. Duck King==== | ====Vs. Duck King==== | ||
4.5 - 5.5 | |||
====Vs. Geese Howard==== | ====Vs. Geese Howard==== | ||
4.5 - 5.5 | |||
====Vs. Joe Higashi==== | ====Vs. Joe Higashi==== | ||
2 - 8 | |||
====Vs. Jubei Yamada==== | ====Vs. Jubei Yamada==== | ||
3.5 - 6.5 | |||
====Vs. Kim Kaphwan==== | ====Vs. Kim Kaphwan==== | ||
4 - 6 | |||
====Vs. Laurence Blood==== | ====Vs. Laurence Blood==== | ||
4 - 6 | |||
====Vs. Mai Shiranui==== | ====Vs. Mai Shiranui==== | ||
4 - 6 | |||
====Vs. Ryo Sakazaki==== | ====Vs. Ryo Sakazaki==== | ||
====Vs. Terry Bogard==== | ====Vs. Terry Bogard==== | ||
5.5 - 4.5 | |||
====Vs. Tung Fu Rue==== | ====Vs. Tung Fu Rue==== | ||
3 - 7 | |||
====Vs. Wolfgang Krauser==== | ====Vs. Wolfgang Krauser==== | ||
5 - 5 | |||
{{Navbox-FFS}} | {{Navbox-FFS}} | ||
[[Category:Fatal Fury Special]] | [[Category:Fatal Fury Special]] | ||
[[Category:Big Bear]] | [[Category:Big Bear]] | ||
Revision as of 19:24, 13 January 2025


Introduction
After the events of Fatal Fury 1, the wrestler Raiden drops his heel persona and joins the fight under the new alias Big Bear. Bear is the resident big body grappler and has the usual pros and cons of the archetype - great throw range, damaging moves and long reaching normals, but also big hurtboxes, slow walk speed and hard matchups against good zoners.
| Pros | Cons |
|---|---|
|
|
Move List
| Standing | Walking | Crouching | Jumping | Taunting |
 |
 |
 |
 |

|
| 46F (4+39+3) duration, the fastest jump in the game. |
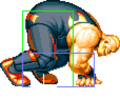
Close Standing Normals
c5A
Elbow/エルボー

| Damage | Stun | Guard | Startup | Active | Recovery | Total | Hit Adv | Block Adv | Property | |
|---|---|---|---|---|---|---|---|---|---|---|
| 9 | 2 | Mid | 7 | 7 | 6 | 19 | +3 | +4 | Kara Cancel | |
| ||||||||||
c5B
Knee Attack/ニーアタック

| Damage | Stun | Guard | Startup | Active | Recovery | Total | Hit Adv | Block Adv | Property | |
|---|---|---|---|---|---|---|---|---|---|---|
| 12 | 2 | Mid | 8 | 9 | 10 | 26 | -3 | -2 | Kara Cancel | |
| ||||||||||
c5C
Elbow/エルボー
| Damage | Stun | Guard | Startup | Active | Recovery | Total | Hit Adv | Block Adv | Property | |
|---|---|---|---|---|---|---|---|---|---|---|
| 22 | 4 | Mid | 12 | 10 | 8 | 29 | +6 | +5 | Kara Cancel | |
| ||||||||||
c5D
Stomping/ストンピング

| Damage | Stun | Guard | Startup | Active | Recovery | Total | Hit Adv | Block Adv | Property | |
|---|---|---|---|---|---|---|---|---|---|---|
| 24 | 4 | Mid | 13 | 10 | 9 | 31 | +5 | +4 | Kara Cancel | |
| ||||||||||

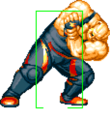
Far Standing Normals
f5A
Jab/ジャブ

| Damage | Stun | Guard | Startup | Active | Recovery | Total | Hit Adv | Block Adv | Property | |
|---|---|---|---|---|---|---|---|---|---|---|
| 7 | 2 | Mid | 6 | 8 | 7 | 20 | +1 | +2 | Kara Cancel | |
| ||||||||||
f5B
Front Kick/前蹴り

| Damage | Stun | Guard | Startup | Active | Recovery | Total | Hit Adv | Block Adv | Property | |
|---|---|---|---|---|---|---|---|---|---|---|
| 10 | 2 | Mid | 10 | 8 | 10 | 27 | -2 | -1 | Kara Cancel | |
| ||||||||||
f5C
Knuckle Part/ナックルパート

| Damage | Stun | Guard | Startup | Active | Recovery | Total | Hit Adv | Block Adv | Property | |
|---|---|---|---|---|---|---|---|---|---|---|
| 20 | 4 | Mid | 12 | 11 | 12 | 34 | -5 | -6 | / | |
| ||||||||||
f5D
Dropkick/ドロップキック

| Damage | Stun | Guard | Startup | Active | Recovery | Total | Hit Adv | Block Adv | Property | |
|---|---|---|---|---|---|---|---|---|---|---|
| 23 | 4 | Mid | 16 | 12 | 11 | 38 | -5 | -6 | Throw Invincible 16-27F | |
| ||||||||||


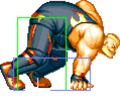
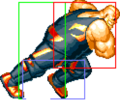
Crouching Normals
2A
Crouching Straight/しゃがみストレート

| Damage | Stun | Guard | Startup | Active | Recovery | Total | Hit Adv | Block Adv | Property | |
|---|---|---|---|---|---|---|---|---|---|---|
| 7 | 2 | Mid | 6 | 8 | 7 | 20 | +1 | +2 | Kara Cancel | |
| ||||||||||
2B
Slide Kick/スライドキック

| Damage | Stun | Guard | Startup | Active | Recovery | Total | Hit Adv | Block Adv | Property | |
|---|---|---|---|---|---|---|---|---|---|---|
| 10 | 2 | Low | 8 | 9 | 10 | 26 | -3 | -2 | Kara Cancel | |
| ||||||||||
2C
Crouching Straight/しゃがみストレート
| Damage | Stun | Guard | Startup | Active | Recovery | Total | Hit Adv | Block Adv | Property | |
|---|---|---|---|---|---|---|---|---|---|---|
| 20 | 4 | Mid | 10 | 13 | 10 | 32 | +1 | 0 | Kara Cancel | |
| ||||||||||
2D
Slide Kick/スライドキック

| Damage | Stun | Guard | Startup | Active | Recovery | Total | Hit Adv | Block Adv | Property | |
|---|---|---|---|---|---|---|---|---|---|---|
| 23 | 4 | Low | 11 | 13 | 21 | 44 | KD (+28) | -11 | Kara Cancel | |
| ||||||||||
Jumping Normals
jA
Albatross Chop/アルバトロスチョップ

| Version | Damage | Stun | Guard | Startup | Active | Recovery | Total | Hit Adv | Block Adv | Property | |
|---|---|---|---|---|---|---|---|---|---|---|---|
| Diagonal Jump | 9 | 2 | Overhead | 6 | ∞ | / | / | - | - | - | |
| |||||||||||
| Neutral Jump | 9 | 2 | Overhead | 8 | ∞ | / | / | - | - | - | |
jB
Stamp Kick/スタンプキック

| Version | Damage | Stun | Guard | Startup | Active | Recovery | Total | Hit Adv | Block Adv | Property | |
|---|---|---|---|---|---|---|---|---|---|---|---|
| Diagonal Jump | 12 | 2 | Overhead | 8 | ∞ | / | / | - | - | - | |
| |||||||||||
| Neutral Jump | 12 | 2 | Overhead | 5 | ∞ | / | / | - | - | - | |
| |||||||||||
jC
Albatross Chop/アルバトロスチョップ
| Version | Damage | Stun | Guard | Startup | Active | Recovery | Total | Hit Adv | Block Adv | Property | |
|---|---|---|---|---|---|---|---|---|---|---|---|
| Diagonal Jump | 22 | 4 | Overhead | 11 | 18 | / | / | - | - | - | |
| |||||||||||
| Neutral Jump | 22 | 4 | Overhead | 11 | 17 | / | / | - | - | - | |
jD

| Version | Damage | Stun | Guard | Startup | Active | Recovery | Total | Hit Adv | Block Adv | Property | |
|---|---|---|---|---|---|---|---|---|---|---|---|
| Diagonal Jump Flying Dropkick/フライングドロップキック |
24 | 4 | Overhead | 13 | 18 | / | / | - | - | - | |
| |||||||||||
| Neutral Jump Stamp Kick/スタンプキック |
24 | 4 | Overhead | 13 | 18 | / | / | - | - | - | |
| |||||||||||
Universal Mechanics
Lane Blast (CD)
Outstep Kick/アウトステップキック
C+D


| Version | Damage | Stun | Guard | Startup | Active | Recovery | Total | Hit Adv | Block Adv | Property | |
|---|---|---|---|---|---|---|---|---|---|---|---|
| Front Lane | 22 | 5 | Mid | 15 | 12 | 8 | 34 | KD | -1 | Cancel, Lane Shift | |
| |||||||||||
| Back Lane | 22 | 5 | Mid | 15 | 12 | 15 | 41 | KD | -8 | Cancel, Lane Shift | |
| |||||||||||
Lane Attack
Flying Dropkick/フライングドロップキック
A/B/C/D from opposite lane


| Version | Damage | Stun | Guard | Startup | Active | Recovery | Total | Hit Adv | Block Adv | Property | |
|---|---|---|---|---|---|---|---|---|---|---|---|
| A/B | 20 | 2 | Overhead | 13 | - | 4 | - | - | - | / | |
| |||||||||||
| C/D | 20 | 4 | Overhead | 13 | - | 4 | - | - | - | / | |
| |||||||||||
Dodge Attack
Bear Claw/ベアクロー
6A during proximity guard

| Damage | Stun | Guard | Startup | Active | Recovery | Total | Hit Adv | Block Adv | Property | |
|---|---|---|---|---|---|---|---|---|---|---|
| 11 | 5 | Mid | 20 | 11 | 9 | 39 | Air Reset (+20) | -1 | Kara Cancel, Upper-Body Invuln 1-39F | |
| ||||||||||


Throws
Power Bomb (6C)
close 6C

| Damage | Stun | Guard | Startup | Active | Recovery | Total | Hit Adv | Block Adv | Property | |
|---|---|---|---|---|---|---|---|---|---|---|
| 26 | 3 | Throw | 1 | 1 | / | - | KD (+78) | / | / | |
| ||||||||||

Back Drop (4C)
close 4C
| Damage | Stun | Guard | Startup | Active | Recovery | Total | Hit Adv | Block Adv | Property | |
|---|---|---|---|---|---|---|---|---|---|---|
| 26 | 3 | Throw | 1 | 1 | / | - | KD (+79) | / | / | |
| ||||||||||

Lariat Drop (3C)
close 3C

| Damage | Stun | Guard | Startup | Active | Recovery | Total | Hit Adv | Block Adv | Property | |
|---|---|---|---|---|---|---|---|---|---|---|
| 26 | 3 | Throw | 1 | 1 | / | - | KD (+18) | / | / | |
| ||||||||||

Neck Hang (6D)
close 6D

| Damage | Stun | Guard | Startup | Active | Recovery | Total | Hit Adv | Block Adv | Property | |
|---|---|---|---|---|---|---|---|---|---|---|
| 16~32 (4 x 4~8) | 0 | Throw | 1 | 1 | / | - | +29 | / | / | |
| ||||||||||

Headbutt (4D)
close 4D
| Damage | Stun | Guard | Startup | Active | Recovery | Total | Hit Adv | Block Adv | Property | |
|---|---|---|---|---|---|---|---|---|---|---|
| 12~32 (4 x 3~8) | 0 | Throw | 1 | 1 | / | - | +28 | / | / | |
| ||||||||||

Lift Up Throw (3D)
close 3D

| Damage | Stun | Guard | Startup | Active | Recovery | Total | Hit Adv | Block Adv | Property | |
|---|---|---|---|---|---|---|---|---|---|---|
| 26 | 3 | Throw | 1 | 1 | / | - | KD (+39) | / | / | |
| ||||||||||

Bear Hug (9D)
close 9D

| Damage | Stun | Guard | Startup | Active | Recovery | Total | Hit Adv | Block Adv | Property | |
|---|---|---|---|---|---|---|---|---|---|---|
| 24~48 (4 x 6~12) | 0 | Throw | 1 | 1 | / | - | +30 | / | / | |
| ||||||||||

Special Moves
Giant Bomb ([1]6P)
[1]6P

- Your main tool for getting past projectiles. Fully invulnerable during startup, but gains a lower body hurtbox once Bear starts charging at the opponent.
- While this move may seem hilariously broken at first glance, it's fairly easy to react to and still loses to just about any low, dodge attack, ground projectile or invulnerable special.
Invincible during recovery on contact


| Version | Damage | Stun | Guard | Startup | Active | Recovery | Total | Hit Adv | Block Adv | Property | |
|---|---|---|---|---|---|---|---|---|---|---|---|
| A | 16 (4) | 3 | Mid | 37 | 12 | 2※ | 50 | KD (+41) | +2 | Invincible 1-25F, Upper-Body Invuln 26-48F, Throw Invincible | |
|
Travels 3/4ths of the screen.
| |||||||||||
| C | 22 (5) | 6 | Mid | 57 | 16 | 2※ | 74 | KD (+74) | -4 | Invincible 1-45F, Upper-Body Invuln 46-73F, Throw Invincible | |
|
Travels fullscreen.
| |||||||||||
Super Drop Kick ([D])
Hold D

- Pressing D immediately after releasing the charge will cause Bear to execute a D normal or D throw instead of the dropkick.
- Has lower body invulnerability and thus can be used to get past some projectiles that travel across the ground (Terry 236A/C, Geese 236A).


| Version | Damage | Stun | Guard | Startup | Active | Recovery | Total | Hit Adv | Block Adv | Property |
|---|---|---|---|---|---|---|---|---|---|---|
| 300F Charge 5 Second Charge |
13 (3) | 3 | Mid | 21 | 11 | 12 | 43 | KD (+77) | -1 | Invincible 1-11F, Foot Invuln after frame 18, Throw Invincible |
| 720F Charge 12 Second Charge |
33 (8) | 3 | Mid | 23 | 11 | 12 | 45 | KD (+77) | -1 | Foot Invuln after frame 20, Throw Invincible |
| 1200F Charge 20 Second Charge |
53 (13) | 3 | Mid | 25 | 11 | 12 | 47 | KD (+77) | -1 | Foot Invuln after frame 22, Throw Invincible |
| 2400F Charge 40 Second Charge |
73 (18) | 3 | Mid | 27 | 11 | 12 | 49 | KD (+77) | -1 | Foot Invuln after frame 24, Throw Invincible |
Bear Bomber (6428C)
6428C

| Damage | Stun | Guard | Startup | Active | Recovery | Total | Hit Adv | Block Adv | Property | |
|---|---|---|---|---|---|---|---|---|---|---|
| 26 | 3 | Throw | 1 | 1 | / | / | KD (+71) | / | - | |
|
A throw with average damage but immensely large range.
| ||||||||||

Desperation Move
Fire Breath (63216BC)
When health is flashing
63216BC

| Damage | Stun | Guard | Startup | Active | Recovery | Total | Hit Adv | Block Adv | Property | |
|---|---|---|---|---|---|---|---|---|---|---|
| 48 (12) | 4 | Mid | 30 | 96 | 16 | 141 | KD | +12 | - | |
Very good super despite its slow startup. Safe on block and deals a good chunk of chip damage. Has a projectile hitbox, but stays active even if it collides with an enemy projectile.
| ||||||||||


Combos
- 2C > Super Drop Kick (5 sec. version only)
- Meaty c5D > 2C
Strategies
The Basics
If you're the type of player to gravitate towards traditional grapplers like Zangief, picking up Big Bear in FFS is a no-brainer. Regardless of matchup, your gameplan revolves around getting into throw range and then threatening your opponent with your powerful strike/throw mixups. In a game with several strong zoners, getting into close range is a task easier said than done, but fortunately Bear is equipped with several good tools to deal with projectiles. His Giant Bomb ([1]6P) is an upper body invulnerable tackle that allows Bear to go past any projectile that doesn't hit his feet. The light version of the move is slightly plus on block to boot, making it possible to go for a throw attempt even if the move gets blocked. Super Drop Kick (charge D and release) on the other hand is an advancing move with lower body invulnerability, making it ideal for punishing lows and projectiles that travel on ground like Terry's Power Wave. Bear's dodge attack is excellent for avoiding projectiles as well, as it retains its invulnerability even during recovery.
Bear's most useful normals are:
- 5A: Decently fast jab with good reach. It's possible to option select between this move and a dodge attack when input as 46A.
- 2A/2C: Crouching punch with a strong hitbox. 2C is one of the very few moves Bear can combo off of.
- 5B/CD: Good long reaching pokes, ideal for stopping the opponent's advancing moves.
- 2B: Solid low kick that makes for a good tick throw button.
While Bear comes with a massive number of throws, you mainly need to just remember two of them: his command grab, Bear Bomber (6428C), and Bear Hug (9D). Bear Bomber has more range than any other throw in the game, allowing Bear to grab his opponent from a slight distance without the risk of being counter-grabbed. Bear Hug, on the other hand, has much less range but does immense damage, making it the optimal throw to go for if you're right next to your enemy. Since Bear has almost no combo potential, 9D is also generally the best move to go for if you happen to stun your opponent.
Advanced Strategy
Match-ups
Vs. Andy Bogard
4 - 6
Vs. Axel Hawk
4 - 6
Vs. Big Bear
5 - 5
Vs. Billy Kane
3.5 - 6.5
Vs. Cheng Sinzan
3 - 7
Vs. Duck King
4.5 - 5.5
Vs. Geese Howard
4.5 - 5.5
Vs. Joe Higashi
2 - 8
Vs. Jubei Yamada
3.5 - 6.5
Vs. Kim Kaphwan
4 - 6
Vs. Laurence Blood
4 - 6
Vs. Mai Shiranui
4 - 6
Vs. Ryo Sakazaki
Vs. Terry Bogard
5.5 - 4.5
Vs. Tung Fu Rue
3 - 7
Vs. Wolfgang Krauser
5 - 5


