|
|
| (13 intermediate revisions by 3 users not shown) |
| Line 1: |
Line 1: |
| =Introduction= | | {{Character Subnav ROTD|name=Pupa}} |
| [[File:puparotdprofile.gif|right]] | | {{infobox-ROTD |
| [[File:puparotd.gif|right]]
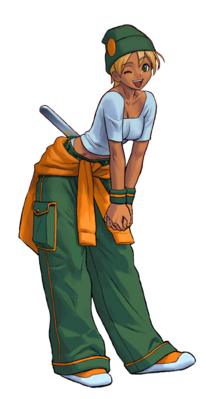
| | |Name=Pupa Salgueiro |
| =Movelist= | | |image=RotdPupaFullPortrait.png |
| | |Unique Partner=[[Rage_of_The_Dragons/Pepe|'''Pepe''']] |
| | |Life=160 |
| | |Stun=100 |
| | |Guard=80 |
| | |Air Throw=Yes |
| | |Walk Speed= 1 |
| | |Run Speed= 1 |
| | |Difficulty=★★☆☆☆ Easy |
| | |- |
| | |Tier=C+ |
| | }} |
|
| |
|
| ==Command Moves==
| |
|
| |
| (n)fwd A - Hits you with a wrench.<br>
| |
|
| |
| Overhead, slow, doesn't combo after her normals. <br>
| |
|
| |
| Bufferable.<br>
| |
|
| |
|
| |
| dwnfwd B - 3 hit breakdance kick. <br>
| |
|
| |
| Must be blocked low. <br>
| |
|
| |
| Last hit is a knock away. <br>
| |
|
| |
| Comboable after her strong normals. <br>
| |
|
| |
| Cancelable on any of the 3 hits.<br>
| |
| ==Special Moves==
| |
| (n)Parafuso - hcb B/D. <br>
| |
|
| |
| 3 hit aerial kick move. <br>
| |
|
| |
| Last hit is a knock away.<br>
| |
|
| |
| Button pressed determines the range of the move.<br>
| |
|
| |
| (a)Bencao - qcf A/C. <br>
| |
| She throws a wrench. A version goes straight, C version goes diagonally upward in a 45 degree angle.<br>
| |
|
| |
| (a)Flying Dance - DP B/D. <br>
| |
| She does a 2 hit kick upwards.<br>
| |
|
| |
| You can add dwn A/C after this for an additional knockdown hit with her wrench.<br>
| |
|
| |
| (n)Queixada - Hold D for 2 or more seconds then release. <br>
| |
|
| |
| Does a split kick that looks like an overhead but its not. <br>
| |
|
| |
| Only combos after the 1st or 2nd hit of her dwnfwd B command move(and after hitting the wall of course :p), and its not a knockdown move. <br>
| |
|
| |
|
| |
| (n)Fast Kicks - Press B/D rapidly. <br>
| |
| She does Rapid kicks like chun li.<br>
| |
| She has a finisher by doing qcf B/D where She does a charging straight kick thats send the opponent flying.<br>
| |
| ==Super Moves==
| |
| (n)Au - qcf x 2 B/D. <br>
| |
|
| |
| Does 2 cartwheel attacks(2 hits per cartwheel attack).<br>
| |
|
| |
| Initial hit of EVERY cartwheel is an overhead.<br>
| |
|
| |
| C version does 4 cartwheels. <br>
| |
|
| |
| (n)Queixada - Hold D for 10 seconds.<br>
| |
|
| |
| If you have one super bar available, she will do a super version of her split kick move when button is released. <br>
| |
|
| |
| This version is an OVERHEAD move and is fast enough to combo after the 1st or 2nd hit of dwnfwd B.<br>
| |
|
| |
| Now, if you hold the D button for 30 seconds and have 2 super bars, she will do a level 2 super version of this move. <br>
| |
| This level 2 version is UNBLOCKABLE and does a whooping 45% damage!<br>
| |
|
| |
| The level 2 doesn't combo from anything though(again except after hitting the wall).<br>
| |
|
| |
| The 2 versions knock away opponent after being hit.
| |
| ==Super Tag==
| |
|
| |
| =Combos=
| |
| First Impact combos:<br>
| |
| Ground - A, A, B, B, D<br>
| |
| Air - B, B, D, D, D<br>
| |
|
| |
| My B&B combo:<br>
| |
| Jump D(hold D), dwn C, dwnfwd B(2 hits), release D or qcf A<br>
| |
|
| |
| -You can use DP B then dwn C or hcb B/D or the rapid kicks, but Queixada is better since its safe when blocked.<br>
| |
| -Holding D button with her can do a lot of wonder... ^_^<br><br>
| |
|
| |
| Other combos:<br>
| |
| -Jump C, dwn C, dwnfwd B(2 hits), hcb B/D<br>
| |
| -Jump C, dwn C, dwnfwd B(2 hits), press B/D rapidly, qcf B/D<br>
| |
| -Jump C, dwn C, dwnfwd B(2 hits), qcf x 2 B/D<br><br>
| |
|
| |
|
| |
| Trick Combos:<br>
| |
| -Jump D(hold D), dwn C, fwd A, release D or hcb B/D<br>
| |
| -Jump D(hold D), dwn C, dwnfwd B(2 hits), release D or hcb B/D<br>
| |
| *mix up the 2 combos above. If you've held the D button for 30 seconds, do:
| |
| -dwn C, release D button.<br><br>
| |
|
| |
| If you're opponent got used to blocking yor combos, chances are, he'll get hit by the super 'coz its unblockable. ^_^<br><br>
| |
|
| |
|
| |
| Wall Combos:<br>
| |
| -Jump D, dwn C, dwnfwd B(2 hits), DP D then dwn C, hits wall, CD, air B, B, D, D, D, qcf x 2 B. 17 hits, approximately 55% damage.<br>
| |
| (needs at least 2 levels of super meter at start)<br>
| |
| -(Hold D for at least 8 seconds before starting the combo), Jump C, dwn C, dwnfwd B(2 hits), release D(super), hits wall, CD, air B, B, D, D, D, qcf x 2 D. 19 hits, approximately 60% damage.<br>
| |
| (needs 3 levels of super meter at start)<br>
| |
| -(Hold D for at least 20 seconds or 13 game seconds before starting the combo), Jump C, dwn C, dwnfwd B(2 hits), qcf x 2 B, hits wall, release D(super). 9 hits, approximately 75% damage. This is probably the most damaging single character wall combo(with the exception of the infinites).<br>
| |
|
| |
| =Strategies=
| |
|
| |
|
| [[Category:Rage of the Dragons]] | | [[Category:Rage of the Dragons]] |
| | {{Rage Of The Dragons}} |

