Street Fighter 2: Champion Edition/Balrog (boxer): Difference between revisions
Wingedhorse (talk | contribs) |
Wingedhorse (talk | contribs) mNo edit summary |
||
| Line 5: | Line 5: | ||
=Introduction= | =Introduction= | ||
A former World Heavyweight Champion, banned from the professional circuit for killing <s>bitting the ears of</s> an opponent, and now Shadaloo's forth in command. Unfortunately in SF2CE he is the worst character in the game due to his | A former World Heavyweight Champion, banned from the professional circuit for killing <s>bitting the ears of</s> an opponent, and now Shadaloo's forth in command. Unfortunately in SF2CE he is the worst character in the game due to his sluggish normals, practically no low hitting moves (and bad mid pokes too), sluggish crouch that only he has, and no reversal. Balrog eats fireballs and DPs like no tomorrow. Despite these incredible flaws, his saving grace is that he has the potential to steal a round off of one good jump-in/CPS1 chain combo with his redizzy combos, and just like in Super Turbo his Headbutt throw can be tough to deal with for some characters. Mastery of his redizzy combos, alongside an airtight neutral game and total knowledge of how your moves work is key to win with Balrog. | ||
Changes from WW: Balrog was nerfed down to reality (perhaps too hard), his only real buffs being that some of his moves are faster than WW Boss version, and his TAP + his Headbutt grab becoming usable. However, Balrog's viability is very different according to the game version: In CE, TAP cannot be charged and his Dash Straight hits high (misses crouchers), while in Dash he has 8 TAP levels (according to how long you hold PPP/KKK) and Dash Straight hits mid (chips crouchers!) on the entire cast. Coupled with the different damage rate of Dash, he can win off of less reads making him a much better character (although still not good enough to move out of 12th). | |||
This is Balrog's first step from being a | This is Balrog's first step from being a bottom-tier character, to just low-tier in HF, mid-tier in Super, finally to top-tier in 2X and HSF2. | ||
===Color Options=== | ===Color Options=== | ||
{| border="1em" cellspacing="0" style="border: 1px solid #999;" | {| border="1em" cellspacing="0" style="border: 1px solid #999;" | ||
| Line 22: | Line 22: | ||
*Headbutt: close, f + MP or HP | *Headbutt: close, f + MP or HP | ||
==Special Moves== | ==Special Moves== | ||
*Turn Around Punch (a.k.a. TAP): Hold all three Punches or Kicks for | *Turn Around Punch (a.k.a. TAP): Hold all three Punches or Kicks for 30f then release. | ||
*Final Punch: Above move and hold for | *Final Punch: Above move and hold for 2400f (42ish seconds) and release (Dash only. Does MASSIVE damage) | ||
*Dash | *Dash Straight: b~f + Punch | ||
*Dash Uppercut: b~f + Kick | *Dash Uppercut: b~f + Kick | ||
| Line 35: | Line 35: | ||
*Long pokes that trade well | *Long pokes that trade well | ||
*Strong anti-air moves | *Strong anti-air moves | ||
*CPS1 Chain | *CPS1 Chain Boss | ||
*Great redizzy combos | *Great redizzy combos | ||
'''Cons'''<br> | '''Cons'''<br> | ||
*Fireball | *Fireball/DP game makes things super tough | ||
*No reversal | *No reversal | ||
* | *Super weak to lows, and he can't beat most of them either | ||
*His only way to chip out opponents is TAP in CE | |||
=Combos= | =Combos= | ||
| Line 116: | Line 117: | ||
| align="center" colspan="2" | Frame Count || align="center" colspan="2" | 1+8 || align="center" bgcolor="blue" | 6 || align="center" colspan="2" | 15 | | align="center" colspan="2" | Frame Count || align="center" colspan="2" | 1+8 || align="center" bgcolor="blue" | 6 || align="center" colspan="2" | 15 | ||
|} | |} | ||
Great poke to use at max range. | Great poke to use at max range. Can hit mid against half of the cast which makes it a must-know move. It CAN'T hit the following opponents when they're crouching: Ryu, Blanka, Guile, Ken, Chun Li, and Dictator. | ||
*<b>Standing LK:</b> | *<b>Standing LK:</b> | ||
| Line 137: | Line 138: | ||
| align="center" colspan="2" | Frame Count || align="center" | 1+3 || align="center" bgcolor="blue" | 4 || align="center" | 5 | | align="center" colspan="2" | Frame Count || align="center" | 1+3 || align="center" bgcolor="blue" | 4 || align="center" | 5 | ||
|} | |} | ||
Elbow attack with no notable properties. Although it does more damage than Jab, it's only useful in combos. | Elbow attack with no notable properties. Although it does more damage than Jab, and has a bit more range, it's only useful in combos. Don't try throwing it out in neutral, your lower hurtbox extends. | ||
*<b>Standing MK:</b> | *<b>Standing MK:</b> | ||
| Line 158: | Line 159: | ||
| align="center" colspan="2" | Frame Count || align="center" | 1+6 || align="center" bgcolor="blue" | 4 || align="center" | 7 | | align="center" colspan="2" | Frame Count || align="center" | 1+6 || align="center" bgcolor="blue" | 4 || align="center" | 7 | ||
|} | |} | ||
A punch to the body. It can be used in block strings and when you predict a move that is vulnerable during its start-up, but you shouldn't try footsies with this move, since the priority is bad. | A punch to the body. It can be used in block strings and when you predict a move that is vulnerable during its start-up, but you shouldn't try footsies with this move, since the priority is very bad. | ||
*<b>Standing HK:</b> | *<b>Standing HK:</b> | ||
{| border="1em" cellspacing="0" style="border: 1px solid #999;" | {| border="1em" cellspacing="0" style="border: 1px solid #999;" | ||
| Line 178: | Line 179: | ||
| align="center" colspan="2" | Frame Count || align="center" colspan="2" | 1+8 || align="center" bgcolor="blue" | 6 || align="center" colspan="2" | 15 | | align="center" colspan="2" | Frame Count || align="center" colspan="2" | 1+8 || align="center" bgcolor="blue" | 6 || align="center" colspan="2" | 15 | ||
|} | |} | ||
Unlike Super Turbo, this move has nothing better than St.HP. Avoid using this | Unlike Super Turbo, this move has nothing better than St.HP. Avoid using this move. | ||
==Close Standing Normals== | ==Close Standing Normals== | ||
| Line 222: | Line 223: | ||
| align="center" colspan="2" | Simplified || align="center" colspan="2" | 1+8 || align="center" bgcolor="blue" | 6 || align="center" colspan="2" | 15 | | align="center" colspan="2" | Simplified || align="center" colspan="2" | 1+8 || align="center" bgcolor="blue" | 6 || align="center" colspan="2" | 15 | ||
|} | |} | ||
A pretty ordinary straight punch. It's a relatively slow move, but one wouldn't use it much, since he has better options up close. | A pretty ordinary straight punch. It's a relatively slow move, but one wouldn't use it much, since he has better options up close, maybe if you need the extra bit of damage to KO. | ||
*<b>Close MK:</b> | *<b>Close MK:</b> | ||
| Line 330: | Line 331: | ||
|} | |} | ||
Balrog's best anti-air that isn't Dash Upper. Great priority. | Balrog's best anti-air that isn't Dash Upper. Great priority. | ||
*<b>Crouching MK:</b> | *<b>Crouching MK:</b> | ||
| Line 391: | Line 389: | ||
| align="center" colspan="2" | Simplified || align="center" | 1 || align="center" bgcolor="blue" | 30 || align="center" colspan="3" | ∞ | | align="center" colspan="2" | Simplified || align="center" | 1 || align="center" bgcolor="blue" | 30 || align="center" colspan="3" | ∞ | ||
|} | |} | ||
Lasts long with a slightly higher hitbox. You can use this after a throw against Dhalsim to juggle him once | Lasts long with a slightly higher hitbox, could be used as an air-to-air or to stop Claw dives. You can use this after a throw against Dhalsim to juggle him once, NEVER use this to jump-in on anyone though | ||
*<b>Neutral/Diagonal Jumping MP/MK:</b> | *<b>Neutral/Diagonal Jumping MP/MK:</b> | ||
| Line 406: | Line 404: | ||
| align="center" colspan="2" | Simplified || align="center" | 2 || align="center" bgcolor="blue" | 15 || align="center" colspan="3" | ∞ | | align="center" colspan="2" | Simplified || align="center" | 2 || align="center" bgcolor="blue" | 15 || align="center" colspan="3" | ∞ | ||
|} | |} | ||
Better priority but | Better priority downwards and more damage, but there's not much use for this one. | ||
*<b>Neutral/Diagonal Jumping HP/HK:</b> | *<b>Neutral/Diagonal Jumping HP/HK:</b> | ||
{| border="1em" cellspacing="0" style="border: 1px solid #999;" | {| border="1em" cellspacing="0" style="border: 1px solid #999;" | ||
| Line 420: | Line 418: | ||
| align="center" colspan="2" | Simplified || align="center" | 3 || align="center" bgcolor="blue" | 8 || align="center" colspan="3" | ∞ | | align="center" colspan="2" | Simplified || align="center" | 3 || align="center" bgcolor="blue" | 8 || align="center" colspan="3" | ∞ | ||
|} | |} | ||
The lowest hitting of your air normals, good for certain anti-airs or starting your redizzy combos if you jump in with this. Can even be used as an instant overhead although it's nowhere near as good as Chun-Li's. | The lowest hitting of your air normals, good for certain anti-airs or starting your redizzy combos if you jump in with this. Can even be used as an instant overhead which is great to use to finish out rounds, although it's nowhere near as good as Chun-Li's. | ||
==Throws== | ==Throws== | ||
| Line 439: | Line 437: | ||
| align="center" | Range advantage || align="center" | 36 | | align="center" | Range advantage || align="center" | 36 | ||
|} | |} | ||
Infamous throw in ST, about as useful here, but with your lack of lows you can't get nearly as degenerate here. Don't be afraid to abuse Headbutt. | |||
== Special Moves == | == Special Moves == | ||
| Line 462: | Line 460: | ||
| align="center" colspan="2" | Simplified || align="center" colspan="2" | 4~11/4~19/4~27 || align="center" | 8 || align="center" colspan="2"| 10 | | align="center" colspan="2" | Simplified || align="center" colspan="2" | 4~11/4~19/4~27 || align="center" | 8 || align="center" colspan="2"| 10 | ||
|} | |} | ||
Startup is 4 frames for all versions point blank, stronger punches can travel further (and thus can have longer startup). Champion Edition has a long reach and short charge time making it good as a risky high poke, while Dash (and HSF2) made it's charge time 70f but it can hit mid, a giant buff since standing pokes that hit you ducking are rare in SF2. | Startup is 4 frames for all versions point blank, stronger punches can travel further (and thus can have longer startup). Champion Edition has a long reach and short charge time making it good as a risky high poke, while Dash (and HSF2) made it's charge time 70f but it can hit mid, a giant buff since standing pokes that hit you ducking are rare in SF2. Use this to stuff fireball attempts or trade. | ||
*<b>Dashing Uppercut</b>: (Charge ←, →, K) [charge time: 40f] | *<b>Dashing Uppercut</b>: (Charge ←, →, K) [charge time: 40f] | ||
| Line 516: | Line 514: | ||
| align="center" colspan="2" | Simplified || align="center" | 12 || align="center" colspan="2"| 10 | | align="center" colspan="2" | Simplified || align="center" | 12 || align="center" colspan="2"| 10 | ||
|} | |} | ||
Attacks that either do insane damage on hit (CE), or increase in strength, speed, and distance over time (Dash and HSF2), making them hard to predict. They also have great hit properties able to hit nicely and on crouching opponents, essential for CE Balrog. They can be used without | Attacks that either do insane damage on hit (CE), or increase in strength, speed, and distance over time (Dash and HSF2), making them hard to predict. They also have great hit properties able to hit nicely and on crouching opponents, essential for CE Balrog. They can be used without needing chargeback like your Dash punches. Work hard to connect this move as it's safe on block. | ||
*<b>Turn Around Punch (lvl 3,4,5,6,7,final)</b>: Hold all 3 Punch or Kick buttons for at least 240f (lvl3), 480f (lvl4), 960f (lvl5), 1440f (lvl6), 1920f (lvl7), or 2400f (final), then release. | *<b>Turn Around Punch (lvl 3,4,5,6,7,final)</b>: Hold all 3 Punch or Kick buttons for at least 240f (lvl3), 480f (lvl4), 960f (lvl5), 1440f (lvl6), 1920f (lvl7), or 2400f (final), then release. | ||
| Line 546: | Line 544: | ||
| align="center" colspan="2" | Simplified || align="center" | 12 || align="center" colspan="2"| 10 | | align="center" colspan="2" | Simplified || align="center" | 12 || align="center" colspan="2"| 10 | ||
|} | |} | ||
Dash/HSF2 Balrog can charge his TAP, allowing it to gain more damage over time. | Dash/HSF2 Balrog can charge his TAP, allowing it to gain more damage over time. | ||
| Line 583: | Line 580: | ||
=Advanced Strategy= | =Advanced Strategy= | ||
Balrog | Balrog was clearly designed to be a close combat specialist by CAPCOM. His long limbs have good priority and can win most punch/kick trades with heavy damage. His high pokes are pretty good, and his redizzy combos on paper mean he can win off a single good jump-in or read. However, this means NOTHING in reality, as Balrog has in my opinion, 3 serious fundamental flaws in his kit in CE that make him practically irrelevant, ones that would be remedied in Super. | ||
1. He has no reversal attack, so all he can do is just block attacks without a good way to get out of pressure or anti-air that well. | |||
2. Lows murder him. He only has one decent low which doesn't even trade with most lows anyways, meaning you can avoid most of his powerful high moves by just ducking and then sweeping the lower extended hurtbox. | |||
3. He has practically no way of dealing with fireballs in SF2 besides jumping, which is a problem because every fireball character happens to have great answers to jumping all willy-nilly ツ. At least the low jump means he does hit the ground faster than most, which is important, as you'll see below. | |||
Balrog's main strategy is to alternate poking and far standing attacks or get closer to the opponent with TAP and Dashes. Most of time the attempts will result in trading hits, but that's normal. Just be | Balrog's main strategy is to alternate poking and far-standing attacks or get closer to the opponent with TAP and Dashes. Most of the time the attempts will result in trading hits, but that's normal. Just be mindful of your own stun. Although cr.HK can't beat most lows, it's great to throw out as a poke especially because most moves that hit low can't hit it. His st. HP has long reach and is a good answer to fireball startup, especially Ryu and Ken ones. Other fireballers like Guile and Sagat can be a little tricky to counter this way, but it's still possible. | ||
You must be good at reading the opponent's game, to the point you can read their patterns like an open book. If you manage to jump in with j.HP or HK and land it, you've basically already won the round, as provided you can execute like a boxing GOD, your dizzy combo + the redizzy combo right after will guarantee victory. Your execution MUST be tip-top to play Balrog. TAPs here and there can be good to throw out to chip away, especially against characters without fully invincible reversals. | |||
TAPs are faster than WW, but it's still a move that can be countered by your toughest matchups easily, so use it wisely, preferably when countering isn't possible. The chip damage is above normal but work hard to connect the move. And remember that you can even combo a st.HP right after the successfully connected TAP on most opponents and situations, and dizzies aren't that rare. It's a great meaty as well, as you can COMBO off it for insane damage. | |||
The Headbutt | The Headbutt isn't as good as it's CPS2 version. But it's still a great hold throw which can inflict heavy damage when you mash. Be aware of the release moment, since it's when you can start your mixups. For example, just off release you could a) stay on the same side and tick them for another throw, b) swap sides and take a chunk of their life with a meaty, c) use the fact your crouching moves all have the same animation to trick them into blocking high on MK, just to hit them with roundhouse and sweep them. | ||
Cr.HP and Far st.MP are your anti-air weapons against jumping characters like Blanka and Claw, and so | Cr.HP and Far st.MP are your anti-air weapons against jumping characters like Blanka and Claw, and so is the Dash Upper. Air attacks must be countered on the ground, because your air normals aren't cut out for it. Just don't try it. AVOID the corner against fireball characters, because once you're there it's game over. One of Balrog's main features is his speed, so don't be ashamed to put it to good use, pressing the opponent against the corners or cheesing them out with throw loops, maybe even a walk-up throw if you think you're a bad enough dude to pull it off. No matter what anyone says, don't let people who call you cheap for throws get to you, their opinion doesn't matter. As the Wise, All-Knowing, Mythical Pro Gamer David "Low Strong" Sirlin, now known as the designer behind revolutionary, life-changing '''experiences''' like Yomi, Yomi 2, Puzzle Strike 2, and Fantasy Strike, said in his book, Playing to Win, all the way back in 2000 or whatever: "The game knows no rules of 'honor' or of 'cheapness.' The game only knows winning and losing." (Sirlin, David, ''Playing to Win: Becoming the Champion'', 2000). As long as you remember the Wise, All-Knowing, Mythical Pro Gamer David "Low Strong" Sirlin's words of wisdom, you will always have a fighting chance as CE Balrog. Show them what you got! | ||
NOTE: Curiously, | NOTE: Curiously, Dash/HSF2 Balrog (or M. Bison as he's known in Dash, since its JPN-only) has more going for him. His Dash Straight hits mid, and the TAP can be charged up to 60 seconds for a devastating final blow on the opponent. Although this isn't really enough to get him out of bottom tier still, this coupled with Dash's damage differences makes him more potent. | ||
=Match-Ups= | =Match-Ups= | ||
| Line 615: | Line 615: | ||
==Vs. Ryu== | ==Vs. Ryu== | ||
Easily his 3rd worse matchup. Ryu has better priority on most of his quicker attacks with your only decent one being cr. HK, and it can't stop his lows. He can just crouch most of your best attacks. Once he starts throwing fireballs it's hard to stop him unless you are preemptively jumping over it knowing he will do another one (Chances are you'll be eating a DP instead). If you are cornered by fireballs, you've basically already lost. Only way to win this matchup is a great deal of patience, trading, and getting him into headbutt or managing to land a jump-in (which if you can pull off the combos, means you win) | |||
==Vs. E.Honda== | ==Vs. E.Honda== | ||
Your standing fierce punch is effective, as it can hit E.Honda even if he's ducking. | |||
You can keep him at bay with this move (watch out for his foot sweeps for they have | You can keep him at bay with this move (watch out for his foot sweeps for they have | ||
just about the same range as your | just about the same range as your punches and they will knockdown.) | ||
Keeping up the pressure with your pokes is good, and TAP can also be effective if he has no charge. The best | |||
counter for his fists-o-fury attack when in the corner is cr.HK or a TAP, when you execute this move make sure that only your glove hits | counter for his fists-o-fury attack when in the corner is cr.HK or a TAP, when you execute this move make sure that only your glove hits | ||
the hands otherwise it will be a mutual hit with you probably losing more. Jumping over his fists allows you to | the hands otherwise it will be a mutual hit with you probably losing more. Jumping over his fists allows you to go for dizzy combo, so when possible try that as well. | ||
Against his headbutt you can either jump over and headbutt him if he uses a fast one | Against his headbutt you can either jump over and headbutt him if he uses a fast one or use your jab, it will always beat headbutts. | ||
or use your jab, it will always beat headbutts. | |||
If he headbutts you if you try to | If he headbutts you if you try to hit him, the best tactic is to get about | ||
half the screen away and execute a | half the screen away and execute a dash upper. From this distance you will not | ||
reach him and can | reach him and can recover fast enough to jump or punch his headbutt if he goes | ||
for it. | for it. (If you play with cheaps, a good tactic is to get just out of his | ||
sweep range and use a short charging punch, straight ones are better, then | sweep range and use a short charging punch, straight ones are better, then | ||
headbutt him. Works great.) | headbutt him. Works great.) Throw loops work great against Honda as well. | ||
==Vs. Blanka== | ==Vs. Blanka== | ||
| Line 642: | Line 641: | ||
This will allow you to keep him and any jump attack he uses at a distance. When he | This will allow you to keep him and any jump attack he uses at a distance. When he | ||
jumps in your charging uppercut attacks are very effective if he jumps from a | jumps in your charging uppercut attacks or St.MP are very effective if he jumps from a | ||
distance. When you do use these attacks DO NOT commit | distance. When you do use these attacks DO NOT commit too early for if you | ||
execute your punch before he starts to come down (and or) before he uses his | execute your punch before he starts to come down (and or) before he uses his | ||
attack you will be sitting pretty for a roundhouse kick. If he jumps in from | attack you will be sitting pretty for a roundhouse kick. If he jumps in from | ||
| Line 653: | Line 652: | ||
only thing Balrog has trouble with is hitting Blanka out of the electricity | only thing Balrog has trouble with is hitting Blanka out of the electricity | ||
without getting shocked. To do so it is like hitting Honda out of his hands. | without getting shocked. To do so it is like hitting Honda out of his hands. | ||
Time your strike so that it barely hits him. Or if he is close | Time your strike so that it barely hits him. Or just wait for him to stop mashing (and spam Jab while you do) | ||
Or if he is close to dying a TAP will get you shocked but do more damage to him. | |||
==Vs. Guile== | ==Vs. Guile== | ||
Guile can be very difficult for Balrog to beat especially if he plays | Guile can be very difficult, if not impossible for Balrog to beat especially if he plays | ||
super defensive. i.e. (sonic boom, foot sweep, sonic boom, etc.). Against a | super defensive. i.e. (sonic boom, foot sweep, sonic boom, etc.). Against a Guile | ||
that jumps in and attacks a lot react much as you would to Blanka, for your | that jumps in and attacks a lot react much as you would to Blanka, for your | ||
anti-air normals are good. But if your opponent stays on | |||
the ground using sonic booms and foot sweeps then your choices are few. First | the ground using sonic booms and foot sweeps then your choices are few. First | ||
you must try to back him into a corner like Zan and Honda must do | you must try to back him into a corner like Zan and Honda must do. Your can knock him out of the sonic booms like you can Ken | ||
and Ryu, just use the standing fierce and hit him just as he starts the motion | and Ryu, just use the standing fierce and hit him just as he starts the motion | ||
that forms them. Another good technique is the superpunch barrage described | that forms them. Another good technique is the superpunch barrage described | ||
| Line 674: | Line 671: | ||
A good way to sucker Guile into an axe-kick is to get about one inch out of his sweep range and either 1) let your man stand and move slightly back. Most patterning Guiles will see this as the beginning of a super punch and axe. 2) Wait for his sweep to start to recoil and use a short charging punch, then quickly go into the defensive crouch. | A good way to sucker Guile into an axe-kick is to get about one inch out of his sweep range and either 1) let your man stand and move slightly back. Most patterning Guiles will see this as the beginning of a super punch and axe. 2) Wait for his sweep to start to recoil and use a short charging punch, then quickly go into the defensive crouch. | ||
Both these fakes work fairly regularly into opening Guile up for a | Both these fakes work fairly regularly into opening Guile up for a TAP or dizzy combo. | ||
Respect his Cr.MK. You have no way to hit him out of it outside of landing a TAP out of it's range. | Respect his Cr.MK. You have no way to hit him out of it outside of landing a TAP out of it's range. | ||
==Vs. Ken== | ==Vs. Ken== | ||
Pretty much the same as Ryu except Ken can travel way further with his | Pretty much the same as Ryu except Ken can travel way further with his DPs. You can punish missed DP with a Dash Straight or Upper. You can use crouching Roundhouse or Standing Fierce against his startup of hadouken that is slower than Ryu's one. | ||
==Vs. Chun Li== | ==Vs. Chun Li== | ||
| Line 702: | Line 699: | ||
==Vs. Zangief== | ==Vs. Zangief== | ||
His WORSE matchup by far (yes, I think it's worse than even Guile!) The main reason is that if Zangief gets you cornered, | |||
or even just SPDs you once, he instantly wins as he can just keep ticking you into SPD until you die. | |||
The usual standing fierce punch will be effective against Zan as well | The usual standing fierce punch will be effective against Zan as well | ||
(use them slightly more sparingly | (use them slightly more sparingly than against Blanka or Honda for the | ||
airplane punch can knock you out of any standing attack if Zan times it right.) | airplane punch can knock you out of any standing attack if Zan times it right.) | ||
The charging uppercut punches can knock him out of the airplane punch if you hit | The charging uppercut punches can knock him out of the airplane punch if you hit | ||
him in between his swinging arms. The best way to fight Zan however is to be | him in between his swinging arms. The best way to fight Zan however is to be | ||
defensive. The ducking roundhouse punch is your best defense here for its range | defensive. The ducking roundhouse punch is your best defense here for its range | ||
and high priority make it very difficult for him to counter. Don't be | and high priority make it very difficult for him to counter. Don't be too | ||
defensive for it won't take him long to get the timing to 360 | defensive for it won't take him long to get the timing to 360 you | ||
in between punches. | in between punches. You want to basically keep him away as much as you can, a Zangief who knows the matchup | ||
will be on the offensive trying to get you mess up and make the one mistake that'll end the round. | |||
DON'T LET HIM GET IN YOUR HEAD!!! | |||
==Vs. Dhalsim== | ==Vs. Dhalsim== | ||
| Line 791: | Line 788: | ||
==Vs. Dictator== | ==Vs. Dictator== | ||
Another bad match-up, | Another bad match-up, Dictator had better pokes with fastest startup, Psycho Crusher can be punished at his start with a Far Fierce at distance or if you are close,you must block them and then punish Dictator with hold him or a switch side Dash Straight or Upper, close Jab are fine to keep him away or comboing,and Stomp can be defeated at the start or follow up with a jumping Roundhouse easily,Crouching Roundhouse its your best poke for medium range and wake ups,your main plan is to avoid Corner Trap and stay in the midscreen as long as possible. | ||
Turn Around Punch can be nice as a surprise attack if Dictador walks to get close to you,and a miss Slide is the main attack that you need to punish him with a jumping Fierce and linked to a Crouching Roundhouse, and then a Dash Upper or Straight wake up. | Turn Around Punch can be nice as a surprise attack if Dictador walks to get close to you,and a miss Slide is the main attack that you need to punish him with a jumping Fierce and linked to a Crouching Roundhouse, and then a Dash Upper or Straight wake up. | ||
Revision as of 20:20, 17 October 2024


Introduction
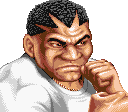
A former World Heavyweight Champion, banned from the professional circuit for killing bitting the ears of an opponent, and now Shadaloo's forth in command. Unfortunately in SF2CE he is the worst character in the game due to his sluggish normals, practically no low hitting moves (and bad mid pokes too), sluggish crouch that only he has, and no reversal. Balrog eats fireballs and DPs like no tomorrow. Despite these incredible flaws, his saving grace is that he has the potential to steal a round off of one good jump-in/CPS1 chain combo with his redizzy combos, and just like in Super Turbo his Headbutt throw can be tough to deal with for some characters. Mastery of his redizzy combos, alongside an airtight neutral game and total knowledge of how your moves work is key to win with Balrog.
Changes from WW: Balrog was nerfed down to reality (perhaps too hard), his only real buffs being that some of his moves are faster than WW Boss version, and his TAP + his Headbutt grab becoming usable. However, Balrog's viability is very different according to the game version: In CE, TAP cannot be charged and his Dash Straight hits high (misses crouchers), while in Dash he has 8 TAP levels (according to how long you hold PPP/KKK) and Dash Straight hits mid (chips crouchers!) on the entire cast. Coupled with the different damage rate of Dash, he can win off of less reads making him a much better character (although still not good enough to move out of 12th).
This is Balrog's first step from being a bottom-tier character, to just low-tier in HF, mid-tier in Super, finally to top-tier in 2X and HSF2.
Color Options
| Start | Default |
 |

|
Moves List
Normal Moves
- Headbutt: close, f + MP or HP
Special Moves
- Turn Around Punch (a.k.a. TAP): Hold all three Punches or Kicks for 30f then release.
- Final Punch: Above move and hold for 2400f (42ish seconds) and release (Dash only. Does MASSIVE damage)
- Dash Straight: b~f + Punch
- Dash Uppercut: b~f + Kick
The Basics
- Anti-Airs: Dash Upper, crouching High Punch, standing Medium Punch
- High Pokes: Standing Medium Punch, Standing High Punch
- Low Pokes: Crouching Roundhouse Kick
Pros
- Long pokes that trade well
- Strong anti-air moves
- CPS1 Chain Boss
- Great redizzy combos
Cons
- Fireball/DP game makes things super tough
- No reversal
- Super weak to lows, and he can't beat most of them either
- His only way to chip out opponents is TAP in CE
Combos
- j.HP, cr.LK, st.LK, b charge f+K, s.HP (redizzy)
- cr.LP, st.LP, b chage f+P
- (Zangief Only)cl.MP, st. MP, st. MP
- (Zangief Only)cl.MK, Cr. MP, st. MP
- (Opponent in Corner)cl.MK, St. HP
- cr.LK x1~3 CPS1 Chain st.HP
- (Dhalsim Only, in corner)Throw, j.LP, st.MP, s.HP OR j.LP, b charge, st.MP, F+P
Hitboxes
Standing Normals
- Standing LP:
| Damage | 4 |  |
 |

|
| Stun | 1~7 | |||
| Stun Timer | 40 | |||
| Chain Cancel | Yes | |||
| Special Cancel | Yes | |||
| Frame Advantage | +5 | |||
| Frame Count | 3 | 4 | 5 | |
| Frame Count | 1+3 | 4 | 5 | |
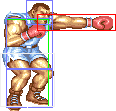
A standard jab punch. Balrog's arm is fully invincible. Useful to cancel into rushes. Also good to stop some stuff (Honda's headbutts for example, or Dhalsim drills on reaction).
- Standing MP:
| Damage | 14 |  |
 |
 |
 |

|
| Stun | 5~11 | |||||
| Stun Timer | 60 | |||||
| Chain Cancel | No | |||||
| Special Cancel | No | |||||
| Frame Advantage | +6 | |||||
| Frame Count | 3 | 3 | 4 | 3 | 4 | |
| Frame Count | 1+6 | 4 | 7 | |||
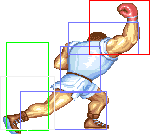
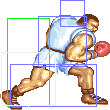
Second best anti-air move. Has more range than cr.HP.
- Standing HP:
| Damage | 22 |  |
 |
 |
 |

|
| Stun | 11~17 | |||||
| Stun Timer | 80 | |||||
| Chain Cancel | No | |||||
| Special Cancel | No | |||||
| Frame Advantage | +2 | |||||
| Frame Count | 5 | 3 | 6 | 9 | 6 | |
| Frame Count | 1+8 | 6 | 15 | |||
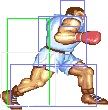
Great poke to use at max range. Can hit mid against half of the cast which makes it a must-know move. It CAN'T hit the following opponents when they're crouching: Ryu, Blanka, Guile, Ken, Chun Li, and Dictator.
- Standing LK:
| Damage | 10 |  |
 |

|
| Stun | 1~7 | |||
| Stun Timer | 40 | |||
| Chain Cancel | Yes | |||
| Special Cancel | Yes | |||
| Frame Advantage | +5 | |||
| Frame Count | 3 | 4 | 5 | |
| Frame Count | 1+3 | 4 | 5 | |
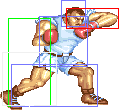
Elbow attack with no notable properties. Although it does more damage than Jab, and has a bit more range, it's only useful in combos. Don't try throwing it out in neutral, your lower hurtbox extends.
- Standing MK:
| Damage | 14 | 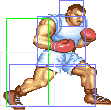 |
 |

|
| Stun | 5~11 | |||
| Stun Timer | 60 | |||
| Chain Cancel | Yes | |||
| Special Cancel | Yes | |||
| Frame Advantage | +8 | |||
| Frame Count | 5 | 4 | 7 | |
| Frame Count | 1+6 | 4 | 7 | |
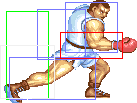
A punch to the body. It can be used in block strings and when you predict a move that is vulnerable during its start-up, but you shouldn't try footsies with this move, since the priority is very bad.
- Standing HK:
| Damage | 22 |  |
 |
 |
 |

|
| Stun | 11~17 | |||||
| Stun Timer | 80 | |||||
| Chain Cancel | No | |||||
| Special Cancel | No | |||||
| Frame Advantage | +2 | |||||
| Frame Count | 5 | 3 | 6 | 9 | 6 | |
| Frame Count | 1+8 | 6 | 15 | |||
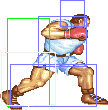
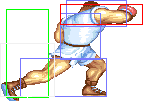
Unlike Super Turbo, this move has nothing better than St.HP. Avoid using this move.
Close Standing Normals
- Close MP:
| Damage | 16 |  |
 |

|
| Stun | 1~7 | |||
| Stun Timer | 40 | |||
| Chain Cancel | Yes | |||
| Special Cancel | no | |||
| Frame Advantage | +6/+5 | |||
| Frame Count | 5 | 4 | 7 | |
| Simplified | 1+5 | 4 | 7 | |
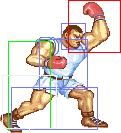
A good anti-air. Although cr.HP is preferred, it can catch opponents trying to jump away when going for a throw, and it has great priority.
- Close HP:
| Damage | 24 |  |
 |
 |
 |

|
| Stun | 1~7 | |||||
| Stun Timer | 40 | |||||
| Chain Cancel | Yes | |||||
| Special Cancel | no | |||||
| Frame Advantage | +6/+5 | |||||
| Frame Count | 5 | 3 | 6 | 9 | 6 | |
| Simplified | 1+8 | 6 | 15 | |||
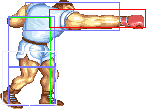
A pretty ordinary straight punch. It's a relatively slow move, but one wouldn't use it much, since he has better options up close, maybe if you need the extra bit of damage to KO.
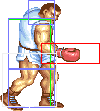
- Close MK:
| Damage | 16 |  |
 |

|
| Stun | 1~7 | |||
| Stun Timer | 40 | |||
| Chain Cancel | Yes | |||
| Special Cancel | no | |||
| Frame Advantage | +6/+5 | |||
| Frame Count | 4 | 4 | 7 | |
| Simplified | 1+4 | 4 | 7 | |
Body punch. This is a vital move for Balrog as it allows him to tick into Headbutt.
- Close HK:
| Damage | 24 |  |
 |

|
| Stun | 1~7 | |||
| Stun Timer | 40 | |||
| Chain Cancel | Yes | |||
| Special Cancel | no | |||
| Frame Advantage | +6/+5 | |||
| Frame Count | 6 | 6 | 15 | |
| Simplified | 1+6 | 6 | 15 | |
Close standing Forward and close standing Roundhouse share the same animation. Close standing roundhouse has nothing special about it.
Crouching Normals
- Crouching LP/LK:
| Damage | 6 |  |
 |
 |
 |

|
| Stun | 1~7 | |||||
| Stun Timer | 40 | |||||
| Chain Cancel | Yes | |||||
| Special Cancel | Yes | |||||
| Frame Advantage | +6/+7 | |||||
| Frame Count | 1 | 2 | 4 | 2 | 2 | |
| Simplified | 1+3 | 4 | 4 | |||
It can stop a Dhalsim slide on reaction at very specific situations, but otherwise the priority is awful.
- Crouching MP:
| Damage | 14 |  |
 |
 |
 |

|
| Stun | 5~11 | |||||
| Stun Timer | 60 | |||||
| Chain Cancel | No | |||||
| Special Cancel | No | |||||
| Frame Advantage | +9/+8 | |||||
| Frame Count | 3 | 2 | 4 | 3 | 4 | |
| Simplified | 1+6 | 4 | 7 | |||
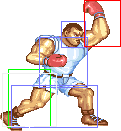
- Crouching HP:
| Damage | 20 |  |
 |
 |
 |

|
| Stun | 11~17 | |||||
| Stun Timer | 80 | |||||
| Chain Cancel | No | |||||
| Special Cancel | No | |||||
| Frame Advantage | +1,+2 | |||||
| Frame Count | 4 | 2 | 6 | 9 | 6 | |
| Simplified | 1+4 | 8 | 15 | |||
Balrog's best anti-air that isn't Dash Upper. Great priority.
- Crouching MK:
| Damage | 14 |  |
 |
 |
 |

|
| Stun | 5~11 | |||||
| Stun Timer | 60 | |||||
| Chain Cancel | No | |||||
| Special Cancel | No | |||||
| Frame Advantage | +9/+8 | |||||
| Frame Count | 3 | 2 | 4 | 3 | 4 | |
| Simplified | 1+5 | 4 | 7 | |||
The same frame and attack data as cr.Strong. Even the same hitboxes too. This means Balrog has absolutely no way of trading with moves like Guile's cr.MK.
- Crouching HK:
| Damage | 20 |  |
 |
 |
 |

|
| Stun | 11~17 | |||||
| Stun Timer | 80 | |||||
| Chain Cancel | No | |||||
| Special Cancel | No | |||||
| Frame Advantage | KD/+2 | |||||
| Frame Count | 2 | 4 | 6 | 9 | 6 | |
| Simplified | 1+6 | 6 | 15 | |||
Although it looks like a move that hits mid, it actually hits low. Best horizontal range out of his ducking moves and knocks down. Useful for footsies when a crouching Forward won't reach. Long recovery so be careful.
Aerial Normals
- Neutral/Diagonal Jumping LP/LK:
| Damage | 10 |  |
 |
 |
 |

|
| Stun | 1~7 | |||||
| Stun Timer | 40 | |||||
| Frame Count | 1 | 30 | 3 | 3 | ∞ | |
| Simplified | 1 | 30 | ∞ | |||
Lasts long with a slightly higher hitbox, could be used as an air-to-air or to stop Claw dives. You can use this after a throw against Dhalsim to juggle him once, NEVER use this to jump-in on anyone though
- Neutral/Diagonal Jumping MP/MK:
| Damage | 14/16 |  |
 |
 |
 |

|
| Stun | 5~11 | |||||
| Stun Timer | 50 | |||||
| Frame Count | 2 | 15 | 3 | 3 | ∞ | |
| Simplified | 2 | 15 | ∞ | |||
Better priority downwards and more damage, but there's not much use for this one.
- Neutral/Diagonal Jumping HP/HK:
| Damage | 18/20 |  |
 |
 |
 |

|
| Stun | 11~17 | |||||
| Stun Timer | 60 | |||||
| Frame Count | 3 | 8 | 3 | 3 | ∞ | |
| Simplified | 3 | 8 | ∞ | |||
The lowest hitting of your air normals, good for certain anti-airs or starting your redizzy combos if you jump in with this. Can even be used as an instant overhead which is great to use to finish out rounds, although it's nowhere near as good as Chun-Li's.
Throws
- Headbutt: (←/→ + Strong or Fierce)
To grab your opponent, hold towards or back and press Strong or Fierce punch. Boxer will hold the opponent in place for a few seconds and repeatedly headbutt them. If Boxer wiggles the joystick and/or mashes buttons while the grab is taking place, it will extend the duration. Similarly, his opponent may do the same to reduce the grab's duration. Sometimes people playing charge characters will elect to do this only for a moment before opting to charge during the grab's animation instead. Weirdly, the Strong grab has more range than the Fierce grab despite seeming identical due to Balrog's grabs only being activated when in Close Standing MP/HP activation range. You should favor using the Strong grab in situations where range is an issue.
| Damage | 22+(4*n) | 
|
| Duration | 300 | |
| Stun | 1~7 | |
| Stun Timer | 60 | |
| Range (from axis) | 64 | |
| Range advantage | 36 |
Infamous throw in ST, about as useful here, but with your lack of lows you can't get nearly as degenerate here. Don't be afraid to abuse Headbutt.
Special Moves
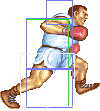
- Dashing Straight: (Charge ←, →, P) [charge time: 40f, 70f (Japanese version)]
| Damage (Jab) | 22 |  |
 |
  |
 |

|
| Damage (Strong) | 24 | |||||
| Damage (Fierce) | 26 | |||||
| Random dmg table | 0x080 | |||||
| Stun | 13~19 | |||||
| Stun Timer | 120 | |||||
| Frame Advantage | +5 | |||||
| Frame Count | 1~8/1~16/1~24 | 3 | 8 | 6 | 4 | |
| Simplified | 4~11/4~19/4~27 | 8 | 10 | |||
Startup is 4 frames for all versions point blank, stronger punches can travel further (and thus can have longer startup). Champion Edition has a long reach and short charge time making it good as a risky high poke, while Dash (and HSF2) made it's charge time 70f but it can hit mid, a giant buff since standing pokes that hit you ducking are rare in SF2. Use this to stuff fireball attempts or trade.
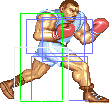
- Dashing Uppercut: (Charge ←, →, K) [charge time: 40f]
| Damage (Short) | 20 |  |
 |
 |

| |
| Damage (Forward) | 22 | |||||
| Damage (Roundhouse) | 26 | |||||
| Random dmg table | 0x080 | |||||
| Stun | 13~19 | |||||
| Stun Timer | 120 | |||||
| Frame Advantage | +9 | |||||
| Frame Count | 1~8/1~16/1~24 | 3 | 8 | 6 | ||
| Simplified | 4~11/4~19/4~27 | 8 | 6 | |||
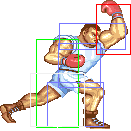
Startup is 4 frames for all versions point blank, stronger kicks can travel further (and thus can have longer startup). Good anti-air. Whiffs on crouching characters VERY short charge time, amazing frame advantage which allows you to land a St.HP immediately after. Able to hit Zangief out of his Lariats if timed right.
- Turn Around Punch (lvl 1 & 2): Hold all 3 Punch or Kick buttons for at least 30f (World/lvl1) or 120f (lvl2), then release.
Startup
 |
 |
 |
 |
 |
 |
 |
| |
| Frame Count | 4 | 4 | 4 | 7 | 2 | 2 | 2 | 2 |
| Simplified | 27 | |||||||
Active/Recovery
| Damage (lvl1) | 22 |  |
 |

|
| Damage (lvl2) | 28 | |||
| Random dmg (lvl1) | 0 | |||
| Random dmg (lvl2) | 6 | |||
| Stun | 13~19 | |||
| Stun Timer | 120 | |||
| Frame Advantage | +1 | |||
| Frame Count | 12 | 6 | 4 | |
| Simplified | 12 | 10 | ||
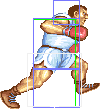
Attacks that either do insane damage on hit (CE), or increase in strength, speed, and distance over time (Dash and HSF2), making them hard to predict. They also have great hit properties able to hit nicely and on crouching opponents, essential for CE Balrog. They can be used without needing chargeback like your Dash punches. Work hard to connect this move as it's safe on block.
- Turn Around Punch (lvl 3,4,5,6,7,final): Hold all 3 Punch or Kick buttons for at least 240f (lvl3), 480f (lvl4), 960f (lvl5), 1440f (lvl6), 1920f (lvl7), or 2400f (final), then release.
Active/Recovery
Dash/HSF2 Balrog can charge his TAP, allowing it to gain more damage over time.
Misc Animations
| Walk back | Neutral | Walk Fwd | Crouch |
 |
 |
 |

|
- Standing reel:
 |
 |

|
- Standing gut reel:
 |
 |

|
- Crouching reel:
 |
 |

|
- Dizzy:
 |
 |

|
Advanced Strategy
Balrog was clearly designed to be a close combat specialist by CAPCOM. His long limbs have good priority and can win most punch/kick trades with heavy damage. His high pokes are pretty good, and his redizzy combos on paper mean he can win off a single good jump-in or read. However, this means NOTHING in reality, as Balrog has in my opinion, 3 serious fundamental flaws in his kit in CE that make him practically irrelevant, ones that would be remedied in Super. 1. He has no reversal attack, so all he can do is just block attacks without a good way to get out of pressure or anti-air that well. 2. Lows murder him. He only has one decent low which doesn't even trade with most lows anyways, meaning you can avoid most of his powerful high moves by just ducking and then sweeping the lower extended hurtbox. 3. He has practically no way of dealing with fireballs in SF2 besides jumping, which is a problem because every fireball character happens to have great answers to jumping all willy-nilly ツ. At least the low jump means he does hit the ground faster than most, which is important, as you'll see below.
Balrog's main strategy is to alternate poking and far-standing attacks or get closer to the opponent with TAP and Dashes. Most of the time the attempts will result in trading hits, but that's normal. Just be mindful of your own stun. Although cr.HK can't beat most lows, it's great to throw out as a poke especially because most moves that hit low can't hit it. His st. HP has long reach and is a good answer to fireball startup, especially Ryu and Ken ones. Other fireballers like Guile and Sagat can be a little tricky to counter this way, but it's still possible.
You must be good at reading the opponent's game, to the point you can read their patterns like an open book. If you manage to jump in with j.HP or HK and land it, you've basically already won the round, as provided you can execute like a boxing GOD, your dizzy combo + the redizzy combo right after will guarantee victory. Your execution MUST be tip-top to play Balrog. TAPs here and there can be good to throw out to chip away, especially against characters without fully invincible reversals.
TAPs are faster than WW, but it's still a move that can be countered by your toughest matchups easily, so use it wisely, preferably when countering isn't possible. The chip damage is above normal but work hard to connect the move. And remember that you can even combo a st.HP right after the successfully connected TAP on most opponents and situations, and dizzies aren't that rare. It's a great meaty as well, as you can COMBO off it for insane damage.
The Headbutt isn't as good as it's CPS2 version. But it's still a great hold throw which can inflict heavy damage when you mash. Be aware of the release moment, since it's when you can start your mixups. For example, just off release you could a) stay on the same side and tick them for another throw, b) swap sides and take a chunk of their life with a meaty, c) use the fact your crouching moves all have the same animation to trick them into blocking high on MK, just to hit them with roundhouse and sweep them.
Cr.HP and Far st.MP are your anti-air weapons against jumping characters like Blanka and Claw, and so is the Dash Upper. Air attacks must be countered on the ground, because your air normals aren't cut out for it. Just don't try it. AVOID the corner against fireball characters, because once you're there it's game over. One of Balrog's main features is his speed, so don't be ashamed to put it to good use, pressing the opponent against the corners or cheesing them out with throw loops, maybe even a walk-up throw if you think you're a bad enough dude to pull it off. No matter what anyone says, don't let people who call you cheap for throws get to you, their opinion doesn't matter. As the Wise, All-Knowing, Mythical Pro Gamer David "Low Strong" Sirlin, now known as the designer behind revolutionary, life-changing experiences like Yomi, Yomi 2, Puzzle Strike 2, and Fantasy Strike, said in his book, Playing to Win, all the way back in 2000 or whatever: "The game knows no rules of 'honor' or of 'cheapness.' The game only knows winning and losing." (Sirlin, David, Playing to Win: Becoming the Champion, 2000). As long as you remember the Wise, All-Knowing, Mythical Pro Gamer David "Low Strong" Sirlin's words of wisdom, you will always have a fighting chance as CE Balrog. Show them what you got!
NOTE: Curiously, Dash/HSF2 Balrog (or M. Bison as he's known in Dash, since its JPN-only) has more going for him. His Dash Straight hits mid, and the TAP can be charged up to 60 seconds for a devastating final blow on the opponent. Although this isn't really enough to get him out of bottom tier still, this coupled with Dash's damage differences makes him more potent.
Match-Ups
Balrog's match-ups according the "official" SF2CE Tier List:
- against Ryu: 1
- against Ken: 2
- against Chun Li: 4
- against E. Honda: 2
- against Zangief: 3
- against Blanka: 8
- against Dhalsim: 1
- against Guile: 0
- against Balrog: 5
- against Vega: 3
- against Sagat: 2
- against M. Bison: 2
Vs. Ryu
Easily his 3rd worse matchup. Ryu has better priority on most of his quicker attacks with your only decent one being cr. HK, and it can't stop his lows. He can just crouch most of your best attacks. Once he starts throwing fireballs it's hard to stop him unless you are preemptively jumping over it knowing he will do another one (Chances are you'll be eating a DP instead). If you are cornered by fireballs, you've basically already lost. Only way to win this matchup is a great deal of patience, trading, and getting him into headbutt or managing to land a jump-in (which if you can pull off the combos, means you win)
Vs. E.Honda
Your standing fierce punch is effective, as it can hit E.Honda even if he's ducking.
You can keep him at bay with this move (watch out for his foot sweeps for they have just about the same range as your punches and they will knockdown.) Keeping up the pressure with your pokes is good, and TAP can also be effective if he has no charge. The best counter for his fists-o-fury attack when in the corner is cr.HK or a TAP, when you execute this move make sure that only your glove hits the hands otherwise it will be a mutual hit with you probably losing more. Jumping over his fists allows you to go for dizzy combo, so when possible try that as well.
Against his headbutt you can either jump over and headbutt him if he uses a fast one or use your jab, it will always beat headbutts.
If he headbutts you if you try to hit him, the best tactic is to get about half the screen away and execute a dash upper. From this distance you will not reach him and can recover fast enough to jump or punch his headbutt if he goes for it. (If you play with cheaps, a good tactic is to get just out of his sweep range and use a short charging punch, straight ones are better, then headbutt him. Works great.) Throw loops work great against Honda as well.
Vs. Blanka
Use the standing fierce punch just as you would against Honda.
This will allow you to keep him and any jump attack he uses at a distance. When he jumps in your charging uppercut attacks or St.MP are very effective if he jumps from a distance. When you do use these attacks DO NOT commit too early for if you execute your punch before he starts to come down (and or) before he uses his attack you will be sitting pretty for a roundhouse kick. If he jumps in from medium range your best defense is standing strong or perhaps ducking fierce punch. At close range it is best to try to either block or walk under and headbutt for at close range your attacks will probably overextend and leave you vulnerable. If Blanka use the ball it is a simple matter to block the attack and then use a charging punch to knock him out of the air as he bounces away. The only thing Balrog has trouble with is hitting Blanka out of the electricity without getting shocked. To do so it is like hitting Honda out of his hands. Time your strike so that it barely hits him. Or just wait for him to stop mashing (and spam Jab while you do) Or if he is close to dying a TAP will get you shocked but do more damage to him.
Vs. Guile
Guile can be very difficult, if not impossible for Balrog to beat especially if he plays super defensive. i.e. (sonic boom, foot sweep, sonic boom, etc.). Against a Guile that jumps in and attacks a lot react much as you would to Blanka, for your anti-air normals are good. But if your opponent stays on the ground using sonic booms and foot sweeps then your choices are few. First you must try to back him into a corner like Zan and Honda must do. Your can knock him out of the sonic booms like you can Ken and Ryu, just use the standing fierce and hit him just as he starts the motion that forms them. Another good technique is the superpunch barrage described under Ken.
Don't use this that much for it leaves you open for axe-kick.
A good way to sucker Guile into an axe-kick is to get about one inch out of his sweep range and either 1) let your man stand and move slightly back. Most patterning Guiles will see this as the beginning of a super punch and axe. 2) Wait for his sweep to start to recoil and use a short charging punch, then quickly go into the defensive crouch.
Both these fakes work fairly regularly into opening Guile up for a TAP or dizzy combo. Respect his Cr.MK. You have no way to hit him out of it outside of landing a TAP out of it's range.
Vs. Ken
Pretty much the same as Ryu except Ken can travel way further with his DPs. You can punish missed DP with a Dash Straight or Upper. You can use crouching Roundhouse or Standing Fierce against his startup of hadouken that is slower than Ryu's one.
Vs. Chun Li
Her speed could be a problem here but your excellent air defense should help curb this. If she stays ground based and tries to beat you with foot sweeps the best defense is either the non-stop superpunch combinations or a ducking roundhouse that should knock her down if you time it right. Most Chuns however will most likely come at you from the air. Learning how to use your different charging uppercut punches is key here. Another good attack (best if you have no time to charge) is just the ducking fierce punch or standing strong. If she uses lots of head stomps you can counter this by hitting her with a standing strong or fierce as she goes over you (after she already stomped you). Or you can take her out before she even hits you. You can do this by using a charging uppercut attack (will need her to be at a distance) and timing it so that it hits her in the chest just as she starts to drop. this will work for her stomping leg will be below you. Lastly a good way to get out of her neck kick is to jump straight up and use the jab punch for it stays out so long (or strong if you have good timing) and hit her before she peaks in her attack. You may both get hit but it will give you the distance you need to start using heavier punches.
Vs. Zangief
His WORSE matchup by far (yes, I think it's worse than even Guile!) The main reason is that if Zangief gets you cornered, or even just SPDs you once, he instantly wins as he can just keep ticking you into SPD until you die. The usual standing fierce punch will be effective against Zan as well (use them slightly more sparingly than against Blanka or Honda for the airplane punch can knock you out of any standing attack if Zan times it right.) The charging uppercut punches can knock him out of the airplane punch if you hit him in between his swinging arms. The best way to fight Zan however is to be defensive. The ducking roundhouse punch is your best defense here for its range and high priority make it very difficult for him to counter. Don't be too defensive for it won't take him long to get the timing to 360 you in between punches. You want to basically keep him away as much as you can, a Zangief who knows the matchup will be on the offensive trying to get you mess up and make the one mistake that'll end the round. DON'T LET HIM GET IN YOUR HEAD!!!
Vs. Dhalsim
Your two fierce buttons are best here. Your standing fierce punch can knock him out of fireballs, and your ducking roundhouse punch can knock him out of both his ducking fierce punch and standing kicks. A good way to lure him off sides is to use lots of ducking jab punches (these recover so fast that they easily allow you to switch to a more effective ducking roundhouse kick if he tries to knock you out of the jabs or lure you off sides). When doing this try to stay about two body widths distance from Dhalsim so that if he starts a fireball you can execute a charging punch (short uppercut is best) and knock him out of it. Lastly when jumping over his fireballs use your punch almost immediately when you reach the peak of you jump (stays out long enough that you can usually hit him). If he starts to use the slide try using the jab (stays out really long) or hold your attack until you almost land. Another good way to break the fireball kick pattern is to learn the timing of either his kick or fierce punch. You can hit his leg if you use your attack (any will work) just as you start to descend in your jump. You can hit his arm pattern if you hold your attack until you about two inches above the screen. The hardest part in countering his pattern is being able to predict which defend he is going to use. The best way is to jump the fireball and look at your opponents hands instead of the screen. Then hit your button right after you see him hit his. If you have him in the corner and successfully throw him, do the combo listed above, it will deal a good chunk of damage for little effort on your part.
Vs. Boxer
A good defense and quick reaction to his charging punches are key to defeating a good Balrog. Your ducking roundhouse punch will knock him out of most things and a quick ducking jab usually knocks him out of a charging punch, if you hit him with the first jab you can treat him much as you would Ken, Ryu or Sagat if you hit them right after coming down from an uppercut. The constant superpunch technique is effective here as well as short range charging punches (good to lure your opponent into making a mistake.) When you jump in try to do so from a distance or very close, this makes it harder for him to use his charging punches, and when jumping from a distance try to hold your attack until you have an idea of what your opponent is going to do.
Vs. Claw
Vega's speed, range, excellent throw and of the wall attack combine to make him one of Balrog's toughest opponents. His claw on the ground keep you at a distance and if you jump you will be sliced. A good way to stop his constant ducking claw attack is to either use the ducking roundhouse punch if you have good timing or the standing jab punch like Zangief does. These work well as does the constant superpunch barrage. In countering his claw he will most likely go to the air. Use your charging punches like you would against Blanka. If he uses lots of wall attacks you can 1- wait for him to approach and use the ducking fierce punch 2- if it is coming from a distance use the charging uppercuts, and 3- if it is coming from an opposite wall and you have no time to really orientate yourself a simple jump away in the air punch is your best chance. A good answer to wall dives is also Balrog's standing jab, it works as an anti-air. Get a grab on Claw! If you have him in a tick throw loop he has no good way to get out of it.
Vs. Sagat
Handle much like you would Ken and Ryu but take heed of his low tigers.
Sagat's goal in the matchup is to prevent you from leaving the corner once you're there. STAY OUT OF THE CORNER! At round-start, St.MK, St.HP, or cr.HP will knock him out of an attempted low tiger. Remember that Sagat can be hit by your St.HP, so use it to check his attempts at low tigers. Low tigers are otherwise very powerful so denying his ability to use them through reads is key. Keep distance from Sagat so that if he does an uppercut you won't get nailed. If you can time it right you can superpunch him over the low tigers. You will both get hit and take damage but he will lose much more. Also if you are close when you jump over hold your attack until you are low to the ground (this is good for it will raise your chances of knocking him out of a tiger uppercut. If you are at a distance try some short charging punches to try and fool him into doing an upper cut, then if he does you can standing fierce punch him or if you have time a charging punch. One final note do not use to many standing fierce punches to deter him from throwing for 1- he can still throw low ones 2- he gets so low when he starts his tiger uppercut that he may uppercut you out of it.
Vs. Dictator
Another bad match-up, Dictator had better pokes with fastest startup, Psycho Crusher can be punished at his start with a Far Fierce at distance or if you are close,you must block them and then punish Dictator with hold him or a switch side Dash Straight or Upper, close Jab are fine to keep him away or comboing,and Stomp can be defeated at the start or follow up with a jumping Roundhouse easily,Crouching Roundhouse its your best poke for medium range and wake ups,your main plan is to avoid Corner Trap and stay in the midscreen as long as possible.
Turn Around Punch can be nice as a surprise attack if Dictador walks to get close to you,and a miss Slide is the main attack that you need to punish him with a jumping Fierce and linked to a Crouching Roundhouse, and then a Dash Upper or Straight wake up.
