No edit summary |
No edit summary |
||
| Line 21: | Line 21: | ||
| Combo Counter || style="text-align:center" | [[File:SF6_icon_combocount.png|x60px|class=sc-img-responsive]] || The number indicates the number of hits in the current combo. Useful for determining whether or not a sequence of attacks is a true combo. | | Combo Counter || style="text-align:center" | [[File:SF6_icon_combocount.png|x60px|class=sc-img-responsive]] || The number indicates the number of hits in the current combo. Useful for determining whether or not a sequence of attacks is a true combo. | ||
|- | |- | ||
| | | Counter-hit || style="text-align:center" |[[File:SF6_icon_counterhit.png|x35px|class=sc-img-responsive]] || Appears when interrupting the startup or active frames of an opponent's attack. If two attacks trade with each other, both players get a Counter-hit. | ||
|- | |- | ||
| Punish Counter || style="text-align:center" |[[File:SF6_icon_punishcounter.png|x40px|class=sc-img-responsive]] || Appears when punishing the recovery frame's of an opponent's attack. | | Punish Counter || style="text-align:center" |[[File:SF6_icon_punishcounter.png|x40px|class=sc-img-responsive]] || Appears when punishing the recovery frame's of an opponent's attack. | ||
|- | |- | ||
| | | Cross-up || [[File:SF6_icon_crossup.png|x35px|class=sc-img-responsive]] || Appears when an attack crosses over the opponent, forcing them to block in the opposite direction that they were facing. | ||
|- | |- | ||
| Hard Knockdown || [[File:SF6_icon_hkd.png|x35px|class=sc-img-responsive]] || Appears after a knockdown, such as a 2HK or Punish Counter Throw, that prevents the opponent from Back Rising. | | Hard Knockdown || [[File:SF6_icon_hkd.png|x35px|class=sc-img-responsive]] || Appears after a knockdown, such as a 2HK or Punish Counter Throw, that prevents the opponent from Back Rising. Often abbreviated as HKD. | ||
|- | |- | ||
| Reversal || [[File:SF6_icon_reversal.png|x35px|class=sc-img-responsive]] || Appears when a Special or Super move is input at the earliest possible timing after hitstun, blockstun, or | | Reversal || [[File:SF6_icon_reversal.png|x35px|class=sc-img-responsive]] || Appears when a Special or Super move is input at the earliest possible timing after hitstun, blockstun, knockdown, or air reset. | ||
|- | |- | ||
| Throw Escape || [[File:SF6_icon_throwescape.png|x35px|class=sc-img-responsive]] || Appears when successfully defending against a Throw. | | Throw Escape || [[File:SF6_icon_throwescape.png|x35px|class=sc-img-responsive]] || Appears when successfully defending against a Throw. Also known as a "Throw Tech". | ||
|- | |- | ||
| Stun/Dizzy || [[File:SF6_icon_stun.png|x35px|class=sc-img-responsive]] || Appears when '''Drive Impact''' connects on a cornered opponent during '''Burnout''' state, allowing for a free combo followup. | | Stun/Dizzy || [[File:SF6_icon_stun.png|x35px|class=sc-img-responsive]] || Appears when '''Drive Impact''' connects on a cornered opponent during '''Burnout''' state, allowing for a free combo followup. | ||
Revision as of 00:53, 28 December 2023
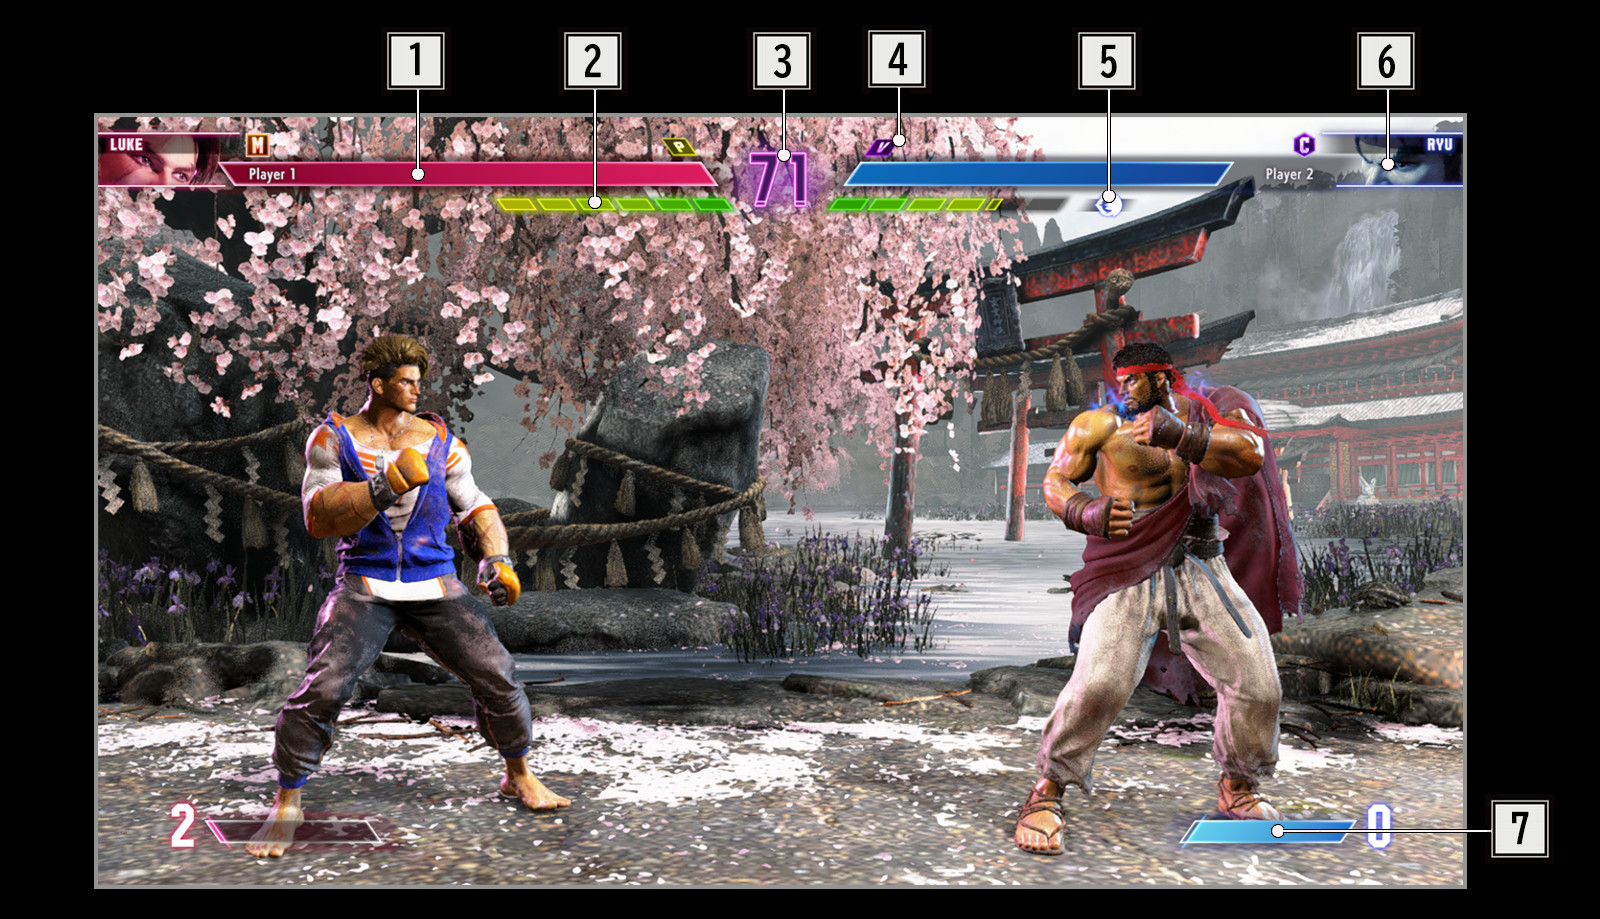
Battle HUD
1. Vitality Gauge: Indicates the health remaining for each character.
2. Drive Gauge: Drive gives you the ability to perform various actions in SF6. When this gauge is empty, it turns gray and begins slowly replenishing. The fighter will enter Burnout and will not be able to use Drive-related techniques until the gauge is fully replenished.
3. Timer: Indicates the time remaining in the round.
4. Round Count: Indicates the current round count. The type of icon indicates how the round was won.
5. Attribute Icon: Some characters have unique icons that indicate some property. Examples include Kimberly's Spray Can stock, Ryu's Denjin charge, and Juri's Fuha stock.
6. Character Icon: Indicates the character and control type (Classic/Modern/Dynamic) being used.
7. Super Art Gauge: Spend this gauge to perform a devastating Super Art. Every attack that lands will fill up the Super Art gauge, and you can fill it up to 3 stocks. Super Art gauge also carries over between rounds.
