No edit summary |
|||
| (35 intermediate revisions by 5 users not shown) | |||
| Line 1: | Line 1: | ||
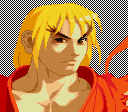
[[File:sfaken.png]] | |||
= Introduction = | = Introduction = | ||
+"Combo to fierce dp" | |||
+Roll is unthrowable and very good for pressure | |||
+St.mk Moves him forward making Dp combos Easy | |||
+shoto normals are Very strong | |||
+Crouch.MK Does 6 Stun instead of 1 like other shotos | |||
-Fireball will never knock down And Due to startup does not combo from as far out as Akuma/ryu But it does the most Damage Of the 3 | |||
= Moves List = | = Moves List = | ||
== Normal Moves == | ==Normal Moves== | ||
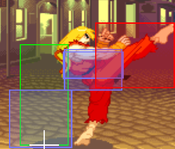
Almost all of kens moves are cloned from the other shotos but there are exceptions | |||
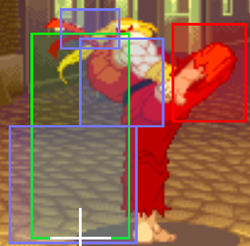
{{MoveData | |||
|image=A1 Ken S.MK.png | |||
|imageSize=250px | |||
|image2=A1 Ken S.MK 2.png | |||
|imageSize2=250px | |||
|caption= | |||
|name=st.[[File:Mk.png]] | |||
|data= | |||
{{AttackData-Alpha2 | |||
|Damage= 11-13,6 | |||
|Stun= 3,3 | |||
|Startup= 5 | |||
|Frame Adv= -8(second hit) | |||
|Block=[[File:Mid.png]] | |||
|Properties=[[File:Specialcancel.png]]<br>[[File:Supercancel.png]] | |||
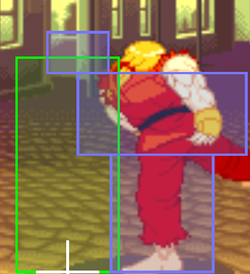
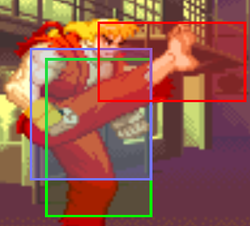
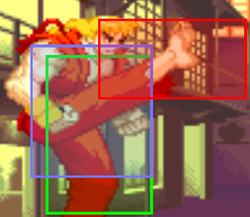
|description= Awesome Move In chain combos because it has insane forward momentum, Only first hit can be canceld and you should always be using it for combos due to the - frames. | |||
}} | |||
}} | |||
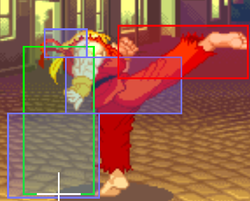
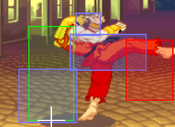
{{MoveData | |||
|image=A1 Ken S.HK.png | |||
|imageSize=250px | |||
|image2=A1 Ken S.HK 2.png | |||
|imageSize2=250px | |||
|caption= | |||
|name=st.[[File:Hk.png]] | |||
|data= | |||
{{AttackData-Alpha2 | |||
|Damage=12-15 | |||
|Stun= 8 | |||
|Startup= 7 | |||
|Frame Adv= -5 | |||
|Block=[[File:Mid.png]] | |||
|Properties= | |||
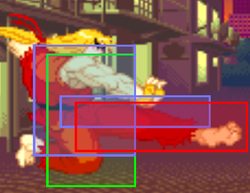
|description= Same animation as his awesome kick AC in alpha 2,Good mid ranged poke Overall But you want to whiff punish with it Because of the lingering Hurtbox | |||
}} | |||
}} | |||
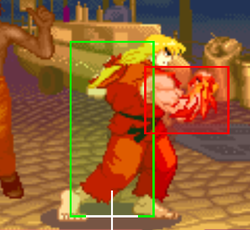
{{MoveData | |||
|image=A1 Ken J.MK.png | |||
|imageSize=250px | |||
|caption= | |||
|name=dj.[[File:Mk.png]] | |||
|data= | |||
{{AttackData-Alpha2 | |||
|Damage= 12-14 | |||
|Stun= 6 | |||
|Startup= 7 | |||
|Frame Adv= | |||
|Block=[[File:High.png]] | |||
|Properties= | |||
|description= Decent crossup | |||
}} | |||
}} | |||
{{MoveData | |||
|image=A1 Ken and Ryu NJ.LK.png | |||
|imageSize=250px | |||
|caption= | |||
|name=Nj.[[File:Lk.png]] | |||
|data= | |||
{{AttackData-Alpha2 | |||
|Damage= 12 | |||
|Stun= 3 | |||
|Startup= 2 | |||
|Frame Adv= | |||
|Block=[[File:High.png]] | |||
|Properties= | |||
|description= | |||
}} | |||
}} | |||
{{MoveData | |||
|image=A1 Ken and ryu NJ.MK.png | |||
|imageSize=250px | |||
|caption= | |||
|name=Nj.[[File:mk.png]] | |||
|data= | |||
{{AttackData-Alpha2 | |||
|Damage= 13-14 | |||
|Stun= 6 | |||
|Startup= 2 | |||
|Frame Adv= | |||
|Block=[[File:High.png]] | |||
|Properties= | |||
|description= | |||
}} | |||
}} | |||
==Command Normals== | |||
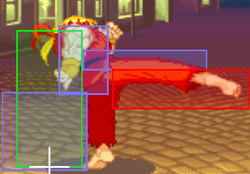
{{MoveData | |||
|image=A1 Ken F+MK.png | |||
|imagesize=250px | |||
|image2=A1 Ken F+MK 2.png | |||
|imagesize2=250px | |||
|caption= | |||
|name=[[File:F.png]] + [[File:Mk.png]] | |||
|data= | |||
{{AttackData-Alpha2 | |||
|Damage= 13-15,6 | |||
|Stun= 3,3 | |||
|Startup= 23 | |||
|Frame Adv= +1(only second hit) +5(both hits) | |||
|Block=[[File:High.png]] | |||
|Properties= | |||
|description= Actually has Great hitboxes And You can link sweep after it hits up close but its EXTREMELY slow | |||
}} | |||
}} | |||
== Special Moves == | == Special Moves == | ||
{{MoveData | |||
|image= | |||
|imageSize=250px | |||
|caption= | |||
|name= Hadouken | |||
|data= | |||
{{AttackData-Alpha2 | |||
|version=[[File:qcf.png]]+ [[File:Lp.png]] | |||
|Damage= 15-21 | |||
|Stun= 8 | |||
|Startup= 11 | |||
|Frame Adv= -7 to +23 depending on how long it travels,-8 to +18 on block depending on how long it travels | |||
|Block=[[File:Mid.png]] | |||
|Properties=[[File:Proj.png]] | |||
|description=Ken has the slowest Startup hadokens but they do the most damage | |||
}} | |||
{{AttackData-Alpha2 | |||
|header= no | |||
|version=[[File:qcf.png]] + [[File:Mp.png]] | |||
|Damage= 15-21 | |||
|Stun= 10 | |||
|Startup= 11 | |||
|Frame Adv= -7 to +23 depending on how long it travels,-8 to +18 on block depending on how long it travels | |||
|Block=[[File:Mid.png]] | |||
|Properties=[[File:Proj.png]] | |||
|description= | |||
}} | |||
{{AttackData-Alpha2 | |||
|header= no | |||
|version=[[File:qcf.png]] + [[File:Hp.png]] | |||
|Damage= 19-27 | |||
|Stun= 12 | |||
|Startup= 11 | |||
|Frame Adv= -7 to +23 depending on how long it travels,-8 to +18 on block depending on how long it travels | |||
|Block=[[File:Mid.png]] | |||
|Properties=[[File:Proj.png]] | |||
|description= | |||
}} | |||
}} | |||
{{MoveData | |||
|caption= | |||
|name=Tatsumaki Senpuukyaku | |||
|data= | |||
{{AttackData-Alpha2 | |||
|version=[[File:qcb.png]]+ [[File:Lk.png]] (air ok) | |||
|Damage= | |||
|Stun= | |||
|Startup= | |||
|Frame Adv= 0,-10(block) | |||
|Block=[[File:Mid.png]] | |||
|Properties= | |||
|description= Kens tatsus Never knock down But his lk tatsu can hit crouchers very close,Keep in mind you need to combo these very close and generally only on standing opponents otherwise you end up pretty - on hit Also just like akuma they dont jail on block so you can block the first hit then crouch to make it unsafe. its worth noting the air versions even though they Can whiff crouchers are generally very + on hit or block | |||
}} | |||
{{AttackData-Alpha2 | |||
|header= no | |||
|version=[[File:qcb.png]] + [[File:Mk.png]] (air ok) | |||
|Damage= | |||
|Stun= | |||
|Startup= | |||
|Frame Adv= 0,-15(block) | |||
|Block=[[File:Mid.png]] | |||
|Properties= | |||
|description= | |||
}} | |||
{{AttackData-Alpha2 | |||
|header= no | |||
|version=[[File:qcb.png]] + [[File:Hk.png]] (air ok) | |||
|Damage= | |||
|Stun= | |||
|Startup= | |||
|Frame Adv= 0 -19(block) | |||
|Block=[[File:Mid.png]] | |||
|Properties= | |||
|description= | |||
}} | |||
}} | |||
{{MoveData | |||
|image=A1 Ken HP Shoryouken First hit.png | |||
|imageSize=250px | |||
|caption=BIG boy DAMAGE | |||
|name= shoryuken | |||
|data= | |||
{{AttackData-Alpha2 | |||
|version=[[File:dp.png]] + [[File:Lp.png]] | |||
|Damage= 24-30 | |||
|Stun= | |||
|Startup= 3 | |||
|Frame Adv= -18 -10(second hitbox) | |||
|Block=[[File:mid.png]] | |||
|Properties= [[File:Startupinv.png]]<br>[[File:Upperbodyinv.png]][[File:Lowerbodyinv.png]] | |||
|description= Only hits once | |||
}} | |||
{{AttackData-Alpha2 | |||
|header= no | |||
|version=[[File:dp.png]] + [[File:Mp.png]] | |||
|Damage= 26-34 | |||
|Stun= | |||
|Startup= 3 | |||
|Frame Adv= -23 | |||
|Block=[[File:mid.png]] | |||
|Properties= [[File:Startupinv.png]]<br>[[File:Upperbodyinv.png]][[File:Lowerbodyinv.png]] | |||
|description= First Hit Does not knock down so the other hitboxes can combo | |||
}} | |||
{{AttackData-Alpha2 | |||
|header= no | |||
|version=[[File:dp.png]] + [[File:hp.png]] | |||
|Damage= 39-58 | |||
|Stun= | |||
|Startup= 2 | |||
|Frame Adv= -32 | |||
|Block=[[File:mid.png]] | |||
|Properties= [[File:Startupinv.png]]<br>[[File:Upperbodyinv.png]][[File:Lowerbodyinv.png]] | |||
|description= Kens only unique attribute aside from The damage/Startup For this move is His Hp dp has a different Starting hitbox from Akuma. Lp/Mp Dp are identical Hitbox wise To akuma As are The Hits after Hp dp lands | |||
}} | |||
}} | |||
- | |||
Zenpou Tenshin/Roll - qcb + punch | |||
== Super Moves == | == Super Moves == | ||
| Line 29: | Line 267: | ||
Something to fierce dp.The most powerful regular combo in the game. Kens dp also has a HUGE random factor to. Many combos can very quite drastically. A combo might | Something to fierce dp.The most powerful regular combo in the game. Kens dp also has a HUGE random factor to. Many combos can very quite drastically. A combo might do 50% one time, then the next 65%. In general aim for something,(after a jump in/cross up)duck kX2, stand mk/duck k, stand mp/ or duck k, duck hp/to fierce dp. The latter can literally do about 80% on akuma depending on the random factor of the game. And in general combo to fierce dp is a safe bet to always at least do 50% on everyone in the cast. Remember that stand mk moves you foward, making combos much more lax. This combo also does good dizzy, however ken is not in a great position to punish if the opponent rolls so be on your toes. | ||
-C.Lkx2,C.mk,Hp hado because of kens buffed stun on crouch mk he can punish crouch slighty harder | |||
-C.lkx2,S.Mk,Lvl 3 shoryu reppa Simple confirm that does Tons of damage and since ken will get plenty of meter rolling its not that unrealistic | |||
= The Basics = | = The Basics = | ||
| Line 40: | Line 284: | ||
= Match-ups = | = Match-ups = | ||
{{Navbox-SFA1}} | |||
[[Category:Street Fighter Alpha Series]] | [[Category:Street Fighter Alpha Series]] | ||
[[Category:Street Fighter Alpha]] | [[Category:Street Fighter Alpha]] | ||
[[Category:Ken]] | |||
Latest revision as of 21:53, 22 March 2021
Introduction
+"Combo to fierce dp"
+Roll is unthrowable and very good for pressure
+St.mk Moves him forward making Dp combos Easy
+shoto normals are Very strong
+Crouch.MK Does 6 Stun instead of 1 like other shotos
-Fireball will never knock down And Due to startup does not combo from as far out as Akuma/ryu But it does the most Damage Of the 3
Moves List
Normal Moves
Almost all of kens moves are cloned from the other shotos but there are exceptions
Command Normals
Special Moves
Zenpou Tenshin/Roll - qcb + punch
Super Moves
Shouryuu Reppa
qcf,qcf+P
Shinryuu Ken
qcf,qcf+Mash K
Combos
Something to fierce dp.The most powerful regular combo in the game. Kens dp also has a HUGE random factor to. Many combos can very quite drastically. A combo might do 50% one time, then the next 65%. In general aim for something,(after a jump in/cross up)duck kX2, stand mk/duck k, stand mp/ or duck k, duck hp/to fierce dp. The latter can literally do about 80% on akuma depending on the random factor of the game. And in general combo to fierce dp is a safe bet to always at least do 50% on everyone in the cast. Remember that stand mk moves you foward, making combos much more lax. This combo also does good dizzy, however ken is not in a great position to punish if the opponent rolls so be on your toes.
-C.Lkx2,C.mk,Hp hado because of kens buffed stun on crouch mk he can punish crouch slighty harder
-C.lkx2,S.Mk,Lvl 3 shoryu reppa Simple confirm that does Tons of damage and since ken will get plenty of meter rolling its not that unrealistic
The Basics
Combo to fierce dp. Its the most powerful combo in the game.
Duck fierce, jab roll repeat. Duck fierce has tremendous priority and although not a true combo most characters do not have a attack that is fast enough to beat it. And if they do, the priority is not good enough to beat the duck fierce. Duck fierce will actually even out right beat "weaker" reversal moves(like guys hurricane kick)so your opponent is forced to throw to beat the trap, AC, or reversal(again assuming there reversal has enough priority to beat kens duck fierce in the first place). Note of course the problems with this being in the corner ken can roll through certain ACs etc. And for throwing, well roll is invulnerable to throws and if you are doing d/b fierce you will automatically tech throws. You get the idea. Very effective for what it is. Obviously there are other variations but this is a basic idea.
