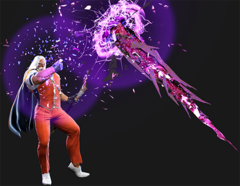
Neutral
Midrange/Close
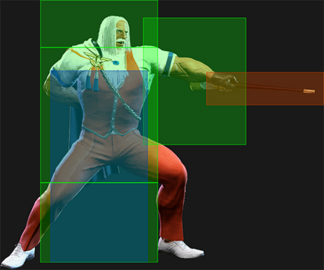
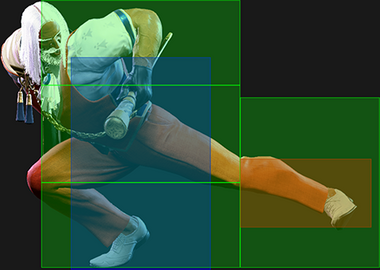
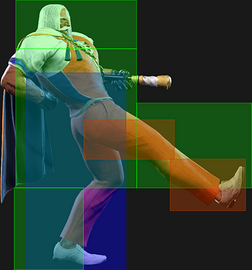
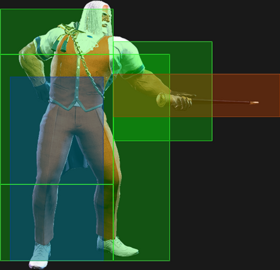
JP's has a lot of great tools for the midrange thanks to good range on most of his pokes and slight disjoints. Your main buttons at this range are 5MP, 5MK, 2MK, 5HP, j.MP, and more situationaly 2MP, 4MP and 5HK. His fireballs, and especially his fireballs fakes are also situational tools to force your opponent to commit to more unsafe options like jumping. As some of them lack special cancels, you will have to
- 5MP
- Your first and easiest neutral poke to use, sporting great range and some disjoint. It's especially handy against raw Drive Rushes if you can react in time, but unlike his other pokes you cannot convert any catches into a combo. Once used enough, your opponent will likely try to get around it using either a jump, a Drive Impact, or counterpoke it with one of their own button. For these reasons, this button shouldn't be abused even if it has allowed you to get some stray hits. You should alternate it with another, quicker and cancelable button such as 2MP or 5LP.
- 2MK
- A great low poke, an invaluable tool when opponents try to reposition to deal with JP's other options, walk away from a portal or simply try to shimmy you, as it moving JP forward gives it deceptive range. All of these traits are amplified when used out of Drive Rush, and is one of your core buttons to use out of Raw DR, as it grants great conversions on hit while also giving plus frames on block. It can also be used as a punish tool due to outranging a lot of JP's other buttons of the same speed.
- 5MK
- Used to fish for stray hits such as an opponent advancing or using forward travelling moves, or for forcing your way in with a Drive Rush that you buffer behind it. You can also buffer OD Triglav, as it will combo on hit and be plus on block, but be very careful of opponent recognizing it as a Drive Impact point. Good range and being special-cancellable makes it one of your safest pokes, but more vulnerable to counterpoking itself.
- 5HP
- Big and commital poke, as it has less range than 5MP, but is cancelable. Amazing for whiff punishes as it grants immense frame advantage on Punish Counter allowing you to convert no matter the spacing. On block, you can try to continue pressure by canceling into L Torbalan which frametraps anything the opponent might try after blocking, which then allows you to stagger with it. Crucially, this cancel is safe to Drive Impact (though you still have to worry about reversals). You can also mix with the M and H versions, or even try Embrace, but they can all be jumped out of if the opponent is ready, requiring conditioning with L Torbalan to dissuade. Overall JP's most rewarding move to connect, either on hit or block, but since the hurtbox comes out before the hitbox, you will have to be careful to not stick it out into your opponent's active frames.
- 8j.MP
- Interesting and situational poke that has nearly as much range as 5MP, but isn't weak to Drive Impact and has great frame advantage, able to link at worst into 5MP, and at best into cancelable normals like 5HP. Use it to keep an air presence if your opponent is too jump happy, to counterpoke after neutral jumping a fireball. Keep in mind that the staff is NOT disjointed and can be anti-aired. It also completly whiffs on crouching opponent, though it will be hard for your opponent to capitalize on it.
- 5HK~HP
- Works best when hitting standing opponents as it will connect further. Because of the target combo it makes the most sense to press HP so if the 5HK connects, JP will automatically go into the target combo 5HK~HP. This is great as this target combo provides mixup with 214K,236K, and drive rish. The range is not great on crouching opponents but if the opponent is frequently crouching they may be doing so to avoid 2MK. In this scenario it's best to start using 5MP as they are less likely to jump or drive impact.
Fullscreen
This situation is great for JP as he is able to setup his zoning with clones, and spikes. Generally this will most often occur after opponent gets hit by 22P or 236P. If possible JP wants to setup Departure(214P) as it makes getting closer to JP difficult for the opponent. Because JP cannot command grab(214K) while the Departure(214P) is active most opponents who are aware will try and Drive Parry to avoid losing as much drive gauge when blocking and negating ghost mixups. When this happens JP teleporting to an active portal from Departure is great to hit the opponent with a throw.
- 214P
Generally will be 214HP but if done after 236LP it can be beneficial to do 214LP or 214MP if the opponent is aware how minus this is (-12).
Before the spike triggers JP has time to do...
- 236K x2
- 236K and 22P in any order
- 236[K] x3
- 236[K] x2 and teleport to departure
- 22P x2
This is important because if the spike gets to trigger JP has several options to threaten the opponent. 214P trigger has 31 frames of blockstun which allows JP to do 214PP if frame perfect and be only -9 which is amazing at full screen. This can allow JP to always threaten the opponent and make them have to take more risk to approach JP
- 214PP
Generally will be 214LP+HP as the LP spike will catch an opponent approaching while HP spike will ensure they get hit from far away. The main use is the frame advantage is much better than 214P as it's -2 after 236LP and +2 after 236MP
- 236MK & 236HK
Will always be plus at range on hit (max of +27) and block (max of +13) making it very useful to continue full screen pressure however some characters can drive rush past the ghosts so JP needs to keep this in mind.
- 22HP
Is fantastic at stopping an an opponent from approaching, especially if they blocked a ghost from
Offense
Frame Traps
Light Chains - 2LK, 2LP, 5LP
- Can chain up to 3 of any of these normals together from point blank distance and 2LK has the most pushback on block of these however is not special cancelable.
5HK - +2 on block allowing for several frame traps
- 2LP 2f gap
- 5LK 3f gap
- 6f moves 4f gap which allows for trades but will generally not combo
- 5LP or 2LK
Blockstrings
- Drive Rush(DR) 2MK
- throw: 4f gap
- 2LP: 3f gap
- on hit; DR 2MK > 2MP > 236MP
This is a great option in in neutral as 2MK hits incredibly far. As well due to it's low recovery it can recover in time to punish Drive impact. This option is great as it establishes threat and forces the opponent to look out for it. the more they respect it the more likely they are to get hit by bigger followups down the line such as DR 6MK.
- 5MK
- DR 2MK: 2f gap, then gives DR 2MK follow up options if blocked
- DR 6MK: leaves a pretty big gap but good for opponents who start to respect DR 2MK
- DR throw: Good to make the opponent want to mash more during blockstrings.
- 214K,236MK,236HK,236P: multiple followups with all but the command grab losing to Drive impact. Mash from opponent also can beat many of these options
5MK hits fairly far and is special cancelable, however the blockstun and recovery makes most special cancels beside Drive Rush susceptible to Drive Impact. This means Drive rush is the safest option after an opponent blocks 5MK
Okizeme and Mixups
TO-DO
Corner throw
JP has the ability to throw loop by walking forward which is incredibly powerful. He also can setup a meaty drive rush 5HK.
- Throw > Drive rush 5HK > 5HK
- is a 4f frame trap that trades in JP's favor if done correctly. Combos if they were not blocking as well. And allows for several mixup options after blocked
236LP
Midscreen JP doesn't get too much however he can attempt to setup 214PP but will be slightly minus at -2 and -12 with 214P. This can still be a great option as the distance provided can make it easier for you to stop your opponent from approaching.
In the corner JP can start drive rush pressure. If you are having difficulties timing okizeme you have a few options
dash > DR 2MK can help auto time it
2MK(wiff) > 5HK +5 on block and +10 on hit
236MP
Midscreen 214PP and 214P are generally the options 214PP is +2 with 214P being -8. Good option as the distance and slight frame advantage can make it difficult for opponent to approach.
In the corner JP gets an auto timed j.HK that will safejump the opponent.
With 214PP JP can go into +2 Departure setups which is listed below.
Drive rush pressure is also possible and dash > DR 2MK works as a solid general option
Setups
+2~+4 corner Departure setups
Can be done by some sample combos below in the corner only
- DI > 6HK > 236MP > 5HP > 236KK > 22P > 214P
- 236HP > 5HP > 236KK > 22P > 214P
- throw > spike trigger > 5HP > 236KK > 22P > 214P
- 236MP > 214PP
- etc
After 22P JP can go into level 1 or 236P > 236236K. Video on the setups can be found here: https://youtu.be/q1Dc_22Ea3Y
| option | combo | Oki/Notes |
|---|---|---|
| throw | throw > 214P(auto) > 5HP > 236KK > 22P | Allows for loopable oki on hit |
| 2LK > 2LP > 236LP | 2LK > 2LP > 236LP > 214P(auto) > 5HP > 236KK > 22P | loopable and allows for jp to be fairly plus if done correctly |
| backdash > 5MK > 236LP > DR 5HK(+6) or DR 2MK(+1) | backdash > 5MK > 236LP > 214P(auto) > 5HP > 236KK > 22P | backdash to try and bait throw |
| 4MP~MP > 236LP > 6MK or DR pressure | 4MP~MP > 236LP > 214P(auto) > 5HP > 236KK > 22P | Allows for JP to be plus enough to setup a 6MK while adding multiple small frame traps |
| (214PP) 2LK > 2LP > 2LP > spike > 6MK | dl 6HK > 236MP > 5HP > 236KK > 22P | loopable and allows for an overhead mixup to be thrown in |
Knockdown Advantage: all scenarios assume that opponent will Back Rise midscreen when possible, unless otherwise stated
| Knockdown | KD Adv. | Oki/Notes |
|---|---|---|
| Forward Throw | +24 | throw loops in corner, also meaty DR 5HK |
| Back Throw | +36 | backthrow > dash > DR 5LP can be a simple setup when throwing opponent back into the corner |
| 2HK | HKD +27 HKD +48 (Punish) |
22LP is good for an autotimed meaty which is +4; punish counter gives 214PP setup. |
| 3HP | HKD +17 HKD +39 (Punish) |
2HK > DR > 5LK/2MK/2MP are some basic pressure option after. |
vs. Burnout
Drive Rush
When canceling a normal into Drive Rush on block and following it up with another normal, there may be an interruptible gap in the blockstring. The following table lists these blockstring gaps when performed at the fastest possible timing.
| Gap Value | Meaning |
|---|---|
| 0 | True Blockstring (no gap) if input with fastest button timing; can still lose to Drive Reversal |
| 1 to 4 | Small blockstring gap; opponent can interrupt with an invincible reversal; a 4f gap can trade with 4f normal attack |
| 5+ | Large blockstring gap; opponent can interrupt without an invincible attack |
| 2LP | 5LK | 5LP/2LK | 2MP | 5MK/4MP | 2MK/2HP | 2HK | 6HK | 5MP/5HP/5HK | 3HP | 6MK | |
|---|---|---|---|---|---|---|---|---|---|---|---|
| 5LP~DR | 4 | 5 | 6 | 7 | 8 | 9 | 10 | 11 | 12 | 16 | 22 |
| 5HP~DR | 0 | 0 | 0 | 0 | 0 | 0 | 0 | 0 | 1 | 5 | 11 |
| 5LK~DR | 3 | 4 | 5 | 6 | 7 | 8 | 9 | 10 | 11 | 15 | 21 |
| 5MK~DR | 0 | 0 | 0 | 0 | 1 | 2 | 3 | 4 | 5 | 9 | 15 |
| 2LP~DR | 3 | 4 | 5 | 6 | 7 | 8 | 9 | 10 | 11 | 15 | 21 |
| 2MP~DR | 1 | 2 | 3 | 4 | 5 | 6 | 7 | 8 | 9 | 13 | 19 |
| 2HP~DR | 0 | 0 | 0 | 0 | 0 | 0 | 0 | 1 | 2 | 6 | 12 |
| 4MP~DR | 0 | 0 | 0 | 0 | 0 | 1 | 2 | 3 | 4 | 8 | 14 |
| 6HK(2)~DR | 0 | 0 | 0 | 0 | 0 | 0 | 0 | 0 | 0 | 4 | 10 |
| 4MP~MP~DR | 0 | 0 | 0 | 0 | 1 | 2 | 3 | 4 | 5 | 9 | 15 |
| 5HK~HP~DR | 0 | 0 | 0 | 0 | 0 | 0 | 1 | 2 | 3 | 7 | 13 |
The following table lists the general BnB combo routes when canceling a button into Drive Rush on hit.
| Starter | Hit Adv. | Combo Route |
|---|---|---|
| 5LP~DR | +6 | ? |
| 5LK~DR | ||
| 2LP~DR | ||
| 5MK~DR | +11 | ? |
| 2MP~DR | ||
| 4MP~DR | +14 | ? |
| 5HK~HP~DR | +15 | ? |
| 4MP~MP~DR | +16 | ? |
| 5HP~DR | +17 | ? |
| 2HP~DR | ||
| 6HK(2)~DR | Free Juggle | ? |
Defense
Abare
- 2LP
JP's fastest option but the range isn't great.
- 5LP
Decent option as the range is further than it seems while still having 6f startup
- 22K
Can actually be useful if you know there will be 3f gaps during blockstrings
Reversals
- 22KK
- 236236P(Level 1)
Anti-Airs
- 2HP
- 6HK
- air throw
Anti-Projectile
- 22P
- 236KK
- 214KK
- 236236K(level 3)
OD Amnesia (22KK)
- TO-DO: Video example to the right of parry triggers
Infamous tool accessible to JP. When triggered JP will go into 17 frames of recovery while the opponent will go through their remaining active and recovery. This means certain moves that his Amnesia can be punishable while others still plus. The general rule of thumb is moves with 16f of recovery or more will be minus or punishable while anything shorter recovery
- table here
| opponent move recovery | Options |
|---|---|
| 12f recovery or less | Opponent is always plus and if JP is cornered they can enforce some options to threaten past the bombs such as throw, Drive impact, supers, etc However JP can threaten another layer of RPS by using his level 1 as the bombs will often explode after leaving him safe |
| 17f recovery | ranges from -2~+2 depending on how many active frames left |
| 21f recovery | If JP is cornered he can usually punish with jab (2LP or 5LP) |
| 23f recovery | Almost always punished by 2MP when cornered |
| 29f+ recovery | Can be punished midscreen by several moves such as 5MP or walk up 2MK |
Will use JP's moves to detail this with 5LP, throw, 5HK meaty & non-meaty, and 3HP
- 5LP has 6f startup, 3 active, 10 recovery
- Throw has 5f startup, 3 active, 23 recovery
- 5HK has 12 startup, 4 active, and 17 recovery
- Will do a meaty setup which is throw > DR 5HK making it so 5HK hits on the 3rd active frame
- 3HP has 16 startup, 3 active, and 31 recovery
So for 5LP the opponent triggers this on their first active frame so active frame 1 is frame 1 of parry while the last active frame (3f) is frame 2 of parry recovery. Now opponent will go into the 10 frames of recovery frames.
Math wise you would say remain active + recovery - 17 = advantage. 2 + 10 -17 = -5 however JP can block. This just means it's the opponent's turn still if they are aware
| Move Parried | meaty | first active frame |
active | remaining active |
recovery | equation | result |
|---|---|---|---|---|---|---|---|
| 5LP | no | 1 | 3 | 2 | 10 | 2 + 10 -17 | -5 |
| throw | no | 1 | 3 | 2 | 23 | 2 + 23 -17 | +8 |
| 5HK | no | 1 | 4 | 3 | 17 | 3 + 17 -17 | +3 |
| 5HK (throw > DR 5HK) | yes | 3 | 4 | 1 | 17 | 1 + 17 -17 | +1 |
| 3HP | no | 1 | 3 | 2 | 31 | 2 + 31 -17 | +16 |
Fighting vs. JP
Dealing with Zoning
Some characters can drive rush past ghosts(236K).
Need to know some of JP's setups as often times he can be minus if not done correctly. For instance 236MK/HK > 214HP on block is -21 fullscreen which gives you plenty of time to approach JP
OD amnesia counterplay
When JP is cornered use low recovery moves so you can maintain frame advantage. To have a better understanding on how it works please visit this section About OD Amnesia. If a low recovery move was preformed to trigger the parry The options from there are varied.
- Backdash > drive parry
- best if done after a safejump as you will be extremely plus and very safe
- throw
- if it hits most animations will go beyond explosion but is character specific.
- Jab > throw
- if it hits all animations should go beyond explosion with throw tech sometimes avoiding the 2nd bomb.
- (Jab) > (Jab) > DI
- DI can be done immediately or after jabs with each having it's own downside. Raw DI losing to throw with jab > DI being much more reactable.
Defending vs Pressure
TO-DO
