| Line 101: | Line 101: | ||
== Custom Combos == | == Custom Combos == | ||
http://sfz2.wordpress.com/projects/sfz2-custom-combos-videos/m-bison-custom-combos/ | |||
= Match-ups = | = Match-ups = | ||
Revision as of 20:02, 10 March 2014
Story
Bison, leader of the criminal organization known as Shadaloo, hears of a fighter named Ryu who defeated his new henchman, Sagat. Bison decides to recruit Ryu and begins the search for him. In the meantime, he is confronted by Rose, a mysterious woman who wields power that is in many ways similar to his own. Rose wins the ensuing battle but only to find out that Bison has left the battlefield completely unscathed and has possibly threw the fight. Reasons for this are disclosed during the events of SFA3.
Afterwards, Bison encounters Chun Li. They have a brief duel in which Bison toys around with the girl. He flees and lets Chun Li know that he murdered her father.
After this, Bison is finally able to track down Ryu. At first, Bison attempts to persuade Ryu to join him by promising that he would make him the greatest fighter ever. Ryu mocks him and the two engage in combat. Bison wins and takes Ryu's body to his scientists for a brainwashing via exposure to Psycho Power. It is debatable whether this ending is canon or not, however, the exact events which it depicts did take place during SFA3.
Moves List
Normal Moves
Throws
Deadly Throw
- Forward or Back + MP or HP
Psycho Fall
- (In Air)Forward or Back + MP or HP
Special Moves
Psycho Shot
- Charge Back, Forward + Punch
Double Knee Press
- Charge Back, Forward + Kick
Head Press
- Charge Down, Up + Kick, then hold Forward or Back
Somersault Skull Diver
- (After Head Press)Punch
Somersault Skull Diver
- Charge Down, Up + Punch, then hold Forward or Back and press Punch again
Vega Warp
- Back, Down, Down-Back or Forward, Down, Down-Forward + All three Punch or Kick buttons
Super Moves
Psycho Crusher
- Charge Back, Forward, Back, Forward + Punch
Knee Press Nightmare
- Charge Back, Forward, Back, Forward + Kick
The Basics
Try and keep the opponent away with your safe pokes and fireball. Try and think of the character as Dictator with a DeeJay style fireball. Powerful in the right situations but can be unsafe if you don't pay attention. MP is your go to button for all kinds of situations. You can kind of mash out counter hits but don't go overboard. Standing MK is a good poke at far range. The hitbox is very low so it is not an anti-air. Also very good for poking shotos that try and move around the screen unsafely with tatsus. As far as anti-airs go you have 3 options. Stand HP, Crouch HP, and Stand HK. All of these have their own situtations. For example Crouching HP is faster than Standing HP even though they have similar hitboxes. While Stand HK has a different range/hitbox all together. Mess around with the character in training mode and get a good feel for your normals. Most of your play time will be blocking and using pokes.
BnB Combos
1) Jump HK > Stand/Crouch MP (2 hits, 26 dmg, 14 stun)
Good 2 hit BnB off a safe jump in. Jump HK is pretty safe and the follow up is easy. Leaves you at +20 to +22 frame advantage. Can be followed up with fireball for free if you have enough charge time, but it will not combo.
2) Jump HK > Stand HK (3 hits, 30 dmg, 16 stun)
Another good and simple BnB off a safe jump in. Better damage than combo 1 but leaves you at an unsafe range to get clipped by a custom combo. However if they do not have meter you are outside of sweep range for most characters.
Advanced Strategy
Bison's Crossup
Advanced Combos
1) Jump HK > Stand HK (1 hit) > Scissor Kicks (4 hits, 38 dmg, 16 stun)
This will end up being your go to big damage combo. The charge time you are given from the jump in is VERY strict. Practice this one in training mode first to get the timing down. The input from the 1 hit of stand HK to scissor kicks is later than you think. It does the same amount of stun as Basic Combo #2 however 8 points of damage can be the difference between winning and losing.
2) Crouch MP > Super Move
Level 1 Psycho Crusher (4 hits, 42 dmg, 6 stun)
Level 2 Psycho Crusher (5 hits, 58 dmg, 6 stun)
Level 3 Psycho Crusher (7 hits, 79 dmg, 6 stun)
Level 1 Scissor Kicks (5 hits, 51 dmg, 10 stun)
Level 2 Scissor Kicks (7 hits, 56 dmg, 9 stun)
Level 3 Scissor Kicks (9 hits, 74 dmg, 10 stun)
Easier to pull off than it looks at first glance. Usually happens the most with shotos who whiff a DP up close. Basically anytime you know you have a charge and can land a close/meaty crouch MP. My personal favorite is to hit the strong and enter the joystick input. Then negative edge for the level 1 Psycho Crusher. If you mess up the input or don't have charge you should be safe.
3) Jump LK (Cross up) > Stand HK (3 hits, 35 dmg, 14 stun)
Harder combo to pull off but can catch people off guard. The follow is easy but getting the spacing for the cross up can be tough. I recommend doing this if you notice that you have a soft corner.
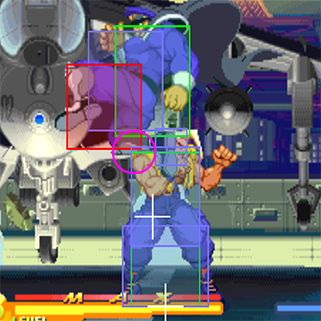
Example of a soft corner.
Custom Combos
http://sfz2.wordpress.com/projects/sfz2-custom-combos-videos/m-bison-custom-combos/
Match-ups
Vs. Adon:
Vs. Akuma:
Vs. Birdie:
Vs. Charlie:
Vs. Chun-Li:
Vs. Dan:
Vs. Dhalsim:
Vs. Gen:
Vs. Guy:
Vs. Ken:
Vs. M. Bison (dictator-self): Dictator always wins the Dictator match-up.
Vs. Rolento:
Vs. Rose:
Vs. Ryu:
Vs. Sagat:
Vs. Sakura:
Vs. Sodom:
Vs. Zangief:
| Characters |
|---|
| Adon - Akuma - Birdie - Charlie - Chun-Li - Dan - Dhalsim - Evil Ryu - Gen - Guy - Ken - M.Bison - Rolento - Rose - Ryu - Sagat - Sakura - Sodom - Zangief |

