|
|
| Line 563: |
Line 563: |
| * At DL4, drink gains 1 Drive bar | | * At DL4, drink gains 1 Drive bar |
| <br> | | <br> |
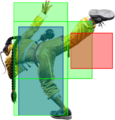
| Jamie's 2-hit 2HK gives plenty of time to confirm the Target Combo follow-up afterward on hit, though 2HK is unsafe on block regardless. Jamie gets no midscreen oki if the opponent back rises, so the Drink ender is generally the best option. In the corner, Jamie can Drink and still push a mixup at +3. This TC has high juggle potential, and even gains slightly more KD advantage when juggled into. | | Jamie's 2-hit {{clr|H|2HK}} gives plenty of time to confirm the Target Combo follow-up afterward on hit, though the sweep is unsafe on block regardless. Jamie gets no midscreen oki if the opponent back rises, so the Drink ender is generally the best option. In the corner, Jamie can Drink and still push a mixup at {{sf6-adv|P|+3}}. This TC has high juggle potential, and even gains slightly more KD advantage when juggled into. This makes it an excellent juggle ender after {{clr|10|214PP}}. |
|
| |
|
| Unlike many Drink activations, going from DL3 to DL4 does not grant Jamie any additional advantage on hit or block. | | Unlike many Drink activations, going from DL3 to DL4 does not grant Jamie any additional advantage on hit or block. |
| Line 583: |
Line 583: |
| | info = | | | info = |
| {{AttackDataCargo-SF6/Query|Jamie_5lp_lk_dl2}} | | {{AttackDataCargo-SF6/Query|Jamie_5lp_lk_dl2}} |
| * Damage DL1-DL4: 190(170)/200(180)/210(188)/220(198) | | * Damage DL1-DL4: 190/200/210/220 (170/180/188/198) |
| | * () refers to scaled damage when beginning combo with {{clr|L|5LP}} |
| * '''Cancel Hitconfirm Window:''' 29f (TC) | | * '''Cancel Hitconfirm Window:''' 29f (TC) |
| * () refers to scaled damage when beginning combo with 5LP
| |
| {{AttackDataCargo-SF6/Query|Jamie_5lp_lk_mp_dl2}} | | {{AttackDataCargo-SF6/Query|Jamie_5lp_lk_mp_dl2}} |
| * Damage DL1-DL4: 475(380)/500(400)/525(420)/550(440) | | * Damage DL1-DL4: 475/500/525/550 (380/400/420/440) |
| * () refers to scaled damage when beginning combo with 5LP~LK | | * () refers to scaled damage when beginning combo with {{clr|L|5LP}}~{{clr|L|LK}} |
| * '''Cancel Hitconfirm Window:''' 52f | | * '''Cancel Hitconfirm Window:''' 52f |
| ** Special/{{clr|4|DR}} cancel is delayed until after 1st recovery frame | | ** Special/{{clr|4|DR}} cancel is delayed until after 1st recovery frame |
| Line 595: |
Line 595: |
| * '''Drink cancel advantage:''' {{sf6-adv|VM|-32}} oH / {{sf6-adv|VM|-40}} oB | | * '''Drink cancel advantage:''' {{sf6-adv|VM|-32}} oH / {{sf6-adv|VM|-40}} oB |
| <br> | | <br> |
| Since 5LP loses much of its frame advantage at Drink Lv.1 and above, this Target Combo is the primary way to convert jab into damage. The MP ender can combo into 236LP/MP/PP, 214LP, 236LK, 623K, or Super. The only safe enders after committing to the TC follow-up are 236PP and {{clr|10|SA2}}. If the opponent tries to punish the TC on block, Jamie can frame trap any non-invincible reversal with 236LP or the much safer 236PP. | | Since {{clr|L|5LP}} loses much of its frame advantage at Drink Lv.1 and above, this Target Combo is the primary way to convert jab into damage, even from max range. The {{clr|M|MP}} ender can combo into 236{{clr|L|LP}}/{{clr|M|MP}}/{{clr|10|PP}}, {{clr|L|214LP}}, {{clr|L|236LK}}, 623K, or {{clr|10|Super}}. |
| | |
| | After committing to the TC follow-up, the only safe enders are {{clr|10|236PP}} and {{clr|10|SA2}}. If the opponent tries to punish the TC on block, Jamie can frame trap any non-invincible reversal with {{clr|L|236LP}} or the much safer {{clr|10|236PP}}. |
| }} | | }} |
|
| |
|
| Line 617: |
Line 619: |
| {{AttackDataCargo-SF6/Query|Jamie_6mk_mk_p_dl2}} | | {{AttackDataCargo-SF6/Query|Jamie_6mk_mk_p_dl2}} |
| * Increases Drink Level by 1 | | * Increases Drink Level by 1 |
| ** DL3: {{sf6-adv|P|KD +2}} on Hit, {{sf6-adv|VM|-43}} on Block
| | * DL3: KD +2 / {{sf6-adv|VM|-43}} oB |
| ** DL4: restores 1 bar of Drive Gauge
| | * DL4: restores 1 bar of Drive Gauge |
| <br> | | <br> |
| Confirming this TC directly from 6MK is strict, but possible with good reactions. It's hard to chase down the opponent for midscreen oki, so ending with a Drink is usually worthwhile. | | Confirming this TC directly from {{clr|M|6MK}} is strict, but possible with very good reactions. It's hard to chase down the opponent for midscreen oki, so ending with a Drink is usually worthwhile. |
|
| |
|
| In the corner, ending with a Drink puts Jamie at -1, making it a little risky; if going from DL3 to DL4, he instead gets slight KD advantage to apply pressure. Jamie can apply much better corner pressure by skipping the drink. 6MK~MK sets up the perfect timing for a meaty 214HP to become {{sf6-adv|P|+2}} on block while remaining safe against {{clr|4|Drive Impact}}. Many opponents will instinctively press a button here, giving Jamie a free Counter-hit. | | In the corner, ending with a Drink puts Jamie at {{sf6-adv|M|-1}}, making it a little risky; if going from DL3 to DL4, he instead gets slight KD advantage to apply pressure. Jamie can apply much better corner pressure by skipping the drink. {{clr|M|6MK}}~{{clr|M|MK}} sets up the perfect timing for a meaty {{clr|H|214HP}} to become {{sf6-adv|P|+2}} on block while remaining safe against {{clr|4|Drive Impact}}. Many opponents will instinctively press a button here, giving Jamie a free Counter-hit. |
| }} | | }} |
|
| |
|
| Line 641: |
Line 643: |
| {{AttackDataCargo-SF6/Query|Jamie_4hp_hp_dl3}} | | {{AttackDataCargo-SF6/Query|Jamie_4hp_hp_dl3}} |
| * Damage DL3-DL4: 630/660 | | * Damage DL3-DL4: 630/660 |
| * 3f gap between hits on block; requires extra frame advantage to combo from 4HP (Counter-hit, Punish Counter, {{clr|4|Drive Rush}}, meaty timing) | | * Leaves a 3f blockstring gap after {{clr|H|4HP}} (beats non-invincible reversals) |
| * '''Cancel Hitconfirm Window:''' 18f / 56f (from CH 4HP~HP) | | * Requires extra frame advantage to combo from {{clr|H|4HP}} (Counter-hit, Punish Counter, {{clr|4|Drive Rush}}, meaty timing) |
| | * '''Cancel Hitconfirm Window:''' 18f / 56f (from CH {{clr|H|4HP}}~{{clr|H|HP}}) |
| * '''{{clr|10|SA2}} cancel advantage:''' {{sf6-adv|VP|+18}} oH / {{sf6-adv|VP|+6}} oB | | * '''{{clr|10|SA2}} cancel advantage:''' {{sf6-adv|VP|+18}} oH / {{sf6-adv|VP|+6}} oB |
| {{AttackDataCargo-SF6/Query|Jamie_4hp_hp_hk_dl3}} | | {{AttackDataCargo-SF6/Query|Jamie_4hp_hp_hk_dl3}} |
| * Damage DL3-DL4: 840(672)/880(704) | | * Damage DL3-DL4: 840(672)/880(704) |
| * Not airborne despite the animation; 9f gap between final 2 hits on block | | * () refers to scaled damage when beginning combo with {{clr|H|CH 4HP}}~{{clr|H|HP}} |
| | * Leaves a 9f blockstring gap after {{clr|H|4HP}}~{{clr|H|HP}} |
| <br> | | <br> |
| This Target Combo sequence is most useful when performing 4HP as a shimmy to bait a throw tech, since it guarantees a Punish Counter if successful. If the 2nd hit of the Target Combo begins the combo, it is possible to confirm it directly into this ender. While the HP follow-up is unsafe, it can be used to frame trap an opponent that predictably hits buttons after blocking 4HP. If the final HK is performed on block, the opponent can interrupt with any attack 8f or faster for a full punish, so it cannot be used to frame trap an opponent in the same way. | | This Target Combo sequence is most useful when performing {{clr|H|4HP}} as a shimmy to bait a throw tech, since it guarantees a Punish Counter if successful. If the 2nd hit of the Target Combo begins the combo, it is possible to confirm it directly into this ender. While the {{clr|H|HP}} follow-up is unsafe, it can be used to frame trap an opponent that predictably hits buttons after blocking {{clr|H|4HP}}. |
| | |
| | If the final {{clr|H|HK}} is performed on block, the opponent can interrupt with any attack 8f or faster for a full punish, so it cannot be used to frame trap an opponent in the same way. Jamie is not airborne despite the animation, so he can't hop over low-angled buttons or make a throw whiff. |
| }} | | }} |
|
| |
|
| Line 675: |
Line 681: |
| {{AttackDataCargo-SF6/Query|Jamie_6hk_4hk_dl4}} | | {{AttackDataCargo-SF6/Query|Jamie_6hk_4hk_dl4}} |
| * Sways and walks backward; press P at different times to change follow-up | | * Sways and walks backward; press P at different times to change follow-up |
| * Earliest follow-up timing can be input after 25f of 6HK+Sway | | * Earliest follow-up timing can be input after 25f of {{clr|H|6HK}}~Sway |
| * '''Cancel Hitconfirm Window:''' 25f (total time including 6HK and Sway) | | * '''Cancel Hitconfirm Window:''' 25f (total time including {{clr|H|6HK}} and Sway) |
| | ** For successful combo, must input {{clr|H|4HK}} within 20f (CH) or 22f (PC) |
| {{AttackDataCargo-SF6/Query|Jamie_6hk_4hk_p_close_dl4}} | | {{AttackDataCargo-SF6/Query|Jamie_6hk_4hk_p_close_dl4}} |
| * Requires Counter-hit/Punish Counter to combo from 6HK | | * Requires Counter-hit/Punish Counter to combo from {{clr|H|6HK}} |
| * Cancelable into any special or Super | | * Cancelable into any special or Super |
| * '''Cancel Hitconfirm Window:''' 20f (Headbutt) / 59-60f (CH 6HK + Headbutt) | | * '''Cancel Hitconfirm Window:''' 20f (Headbutt) / 59-60f ({{clr|H|CH 6HK}}~Headbutt) |
| ** Special/{{clr|4|DR}} cancel is delayed until after active frames | | ** Special/{{clr|4|DR}} cancel is delayed until after active frames |
| * '''{{clr|4|Drive Rush}} cancel advantage:''' KD +51 oH / {{sf6-adv|VP|+7}} oB | | * '''{{clr|4|Drive Rush}} cancel advantage:''' KD +51 oH / {{sf6-adv|VP|+7}} oB |
| Line 695: |
Line 702: |
| * If no input is performed during recovery, restores a second Drive bar after 112f | | * If no input is performed during recovery, restores a second Drive bar after 112f |
| <br> | | <br> |
| Every part of this Target Combo can be input on hit, block, or whiff from 6HK. The 4HK causes Jamie to stumble away from the opponent, and the timing of Jamie's P input changes which follow-up occurs. All listed startups include the 6HK plus the minimum/maximum delay before hitting P during the Sway animation. The close Headbutt follow-up is fairly easy to confirm on Counter-hit or Punish Counter 6HK. The minimum gap between 6HK and Headbutt is 1f on normal hit, 7f on block, making it a poor frame trap option. The Spinning Fists cannot be comboed into, but are useful for stopping an opponent from chasing down the Sway. The Drink causes Jamie to continue stumbling backwards, making it hard to chase down without a projectile. This does give up a lot of ground, but it may be worth the Drive build depending on the circumstances. | | Every part of this Target Combo can be input on hit, block, or whiff from {{clr|H|6HK}}. The {{clr|H|4HK}} causes Jamie to stumble away from the opponent, and the timing of Jamie's P input changes which follow-up occurs. All listed startups include the {{clr|H|6HK}} plus the minimum/maximum delay before hitting P during the Sway animation. |
| | |
| | The close Headbutt follow-up is fairly easy to confirm on Counter-hit or Punish Counter {{clr|H|6HK}}. The minimum gap between {{clr|H|6HK}} and Headbutt is 1f on normal hit and 7f on block, making it a poor frame trap option. The Spinning Fists cannot be comboed into, but are useful for stopping an opponent from chasing down the Sway. The Drink causes Jamie to continue stumbling backwards, making it hard to chase down without a projectile. This does give up a lot of ground, but it may be worth the Drive build depending on the circumstances. |
| }} | | }} |
| <br> | | <br> |


