|
|
| Line 91: |
Line 91: |
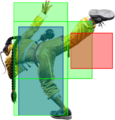
| {{AttackDataCargo-SF6/Query|Jamie_5hp_dl2}} | | {{AttackDataCargo-SF6/Query|Jamie_5hp_dl2}} |
| * Damage DL0-DL4: 810/855/900/945/990 | | * Damage DL0-DL4: 810/855/900/945/990 |
| * Counterhit/Punish Counter bonus frame advantage carries over to all 3 hits | | * Counter-hit/Punish Counter bonus frame advantage carries over to all 3 hits |
| * High juggle potential; final 2 hits maintain juggle state and can allow a followup juggle | | * High juggle potential; final 2 hits maintain juggle state and can allow a followup juggle |
| * '''Cancel Hitconfirm Window:''' 18f | | * '''Cancel Hitconfirm Window:''' 18f |
| Line 200: |
Line 200: |
| * '''SA2 Cancel Advantage:''' +12/+9 | | * '''SA2 Cancel Advantage:''' +12/+9 |
| <br> | | <br> |
| A standard cancelable 6f medium button. Jamie can't link into it without Drive Rush, Counterhit, or Punish Counter bonus advantage, and at only +3 he also needs one of these to link out of it. Very non-committal in neutral when buffered as a counterpoke. | | A standard cancelable 6f medium button. Jamie can't link into it without Drive Rush, Counter-hit, or Punish Counter bonus advantage, and at only +3 he also needs one of these to link out of it. Very non-committal in neutral when buffered as a counterpoke. |
| }} | | }} |
|
| |
|
| Line 271: |
Line 271: |
| {{AttackDataCargo-SF6/Query|Jamie_2hk_dl2}} | | {{AttackDataCargo-SF6/Query|Jamie_2hk_dl2}} |
| * Damage DL0-DL4: 360x2/380x2/400x2/420x2/440x2 | | * Damage DL0-DL4: 360x2/380x2/400x2/420x2/440x2 |
| * Counterhit/Punish Counter: +49 HKD | | * Counter-hit/Punish Counter: +49 HKD |
| * Has high juggle potential; no longer HKD when juggled into | | * Has high juggle potential; no longer HKD when juggled into |
| * '''Cancel Hitconfirm Window:''' 33f (PC: 43f) | | * '''Cancel Hitconfirm Window:''' 33f (PC: 43f) |
| Line 292: |
Line 292: |
| {{AttackDataCargo-SF6/Query|Jamie_jlp_dl2}} | | {{AttackDataCargo-SF6/Query|Jamie_jlp_dl2}} |
| * Damage DL0-DL4: 270/285/300/315/330 | | * Damage DL0-DL4: 270/285/300/315/330 |
| * Can hit Crossup; can hit as fuzzy Instant Overhead | | * Can hit Cross-up; can hit as fuzzy Instant Overhead |
| <br> | | <br> |
| As a crossup, j.LP is far inferior to j.MK. The instant overhead property allows Jamie to close out a round by making the opponent block a deep jump-in; as they transition to a crouch block, they will be stuck in a standing state for a few frames, allowing the j.LP to connect. This is high risk and should only ever be attempted if it is certain to end the round. | | As a cross-up, j.LP is far inferior to j.MK. The instant overhead property allows Jamie to close out a round by making the opponent block a deep jump-in; as they transition to a crouch block, they will be stuck in a standing state for a few frames, allowing the j.LP to connect. This is high risk and should only ever be attempted if it is certain to end the round. |
| }} | | }} |
|
| |
|
| Line 327: |
Line 327: |
| {{AttackDataCargo-SF6/Query|Jamie_jhp_dl2}} | | {{AttackDataCargo-SF6/Query|Jamie_jhp_dl2}} |
| * Damage DL0-DL4: 720/760/800/840/880 | | * Damage DL0-DL4: 720/760/800/840/880 |
| * Spiked knockdown vs. airborne opponents | | * Spike knockdown vs. airborne opponents |
| <br> | | <br> |
| Has high juggle potential. Against grounded opponents, this is stronger than j.HK since all the damage is done on a single hit. | | Has high juggle potential. Against grounded opponents, this is stronger than j.HK since all the damage is done on a single hit. |
| Line 360: |
Line 360: |
| {{AttackDataCargo-SF6/Query|Jamie_jmk_dl2}} | | {{AttackDataCargo-SF6/Query|Jamie_jmk_dl2}} |
| * Damage DL0-DL4: 450/475/500/525/550 | | * Damage DL0-DL4: 450/475/500/525/550 |
| * Can hit Crossup | | * Can hit Cross-up |
| <br> | | <br> |
| A better crossup than j.LP due to its higher damage and wider hitbox. | | A better cross-up than j.LP due to its higher damage and wider hitbox. |
| }} | | }} |
|
| |
|
| Line 459: |
Line 459: |
| * '''SA2 Cancel Advantage:''' +14/+12 | | * '''SA2 Cancel Advantage:''' +14/+12 |
| <br> | | <br> |
| Hermit's Elbow pulls back during startup, making it a useful shimmy tool in tick throw situations. If you successfully bait the opponent's throw and land a Punish Counter, it becomes +5 and can link into 5LK or 5HP. At its max possible range, it can become +4 as a meaty and link into 2LP without a Counterhit. The super cancel window is also quite lenient, allowing for high damage confirms. | | Hermit's Elbow pulls back during startup, making it a useful shimmy tool in tick throw situations. If you successfully bait the opponent's throw and land a Punish Counter, it becomes +5 and can link into 5LK or 5HP. At its max possible range, it can become +4 as a meaty and link into 2LP without a Counter-hit. The super cancel window is also quite lenient, allowing for high damage confirms. |
|
| |
|
| At Drink Lv.3, 4HP gains a Target Combo followup into HP. This TC will only combo if the 4HP hits meaty or with extra frame advantage from Counterhit. In order to confirm the TC as late as possible on reaction, a Punish Counter, Drive Rush start, or final-frame meaty timing is required. However, Jamie gets more damage by simply linking 5LP~LK~MP, since the 4HP becomes +5 in these scenarios. Note that due to increased pushback, the DL3 version can no longer link to 5HP even at +5. | | At Drink Lv.3, 4HP gains a Target Combo followup into HP. This TC will only combo if the 4HP hits meaty or with extra frame advantage from Counter-hit. In order to confirm the TC as late as possible on reaction, a Punish Counter, Drive Rush start, or final-frame meaty timing is required. However, Jamie gets more damage by simply linking 5LP~LK~MP, since the 4HP becomes +5 in these scenarios. Note that due to increased pushback, the DL3 version can no longer link to 5HP even at +5. |
| }} | | }} |
|
| |
|
| Line 484: |
Line 484: |
| {{AttackDataCargo-SF6/Query|Jamie_6hk_dl4}} | | {{AttackDataCargo-SF6/Query|Jamie_6hk_dl4}} |
| * '''Cancel Hitconfirm Window:''' 18f (Super) / 22f (TC) | | * '''Cancel Hitconfirm Window:''' 18f (Super) / 22f (TC) |
| ** TC confirm into 4HK must be input within 20f for a Counterhit combo into Headbutt | | ** TC confirm into 4HK must be input within 20f for a Counter-hit combo into Headbutt |
| * '''SA2 Cancel Advantage:''' +19/+13 | | * '''SA2 Cancel Advantage:''' +19/+13 |
| <br> | | <br> |
| A long range stepkick that can be confirmed into a Super on hit. You cannot space it to connect meaty at max range, so the only followup links require Counterhit, Punish Counter, or Drive Rush (which travels nearly full screen). | | A long range stepkick that can be confirmed into a Super on hit. You cannot space it to connect meaty at max range, so the only followup links require Counter-hit, Punish Counter, or Drive Rush (which travels nearly full screen). |
|
| |
|
| At Drink Lv.4, the move gains extra range and some new Target Combo followups. The TC requires a Counterhit to combo, but the timing is very lenient to react to this. Even if the confirm is missed, the TC followups are cancelable themselves, allowing Jamie to end with a safe option like 236PP even on a failed hitconfirm. | | At Drink Lv.4, the move gains extra range and some new Target Combo followups. The TC requires a Counter-hit to combo, but the timing is very lenient to react to this. Even if the confirm is missed, the TC followups are cancelable themselves, allowing Jamie to end with a safe option like 236PP even on a failed hitconfirm. |
| }} | | }} |
| <br> | | <br> |
| Line 571: |
Line 571: |
| Confirming this TC directly from 6MK is strict, but possible with good reactions. It's hard to chase down the opponent for midscreen oki, so ending with a Drink is usually worthwhile. | | Confirming this TC directly from 6MK is strict, but possible with good reactions. It's hard to chase down the opponent for midscreen oki, so ending with a Drink is usually worthwhile. |
|
| |
|
| In the corner, ending with a Drink puts Jamie at -1, making it a little risky; if going from DL3 to DL4, he instead gets slight KD advantage to apply pressure. Jamie can apply much better corner pressure by skipping the drink. 6MK~MK sets up the perfect timing for a meaty 214HP to become {{sf6-adv|P|+2}} on block while remaining safe against Drive Impact. Many opponents will instinctively press a button here, giving Jamie a free Counterhit. | | In the corner, ending with a Drink puts Jamie at -1, making it a little risky; if going from DL3 to DL4, he instead gets slight KD advantage to apply pressure. Jamie can apply much better corner pressure by skipping the drink. 6MK~MK sets up the perfect timing for a meaty 214HP to become {{sf6-adv|P|+2}} on block while remaining safe against Drive Impact. Many opponents will instinctively press a button here, giving Jamie a free Counter-hit. |
| }} | | }} |
|
| |
|
| Line 627: |
Line 627: |
| * '''Cancel Hitconfirm Window:''' 25f (total time including 6HK and Sway) | | * '''Cancel Hitconfirm Window:''' 25f (total time including 6HK and Sway) |
| {{AttackDataCargo-SF6/Query|Jamie_6hk_4hk_p_close_dl4}} | | {{AttackDataCargo-SF6/Query|Jamie_6hk_4hk_p_close_dl4}} |
| * Requires Counterhit/Punish Counter to combo from 6HK | | * Requires Counter-hit/Punish Counter to combo from 6HK |
| * Cancelable into any special or Super | | * Cancelable into any special or Super |
| * '''Cancel Hitconfirm Window:''' 20f (Headbutt) / 59-60f (CH 6HK + Headbutt) | | * '''Cancel Hitconfirm Window:''' 20f (Headbutt) / 59-60f (CH 6HK + Headbutt) |
| Line 639: |
Line 639: |
| * If no input is performed during recovery, restores a second Drive bar after 112f | | * If no input is performed during recovery, restores a second Drive bar after 112f |
| <br> | | <br> |
| Every part of this Target Combo can be input on hit, block, or whiff from 6HK. The 4HK causes Jamie to stumble away from the opponent, and the timing of Jamie's P input changes which followup occurs. All listed startups include the 6HK plus the minimum/maximum delay before hitting P during the Sway animation. The close Headbutt followup is fairly easy to confirm on Counterhit or Punish Counter 6HK. The minimum gap between 6HK and Headbutt is 1f on normal hit, 7f on block, making it a poor frame trap option. The Spinning Fists cannot be comboed into, but are useful for stopping an opponent from chasing down the Sway. The Drink causes Jamie to continue stumbling backwards, making it hard to chase down without a projectile. This does give up a lot of ground, but it may be worth the Drive build depending on the circumstances. | | Every part of this Target Combo can be input on hit, block, or whiff from 6HK. The 4HK causes Jamie to stumble away from the opponent, and the timing of Jamie's P input changes which followup occurs. All listed startups include the 6HK plus the minimum/maximum delay before hitting P during the Sway animation. The close Headbutt followup is fairly easy to confirm on Counter-hit or Punish Counter 6HK. The minimum gap between 6HK and Headbutt is 1f on normal hit, 7f on block, making it a poor frame trap option. The Spinning Fists cannot be comboed into, but are useful for stopping an opponent from chasing down the Sway. The Drink causes Jamie to continue stumbling backwards, making it hard to chase down without a projectile. This does give up a lot of ground, but it may be worth the Drive build depending on the circumstances. |
| }} | | }} |
| <br> | | <br> |
| Line 656: |
Line 656: |
| {{AttackDataCargo-SF6/Query|Jamie_lplk_dl2}} | | {{AttackDataCargo-SF6/Query|Jamie_lplk_dl2}} |
| * Damage DL0-DL4: 1080/1139/1200/1259/1320 | | * Damage DL0-DL4: 1080/1139/1200/1259/1320 |
| ** Punish Counter: 1836/1937/2040/2141/2244; +23 HKD | | ** Punish Counter: 1836/1937/2040/2141/2244; HKD +23 |
| * Allows for strong, auto-timed corner throw loops (+4 after Forward Dash) | | * Applies 20% immediate damage scaling when comboed into (e.g. after Crumple) |
| ** Also works midscreen if opponent does not Back Rise
| | <br> |
| | Allows for strong corner throw loops that are easily auto-timed with a forward dash, leaving Jamie at +4. |
| }} | | }} |
|
| |
|
| Line 673: |
Line 674: |
| {{AttackDataCargo-SF6/Query|Jamie_4lplk_dl2}} | | {{AttackDataCargo-SF6/Query|Jamie_4lplk_dl2}} |
| * Damage DL0-DL4: 1080/1139/1200/1259/1320 | | * Damage DL0-DL4: 1080/1139/1200/1259/1320 |
| ** Punish Counter: 1836/1937/2040/2141/2244; +38 HKD | | ** Punish Counter: 1836/1937/2040/2141/2244; HKD +38 |
| * Side switches; can dash (+19) or walk to get oki if back throwing opponent into corner | | * Side switch |
| | * Applies 20% immediate damage scaling when comboed into (e.g. after Crumple) |
| | <br> |
| | After throwing the opponent back into the corner, Jamie can dash (+19) or walk to manually time his follow-up strike/throw oki. |
| }} | | }} |
| <br> | | <br> |
| Line 778: |
Line 782: |
| * In DL4, regains 0.5 Drive bars per level increase (or equivalent Burnout reduction) | | * In DL4, regains 0.5 Drive bars per level increase (or equivalent Burnout reduction) |
| * Drink Level from 0-4 affects moveset and base damage scaling (90/95/100/105/110% respectively) | | * Drink Level from 0-4 affects moveset and base damage scaling (90/95/100/105/110% respectively) |
| * Entire animation is in a Counterhit state | | * Entire animation is in a Counter-hit state |
| {{AttackDataCargo-SF6/Query|Jamie_22p_activation}} | | {{AttackDataCargo-SF6/Query|Jamie_22p_activation}} |
| * Happens automatically upon reaching DL4; Drink recovers more quickly, potentially giving stronger oki | | * Happens automatically upon reaching DL4; Drink recovers more quickly, potentially giving stronger oki |
| * Screen freezes for 25f (1f full invincibility on the frame this occurs) | | * Screen freezes for 25f (1f full invincibility on the frame this occurs) |
| * The 4 vulnerable post-freeze frames put Jamie in a Counterhit state | | * The 4 vulnerable post-freeze frames put Jamie in a Counter-hit state |
| }} | | }} |
|
| |
|
| Line 914: |
Line 918: |
| * 2-7f gap between Rekka and 6P on block | | * 2-7f gap between Rekka and 6P on block |
| <br> | | <br> |
| The Punch followups are the preferred route for damage, juggles, and oki; they can be performed on hit, block, or whiff. Like the initial Rekka, this followup is 2 hits when at max Drink Level. All strengths of Rekka lead to the same 2-7f gap between hits on block, which can be used to frame trap the opponent. However, this frame gap is not very useful for two reasons: the initial Rekka is safe (meaning the opponent is less likely to hit a button while attempting a punish), and a Counterhit does not give Jamie the bonus frame advantage when both hits of the followup connect. | | The Punch followups are the preferred route for damage, juggles, and oki; they can be performed on hit, block, or whiff. Like the initial Rekka, this followup is 2 hits when at max Drink Level. All strengths of Rekka lead to the same 2-7f gap between hits on block, which can be used to frame trap the opponent. However, this frame gap is not very useful for two reasons: the initial Rekka is safe (meaning the opponent is less likely to hit a button while attempting a punish), and a Counter-hit does not give Jamie the bonus frame advantage when both hits of the followup connect. |
|
| |
|
| The cancel hitconfirm window applies to the 6P hit only and does not include the first 236P hit. In the startup column, [] refers to the total startup time for 236P~6P when the first Rekka whiffs, which can be useful for certain long-range punishes. | | The cancel hitconfirm window applies to the 6P hit only and does not include the first 236P hit. In the startup column, [] refers to the total startup time for 236P~6P when the first Rekka whiffs, which can be useful for certain long-range punishes. |
| Line 1,081: |
Line 1,085: |
| At Drink Lv.4, Jamie gains an additional [[#Swagger Hermit Punch (214P~6P)|6P Followup]] for extra damage. This can be confirmed off a raw 214P hit, but may drop if input too late. | | At Drink Lv.4, Jamie gains an additional [[#Swagger Hermit Punch (214P~6P)|6P Followup]] for extra damage. This can be confirmed off a raw 214P hit, but may drop if input too late. |
|
| |
|
| Grounded cancel routes: (CH = +2 Counterhit, PC = +4 Punish Counter) | | Grounded cancel routes: (CH = +2 Counter-hit, PC = +4 Punish Counter) |
| * 214HP: CH 5HK, CH 2HP | | * 214HP: CH 5HK, CH 2HP |
| * 214MP/214PP: 5MK, 5HK, 2HP, CH 2MP, CH 2MK, PC 5HP (+ all above) | | * 214MP/214PP: 5MK, 5HK, 2HP, CH 2MP, CH 2MK, PC 5HP (+ all above) |
| Line 1,211: |
Line 1,215: |
| Bakkai is ostensibly Jamie's "anti-projectile" move, though in practice it can be difficult to use like this. 236KK is fairly reliable at mid-range against shoto fireballs, and 236HK has the reach if your reactions are on point. 236LK and 236MK are harder to use because they travel a shorter distance during startup. And against strong projectiles like Guile's Sonic Boom, this move can only be done as a pure prediction, at which point you might as well just do a Drive Impact or Luminous Dive Kick instead. | | Bakkai is ostensibly Jamie's "anti-projectile" move, though in practice it can be difficult to use like this. 236KK is fairly reliable at mid-range against shoto fireballs, and 236HK has the reach if your reactions are on point. 236LK and 236MK are harder to use because they travel a shorter distance during startup. And against strong projectiles like Guile's Sonic Boom, this move can only be done as a pure prediction, at which point you might as well just do a Drive Impact or Luminous Dive Kick instead. |
|
| |
|
| Grounded combo routes: (CH = +2 Counterhit, PC = +4 Punish Counter) | | Grounded combo routes: (CH = +2 Counter-hit, PC = +4 Punish Counter) |
| * 236HK: 2HP, PC 5HK | | * 236HK: 2HP, PC 5HK |
| * 236MK: 5HK, CH 5MK (+ all above) | | * 236MK: 5HK, CH 5MK (+ all above) |
| Line 1,242: |
Line 1,246: |
| The first attack following Tenshin is unscaled, but any following attacks have a 40% scaling penalty applied (100-60-50-40...). Since the OD version gives more than enough time to go into SA3 as the first hit, this will lead to a completely unscaled super with devastating damage, dealing more damage than Zangief's CA if you have CA yourself. There is also an interesting situation after Punish Counter 214PP's tumbling wall splat: Jamie can combo into Tenshin after this, in which case the throw is scaled by 20% and any followups immediately skip to the 40% scaling penalty. | | The first attack following Tenshin is unscaled, but any following attacks have a 40% scaling penalty applied (100-60-50-40...). Since the OD version gives more than enough time to go into SA3 as the first hit, this will lead to a completely unscaled super with devastating damage, dealing more damage than Zangief's CA if you have CA yourself. There is also an interesting situation after Punish Counter 214PP's tumbling wall splat: Jamie can combo into Tenshin after this, in which case the throw is scaled by 20% and any followups immediately skip to the 40% scaling penalty. |
|
| |
|
| Jamie is not point blank after the grab, but is close enough to combo into moves like 5MP, 2MP, or 5HP. While Tenshin can hit as a Counterhit or Punish Counter, this has no effect on frame advantage (OD Tenshin does extra damage on Punish Counter only). | | Jamie is not point blank after the grab, but is close enough to combo into moves like 5MP, 2MP, or 5HP. While Tenshin can hit as a Counter-hit or Punish Counter, this has no effect on frame advantage (OD Tenshin does extra damage on Punish Counter only). |
|
| |
|
| After a stun, Jamie can use Tenshin to reset the opponent without resetting their drive gauge. If the opponent is stunned and Jamie is at drink level 1, he can drink up to drink level 3, use EX Tenshin, get his last drink and still have enough frame advantage to pressure the opponents wake up. [https://www.youtube.com/watch?v=L1lp_kzw3vA Here] is a video going over the tech in more detail. | | After a stun, Jamie can use Tenshin to reset the opponent without resetting their drive gauge. If the opponent is stunned and Jamie is at drink level 1, he can drink up to drink level 3, use EX Tenshin, get his last drink and still have enough frame advantage to pressure the opponents wake up. [https://www.youtube.com/watch?v=L1lp_kzw3vA Here] is a video going over the tech in more detail. |


