|
|
| (10 intermediate revisions by the same user not shown) |
| Line 238: |
Line 238: |
| * '''Drink cancel advantage:''' {{sf6-adv|VM|-30}} oH / {{sf6-adv|VM|-36}} oB | | * '''Drink cancel advantage:''' {{sf6-adv|VM|-30}} oH / {{sf6-adv|VM|-36}} oB |
| <br> | | <br> |
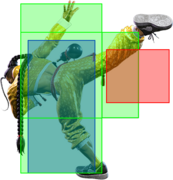
| A useful normal, despite having the lowest range of any {{clr|M|2MP}}. Used in many combo routes, as a non-committal counterpoke, and as Jamie's go-to {{clr|DR|Drive Reversal}} punish. At {{sf6-adv|VP|+5}} on hit, Jamie can link into any of his light attacks on regular hit, and from {{clr|DR|Drive Rush}} it links into {{clr|H|2HP}} or {{clr|M|5MK}}. When canceled, it also links naturally into {{clr|M|214MP}}/{{clr|OD|214PP}}. | | A useful normal, despite having the lowest range of any {{clr|M|2MP}}. Used in many combo routes, as a non-committal counterpoke, and as Jamie's go-to {{clr|DR|Drive Reversal}} punish (usually linked into {{clr|M|5MK}}). At {{sf6-adv|VP|+5}} on hit, Jamie can link into any of his light attacks on regular hit, and from {{clr|DR|Drive Rush}} it links into {{clr|H|2HP}} or {{clr|M|5MK}}. When canceled, it also links naturally into {{clr|M|214MP}}/{{clr|OD|214PP}}. |
| }} | | }} |
|
| |
|
| Line 260: |
Line 260: |
| * '''Drink cancel advantage:''' {{sf6-adv|VM|-23}} oH / {{sf6-adv|VM|-31}} oB | | * '''Drink cancel advantage:''' {{sf6-adv|VM|-23}} oH / {{sf6-adv|VM|-31}} oB |
| <br> | | <br> |
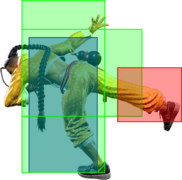
| Works fairly well as a mid-range anti-air due to its vertical reach and large number of active frames. Does not have a useful cancel when used as an anti-air, as only the early grounded frames are cancelable. Useful in many {{clr|PC|Punish Counter}} and {{clr|DR|Drive Rush}} combo routes as it combos into Jamie's strongest special moves. | | Works fairly well as a mid-range anti-air due to its vertical reach and large number of active frames. Does not have a useful cancel when used as an anti-air, as only the early grounded frames are cancelable. Useful in many {{clr|PC|Punish Counter}} and {{clr|DR|Drive Rush}} combo routes as it combos into Jamie's strongest special moves. Also works after Tenshin, making it his strongest command grab follow-up. |
| }} | | }} |
|
| |
|
| Line 607: |
Line 607: |
| * '''Cancel Hitconfirm Window:''' 52f | | * '''Cancel Hitconfirm Window:''' 52f |
| ** Special cancel is delayed until after 1st recovery frame; {{clr|DR|DR}} cancel is delayed until after active frames | | ** Special cancel is delayed until after 1st recovery frame; {{clr|DR|DR}} cancel is delayed until after active frames |
| * '''{{clr|DR|Drive Rush}} cancel advantage:''' {{sf6-adv|VP|+10}} oH / {{sf6-adv|VP|+4}} oB | | * '''{{clr|DR|Drive Rush}} cancel advantage:''' {{sf6-adv|VP|+11}} oH / {{sf6-adv|VP|+4}} oB |
| * '''{{clr|SA|SA2}} cancel advantage:''' {{sf6-adv|VP|+12}} oH / {{sf6-adv|VP|+6}} oB | | * '''{{clr|SA|SA2}} cancel advantage:''' {{sf6-adv|VP|+13}} oH / {{sf6-adv|VP|+6}} oB |
| * '''Drink cancel advantage:''' {{sf6-adv|VM|-32}} oH / {{sf6-adv|VM|-38}} oB | | * '''Drink cancel advantage:''' {{sf6-adv|VM|-31}} oH / {{sf6-adv|VM|-38}} oB |
| <br> | | <br> |
| Since {{clr|L|5LP}} loses much of its frame advantage at Drink Lv.1 and above, this Target Combo is the primary way to convert a jab into damage, even from max range. The {{clr|M|MP}} ender can combo into 236{{clr|L|LP}}/{{clr|M|MP}}/{{clr|OD|PP}}, {{clr|L|214LP}}, {{clr|L|236LK}}, any 623K, or any {{clr|SA|Super}}. | | Since {{clr|L|5LP}} loses much of its frame advantage at Drink Lv.1 and above, this Target Combo is the primary way to convert a jab into damage, even from max range. The {{clr|M|MP}} ender can combo into any 236P or 623K, {{clr|L|214LP}}, {{clr|L|236LK}}, or any {{clr|SA|Super}}. |
|
| |
|
| After committing to the TC follow-up, the only safe enders are {{clr|OD|236PP}}, {{clr|DR|Drive Rush}}, and {{clr|SA|SA2}}. If the opponent tries to punish the TC on block, Jamie can frame trap any non-invincible reversal with {{clr|L|236LP}} or the much safer {{clr|OD|236PP}}. A blocked {{clr|DR|Drive Rush cancel}} can create a true blockstring into {{clr|L|2LP}}, but anything else leaves a gap that can be interrupted with a reversal. | | After committing to the TC follow-up, the only safe enders are {{clr|OD|236PP}}, {{clr|DR|Drive Rush}}, and {{clr|SA|SA2}}. If the opponent tries to punish the TC on block, Jamie can frame trap any non-invincible reversal with {{clr|L|236LP}} or the much safer {{clr|OD|236PP}}. A blocked {{clr|DR|Drive Rush cancel}} can create a true blockstring into {{clr|L|2LP}}, but anything else leaves a gap that can be interrupted with a reversal. |
| Line 637: |
Line 637: |
| * Drink Lv.3: KD +2 / {{sf6-adv|VM|-43}} oB | | * Drink Lv.3: KD +2 / {{sf6-adv|VM|-43}} oB |
| * Refills 0.5 Drive bars; at DL4, refills 1 Drive bar | | * Refills 0.5 Drive bars; at DL4, refills 1 Drive bar |
| | * Does not come out if holding a Kick button after {{clr|M|6MK}}~{{clr|M|MK}} |
| <br> | | <br> |
| Confirming this TC directly from {{clr|M|6MK}} is strict, but possible with very good reactions. It's hard to chase down the opponent for midscreen oki, so ending with a Drink is usually worthwhile. | | Confirming this TC directly from {{clr|M|6MK}} is strict, but possible with very good reactions. It's hard to chase down the opponent for midscreen oki, so ending with a Drink is usually worthwhile. |
| Line 954: |
Line 955: |
| * '''{{clr|SA|SA2}} cancel advantage:''' {{sf6-adv|VP|+17}} oH / {{sf6-adv|VP|+14}} oB | | * '''{{clr|SA|SA2}} cancel advantage:''' {{sf6-adv|VP|+17}} oH / {{sf6-adv|VP|+14}} oB |
| * Both 6P follow-ups do not count as separate hits for damage scaling | | * Both 6P follow-ups do not count as separate hits for damage scaling |
| | * Applies 25% damage scaling when beginning a combo; counts as 2 hits for damage scaling when comboed into |
| | ** This scaling affects any follow-ups after the 1st or 3rd Rekka due to a {{clr|SA|Super}} cancel, not the Rekka follow-ups themselves |
| <br> | | <br> |
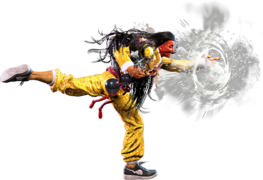
| Freeflow Strikes (or "Rekkas") are forward-moving strikes that can be confirmed into optional follow-ups. Higher strength versions move farther but have slower startup, with the {{clr|OD|OD}} version gaining both speed and longer range. At Drink Lv.0 to Lv.3, each Rekka is a single hit, and only the first part of the sequence can cancel into Super. If well-spaced, the first meterless Freeflow Strike is often safe; the {{clr|L|LP}} version is usually the best for this since it has less forward movement, but this can also cause it to whiff in max range cancels. The {{clr|OD|OD}} version is always safe. | | Freeflow Strikes (or "Rekkas") are forward-moving strikes that can be confirmed into optional follow-ups. Higher strength versions move farther but have slower startup, with the {{clr|OD|OD}} version gaining both speed and longer range. At Drink Lv.0 to Lv.3, each Rekka is a single hit, and you can cancel either the first or third hit into a {{clr|SA|SA3}}. If well-spaced, the first meterless Freeflow Strike is often safe; the {{clr|L|LP}} version is usually the best for this since it has less forward movement, but this can also cause it to whiff in max range cancels. The {{clr|OD|OD}} version is always safe. |
|
| |
|
| When attempting to confirm into the 6P or 6K follow-ups on hit, it's important to note that the follow-up speed depends on the strength of the first Rekka. Delaying the confirm too long, especially on {{clr|H|HP Rekka}}, can cause the follow-up to come out without comboing. The 6K follow-up is slightly slower than 6P, which also makes the confirm slightly stricter. {{clr|OD|OD Rekka}} canceled into {{clr|SA|SA2}} is a great option on hit or block, leading to great combos or block pressure from a mid-range poke. | | When attempting to confirm into the 6P or 6K follow-ups on hit, it's important to note that the follow-up speed depends on the strength of the first Rekka. Delaying the confirm too long, especially on {{clr|H|HP Rekka}}, can cause the follow-up to come out without comboing. The 6K follow-up is slightly slower than 6P, which also makes the confirm slightly stricter. {{clr|OD|OD Rekka}} canceled into {{clr|SA|SA2}} is a great option on hit or block, leading to great combos or block pressure from a mid-range poke. |
| Line 989: |
Line 992: |
| * '''{{clr|SA|SA2}} cancel advantage:''' {{sf6-adv|VP|+18}} oH / {{sf6-adv|VP|+13}} (1st hit), {{sf6-adv|VP|+12}} (2nd hit) oB | | * '''{{clr|SA|SA2}} cancel advantage:''' {{sf6-adv|VP|+18}} oH / {{sf6-adv|VP|+13}} (1st hit), {{sf6-adv|VP|+12}} (2nd hit) oB |
| * Both 6P follow-ups do not count as separate hits for damage scaling | | * Both 6P follow-ups do not count as separate hits for damage scaling |
| | * Applies 25% damage scaling when beginning a combo; counts as 2 hits for damage scaling when comboed into |
| | ** This scaling affects any follow-ups after the 1st or 3rd Rekka due to a {{clr|SA|Super}} cancel, not the Rekka follow-ups themselves |
| <br> | | <br> |
| At max Drink Level, Freeflow Strikes becomes a 2-hit attack, gaining additional damage and making it much easier to confirm follow-ups or Super. It also becomes safe on block for all versions, giving Jamie a great confirmable pressure tool from mid-range. In some juggle routes, it becomes harder to combo into the 6K follow-ups due to the extra pushback, so the 6P follow-ups are recommended for more consistency. | | At max Drink Level, Freeflow Strikes becomes a 2-hit attack, gaining additional damage and making it much easier to confirm follow-ups or {{clr|SA|Super}}. It also becomes safe on block for all versions, giving Jamie a great confirmable pressure tool from mid-range. In some juggle routes, it becomes harder to combo into the 6K follow-ups due to the extra pushback, so the 6P follow-ups are recommended for more consistency. |
| }} | | }} |
| </tabber> | | </tabber> |
| Line 1,022: |
Line 1,027: |
| * 0-3f gap between Rekka and 6P on block | | * 0-3f gap between Rekka and 6P on block |
| * Does not count as a separate hit for damage scaling | | * Does not count as a separate hit for damage scaling |
| | * Applies 25% damage scaling when beginning a combo into {{clr|SA|SA2}}/{{clr|SA|SA3}} (stacks with 10% {{clr|SA|SA3}} cancel scaling) |
| | ** This scaling affects the canceled move after the final ~6P (3rd Rekka) |
| <br> | | <br> |
| The Punch follow-ups are the preferred route for damage, juggles, and oki; they can be performed on hit, block, or whiff. The {{clr|L|LP}}, {{clr|M|MP}}, and {{clr|OD|OD}} Rekka starters require a manual delay to create a blockstring gap, while {{clr|H|HP Rekka}} can automatically frame trap with a 3f gap at the fastest timing. While risky, this frame trap can be used against an opponent that tries to punish your first Rekka on block. On hit, stopping after the first 6P puts Jamie at a slight disadvantage; an unaware opponent may be caught off guard with a quick throw reset, but attempting this is sacrificing guaranteed damage and a knockdown. | | The Punch follow-ups are the preferred route for damage, juggles, and oki; they can be performed on hit, block, or whiff. The {{clr|L|LP}}, {{clr|M|MP}}, and {{clr|OD|OD}} Rekka starters require a manual delay to create a blockstring gap, while {{clr|H|HP Rekka}} can automatically frame trap with a 3f gap at the fastest timing. While risky, this frame trap can be used against an opponent that tries to punish your first Rekka on block, which can be very rewarding with {{clr|SA|SA3}} stocked; when doing this on the {{clr|OD|OD version}}, the {{clr|SA|SA3}} receives extra damage scaling sine the {{clr|OD|OD rekkas}} do not scale separately themselves. |
| | |
| | On hit, stopping after the first 6P puts Jamie at a slight disadvantage; an unaware opponent may be caught off guard with a quick throw reset, but attempting this is sacrificing guaranteed damage and a knockdown. |
|
| |
|
| The cancel hitconfirm window applies to the 6P hit only and does not include the first 236P hit. In the startup column, [] refers to the total startup time for 236P~6P when the first Rekka whiffs, which can be useful for certain long-range punishes. | | The cancel hitconfirm window applies to the 6P hit only and does not include the first 236P hit. In the startup column, [] refers to the total startup time for 236P~6P when the first Rekka whiffs, which can be useful for certain long-range punishes. |
| Line 1,054: |
Line 1,063: |
| * 2-7f gap between Rekka and 6P on block | | * 2-7f gap between Rekka and 6P on block |
| * Does not count as a separate hit for damage scaling | | * Does not count as a separate hit for damage scaling |
| | * Applies 25% damage scaling when beginning a combo into {{clr|SA|SA2}}/{{clr|SA|SA3}} (stacks with 10% {{clr|SA|SA3}} cancel scaling) |
| | ** This scaling affects the canceled move after the final ~6P (3rd Rekka) |
| <br> | | <br> |
| The Punch follow-ups are the preferred route for damage, juggles, and oki; they can be performed on hit, block, or whiff. Like the initial Rekka, this follow-up is 2 hits when at max Drink Level. All strengths of Rekka lead to the same 2-7f gap between hits on block, which can be used to frame trap the opponent. However, this frame gap is not very useful for two reasons: the initial Rekka is safe (meaning the opponent is less likely to hit a button while attempting a punish), and a {{clr|PC|Counter-hit}} does not give Jamie the bonus frame advantage when both hits of the follow-up connect. | | The Punch follow-ups are the preferred route for damage, juggles, and oki; they can be performed on hit, block, or whiff. Like the initial Rekka, this follow-up is 2 hits when at max Drink Level. All strengths of Rekka lead to the same 2-7f gap between hits on block, which can be used to frame trap the opponent. However, this frame gap is not very useful for two reasons: the initial Rekka is safe (meaning the opponent is less likely to hit a button while attempting a punish), and a {{clr|PC|Counter-hit}} does not give Jamie the bonus frame advantage when both hits of the follow-up connect. |
| Line 1,075: |
Line 1,086: |
| * Damage DL0-DL3: 495(396)/522(418)/550(440)/577(462) | | * Damage DL0-DL3: 495(396)/522(418)/550(440)/577(462) |
| * 1-5f gap before final hit on block | | * 1-5f gap before final hit on block |
| | * '''Cancel Hitconfirm Window:''' 17f (Super, single-hit confirm) |
| | * Applies 20% damage scaling to next hit when beginning a combo into {{clr|SA|SA3}} (stacks with 10% {{clr|SA|SA3}} cancel scaling) |
| {{AttackDataCargo-SF6/Query|Jamie_236mp_6p_6p_dl2}} | | {{AttackDataCargo-SF6/Query|Jamie_236mp_6p_6p_dl2}} |
| * Damage DL0-DL3: 540(432)/570(456)/600(480)/630(504) | | * Damage DL0-DL3: 540(432)/570(456)/600(480)/630(504) |
| * 2-6f gap before final hit on block | | * 2-6f gap before final hit on block |
| | * '''Cancel Hitconfirm Window:''' 17f (Super, single-hit confirm) |
| | * Applies 20% damage scaling to next hit when beginning a combo into {{clr|SA|SA3}} (stacks with 10% {{clr|SA|SA3}} cancel scaling) |
| {{AttackDataCargo-SF6/Query|Jamie_236hp_6p_6p_dl2}} | | {{AttackDataCargo-SF6/Query|Jamie_236hp_6p_6p_dl2}} |
| * Damage DL0-DL3: 585(468)/617(494)/650(520)/682(546) | | * Damage DL0-DL3: 585(468)/617(494)/650(520)/682(546) |
| * 3-7f gap before final hit on block | | * 3-7f gap before final hit on block |
| | * '''Cancel Hitconfirm Window:''' 17f (Super, single-hit confirm) |
| | * Applies 20% damage scaling to next hit when beginning a combo into {{clr|SA|SA3}} (stacks with 10% {{clr|SA|SA3}} cancel scaling) |
| {{AttackDataCargo-SF6/Query|Jamie_236pp_6p_6p_dl2}} | | {{AttackDataCargo-SF6/Query|Jamie_236pp_6p_6p_dl2}} |
| * Damage DL0-DL3: 675(540)/712(570)/750(600)/787(630) | | * Damage DL0-DL3: 675(540)/712(570)/750(600)/787(630) |
| * 0-2f gap before final hit on block | | * 0-2f gap before final hit on block |
| | * '''Cancel Hitconfirm Window:''' 17f (Super, single-hit confirm) |
| * Does not count as a separate hit for damage scaling | | * Does not count as a separate hit for damage scaling |
| | * Applies 25% damage scaling to next hit when beginning a combo into {{clr|SA|SA2}}/{{clr|SA|SA3}} (stacks with 10% {{clr|SA|SA3}} cancel scaling) |
| <br> | | <br> |
| The final 6P follow-up completes the Punch sequence. It can be done on hit, block, or whiff and has juggle potential. This sequence gets no oki midscreen if the opponent back rises, but it has good corner carry and is Jamie's most consistent combo ender. Like the first 6P follow-up, there is a blockstring gap between the final 2 hits that varies based on the button timing, but this is a very unsafe gimmick for beating the opponent's attempted Rekka punish. | | The final 6P follow-up completes the Punch sequence. It can be done on hit, block, or whiff and has juggle potential. This sequence gets no oki midscreen if the opponent back rises, but it has good corner carry and is Jamie's most consistent combo ender. Cancel into {{clr|SA|SA3}} for more damage, or into {{clr|SA|SA2}} from the {{clr|OD|OD}} version (though any follow-up hits will have significant scaling). |
| | |
| | Like the first 6P follow-up, there is a blockstring gap between the final 2 hits that varies based on the button timing, but this is a very unsafe gimmick for beating the opponent's attempted Rekka punish. |
|
| |
|
| In the startup column, [] refers to the total startup time for 236P~6P~6P when the first 2 hits of Rekka whiff at the fastest speed. In the Damage column, the first value lists the unscaled damage; () refers to the damage at 80% scaling, which is what would normally occur when starting a combo with the first Rekka. | | In the startup column, [] refers to the total startup time for 236P~6P~6P when the first 2 hits of Rekka whiff at the fastest speed. In the Damage column, the first value lists the unscaled damage; () refers to the damage at 80% scaling, which is what would normally occur when starting a combo with the first Rekka. |
| Line 1,106: |
Line 1,127: |
| {{AttackDataCargo-SF6/Query|Jamie_236lp_6p_6p_dl4}} | | {{AttackDataCargo-SF6/Query|Jamie_236lp_6p_6p_dl4}} |
| * 2-6f gap before final hit on block | | * 2-6f gap before final hit on block |
| | * '''Cancel Hitconfirm Window:''' 46f (Super, single-hit confirm) |
| | * Applies 20% damage scaling to next hit when beginning a combo into {{clr|SA|SA3}} (stacks with 10% {{clr|SA|SA3}} cancel scaling) |
| {{AttackDataCargo-SF6/Query|Jamie_236mp_6p_6p_dl4}} | | {{AttackDataCargo-SF6/Query|Jamie_236mp_6p_6p_dl4}} |
| * 2-6f gap before final hit on block | | * 2-6f gap before final hit on block |
| | * '''Cancel Hitconfirm Window:''' 46f (Super, single-hit confirm) |
| | * Applies 20% damage scaling to next hit when beginning a combo into {{clr|SA|SA3}} (stacks with 10% {{clr|SA|SA3}} cancel scaling) |
| {{AttackDataCargo-SF6/Query|Jamie_236hp_6p_6p_dl4}} | | {{AttackDataCargo-SF6/Query|Jamie_236hp_6p_6p_dl4}} |
| * 2-6f gap before final hit on block | | * 2-6f gap before final hit on block |
| | * '''Cancel Hitconfirm Window:''' 46f (Super, single-hit confirm) |
| | * Applies 20% damage scaling to next hit when beginning a combo into {{clr|SA|SA3}} (stacks with 10% {{clr|SA|SA3}} cancel scaling) |
| {{AttackDataCargo-SF6/Query|Jamie_236pp_6p_6p_dl4}} | | {{AttackDataCargo-SF6/Query|Jamie_236pp_6p_6p_dl4}} |
| * 2-6f gap before final hit on block | | * 2-6f gap before final hit on block |
| | * '''Cancel Hitconfirm Window:''' 44f (Super, single-hit confirm) |
| * Does not count as a separate hit for damage scaling | | * Does not count as a separate hit for damage scaling |
| | * Applies 25% damage scaling to next hit when beginning a combo into {{clr|SA|SA2}}/{{clr|SA|SA3}} (stacks with 10% {{clr|SA|SA3}} cancel scaling) |
| <br> | | <br> |
| At max Drink Level, the Rekka Punch ender does 3 hits. Other than some minor changes to the frame data and blockstring gaps, it functions the same as the DL0-DL3 versions. | | At max Drink Level, the Rekka Punch ender does 3 hits. Other than some minor changes to the frame data and blockstring gaps, it functions the same as the DL0-DL3 versions. |
| Line 1,361: |
Line 1,390: |
| * Damage DL2-DL4: 1800/1887/1980 | | * Damage DL2-DL4: 1800/1887/1980 |
| * '''Projectile Invuln:''' 5-92f (until end of active frames) | | * '''Projectile Invuln:''' 5-92f (until end of active frames) |
| * '''Cancel Hitconfirm Window:''' 94f (Super) | | * '''Cancel Hitconfirm Window:''' 95f (Super) |
| {{AttackDataCargo-SF6/Query|Jamie_236kk_dl2}} | | {{AttackDataCargo-SF6/Query|Jamie_236kk_dl2}} |
| * Damage DL2-DL4: 2000/2100/2200 | | * Damage DL2-DL4: 2000/2100/2200 |
| Line 1,375: |
Line 1,404: |
|
| |
|
| Grounded cancel routes: ({{clr|PC|CH}} = +2 {{clr|PC|Counter-hit}}, {{clr|PC|PC}} = +4 {{clr|PC|Punish Counter}}) | | Grounded cancel routes: ({{clr|PC|CH}} = +2 {{clr|PC|Counter-hit}}, {{clr|PC|PC}} = +4 {{clr|PC|Punish Counter}}) |
| * {{clr|H|236HK}}: {{clr|H|2HP}}, {{clr|PC|PC}} {{clr|H|5HK}} | | * {{clr|H|236HK}}: {{clr|H|5HK}}, {{clr|H|2HP}} |
| * {{clr|M|236MK}}: {{clr|H|5HK}}, {{clr|PC|CH}} {{clr|M|5MK}} (+ all above)
| | * {{clr|M|236MK}}: {{clr|PC|CH}} {{clr|M|5MK}}, {{clr|PC|CH}} {{clr|M|2MP}} (+ all above) |
| * {{clr|OD|236KK}}: {{clr|PC|PC}} {{clr|H|5HP}}, {{clr|PC|PC}} {{clr|M|5MK}}, {{clr|PC|PC}} {{clr|M|2MP}}, {{clr|PC|PC}} {{clr|M|2MK}} (+ all above) | | * {{clr|OD|236KK}}: {{clr|M|5MK}}, {{clr|PC|PC}} {{clr|H|5HP}}, {{clr|PC|PC}} {{clr|M|2MK}} (+ all above) |
| * {{clr|L|236LK}}: {{clr|M|5MK}}, {{clr|M|2MP}}, {{clr|M|2MK}}, {{clr|L|5LP}}~{{clr|L|LK}}~{{clr|M|MP}}, {{clr|PC|PC}} {{clr|L|5LK}}, {{clr|PC|PC}} {{clr|L|2LP}} (+ all above) | | * {{clr|L|236LK}}: {{clr|M|2MP}}, {{clr|M|2MK}}, {{clr|L|5LP}}~{{clr|L|LK}}~{{clr|M|MP}}, {{clr|PC|PC}} {{clr|L|5LK}}, {{clr|PC|PC}} {{clr|L|2LP}} (+ all above) |
| }} | | }} |
|
| |
|


