|
|
| (3 intermediate revisions by 2 users not shown) |
| Line 804: |
Line 804: |
|
| |
|
|
| |
|
| ===== <big>SA1 into Meaty {{clr|L|214LP}}</big> ===== | | ===== <big>{{clr|SA|SA1}} into Meaty {{clr|L|214LP}}</big> ===== |
|
| |
|
| A.K.I.'s Level 1 Super sends the opponent flying far away if used midscreen, and around 1/3 screen away if used on a cornered opponent. A common oki setup after SA1 is to lock down the opponent with Nightshade Pulse ({{clr|L|214LP}}). This puts A.K.I. at around {{sf6-adv|VP|+12 on Block}} in the corner, and severely limits the opponents movements midscreen (though it gives plenty of time for them to reposition before the projectile connects). However, some characters can punish this projectile on reaction, especially near the corner. | | A.K.I.'s Level 1 Super sends the opponent flying far away if used midscreen, and around 1/3 screen away if used on a cornered opponent. A common oki setup after {{clr|SA|SA1}} is to lock down the opponent with Nightshade Pulse ({{clr|L|214LP}}). This puts A.K.I. at around {{sf6-adv|VP|+12 on Block}} in the corner, and severely limits the opponents movements midscreen (though it gives plenty of time for them to reposition before the projectile connects). However, some characters can punish this projectile on reaction, especially near the corner. |
|
| |
|
| A.K.I. can cancel the end of her {{clr|L|214LP}} into OD Snake Step (236KK), which is strike and projectile invincible. If the opponent tries to punish your meaty fireball with a Super, this will usually keep A.K.I. safe or even allow a punish, though there are some exceptions. The following table lists all wakeup reversals that can punish a meaty {{clr|L|214LP}}, and whether or not OD Snake Step can keep A.K.I. safe. | | A.K.I. can cancel the end of her {{clr|L|214LP}} into OD Snake Step (236KK), which is strike and projectile invincible. If the opponent tries to punish your meaty fireball with a Super, this will usually keep A.K.I. safe or even allow a punish, though there are some exceptions. The following table lists all wakeup reversals that can punish a meaty {{clr|L|214LP}}, and whether or not OD Snake Step can keep A.K.I. safe. |
| Line 814: |
Line 814: |
| ! Opponent's<br>Character !! Wakeup<br>Special/Super !! Location !! 236KK Avoids<br>Reversal Punish? !! Notes | | ! Opponent's<br>Character !! Wakeup<br>Special/Super !! Location !! 236KK Avoids<br>Reversal Punish? !! Notes |
| |- | | |- |
| | rowspan="3" | A.K.I. || SA2 {{clr|H|(HP)}} || Midscreen || 🟩 Yes || SA2 (HP) whiffs against A.K.I. if too close to the corner | | | rowspan="3" | A.K.I. || {{clr|SA|SA2}} {{clr|H|(HP)}} || Midscreen || 🟩 Yes || {{clr|SA|SA2}} (HP) whiffs against A.K.I. if too close to the corner |
| |- | | |- |
| | SA2 {{clr|L|(LP)}} || rowspan="2" | Corner || 🟥 No || 236KK recovers directly into LP Super active frames | | | {{clr|SA|SA2}} {{clr|L|(LP)}} || rowspan="2" | Corner || 🟥 No || 236KK recovers directly into LP Super active frames |
| |- | | |- |
| | SA3 || 🟩 Yes || - | | | {{clr|SA|SA3}} || 🟩 Yes || - |
| |- | | |- |
| | rowspan="4" | Akuma || {{clr|10|623PP}} || rowspan="4" | Corner || 🟨 Yes* || No Super freeze to react to (236KK to avoid reversal is a risky hard read)<br>Trades hits, with A.K.I. having +3 KD Advantage after wakeup | | | rowspan="4" | Akuma || {{clr|OD|623PP}} || rowspan="4" | Corner || 🟨 Yes* || No Super freeze to react to (236KK to avoid reversal is a risky hard read)<br>Trades hits, with A.K.I. having +3 KD Advantage after wakeup |
| |- | | |- |
| | SA2 || 🟩 Yes || Akuma is only {{sf6-adv|VM|-8}} after A.K.I.'s 236KK (stricter punish timing) | | | {{clr|SA|SA2}} || 🟩 Yes || Akuma is only {{sf6-adv|VM|-8}} after A.K.I.'s 236KK (stricter punish timing) |
| |- | | |- |
| | SA3 || rowspan="2" | 🟥 No || Akuma gets hit by projectile, and can '''Throw''' punish A.K.I. 236KK in the corner {{sf6-adv|VM|(-7)}} | | | {{clr|SA|SA3}} || rowspan="2" | 🟥 No || Akuma gets hit by projectile, and can '''Throw''' punish A.K.I. 236KK in the corner {{sf6-adv|VM|(-7)}} |
| |- | | |- |
| | CA (Demon) || A.K.I. cannot jump out or escape Demon with 236KK | | | {{clr|SA|CA (Demon)}} || A.K.I. cannot jump out or escape Demon with 236KK |
| |- | | |- |
| | Blanka || SA3 || Corner || 🟩 Yes || - | | | Blanka || {{clr|SA|SA3}} || Corner || 🟩 Yes || - |
| |- | | |- |
| | rowspan="2" | Cammy || SA2 || rowspan="2" | Corner || rowspan="2" | 🟩 Yes || A.K.I. cannot punish Cammy's SA2 escape | | | rowspan="2" | Cammy || {{clr|SA|SA2}} || rowspan="2" | Corner || rowspan="2" | 🟩 Yes || A.K.I. cannot punish Cammy's {{clr|SA|SA2}} escape |
| |- | | |- |
| | SA3 || A.K.I. cannot punish Cammy's SA3 escape;<br>If Cammy attempts SA3 midscreen, gets hit by projectile (can be juggled with Drive Rush > delayed 2HP) | | | {{clr|SA|SA3}} || A.K.I. cannot punish Cammy's {{clr|SA|SA3}} escape;<br>If Cammy attempts {{clr|SA|SA3}} midscreen, gets hit by projectile (can be juggled with Drive Rush > delayed 2HP) |
| |- | | |- |
| | rowspan="2" | Chun-Li || SA2 || rowspan="2" | Corner || 🟩 Yes || - | | | rowspan="2" | Chun-Li || {{clr|SA|SA2}} || rowspan="2" | Corner || 🟩 Yes || - |
| |- | | |- |
| | SA3 || 🟥 No || Chun-Li gets hit by projectile, and can punish A.K.I. 236KK in the corner {{sf6-adv|VM|(-9)}} | | | {{clr|SA|SA3}} || 🟥 No || Chun-Li gets hit by projectile, and can punish A.K.I. 236KK in the corner {{sf6-adv|VM|(-9)}} |
| |- | | |- |
| | rowspan="2" | Dee Jay || SA2 || rowspan="2" | Corner || rowspan="2" | 🟩 Yes || A.K.I. cannot punish Dee Jay's SA2 escape | | | rowspan="2" | Dee Jay || {{clr|SA|SA2}} || rowspan="2" | Corner || rowspan="2" | 🟩 Yes || A.K.I. cannot punish Dee Jay's {{clr|SA|SA2}} escape |
| |- | | |- |
| | SA3 || Dee Jay is only {{sf6-adv|VM|-8}} after A.K.I.'s 236KK (less optimal punish) | | | {{clr|SA|SA3}} || Dee Jay is only {{sf6-adv|VM|-8}} after A.K.I.'s 236KK (less optimal punish) |
| |- | | |- |
| | Ed || SA3 || Corner || 🟩 Yes || - | | | Ed || {{clr|SA|SA3}} || Corner || 🟩 Yes || - |
| |- | | |- |
| | rowspan="2" | E. Honda || SA2 || rowspan="2" | Corner || rowspan="2" | 🟩 Yes || A.K.I. can only punish with her own SA2 (HP) | | | rowspan="2" | E. Honda || {{clr|SA|SA2}} || rowspan="2" | Corner || rowspan="2" | 🟩 Yes || A.K.I. can only punish with her own {{clr|SA|SA2}} (HP) |
| |- | | |- |
| | SA3 || - | | | {{clr|SA|SA3}} || - |
| |- | | |- |
| | rowspan="2" | Guile || {{clr|10|[2]8KK}} || rowspan="2" | Corner || 🟨 Yes* || No Super freeze to react to (236KK to avoid reversal is a risky hard read);<br>Even on a successful read, A.K.I. is cornered at only +4 with an awkward punish timing | | | rowspan="2" | Guile || {{clr|OD|[2]8KK}} || rowspan="2" | Corner || 🟨 Yes* || No Super freeze to react to (236KK to avoid reversal is a risky hard read);<br>Even on a successful read, A.K.I. is cornered at only +4 with an awkward punish timing |
| |- | | |- |
| | SA3 || 🟩 Yes || - | | | {{clr|SA|SA3}} || 🟩 Yes || - |
| |- | | |- |
| | rowspan="2" | Jamie || {{clr|10|236KK}} (DL2) || rowspan="2" | Corner || 🟨 Yes* || No Super freeze to react to (236KK to avoid reversal is a risky hard read) | | | rowspan="2" | Jamie || {{clr|OD|236KK}} (DL2) || rowspan="2" | Corner || 🟨 Yes* || No Super freeze to react to (236KK to avoid reversal is a risky hard read) |
| |- | | |- |
| | SA3 || 🟩 Yes || After A.K.I. 236KK, the spacing makes the punish slightly awkward;<br>A.K.I. can reach with a punish 5HP~HP launch, 6HK > 2MP, or Drive Rush 5MP > 5HK | | | {{clr|SA|SA3}} || 🟩 Yes || After A.K.I. 236KK, the spacing makes the punish slightly awkward;<br>A.K.I. can reach with a punish 5HP~HP launch, 6HK > 2MP, or Drive Rush 5MP > 5HK |
| |- | | |- |
| | JP || SA3 || Anywhere || 🟩 Yes || - | | | JP || {{clr|SA|SA3}} || Anywhere || 🟩 Yes || - |
| |- | | |- |
| | Juri || SA3 || Corner || 🟩 Yes || - | | | Juri || {{clr|SA|SA3}} || Corner || 🟩 Yes || - |
| |- | | |- |
| | rowspan="2" | Ken || {{clr|H|623HP}} || rowspan="2" | Corner || rowspan="2" | 🟨 Yes* || rowspan="2" | No Super freeze to react to (236KK to avoid reversal is a risky hard read) | | | rowspan="2" | Ken || {{clr|H|623HP}} || rowspan="2" | Corner || rowspan="2" | 🟨 Yes* || rowspan="2" | No Super freeze to react to (236KK to avoid reversal is a risky hard read) |
| |- | | |- |
| | {{clr|10|623PP}} | | | {{clr|OD|623PP}} |
| |- | | |- |
| | rowspan="2" | Kimberly || SA2 || rowspan="2" | Corner || rowspan="2" | 🟩 Yes || A.K.I. cannot punish Kimberly's SA2 escape | | | rowspan="2" | Kimberly || {{clr|SA|SA2}} || rowspan="2" | Corner || rowspan="2" | 🟩 Yes || A.K.I. cannot punish Kimberly's {{clr|SA|SA2}} escape |
| |- | | |- |
| | SA3 || - | | | {{clr|SA|SA3}} || - |
| |- | | |- |
| | rowspan="2" | Lily || {{clr|10|236KK}} (Windclad) || rowspan="2" | Corner || 🟨 Yes* || No Super freeze to react to (236KK to avoid reversal is a risky hard read);<br>A.K.I. cannot punish Lily's Windclad OD Condor Spire escape;<br>Midscreen, Lily will fly through projectile but won't reach AKI ({{sf6-adv|VM|-24}} on whiff) | | | rowspan="2" | Lily || {{clr|OD|236KK}} (Windclad) || rowspan="2" | Corner || 🟨 Yes* || No Super freeze to react to (236KK to avoid reversal is a risky hard read);<br>A.K.I. cannot punish Lily's Windclad OD Condor Spire escape;<br>Midscreen, Lily will fly through projectile but won't reach AKI ({{sf6-adv|VM|-24}} on whiff) |
| |- | | |- |
| | SA2 (Windclad) || 🟩 Yes || Without Windclad stock, hitbox does not reach far enough to punish A.K.I. | | | {{clr|SA|SA2}} (Windclad) || 🟩 Yes || Without Windclad stock, hitbox does not reach far enough to punish A.K.I. |
| |- | | |- |
| | Luke || SA3 || Corner || 🟩 Yes || - | | | Luke || {{clr|SA|SA3}} || Corner || 🟩 Yes || - |
| |- | | |- |
| | M. Bison || SA3 || Corner || 🟩 Yes || M. Bison is {{sf6-adv|VM|-27}} after 236KK but recovers a little far away<br>Microwalk + {{clr|H|5HK}} > 2PP~P for a strong crumple punish, or {{clr|4|Drive Rush}} for a closer start | | | M. Bison || {{clr|SA|SA3}} || Corner || 🟩 Yes || M. Bison is {{sf6-adv|VM|-27}} after 236KK but recovers a little far away<br>Microwalk + {{clr|H|5HK}} > 2PP~P for a strong crumple punish, or {{clr|4|Drive Rush}} for a closer start |
| |- | | |- |
| | Manon || SA2 || Corner || 🟥 No* || Manon trades with projectile, landing only 1 hit of SA2<br>If A.K.I. cancels to 236KK, she is cornered and punishable at -9 | | | rowspan="3" | Mai || {{clr|OD|623PP}} || rowspan="3" | Corner || 🟨 Yes* || No Super freeze to react to (236KK to avoid reversal is a risky hard read) |
| |- | | |- |
| | Marisa || SA3 || Corner || 🟩 Yes || - | | | {{clr|SA|SA2}} || 🟩 Yes || Mai is left fullscreen at {{sf6-adv|VM|-15}} (too far to punish with anything) |
| |- | | |- |
| | rowspan="2" | Rashid || {{clr|10|236PP}} || rowspan="2" | Corner || 🟨 Yes* || No Super freeze to react to (236KK to avoid reversal is a risky hard read);<br>Trades with projectile for only 1 hit, so it's better to accept this small risk than to attempt a 236KK cancel
| | | {{clr|SA|SA3}} || 🟥 No* || Fireball hits Mai; A.K.I. is left cornered at {{sf6-adv|VM|-7}} when dodging with {{clr|OD|236KK}} |
| |- | | |- |
| | SA3 || 🟩 Yes || - | | | Manon || {{clr|SA|SA2}} || Corner || 🟥 No* || Manon trades with projectile, landing only 1 hit of {{clr|SA|SA2}}<br>If A.K.I. cancels to 236KK, she is cornered and punishable at -9 |
| |- | | |- |
| | Zangief || SA2 || Corner || 🟩 Yes || - | | | Marisa || {{clr|SA|SA3}} || Corner || 🟩 Yes || - |
| | |- |
| | | rowspan="2" | Rashid || {{clr|OD|236PP}} || rowspan="2" | Corner || 🟨 Yes* || No Super freeze to react to (236KK to avoid reversal is a risky hard read);<br>Trades with projectile for only 1 hit, so it's better to accept this small risk than to attempt a 236KK cancel |
| | |- |
| | | {{clr|SA|SA3}} || 🟩 Yes || - |
| | |- |
| | | rowspan="2" | Terry || {{clr|SA|SA2}} || rowspan="2" | Corner || rowspan="2" | 🟩 Yes || Terry is {{sf6-adv|VM|-26}} after A.K.I.'s 236KK<br>If {{clr|SA|SA2}} hits, he can continue with Double/Triple Geyser |
| | |- |
| | | {{clr|SA|SA3}} || After 236KK, Terry is {{sf6-adv|VM|-38}}; A.K.I. can cross-up {{clr|H|j.2HP}} to retake the corner and punish<br>If {{clr|SA|SA3}} hits, A.K.I. only takes 350 damage and recovers point blank to punish Terry's landing {{sf6-adv|VM|(-6)}} |
| | |- |
| | | Zangief || {{clr|SA|SA2}} || Corner || 🟩 Yes || - |
| |- | | |- |
| ! Opponent's<br>Character !! Wakeup<br>Special/Super !! Location !! 236KK Avoids<br>Reversal Punish? !! Notes | | ! Opponent's<br>Character !! Wakeup<br>Special/Super !! Location !! 236KK Avoids<br>Reversal Punish? !! Notes |
| Line 903: |
Line 913: |
| A.K.I. has limited access to invincible reversal options, requiring meter to be able to use her strike and throw invincible options. Nevertheless, she has decent tools that can be used to catch opponents off-guard when they don't respect A.K.I.'s defensive options. | | A.K.I. has limited access to invincible reversal options, requiring meter to be able to use her strike and throw invincible options. Nevertheless, she has decent tools that can be used to catch opponents off-guard when they don't respect A.K.I.'s defensive options. |
|
| |
|
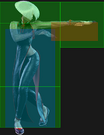
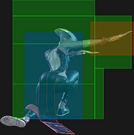
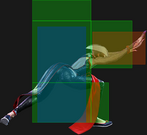
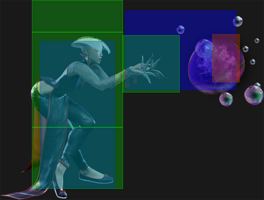
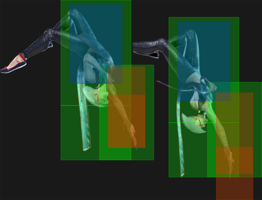
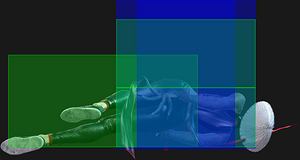
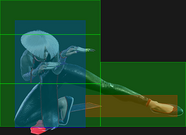
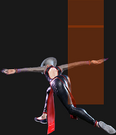
| <big>'''236KK'''</big> - "OD Slide" is A.K.I.'s situational reversal that can be extremely good for escaping the corner. While it is strike-invincible, it is not throw-invincible, meaning the opponent is able to punish counter throw her during the animation. Additionally, the opponent is able to perform an option select on A.K.I.'s wakeup that will either perform a meaty jab or throw if she decides to use 236KK. Having said that, it is still plenty strong and has its uses. For starters, if the opponent chooses to perform the option select, their okizeme's strength is quite weak if A.K.I. simply blocks the jab. Another safe situation to use 236KK is if the opponent jumps or performs a move with longer startup. Outside of that, it is still worth using, especially if the opponent is not ready for it, as it's extremely good at allowing A.K.I. to escape corner pressure without much consequences. | | <big>'''{{clr|OD|OD Snake Step}} ({{clr|OD|236KK}})'''</big> - "OD Slide" is A.K.I.'s situational reversal that can be extremely good for escaping the corner. While it is strike-invincible, the opponent can throw A.K.I. right back into the corner for a {{clr|PC|Punish Counter}} that depletes 1 Drive bar. The opponent can even perform an option select by pressuring with a light normal while still getting a throw punish. This doesn't make it useless as an escape option; opponents who overuse this option select are more predictable, weakening their offense overall. {{clr|OD|236KK}} can also be used against jumps or moves with more reactable startup. |
|
| |
|
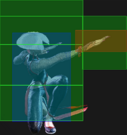
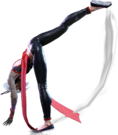
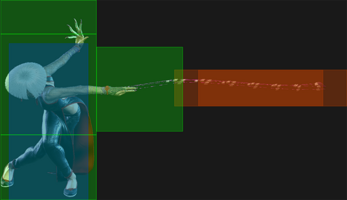
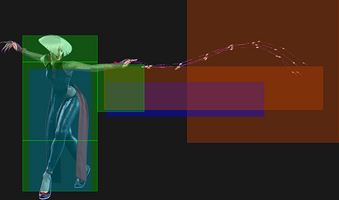
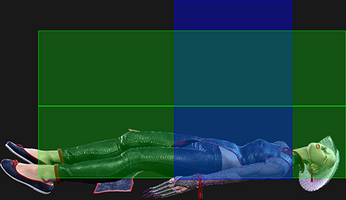
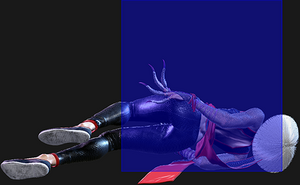
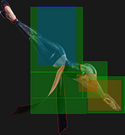
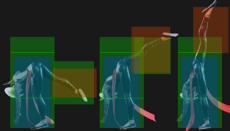
| <big>'''236236K'''</big> - is A.K.I.'s level 1 super that is both strike and throw invincible. It is, however, not projectile invincible, so be careful when using it against characters with a good projectile game. It is fairly slow at a 10f startup, but is otherwise a decent reversal option. It is also able to anti-air quite well. | | <big>'''{{clr|SA|SA1}} ({{clr|SA|236236K}})'''</big> - A.K.I.'s Level 1 Super that is both strike and throw invincible. It is still vulnerable to projectiles, however, so be careful against characters with that can pressure with meaty projectiles or frame trap with a projectile cancel. At 10f startup, many characters can safely pressure A.K.I. with a fast light normal, making it a somewhat risky reversal on wakeup. |
|
| |
|
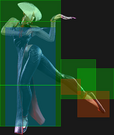
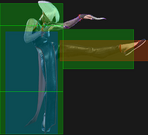
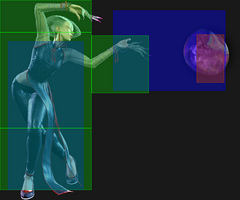
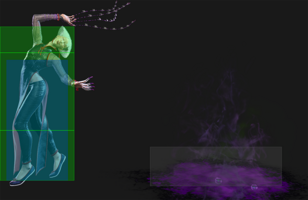
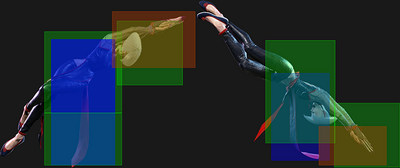
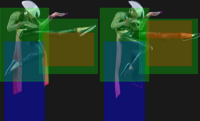
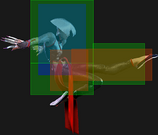
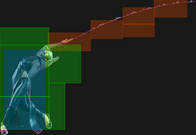
| <big>'''236236P'''</big> - is A.K.I.'s level 3 super that is fully invincible on startup. Similar uses to 236236K, except this is also a good option against characters that choose to throw a fireball on A.K.I.'s wakeup, as she travels a decent distance while being projectile invincible on startup. | | <big>'''{{clr|SA|SA3}} ({{clr|SA|236236P}})'''</big> - A.K.I.'s Level 3 Super that is fully invincible on startup. Similar uses to {{clr|SA|SA1}} (including the mediocre startup) but without the weakness to projectiles. It also has better horizontal range. |
|
| |
|
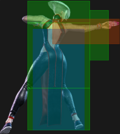
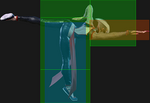
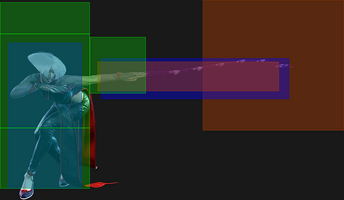
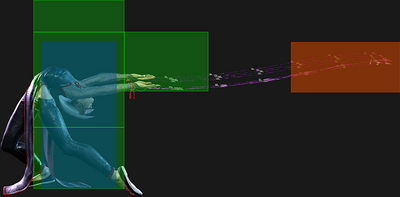
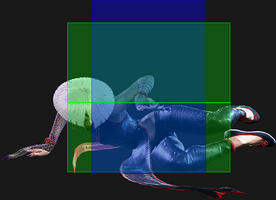
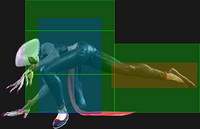
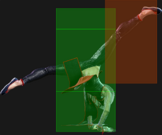
| <big>'''{{clr|L|2LP}}/{{clr|L|2LK}}'''</big> - while not a "true reversal", these are good options to catch opponents trying to shimmy, or performing a move that does not hit meaty on A.K.I.'s wakeup. {{clr|L|2LP}} is her fastest option, at 4f startup, and {{clr|L|2LK}} is 5f, but is able to catch opponents walking backwards. | | <big>'''{{clr|L|2LP}}/{{clr|L|2LK}}'''</big> - while not a "true reversal", these are good options to catch opponents trying to shimmy, or performing a move that does not hit meaty on A.K.I.'s wakeup. {{clr|L|2LP}} is her fastest option, at 4f startup, and {{clr|L|2LK}} is 5f, but is able to catch opponents walking backwards. |
|
| |
|
| <gallery widths="270px" heights="135px" mode="nolines"> | | <gallery widths="270px" heights="135px" mode="nolines"> |
| SF6_A.K.I._236kk_hitbox.png| '''236KK''' Hitbox | | SF6_A.K.I._236kk_hitbox.png| '''{{clr|OD|236KK}}''' Hitbox |
| SF6_A.K.I._236236k_hitbox.png| '''236236K''' Hitbox | | SF6_A.K.I._236236k_hitbox.png| '''{{clr|SA|SA1}}''' Hitbox |
| SF6_A.K.I._236236p_hitbox.png| '''236236P''' Hitbox | | SF6_A.K.I._236236p_hitbox.png| '''{{clr|SA|SA3}}''' Hitbox |
| SF6_A.K.I._2lp_hitbox.png| '''{{clr|L|2LP}}''' Hitbox | | SF6_A.K.I._2lp_hitbox.png| '''{{clr|L|2LP}}''' Hitbox |
| SF6_A.K.I._2lk_hitbox.png| '''{{clr|L|2LK}}''' Hitbox | | SF6_A.K.I._2lk_hitbox.png| '''{{clr|L|2LK}}''' Hitbox |
| Line 925: |
Line 935: |
| A.K.I. has access to some decent anti-air tools. If the opponent jumps in at certain ranges (e.g. cross-up range), A.K.I. may find it difficult to anti-air them consistently due to her anti-air tools having a limited range/hitbox or slower air-invulnerable frames. | | A.K.I. has access to some decent anti-air tools. If the opponent jumps in at certain ranges (e.g. cross-up range), A.K.I. may find it difficult to anti-air them consistently due to her anti-air tools having a limited range/hitbox or slower air-invulnerable frames. |
|
| |
|
| <big>'''{{clr|H|5HK}}'''</big> - A.K.I.'s main anti-air option. It has disjointed upward and forward hitboxes with a good range, making it an all-around good option to deal with jump-ins. It is also special cancelable, allowing for rewarding combo extensions in certain situations, or to set up a meaty {{clr|L|214LP}} (Nightshade Pulse). The main downsides are that it has 9f of startup, meaning A.K.I. will have to react to the jump-in relatively early, and that it does not hit behind, so it will whiff if the opponent crosses up behind her. | | <big>'''{{clr|H|5HK}}'''</big> - A.K.I.'s main anti-air option. It has a disjointed vertical hitboxes, good range, and anti-air invuln frames, making it a consistent option against most jump-ins. It is also special cancelable, allowing for rewarding {{clr|PC|Punish Counter}} juggles or setting up a meaty {{clr|L|Nightshade Pulse}} ({{clr|L|214LP}}). At 9 frames, it is slightly slower than some similar anti-air normals, and loses to cross-up attacks, forcing A.K.I. to pick other options at close range. |
|
| |
|
| <big>'''{{clr|H|2HK}}'''</big> - Better horizontal distance compared to {{clr|H|5HK}}, which makes it a better option in certain situations. It is super cancelable. Punish counters hits leave a very generous window to hit-confirm into a super or Drive Rush combo extensions. It has air invulnerable frames on 10f - 14f. Much like 5HK, it will whiff if the opponent crosses up behind her. | | <big>'''{{clr|H|2HK}}'''</big> - Better horizontal range than {{clr|H|5HK}}, making it a better option at farther ranges. It has upper body invincibility during the active frames, and the crouching hurtbox gives a little more time to react to jumps. Like {{clr|H|5HK}}, it whiffs against cross-ups. If the opponent inputs an air attack, the {{clr|PC|Counter-hit/Punish Counter}} will put the opponent into a juggle state, allowing a cancel into {{clr|SA|Super}} to connect; just be wary of empty jumps, as this will whiff. A {{clr|PC|Punish Counter}} also causes a higher juggle state and gives more time to confirm into a follow-up, including {{clr|DR|Drive Rush}} extensions. |
|
| |
|
| <big>'''{{clr|H|236HP}}'''</big> - A.K.I's other anti-air option, with air invulnerability from 6f - 16f. {{clr|H|236HP}} applies poison on hit or triggers Toxic Blossom, which makes it one of the more rewarding anti-air options. The downside is that it is quite slow, meaning it requires fast reactions. The horizontal hitbox is also quite small, and will not hit on more ambiguous cross-up jump-ins. | | <big>'''{{clr|H|HP Serpent Lash}} ({{clr|H|236HP}})'''</big> - A.K.I's other main anti-air option, with air invulnerability on frames 6-16 and a reduced head hurtbox. {{clr|H|236HP}} applies poison on hit, or triggers Toxic Blossom when already poisoned, making it one of the more rewarding anti-air options. The downside is that it is quite slow, requiring fast reactions. The horizontal hitbox is also quite small, and will whiff underneath jump-ins near cross-up range. |
|
| |
|
| <big>'''{{clr|M|236MP}}'''</big> - This may be used as a situational anti-air for opponents jumping further away, or for neutral jumps and jump backs. The hitbox is quite narrow and specific, so it is easy to whiff this move. | | <big>'''{{clr|M|MP Serpent Lash}} ({{clr|M|236MP}})'''</big> - A situational anti-air for opponents jumping further away, or for neutral/back jumps. The hitbox is quite narrow and specific, making it difficult to space properly. |
|
| |
|
| <big>'''{{clr|L|j.LK}}'''/'''{{clr|M|j.MP}}'''</big> - These are good air-to-air options for A.K.I. {{clr|M|j.MP}} is a 7f disjointed button that will knock the opponent down on hit. Meanwhile, {{clr|L|j.LK}} has a longer range and is faster at 5f, but will not knock the opponent down on hit. They are good options for when A.K.I. wants to keep the opponent in the corner, or when the opponent performs an ambiguous jump-in. | | <big>'''{{clr|L|j.LK}}'''/'''{{clr|M|j.MP}}'''</big> - These are good air-to-air options for A.K.I. {{clr|M|j.MP}} is a 7f disjointed button that will knock the opponent down on hit. Meanwhile, {{clr|L|j.LK}} has a longer range and is faster at 5f, but will not knock the opponent down on hit. They are good options for when A.K.I. wants to keep the opponent in the corner, or when the opponent performs an ambiguous jump-in. |
| | |
| | <big>'''{{clr|SA|SA1}} ({{clr|SA|236236K}})'''</big> - Reliable outside of cross-up range due to its invincibility and large disjointed hitbox. Buffering this in neutral against Divekick characters can make it easier to deal with their air approach. |
|
| |
|
|
| |
|
| Line 948: |
Line 960: |
|
| |
|
| == Fighting vs. A.K.I. == | | == Fighting vs. A.K.I. == |
| === TO-DO ===
| |
|
| |
|
| | When defending against Sinister Slide, you can use a delayed 4 frame normal, such as a crouching jab, to option select against all possible followups. |
|
| |
|
| {{Character Subnav SF6|chara=A.K.I.|tag=AKI}} | | {{Character Subnav SF6|chara=A.K.I.|tag=AKI}} |
