(→Offense: Added A.K.I.'s anti-air options.) |
(→Anti-Airs: Reworded, added 236MP, added hitbox images) |
||
| Line 15: | Line 15: | ||
A.K.I. has access to some decent anti-air tools. If the opponent jumps in at certain ranges (e.g. cross-up range), A.K.I. may find it difficult to anti-air them consistently due to her anti-air tools having a limited range/hitbox or slower air-invulnerable frames. | A.K.I. has access to some decent anti-air tools. If the opponent jumps in at certain ranges (e.g. cross-up range), A.K.I. may find it difficult to anti-air them consistently due to her anti-air tools having a limited range/hitbox or slower air-invulnerable frames. | ||
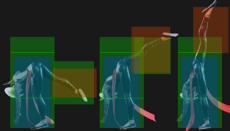
<big>'''5HK'''</big> - A.K.I.'s main anti-air option. It has disjointed upward and forward hitboxes with a good range, making it | <big>'''{{clr|H|5HK}}'''</big> - A.K.I.'s main anti-air option. It has disjointed upward and forward hitboxes with a good range, making it an all-around good option to deal with jump-ins. It is also special cancelable, allowing for combo extensions in certain situations, or to set up a meaty {{clr|L|214LP}} (Nightshade Pulse). The main downsides are that it has 9f of startup, meaning A.K.I. will have to react to the jump-in relatively early, and that it does not hit behind, so it will whiff if the opponent crosses up behind her. | ||
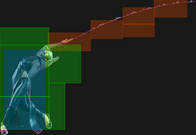
<big>'''2HK'''</big> - 2HK | <big>'''{{clr|H|2HK}}'''</big> - {{clr|H|2HK}} A.K.I.'s crouching anti-air option. If A.K.I. is crouching, it may be worth using 2HK instead of having to stand before being able to use {{clr|H|2HK}}. It has air invulnerable frames on 10f-14f. Much like 5HK, it will whiff if the opponent crosses up behind her. | ||
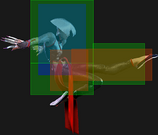
<big>'''236HP'''</big> - A.K.I's other main anti-air option, with air invulnerability from 6f - 16f. 236HP applies poison on hit or triggers Toxic Blossom, which makes it one of the more rewarding anti-air options. Additionally, it is able to anti-air more ambiguous jump-ins (ones that may cross-up), unlike her other anti-air options. The downside is 236HP's horizontal hitbox is quite small, which means that it requires good judgment in terms of spacing and timing to ensure that it will hit the opponent. It also takes a bit longer to input 236HP, as opposed to | <big>'''{{clr|H|236HP}}'''</big> - A.K.I's other main anti-air option, with air invulnerability from 6f - 16f. {{clr|H|236HP}} applies poison on hit or triggers Toxic Blossom, which makes it one of the more rewarding anti-air options. Additionally, it is able to anti-air more ambiguous jump-ins (ones that may cross-up), unlike her other anti-air options. The downside is {{clr|H|236HP}}'s horizontal hitbox is quite small, which means that it requires good judgment in terms of spacing and timing to ensure that it will hit the opponent. It also takes a bit longer to input {{clr|H|236HP}}, as opposed to inputting {{clr|H|5HK}}. | ||
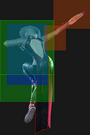
<big>'''j.LK'''/'''j.MP'''</big> - These are good air-to-air options for A.K.I. j.LK has a longer range and is faster at 5f. j.MP is disjointed, but has a | <big>'''{{clr|M|236MP}}'''</big> - This may be used as a situational anti-air for opponents jumping further away, or for neutral jumps and jump backs. The hitbox is quite narrow and specific, so it is easy to whiff this move. | ||
<big>'''{{clr|L|j.LK}}'''/'''{{clr|M|j.MP}}'''</big> - These are good air-to-air options for A.K.I. {{clr|L|j.LK}} has a longer range and is faster at 5f. {{clr|M|j.MP}} is disjointed, but has a strange, upward hitbox, and is slower at 7f. They are good options for when A.K.I. wants to keep the opponent in the corner, or when the opponent performs an ambiguous jump-in. | |||
<gallery widths="230px" heights="135px" mode="nolines"> | |||
SF6_A.K.I._5hk_hitbox.png| '''{{clr|H|5HK}}''' Hitbox | |||
SF6_A.K.I._2hk_hitbox.png| '''{{clr|H|2HK}}''' Hitbox | |||
SF6_A.K.I._236hp_hitbox.png| '''{{clr|H|236HP}}''' Hitbox | |||
SF6_A.K.I._236mp_hitbox.png| '''{{clr|M|236MP}}''' Hitbox | |||
SF6_A.K.I._jlk_hitbox.png| '''{{clr|L|j.LK}}''' Hitbox | |||
SF6_A.K.I._jmp_hitbox.png| '''{{clr|M|j.MP}}''' Hitbox | |||
</gallery> | |||
=== Frame Traps === | === Frame Traps === | ||
Revision as of 18:22, 19 October 2023
Neutral
TO-DO
Offense
Anti-Airs
A.K.I. has access to some decent anti-air tools. If the opponent jumps in at certain ranges (e.g. cross-up range), A.K.I. may find it difficult to anti-air them consistently due to her anti-air tools having a limited range/hitbox or slower air-invulnerable frames.
5HK - A.K.I.'s main anti-air option. It has disjointed upward and forward hitboxes with a good range, making it an all-around good option to deal with jump-ins. It is also special cancelable, allowing for combo extensions in certain situations, or to set up a meaty 214LP (Nightshade Pulse). The main downsides are that it has 9f of startup, meaning A.K.I. will have to react to the jump-in relatively early, and that it does not hit behind, so it will whiff if the opponent crosses up behind her.
2HK - 2HK A.K.I.'s crouching anti-air option. If A.K.I. is crouching, it may be worth using 2HK instead of having to stand before being able to use 2HK. It has air invulnerable frames on 10f-14f. Much like 5HK, it will whiff if the opponent crosses up behind her.
236HP - A.K.I's other main anti-air option, with air invulnerability from 6f - 16f. 236HP applies poison on hit or triggers Toxic Blossom, which makes it one of the more rewarding anti-air options. Additionally, it is able to anti-air more ambiguous jump-ins (ones that may cross-up), unlike her other anti-air options. The downside is 236HP's horizontal hitbox is quite small, which means that it requires good judgment in terms of spacing and timing to ensure that it will hit the opponent. It also takes a bit longer to input 236HP, as opposed to inputting 5HK.
236MP - This may be used as a situational anti-air for opponents jumping further away, or for neutral jumps and jump backs. The hitbox is quite narrow and specific, so it is easy to whiff this move.
j.LK/j.MP - These are good air-to-air options for A.K.I. j.LK has a longer range and is faster at 5f. j.MP is disjointed, but has a strange, upward hitbox, and is slower at 7f. They are good options for when A.K.I. wants to keep the opponent in the corner, or when the opponent performs an ambiguous jump-in.
5HK Hitbox

2HK Hitbox

236HP Hitbox
236MP Hitbox
j.LK Hitbox
j.MP Hitbox


Frame Traps
TO-DO
Okizeme and Mixups
TO-DO
Knockdown Advantage: All scenarios assume that opponent will Back Rise midscreen when possible, unless otherwise stated.
| Knockdown | KD Adv. | Oki/Notes |
|---|---|---|
| Forward Throw | +19 | Gives corner throw loops by walking forward with 16-17f manual timing
|
| Back Throw | +27 | After back throwing opponent into corner, walk/dash and manually time oki
|
| Drive Impact (No Crumple) |
+35 | ? |
| Drive Reversal | +23 | ? |
| 2HP | HKD +27 HKD +49 (Punish) |
On normal hit:
On Punish Counter:
|
| 5HP~HP | KD +34 | ? |
| 214HP | KD +40 | ? |
| SA3 | HKD +30 | Can Drive Rush full screen for a ranged meaty strike, but risky to attempt real oki
|
| CA | HKD +21 | CA leaves A.K.I. closer, allowing better Drive Rush meaties (but still no true throw oki)
|
| ... > 236HP | KD +44 | Sets up a safe jump. Just hold up forward and meaty with j.HP or j.2HP. You'll have to react to the opponent's recovery direction midscreen. Works on a grounded opponent, no Toxic Blossom (TB). |
| ... > 236MP | KD +44 | Another safe jump setup. Only works near the corner on a grounded opponent, no Toxic Blossom (TB). |
| ... > 236LP TB | KD +44 | Safe jump near corner |
| ... > 236HP TB, PDR 2MP > 236HP | KD +44 | Safe jump setup for Toxic Blossom routes. As demonstrated with this example, 236HP can also setup a safe jump in a juggle if the opponent is at a specific height. |
| ... > 236MP TB, PDR 5MP > 2PP~K, PDR 5MP > 236HP | KD +44 | Safe jump setup for Toxic Blossom routes. You can end the combo early with PDR 5MP > 236HP instead of 2PP~K for a cheaper safe jump, but the extra damage and corner carry is usually worth one more bar of drive gauge. |
| ... > 2PP~P TB > 5MP > 236HP | KD +44 | Another safe jump setup. The 236MP TB route above can also work with 2PP~P TB. |
| ... > 236PP TB > 5MP > 236HP | KD +44 | Another safe jump setup. The 236MP TB route above can also work with 236PP TB. |
236HP Setups
A.K.I.'s 236HP (Heavy Serpent Lash) is an extremely useful combo ender that gives A.K.I. a lot of setup options, especially in the corner. Midscreen, her setups will depend on the opponent's wake-up option. If her opponent is poisoned and the 236HP hit triggers Toxic Blossom, A.K.I. can DR 2MP > 236HP to gain access to the same setups as she would have without Toxic Blossom.
Midscreen
Note that these setups also work in the corner.
236HP , immediate (jump forward) j.HP/j.2HP
Simple safejump option to continue pressure. Requires reacting to the opponent's wakeup option. If the opponent normal rises, then A.K.I will have to do j.2HP. If the opponent back rises or is put in the corner, j.HP is used.
236HP , 236LK/236MK , 2LP/Throw/Walk back
Another simple option that allows A.K.I. to continue her pressure. Using 236MK will put A.K.I. right next to the opponent, allowing her to continue her offense with a meaty throw or 2LP. If the opponent back rises, A.K.I. has time to walk back to shimmy. However, if the opponent normal rises, then A.K.I. will not be able to shimmy after 236MK. It is possible to shimmy by using 236LK instead of 236MK if the opponent normal rises, as 236LK has a similar animation to 236MK, but does not move A.K.I. forward. This spaces her well enough for the opponent to whiff their throw, allowing her to punish with 5HK.
Corner Only
Note that these options only work in the corner or near the corner. The options presented above for midscreen are also usable here.
236HP , 66 , 3MP , 5LP~LP > 236H
Overhead option. Dashing forward framekills to allow for a meaty +5 on hit 3MP, allowing A.K.I. to link the hit into her standard BNB. Ending in 236H can allow A.K.I. to loop these setups in the corner.
236HP , (whiff) 5LP , 2PP~LPLK
Meaty command throw option. 5LP framekills. The opponent can only get out of this by jumping or using an invincible reversal. A.K.I. can mix up her options by going for a meaty button if the opponent expects a command throw and jumps.
SA1 into Meaty 214LP
A.K.I.'s Level 1 Super sends the opponent flying far away if used midscreen, and around 1/3 screen away if used on a cornered opponent. A common oki setup after SA1 is to lock down the opponent with Nightshade Pulse (214LP). This puts A.K.I. at around +12 on Block in the corner, and severely limits the opponents movements midscreen (though it gives plenty of time for them to reposition before the projectile connects). However, some characters can punish this projectile on reaction, particularly when near the corner.
A.K.I. can cancel the end of her 214LP into OD Snake Step (236KK), which is strike and projectile invincible. If the opponent tries to punish your meaty fireball with a Super, this will usually keep A.K.I. safe or even allow a punish, though not always. These are the moves to be aware of when applying 214LP pressure.
Corner Punishes: Can't save yourself with reaction OD Snake Step
- A.K.I. LP SA2
- OD Snake Step recovers directly into the LP Super active frames
- Chun-Li SA3
- OD Snake Step will cause Chun to get hit by the fireball, but A.K.I. will be cornered and punishable at -9
- Guile [2]8KK
- No Super freeze to react to; OD Snake Step as a hard read leaves A.K.I. only +4 with an awkward punish timing
- Jamie 236KK (DL2)
- No Super freeze to react to
- Ken 623PP/623HP
- No Super freeze to react to
- Manon SA2
- Trades with projectile for 1 hit + knockdown; OD Snake Step leaves A.K.I. punishable in the corner
- Rashid 236PP
- No Super freeze to react to; trades with projectile for only 1 hit + knockdown
Fullscreen Punishes: OD Snake Step can escape
- A.K.I. HP SA2
- JP SA3
Corner Punishes: OD Snake Step can escape
- A.K.I. SA3
- A defensive 236LK or 2PP can also avoid the meaty fireball, but are punishable if reacted to
- Blanka SA3
- Cammy SA3, SA2
- Both Supers escape and cannot be punished after OD Snake Step cancel
- Chun-Li SA2
- Dee Jay SA3, SA2
- SA2 escapes safely, and SA3 is only -8 after OD Snake Step
- E. Honda SA3, SA2
- After OD Snake Step to avoid Honda's SA2, can only punish with A.K.I.'s own SA2
- Kimberly SA3, SA2
- SA2 is safe on whiff vs. reaction OD Snake Step
- Guile SA3
- Jamie SA3
- Strict punish timing after reaction OD Snake Step
- Juri SA3
- Luke SA3
- Marisa SA3
- Rashid SA3
- Zangief SA2
vs. Burnout
TO-DO
Drive Rush
When canceling a normal into Drive Rush on block and following it up with another normal, there may be an interruptible gap in the blockstring. The following table lists these blockstring gaps when performed at the fastest possible timing.
| Gap Value | Meaning |
|---|---|
| 0 | True Blockstring (no gap) if input with fastest button timing; can still lose to Drive Reversal |
| 1 to 4 | Small blockstring gap; opponent can interrupt with an invincible reversal; a 4f gap can trade with 4f normal attack |
| 5+ | Large blockstring gap; opponent can interrupt without an invincible attack |
| 2LP | 5LP/5LK/2LK | 5MP | 2MK | 2MP | 5MK/5HK | 2HP/2HK | 5HP | 6HK | 6HP | 3MP | |
|---|---|---|---|---|---|---|---|---|---|---|---|
| 5LP~DR | 6 | 7 | 8 | 9 | 10 | 11 | 12 | 14 | 16 | 18 | 26 |
| 5MP~DR | 0 | 0 | 1 | 2 | 3 | 4 | 5 | 7 | 9 | 11 | 19 |
| 5LK~DR | 5 | 6 | 7 | 8 | 9 | 10 | 11 | 13 | 15 | 17 | 25 |
| 5HK~DR | 0 | 0 | 0 | 0 | 0 | 0 | 1 | 3 | 5 | 7 | 15 |
| 2LP~DR | 4 | 5 | 6 | 7 | 8 | 9 | 10 | 12 | 14 | 16 | 24 |
| 2MP~DR | 0 | 0 | 0 | 0 | 0 | 1 | 2 | 4 | 6 | 8 | 16 |
| 5LP~LP~DR | 0 | 1 | 2 | 3 | 4 | 5 | 6 | 8 | 10 | 12 | 20 |
The following table lists the general BnB combo routes when canceling a button into Drive Rush on hit.
| Starter | Hit Adv. | Combo Route |
|---|---|---|
| 5LP~DR | +3 | No combo without CH/PC |
| 5LK~DR | +5 | 2LP/5LK, 2MP ... |
| 2LP~DR | ||
| 5LP~LP~DR | ||
| 5MP~DR | +11 | 5HK > 2PP~P ... 5MK, 5HK ... |
| 2MP~DR | +12 | |
| 5HK~DR | +16 |
Defense
Reversals
Anti-Airs
Anti-Projectile
Fighting vs. A.K.I.
TO-DO