| Line 165: | Line 165: | ||
== Super Meter == | == Super Meter == | ||
Super meter is only used for Super Arts. Super meter is gained by hitting the opponent or getting hit. | Super meter is only used for Super Arts. Super meter is gained by hitting the opponent or getting hit. In general, hits build twice as much Super meter as blocked attacks; whiffing attacks does not build any Super meter. The match starts with 0 meter for both sides, and can build up to a maximum of 3 bars. Unlike the Drive Gauge, Super meter carries over between rounds; this means it is not always beneficial to finish a round with Super if a cheaper alternative exists. | ||
=== Super Art === | === Super Art === | ||
Revision as of 00:52, 13 January 2023
This page covers metered mechanics in Street Fighter 6, specifically the Drive System (and associated Gauge) and the Super Art Gauge.
Drive System
The Drive System is a metered mechanic in Street Fighter 6 that serves as the gateway to universal movement, offensive, and defensive mechanics.
- Each drive bar is 10,000 Drive meter, for a max of 60,000
- Most normals and specials deal between 500-10,000 Drive damage on block
- Drive Impact deals 10,000 Drive damage on a normal hit, while Supers generally do 5,000/10,000/20,000 Drive damage for Lv.1/Lv.2/Lv.3 Super Art respectively
Drive Gauge
| Drive Move | Drive Cost |
|---|---|
| Drive Impact | |
| Drive Parry | |
| Drive Rush (from Parry) | |
| Drive Rush (cancel) | |
| Overdrive Specials | |
| Drive Reversal |
"The engine that powers the Drive System is available as soon as the round begins, allowing you to fight to your liking. If you spend your entire Drive Gauge, you'll enter a burnout state with big disadvantages, but it also replenishes automatically, making meter management a key to the fight. Understanding the system in-depth, including when to be conservative and when to gamble, allows for deep, high-level battles."
- Capcom.
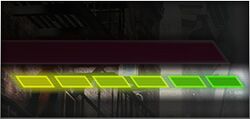
The Drive Gauge is crucial to playing SF6 and is an incredibly valuable resource. Optimal Drive use can create a big advantage over an opponent who manages it poorly. The Drive Gauge starts full every round, and decreases when performing drive actions, blocking, or getting hit by Super Arts. The Drive gauge passively increases over time; the speed at which it regenerates can be affected by various things like cinematic Super Arts.
| Increases Drive Gauge | Decreases Drive Gauge |
|---|---|
| Hitting the opponent | Blocking |
| Passive regeneration (faster when walking forward) |
Getting hit by Supers or Drive Impact (also prevents passive regeneration during Super cinematic) |
| Successful Drive Parry (especially useful vs. Supers) |
Getting hit by other attacks (slows down passive regeneration) |
| Hitting with Super Arts (passive regeneration + extra Drive meter) |
Using Drive actions |
Burnout
Burnout state happens when the player's Drive gauge becomes fully depleted. Burnout gives the player several negative effects, and locks the player out of using Drive actions until it replenishes.
Negative effects include:
- All blocked attacks gain +4 frame advantage; no effect on hitstun
- Gets stunned by Drive Impact in the corner on hit or block
- Takes Chip Damage instead of Drive Damage when blocking; can lose the round to Chip K.O.
- Lack of Drive options (e.g. can no longer use Drive Impact/Parry to counter opponent's Drive Impact)
Being in Burnout creates situations that are extremely difficult to escape, like looping corner sequences that are plus on block. If a cornered player is stunned by Drive impact while in Burnout, their Drive Gauge will be fully replenished after recovering from stun. The usual methods of building Drive Gauge also help decrease the Burnout recovery time.
Drive Impact
Costs 1 Drive Stock. Input ![]() +
+![]() (HP+HK) to perform.
(HP+HK) to perform.
Drive Impact has 26 frames of startup, with 2 hits of armor (from 1-25f), which allows it to absorb and counter the opponent's attacks. If Drive Impact hits as a Punish Counter (or even if the armor is triggered but is too slow to be a true Punish), the opponent will be left in a crumple state. When used predictively, it can counter ranged pokes and projectiles. If blocked midscreen, the opponent is pushed back extremely far, which can help to get yourself out of the corner.
Wall Splat: occurs if Drive Impact connects near the corner on hit or block, allowing a guaranteed followup combo.
- Only occurs when performed raw (will not splat if it hits in a combo or an airtight blockstring)
- Opponent is put into a unique free juggle state where followup attacks will also juggle freely
- example: Normal xx Special or a full Target Combo can fully juggle, even when it's normally impossible
- Airborne opponents will splat higher up along the wall, which can affect the followup juggle possibilities
Dizzy: occurs when Drive Impact connects on a cornered opponent while in Burnout state. Like Wall Splat, this works on hit or block. The opponent is left vulnerable to a huge punish combo, and may also allow time for actions such as Ryu charging Denjin, Kimberly reloading a spraycan, Juri gaining Fuha stocks, etc.
- Also works if the Drive Impact itself puts the opponent into Burnout
- Like Wall Splat, does not work if Drive Impact connects in a combo or airtight blockstring
- "LOCK" will appear on the screen if a true blockstring into Drive Impact occurs; the opponent will bounce away like a blocked midscreen Drive Impact
- Because burned out opponents have no Drive options, their only counter to Drive Impact cancels is usually a reversal Super Art
| on Block | on Hit | on Counterhit | on Crumple/Punish Counter |
|---|---|---|---|
| 0.5 Bar | 1 Bar | 1.25 Bars | 1.5 Bars |
Drive Impact does have a few downsides:
- Can be broken by Armor Break moves such as Super Arts or Drive Reversal, or by quick chained attacks
- A common tactic is to use a poke cancelled into Fireball, then cancel into Lv. 3 Super on reaction to beat Drive Impact
- Against projectiles, there are 6 frames of armor hit-freeze that slow down your Drive Impact without affect the opponent's recovery
- This makes it difficult or impossible to use on reaction to fireballs unless they have very long recovery
- Multi-hit OD fireballs have hit-freeze on each hit, making it even harder to blow through them
- You take recoverable damage when absorbing an attack, which will KO if you don't have enough HP to survive
- The opponent can react with their own Drive Impact, which hits as a Punish Counter
If two Drive Impacts clash simultaneously, they will bounce off each other and reset to neutral. As a side note, Drive moves take priority over special moves (but not Super Arts), so something like Ryu's 236+HP+HK would result in Drive Impact rather than Hadoken.
Drive Parry
Consumes 0.5 Drive gauge upon activation, continues draining while held. Hold ![]() +
+![]() (MP+MK) to perform. Becomes a Perfect Parry if it successfully parries an attack within 2 frames of being input.
(MP+MK) to perform. Becomes a Perfect Parry if it successfully parries an attack within 2 frames of being input.
Regular Parry:
- Parries all strikes and projectiles (high and low) from frame 1
- Results in the same frame advantage as blocking the move
- 8f parry window if buttons are tapped, longer if held
- Can block during recovery frames (must still block in the correct direction)
- Useful for blocking high/low or left/right mixups, but remains vulnerable to throws
- Getting thrown during Parry results in a Punish Counter (extra damage, Hard Knockdown, loses 1 extra Drive bar)
- Rewards 1/2 bar Drive Gauge for successfully parrying Light / Medium attacks
- Rewards 1 bar Drive Gauge for successfully parrying Heavy attacks
- Builds a ton of Drive Gauge if used against Super Arts (always worth using if you could otherwise block the Super)
- Can cancel into Drive Rush from 3rd active frame onward
- Fastest Drive Rush input method is to tap forward, then forward + Parry
Perfect Parry:
- Occurs on the first 2 active frames; Parry cannot be buffered by holding it down, must be timed properly
- Has only 1f of recovery, and prevents the opponent from cancelling their attack, making punishes mostly guaranteed
- The screen freezes upon a successful Perfect Parry, giving ample time to react with a strong punish
- Fully invincible for 6f after success, during which time you can cancel into anything except Drive moves
- A 50% damage scaling penalty is applied to any punish afterward, even if you delay the followup beyond the 6f cancel window
- Against projectiles, the screen does not freeze; puts you into 11f of fixed recovery
- If a strike hits on the same frame as a projectile Perfect Parry, results in a regular parry for the strike
- Perfect Parrying projectiles allows you to hold the input for up to 13 frames without incurring the standard 29f of parry recovery.
Overdrive
Costs 2 Drive Stocks. Press two Punches or Kicks while inputting a special move to perform the Overdrive Art (OD) version.
Acts similarly to EX Special Moves from previous titles. Just like before, input the special move with 2 punches or 2 kicks to perform an enhanced special at the cost of 2 Drive stocks. OD specials can now combo into Super Arts since they are no longer tied to the same meter.
- OD moves generally have benefits like extra damage, faster startup, lower recovery, and may even have invincibility
- OD moves often put the opponent in a juggle state, or have higher juggle potential themselves
- OD moves can be performed with less than 2 Drive stocks, but the player is immediately put into Burnout state
Drive Rush
Costs 1 Drive Stock after a Parry or 3 stocks to cancel from a normal attack. Tap ![]()
![]() (66) to perform. The cancelled version acts like a special move, so it only works from special cancellable normals.
(66) to perform. The cancelled version acts like a special move, so it only works from special cancellable normals.
Drive Rush adds +4 to the frame advantage of the followup normal attack on hit and block. This makes it great for combo extensions and safe high/low mixups. The dash can also be ended early, allowing a quick throw attempt. This prevents players from holding Drive Parry or using Drive Impact as a universal defensive response. Normals from Drive Rush also generally have increased juggle potential, allowing unique juggle sequences.
If Drive Rush is used mid-combo, an additional damage scaling penalty applies, and no additional Drive gauge will be built for the rest of the combo. This does not apply to combos that start with a Drive Rush attack.
The screen freezes for 10 frames during the startup of Drive Rush, whether it was cancelled into or used raw from Parry. This can help to provide a little extra time to decide what to do next, such as reacting to a hit or block, or reacting to an opponent's jump or dash animation. Note that you can't cancel Drive Rush into blocking, so opponents looking for the green flash can counterpoke you if done raw, especially at closer ranges.
Drive Reversal
Costs 2 Drive Stocks. Press ![]() +
+![]() +
+![]() (6HPHK) during blockstun to perform. Similar to Alpha Counter or V-Reversal from previous Street Fighter games. They are fully invincible from frames 1-22, and deal a small amount of recoverable damage. Drive Reversals break armor, so it can be used against buttons cancelled into Drive Impact (although it's usually better to attempt your own Drive Impact in the blockstring gap; if it was a true blockstring, then the Drive Impact wouldn't give the opponent a followup combo anyway).
(6HPHK) during blockstun to perform. Similar to Alpha Counter or V-Reversal from previous Street Fighter games. They are fully invincible from frames 1-22, and deal a small amount of recoverable damage. Drive Reversals break armor, so it can be used against buttons cancelled into Drive Impact (although it's usually better to attempt your own Drive Impact in the blockstring gap; if it was a true blockstring, then the Drive Impact wouldn't give the opponent a followup combo anyway).
All Drive Reversals are punishable at -8 on block, and are slow enough that quick attacks will recover before the Drive Reversal connects. Drive Reversal immediately ends the blockstun of the opponent's attack, so inputting earlier increases the chance of successfully punishing the opponent's move. It is impossible to win a round with the damage from Drive Reversal.
Super Meter
Super meter is only used for Super Arts. Super meter is gained by hitting the opponent or getting hit. In general, hits build twice as much Super meter as blocked attacks; whiffing attacks does not build any Super meter. The match starts with 0 meter for both sides, and can build up to a maximum of 3 bars. Unlike the Drive Gauge, Super meter carries over between rounds; this means it is not always beneficial to finish a round with Super if a cheaper alternative exists.
Super Art
During Super Art animations, the player's Drive Gauge will increase with each hit (in addition to passive regeneration). The opponent's Drive gauge is decreased with each hit and is locked out of passive regeneration. This makes it an important tool for Drive gauge management, whether it be putting the opponent into Burnout or stalling for time to prevent your own Burnout.
- Level 1 Supers can be cancelled into from normal moves only.
- Level 2 Supers can be cancelled into from normals and EX specials.
- Level 3 Supers can be cancelled into from normals and specials.
- At low health level 3 supers get upgraded into Critical Art version which does more damage and may have different frame advantage on hit.
Many Super Arts have invincibility, allowing characters in Burnout to counter Drive Impact blockstrings in the corner. This is often the only way to escape this situation, since burned out characters have no access to Drive options. Some Super Arts create an "install" state that powers the character up, such as Juri's Feng Shui Engine. Install Supers turn the meter into a timer that ticks down until empty, at which point the character returns to normal.
