
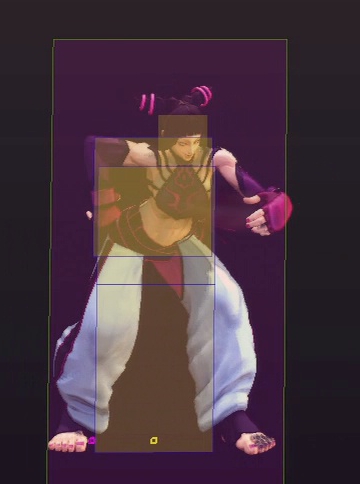
Juri

Juri is a sadistic agent working for Seth under S.I.N. Seth has installed the "Feng Shui Engine" into her left eye, which has enhanced her powers significantly. It is said that having watched her family murdered long ago is what has given Juri her lust for violence. But it is also driven by desires for revenge, as her family was murdered by Shadaloo, and joining S.I.N. is just a ploy to get closer to Shadaloo so she can take down Bison from within. Being hired to kill enemies of S.I.N. just happens to be a nice perk to go along with this mission.
In a nutshell
Juri definitely holds the prize for the most unique Projectile in the game. Learning Juri means mastering the Fuhajin and learning how to find opportunites to store them and how to use them on offense. While it may appear at first glance that Juri plays a game by mixing up Dive Kicks and Senpushas to catch opponents off guard, patient opponents will tear that offense apart. But once you master the art of the Fuhajin, Juri's game really opens up. But it takes a lot of technical prowess and practice to learn how to properly use this weapon, so Juri is definitely not for the feint of heart or those looking for easy wins.
Moves
Unique Attacks
Throws
Special Moves
Super Combo
Ultra Combos
Frame Data
| Move Values | Frame Count | Frame Advantage | |||||||||||
|---|---|---|---|---|---|---|---|---|---|---|---|---|---|
| Move Name | Block (HL) | Damage | Stun | Super Meter Gain | Cancel Ability | Startup | Active | Recovery | On Guard | On Hit | Block Stun | Hit Stun | Notes |
| Standing Close Attacks | |||||||||||||
| HL | 30 | 50 | 20 | ch/sp/su | 4 | 3 | 5 | +3 | +7 | - | - | ||
| HL | 70 | 100 | 40 | sp/su | 5 | 4 | 14 | -4 | -1 | - | - | Juggles if Ultra 1 is activated / 7f startup if Ultra 1 is activated | |
| HL | 100 | 200 | 60 | sp/su | 6 | 4 | 26 | -12 | - | - | - | 3~22f airborne / | |
| HL | 30 | 50 | 20 | ch/sp/su | 3 | 3 | 5 | +3 | +6 | - | - | ||
| HL | 30*35 | 40*40 | 40*20 | sp/su | 6 | 3(6)2 | 19 | -7 | -4 | - | - | 1~6f airborne / 8f startup if Ultra 1 is activated | |
| HL | 40*70 | 125*75 | 60*20 | sp/su | 11 | 2(2)2 | 20 | -4 | +1 | - | - | +0 on hit / Juggles if Ultra 1 is activated / Only 1st hit is cancelable, 2nd hit is cancelable if Ultra 1 is activated | |
| Standing Far Attacks | |||||||||||||
| HL | 30 | 50 | 20 | ch/sp/su | 4 | 3 | 5 | +3 | +7 | - | - | ||
| HL | 80 | 100 | 40 | su | 6 | 4 | 11 | -1 | +2 | - | - | Juggles if Ultra 1 is activated | |
| HL | 120 | 200 | 60 | - | 10 | 3 | 20 | -5 | -1 | - | - | ||
| HL | 40 | 50 | 20 | ch/sp/su | 5 | 3 | 7 | +1 | +4 | - | - | ||
| HL | 30*70 | 30*70 | 20*40 | - | 5 | 5 | 14 | -4 | -1 | - | - | Juggles if Ultra 1 is activated | |
| HL | 110 | 200 | 60 | - | 15 | 4 | 19 | -5 | -1 | - | - | 6~23f airborne / Juggles if Ultra 1 is activated | |
| Crouching Attacks | |||||||||||||
| HL | 30 | 50 | 20 | ch/sp/su | 4 | 2 | 9 | 0 | +3 | - | - | ||
| HL | 70 | 100 | 40 | sp/su | 6 | 6 | 9 | -1 | +2 | - | - | ||
| HL | 100 | 200 | 60 | sp/su | 7 | 4 | 20 | -6 | -1 | - | - | Force to stand on ground hit | |
| L | 20 | 50 | 20 | ch/sp/su | 4 | 4 | 5 | +2 | +5 | - | - | ||
| L | 60 | 100 | 40 | sp/su | 6 | 2 | 17 | -5 | -2 | - | - | ||
| L | 90 | 100 | 60 | - | 8 | 2 | 25 | -9 | - | - | - | Knockdown | |
| Straight Up Jump Attacks | |||||||||||||
| H | 50 | 50 | 20 | - | 4 | 8 | - | - | - | - | - | ||
| H | 80 | 100 | 40 | - | 5 | 7 | - | - | - | - | - | ||
| H | 100 | 200 | 60 | - | 8 | 4 | - | - | - | - | - | ||
| H | 40 | 50 | 20 | - | 5 | 10 | - | - | - | - | - | ||
| H | 80 | 100 | 40 | - | 5 | 5 | - | - | - | - | - | ||
| H | 100 | 200 | 60 | - | 8 | 4 | - | - | - | - | - | ||
| Angled Jump Attacks | |||||||||||||
| H | 50 | 50 | 20 | - | 4 | 11 | - | - | - | - | - | ||
| H | 50 | 50 | 40 | sp | 5 | 6 | - | - | - | - | - | Floats opponent on air hit | |
| H | 90 | 100 | 60 | - | 7 | 4 | - | - | - | - | - | Knockdown / Juggle | |
| H | 40 | 50 | 20 | - | 5 | 6 | - | - | - | - | - | ||
| H | 70 | 100 | 40 | - | 5 | 6 | - | - | - | - | - | ||
| H | 100 | 200 | 60 | - | 6 | 6 | - | - | - | - | - | ||
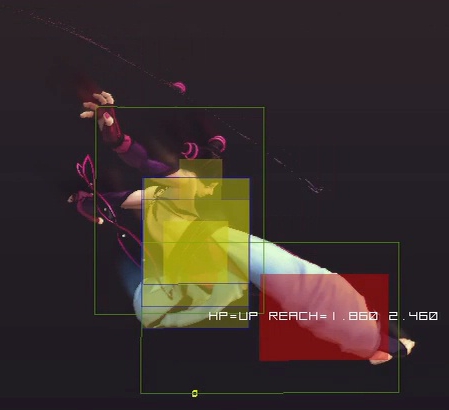
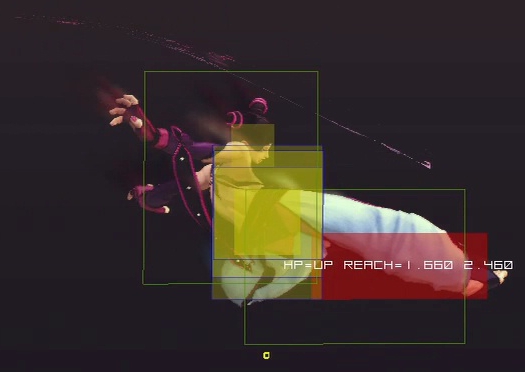
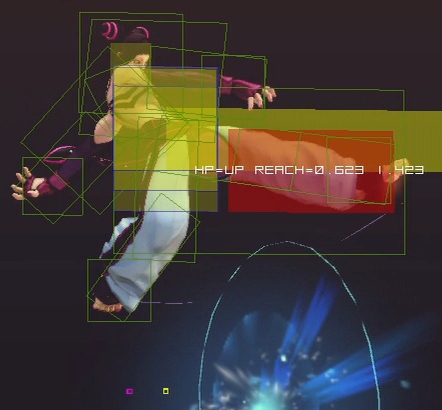
| Unique Attacks | |||||||||||||
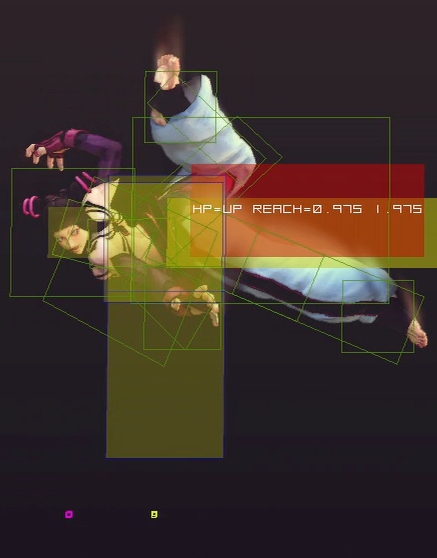
| H | 70 | 70 | 40 | - | 20 | 2 | 18 | -2 | +2 | - | - | 12~26f airborne / +1 on hit on crouching opponent / Juggles if Ultra 1 is activated / +6 on hit if Ultra 1 is activated | |
| Focus Attacks | |||||||||||||
| Focus Attack LVL 1 | HL | 60 | 100 | 20 | - | 21 | 2 | 35 | -21 | -21 | - | - | |
| Focus Attack LVL 2 | HL | 80 | 150 | 40 | - | 17+12 | 2 | 35 | -15 | - | - | - | |
| Focus Attack LVL 3 | - | 140 | 200 | 60 | - | 65 | 2 | 35 | - | - | - | - | |
| Throws | |||||||||||||
| Forward Throw | 0.8 | 130 | 140 | 40 | - | 3 | 2 | 20 | - | - | - | - | |
| Back Throw | 0.8 | 120 | 160 | 40 | - | 3 | 2 | 20 | - | - | - | - | |
| Special Moves | |||||||||||||
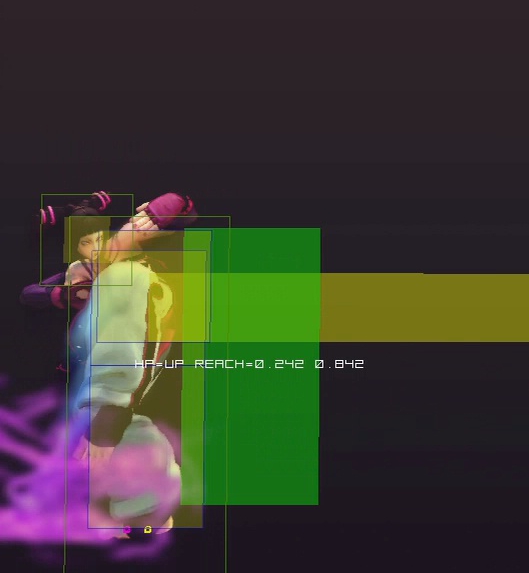
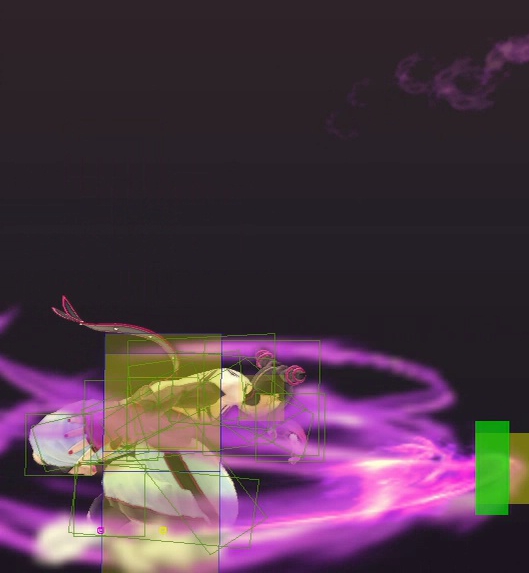
| Fuhajin | HL | 50*50 | 100*50 | 20/20*20 | su | 9 | 6(24)52 | 61 (total duration) | +4 | - | - | - | 41~43 super cancellable / hold the button to feint / only 2nd hit is super cancelable |
| Fuhajin (store) | HL | 50 | 100 | 20/20 | - | 9 | 6 | 16 | -1 | - | - | - | Puts opponent in jugglable state on ground hit / Count as a projectile |
| Fuhajin (release) | HL | 50 | 50 | 0/20 | su | 11 | 52 | 33 (total duration) | +4 | +10 | - | - | Puts opponent in jugglable state on air hit / 13~15 super |
| Fuhajin |
HL | 50*50 | 50*50 | -250/0 | su | 13 | 49 | 39 (total duration) | +5 | - | - | - | Puts opponent in jugglable state on hit / can juggle / 16~18f super |
| Fuhajin |
HL | 50*50 | 50*50 | -250/0 | su | 15 | 49 | 39 (total duration) | +7 | - | - | - | 4~16f airborn / Puts opponent in jugglable state on hit / can juggle / 18~20f super |
| Fuhajin |
HL | 50*50 | 50*50 | -250/0 | su | 13 | 49 | 39 (total duration) | +5 | - | - | - | 4~15 airborne / Puts opponent in jugglable state on hit / can juggle / 17~19f super |
| Shikusen |
HL | 40 | 50 | 10/40 | - | 14 | until ground | 17 | -2 | - | - | - | |
| Shikusen |
HL | 40 | 50 | 10/40 | - | 14 | until ground | 18 | -3 | - | - | - | |
| Shikusen |
HL | 40 | 50 | 10/40 | - | 14 | until ground | 19 | -4 | - | - | - | |
| Shikusen 2nd Impact | HL | 20*20 | 20*20 | 0/20*20 | - | 9 | 4(5)2 | 28 | - | - | - | - | |
| Shikusen 3rd Strike | HL | 80 | 90 | 0/40 | - | 21 | 2 | 19 | - | - | - | - | |
| Shikusen |
HL | 50*25*25*60 | 50*20*20*50 | -250/0 | - | 14 | until ground(8)4(5)2(20)2 | 14or28or18 | - | - | - | - | |
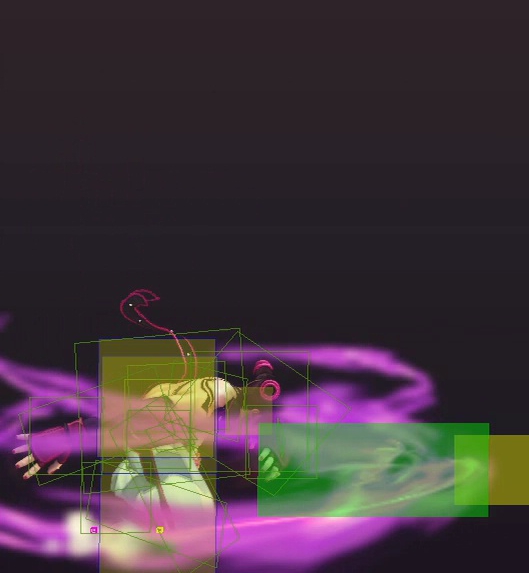
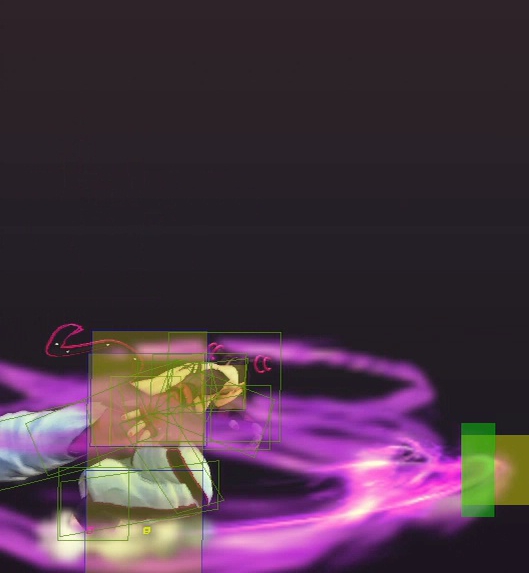
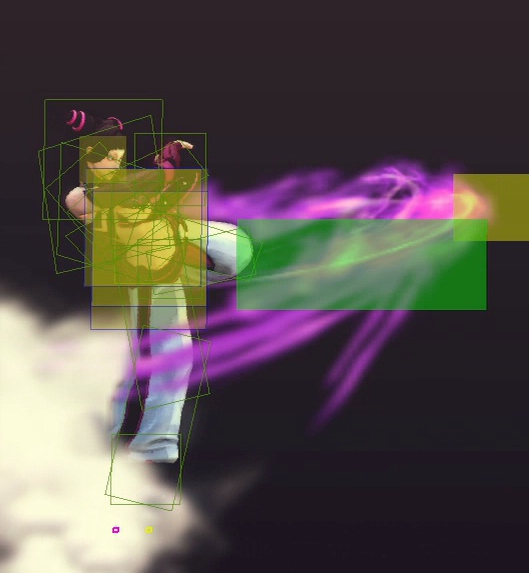
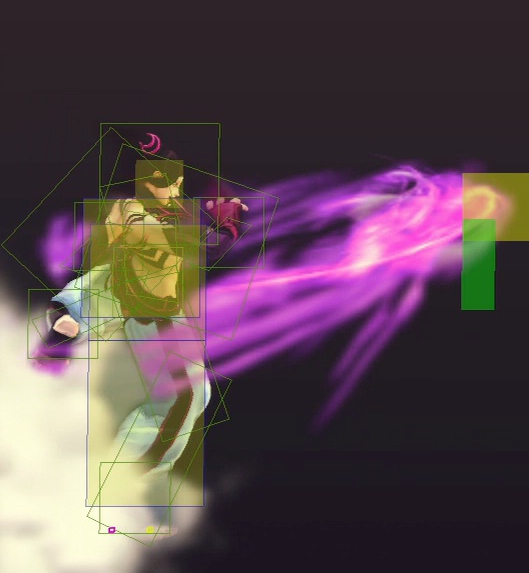
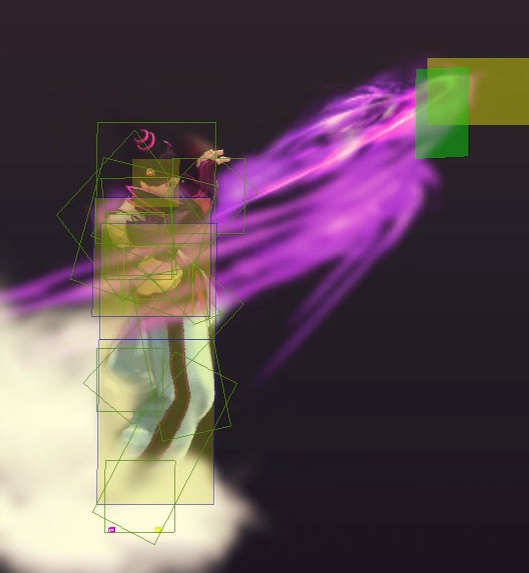
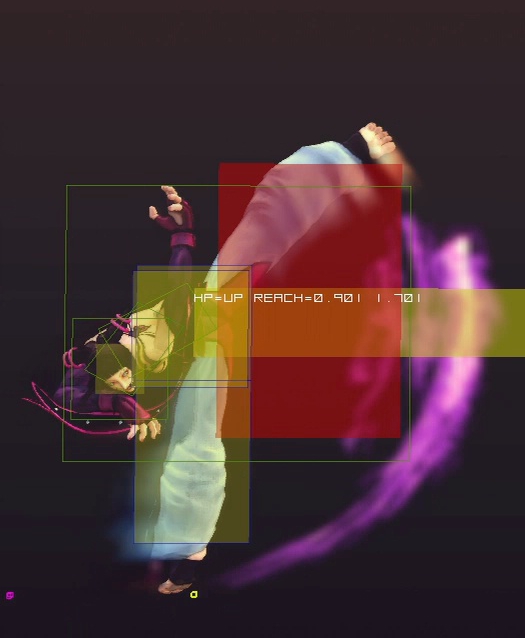
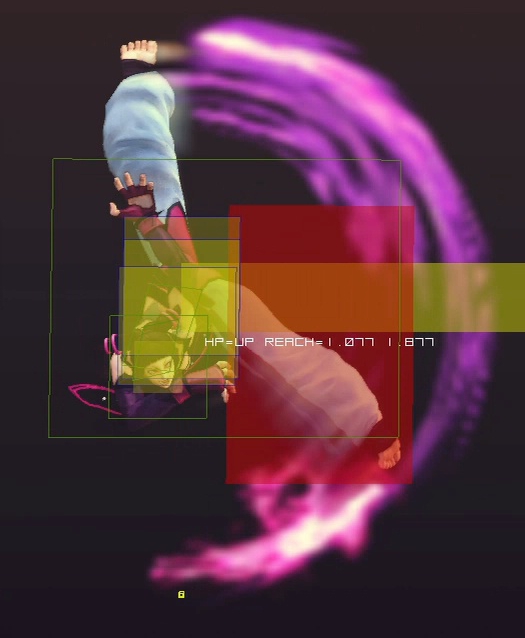
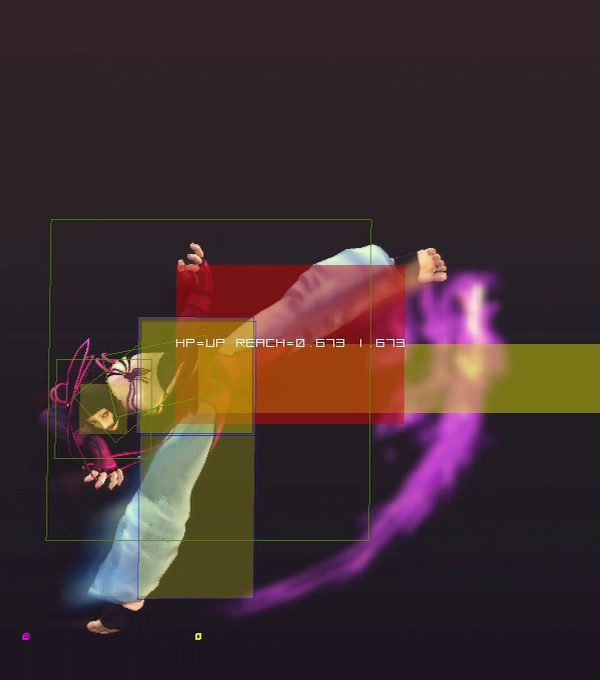
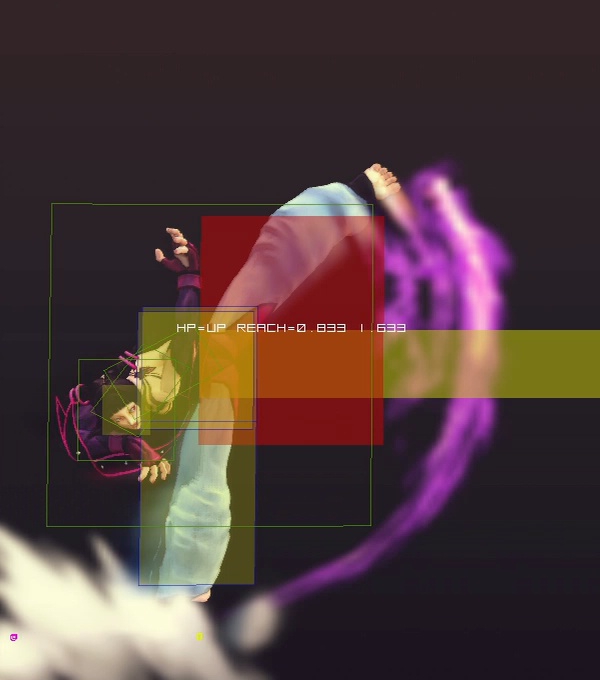
| Senpusha |
HL | 60*40 | 40*40 | 20/20*20 | su | 7 | 3(1)4 | 4+17 | -4 | +1 | - | - | |
| Senpusha |
HL | 45*25x3 | 40*30x3 | 20/15x4 | su | 9 | 3(1)4(6)3(1)3 | 5+21 | -8 | - | - | - | |
| Senpusha |
HL | 50*30x3 | 50*35x3 | 20/15x4 | su | 14 | 3(1)4(6)3(1)3 | 5+24 | -11 | - | - | - | |
| Senpusha |
HL | 30x6 | 30x5*35 | -250/0 | - | 7 | 3(1)4(3)3*3(1)3(4)3*3(1)3 | 5+27 | -13 | - | - | - | |
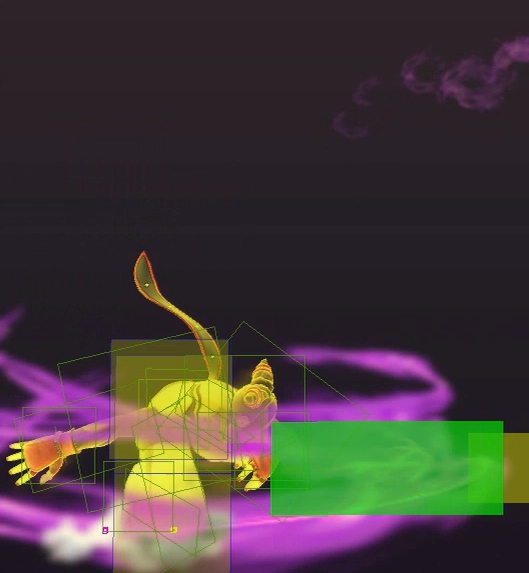
| Kasatushi | - | - | - | 10/- | - | 3 | 29 | 17 | - | - | - | - | |
| Kasatushi |
- | - | - | -250/- | - | 1 | 31 | 17 | - | - | - | - | |
| Kasatushi (???) | - | - | - | -/5 | - | - | - | 29 | - | - | - | - | |
| Kasatushi (???) | - | - | - | -/5 | - | - | - | 28 | - | - | - | - | |
| Kasatushi (???) | - | - | - | -/5 | - | - | - | 54 | - | - | - | - | |
| Super Combo | |||||||||||||
| Super Combo |
HL | 60x5*70 | 0 | -1000/0 | - | 1+8 | 65 | 153 (total duration) | -82 | - | - | - | |
| Super Combo |
HL | 60x5*70 | 0 | -1000/0 | - | 1+8 | 65 | 153 (total duration) | -82 | - | - | - | |
| Super Combo |
HL | 60x5*70 | 0 | -1000/0 | - | 1+11 | 65 | 156 (total duration) | -82 | - | - | - | |
| Ultra Combos | |||||||||||||
| Ultra Combo 1 | - | - | - | - | - | 1+0 | 900 | 7 (total duration) | - | - | - | - | |
| Ultra Combo 2 | HL | 15x8*360 | 0 | 0/0 | - | 1+9 | 4*? (45f total) | 60+33 | -103 | - | - | - | |
| Move Name | Block (HL) | Damage | Stun | Super Meter Gain | Cancel Ability | Startup | Active | Recovery | On Guard | On Hit | Block Stun | Hit Stun | Notes |
| Move Values | Frame Count | Frame Advantage | |||||||||||
Move Analysis
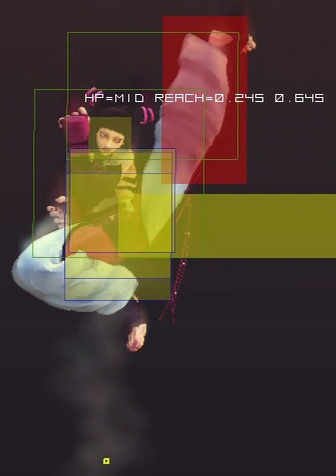
Normal Moves
- Standing
 (hitbox)
- Juri's fastest full animation (11f)
- can be whiffed to quickly discard a held Fuhajin
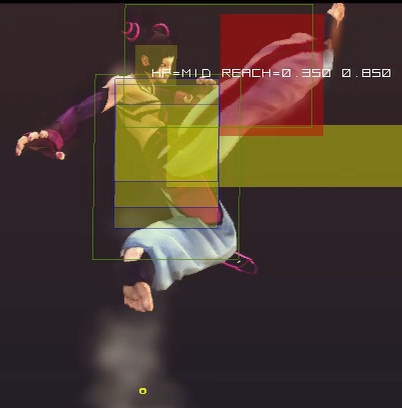
- Far standing
 (hitbox)
- Juri's longest (useful) poke
- moves forward a significant distance on the first frame; very good for kara throws
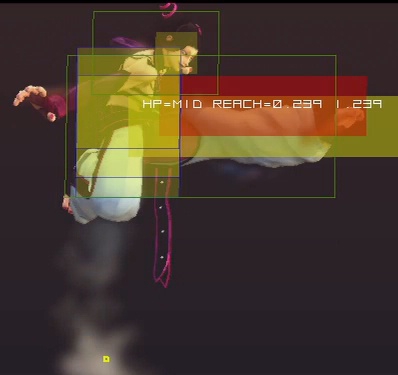
- Far standing
 (hitbox)
- can be used as a poke but generally not useful
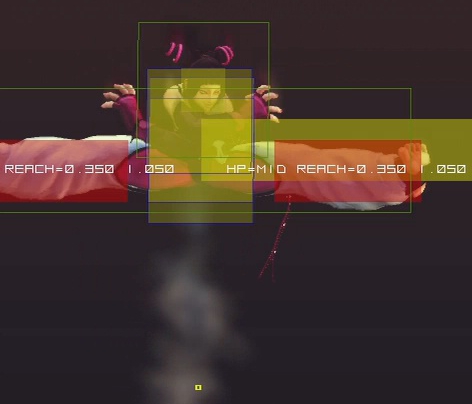
- Far standing
 (hitbox)
- slightly shorter range than far standing

- difficult to whiff-punish
- slightly shorter range than far standing
- Far standing (hitbox 1) (2)
- slightly shorter range than far standing
- good priority
- good anti-air at certain angles
- hits twice if close enough
- slightly shorter range than far standing
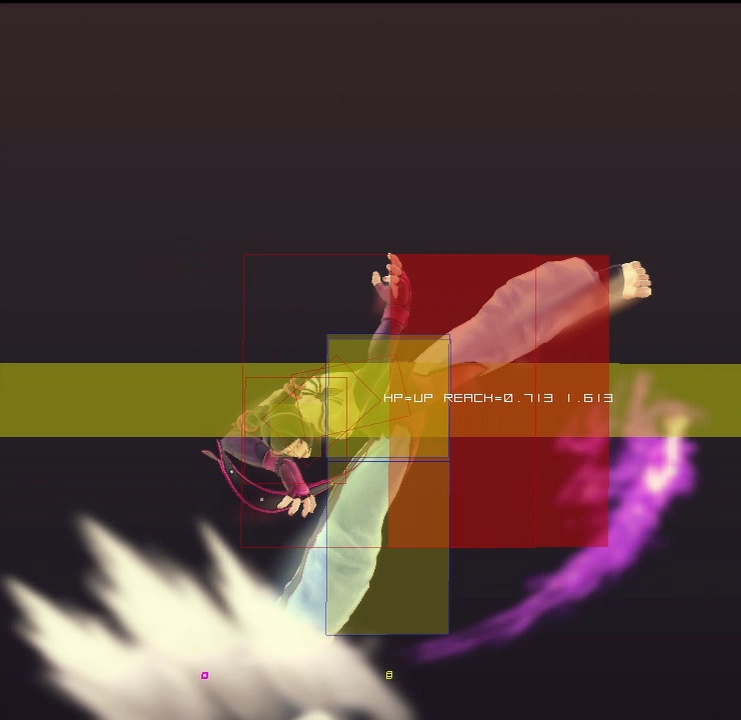
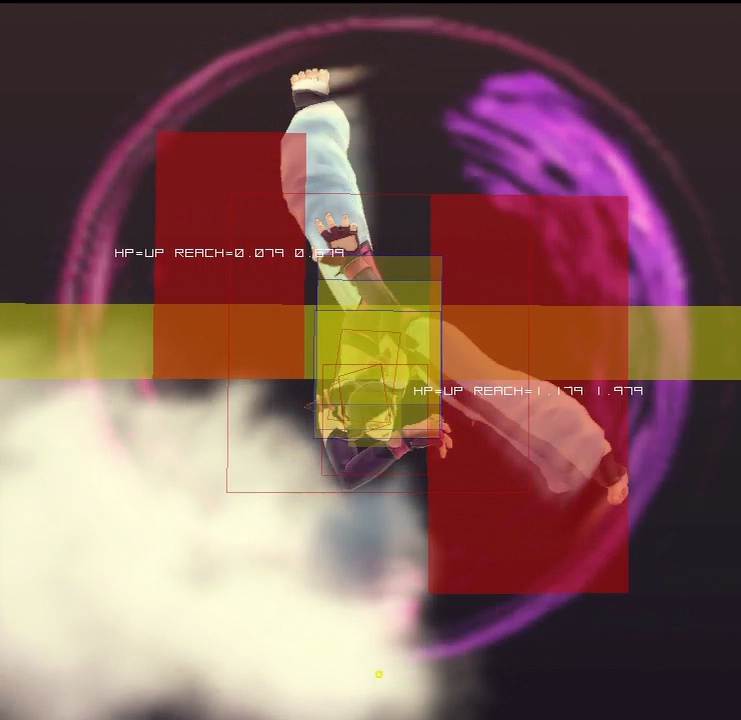
- Far standing
 (hitbox)
- moves very far forward
- vulernable to focus attacks
- whiffs on some crouching characters
- if Feng Shui Engine is active, whiffs on most crouching characters
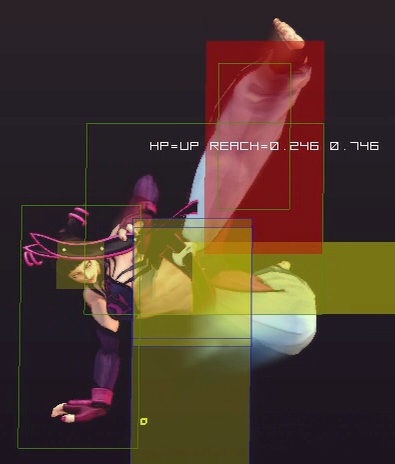
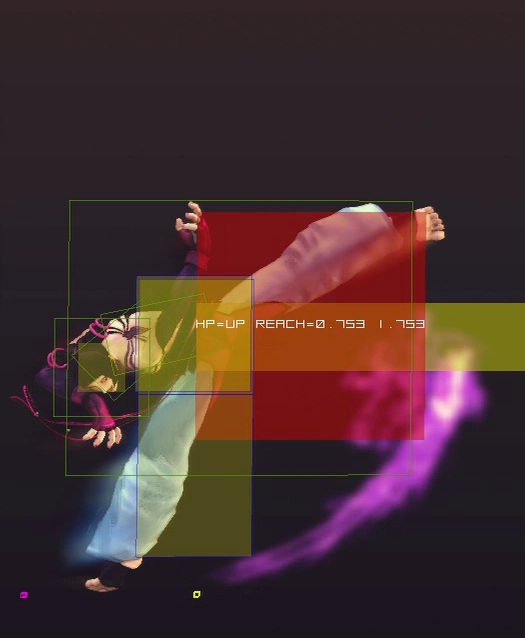
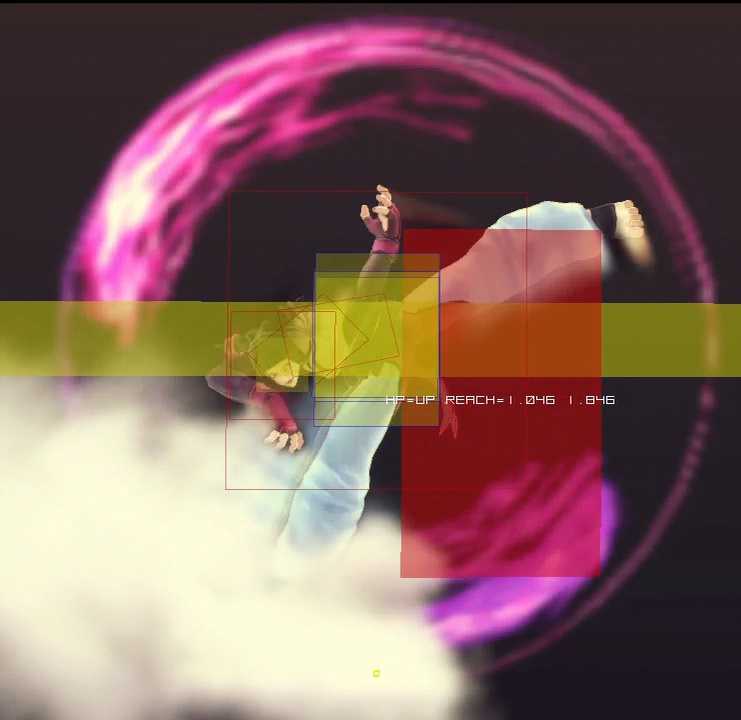
- Close standing (hitbox)
- Close standing (hitbox)
- airborne from frame 3; decent for punishing throw attempts or crouch teching
- very unsafe on block
- situational anti-air
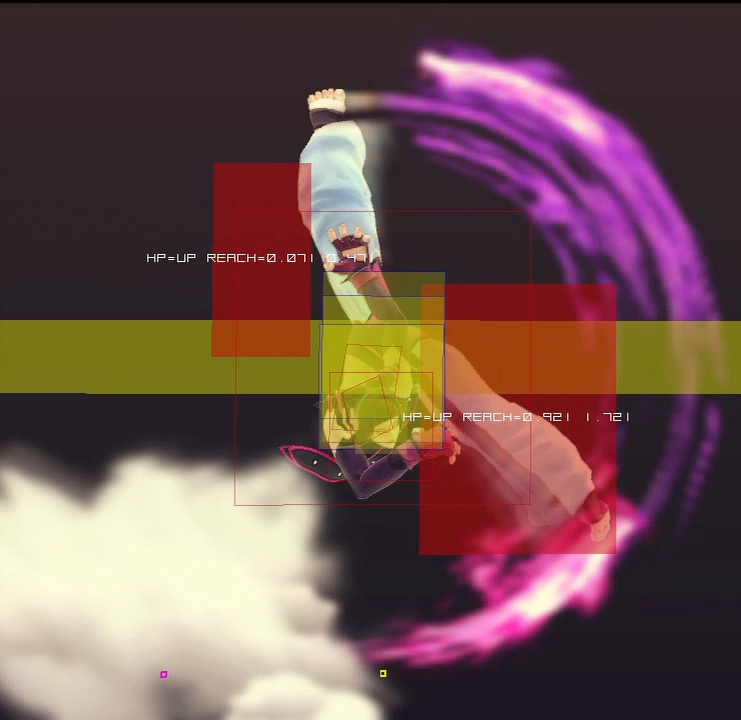
- Close standing (hitbox)
- Juri's fastest attack (3f startup)
- Close standing (hitbox 1) (2)
- startup covered by airborne frames
- beats most throws, but can lose to invincible command grabs
- can be used as a substitute for crouch teching
- second hit can whiff on crouching opponents
- Close standing (hitbox 1) (2)
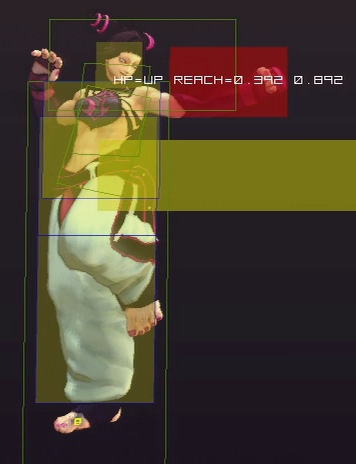
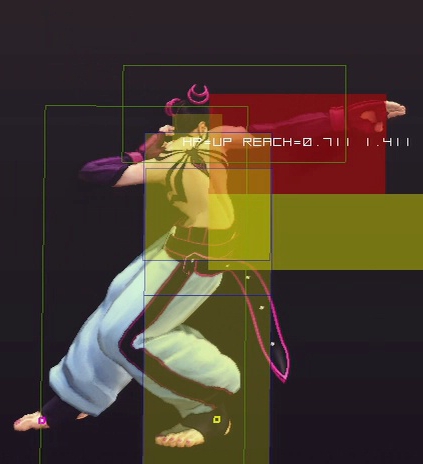
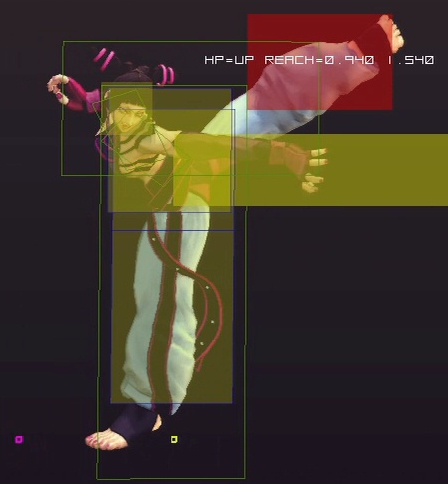
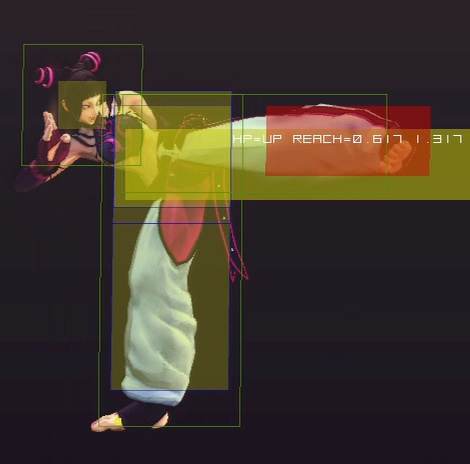
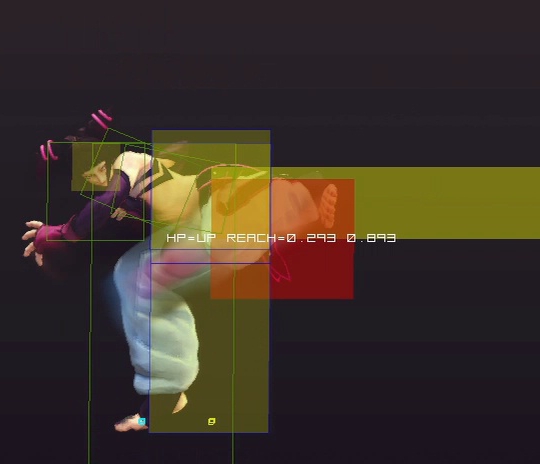
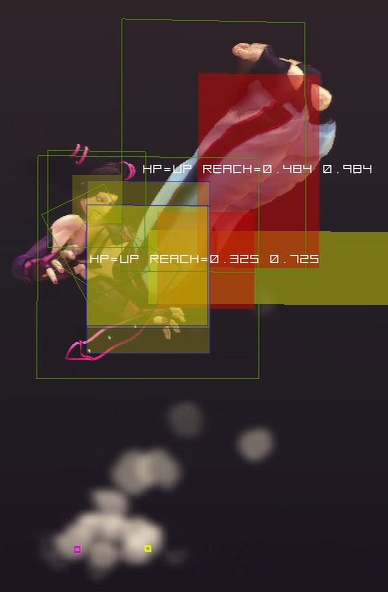
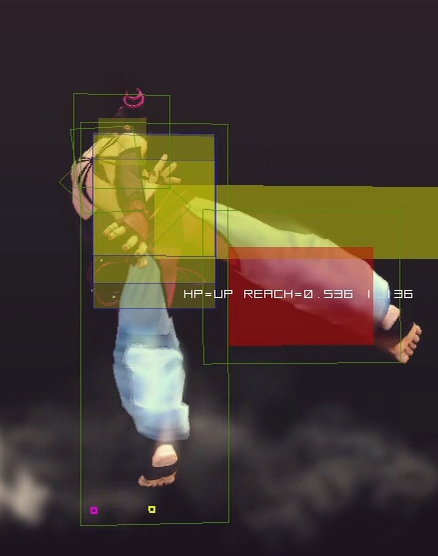
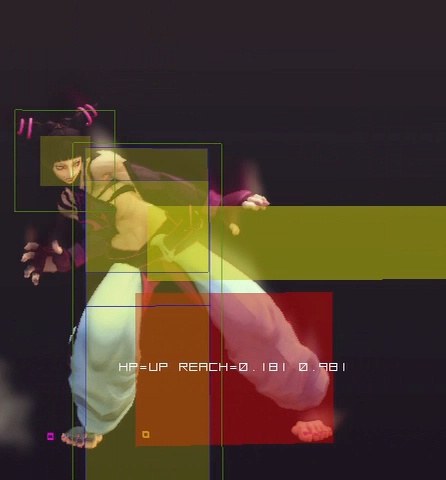
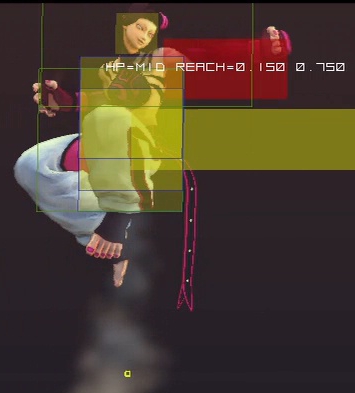
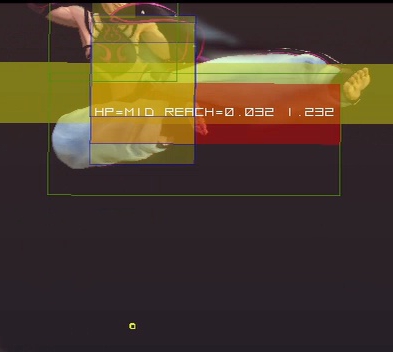
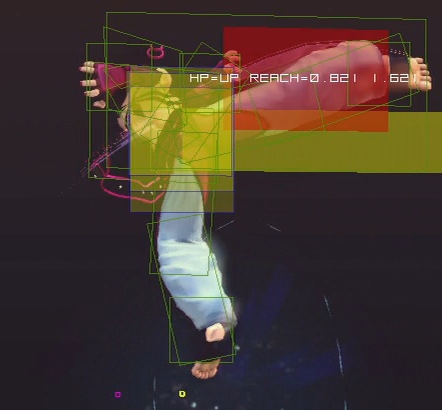
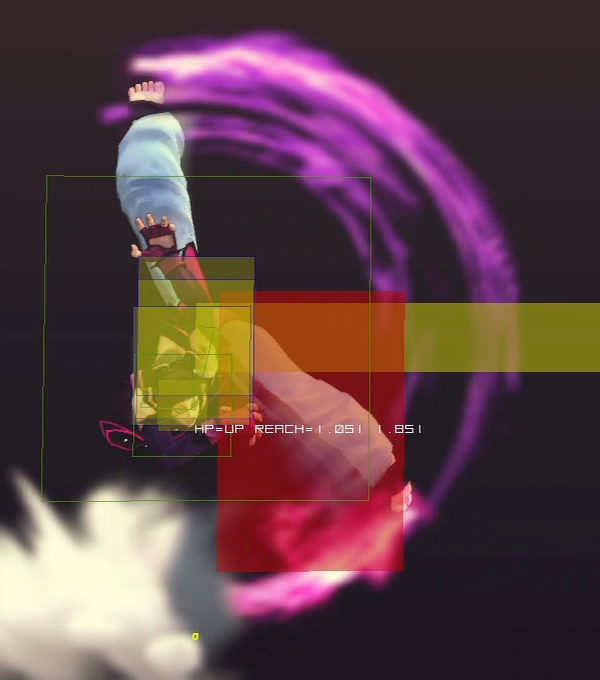
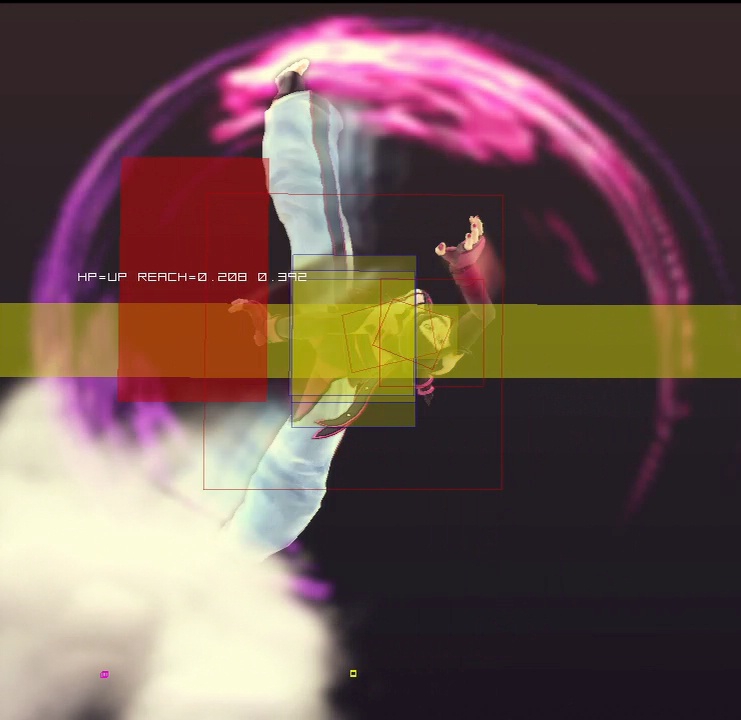
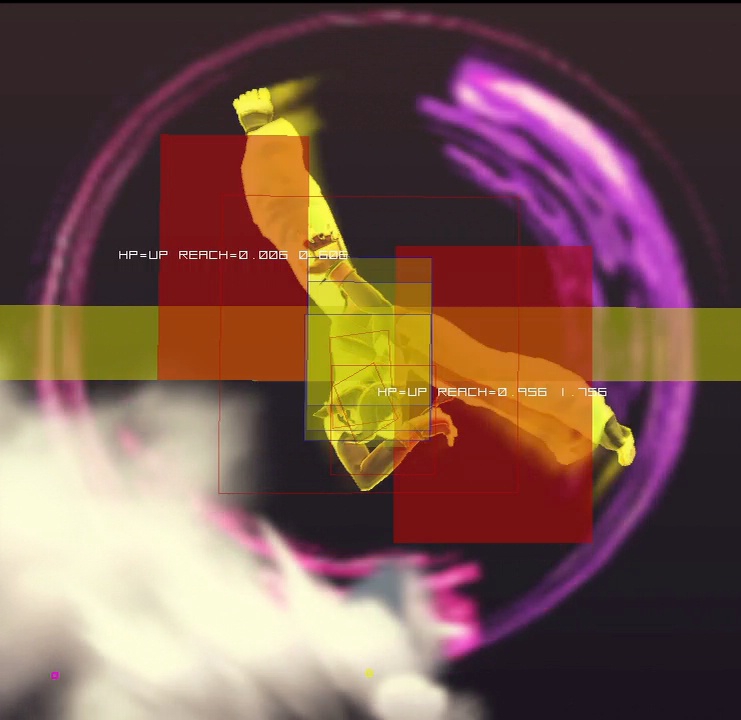
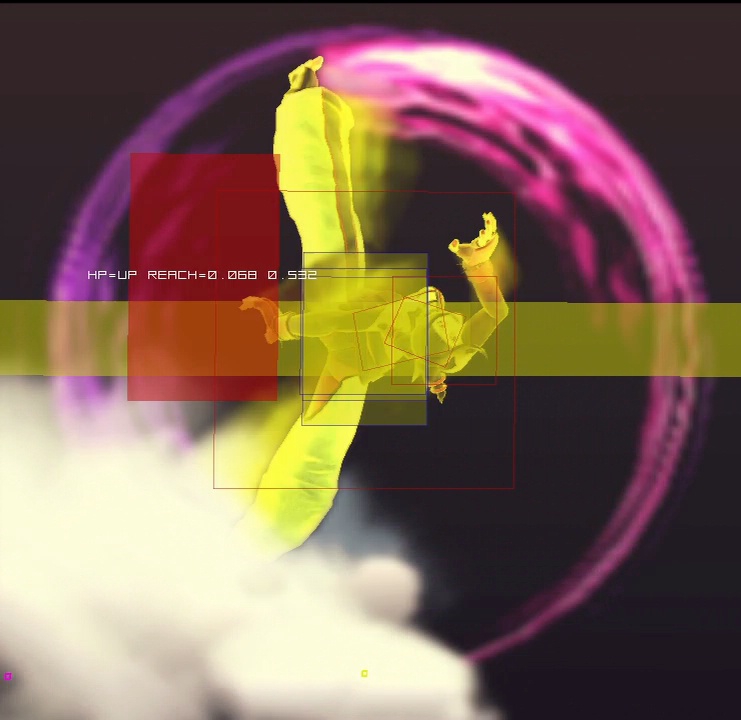
- Crouching (hitbox)
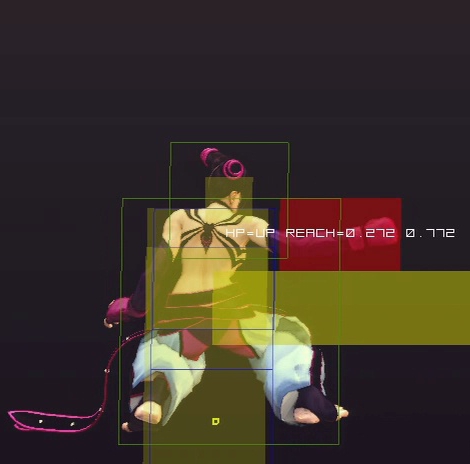
- Crouching (hitbox)
- primary anti-air
- long active window; good meaty attack
- good poke to whiff while buffering Senpusha
- recovers slightly before animation finishes, making it possible to move forward slightly
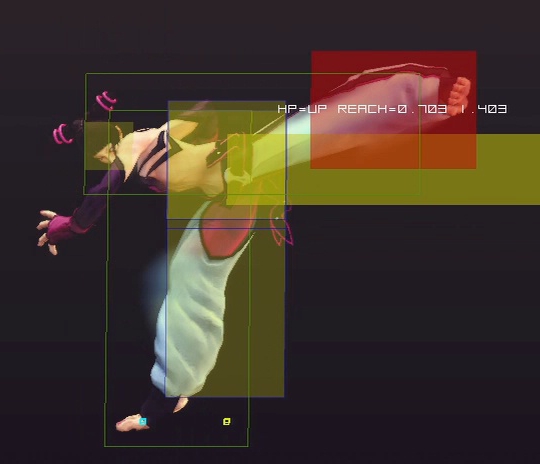
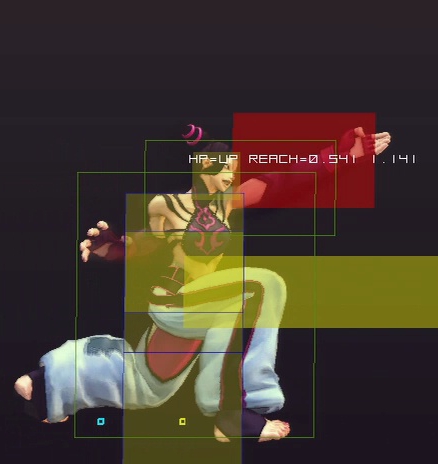
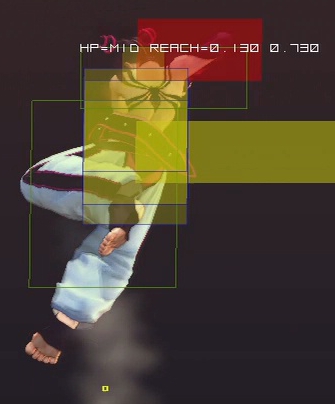
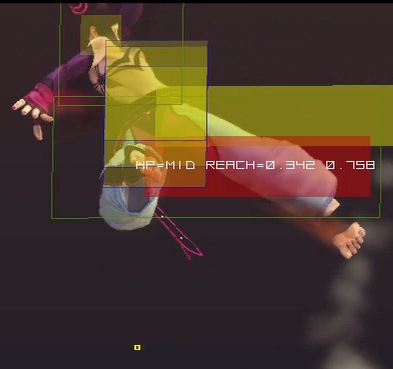
- Crouching (hitbox)
- good anti-air for opponents directly above or crossing up
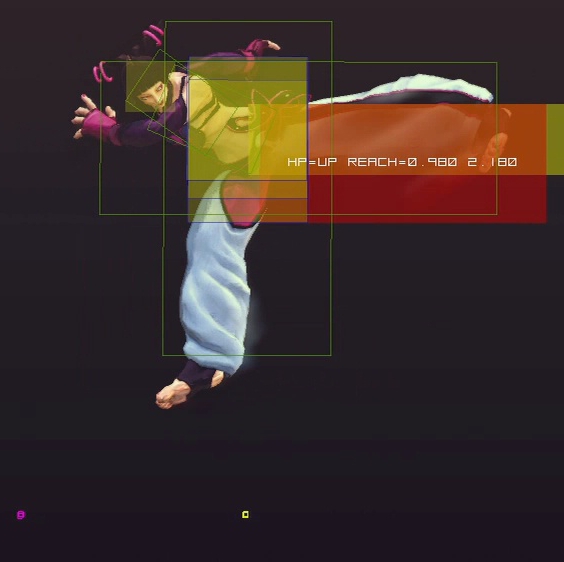
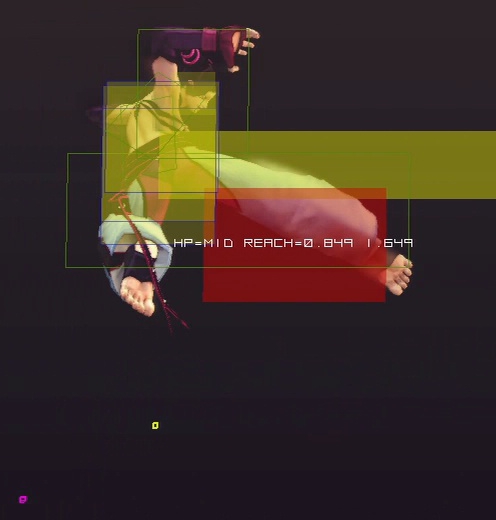
- Crouching (hitbox)
- use for hit-confirming
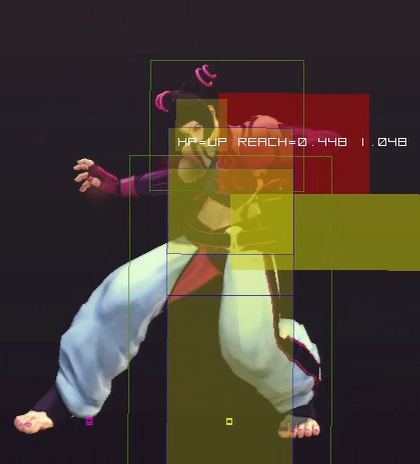
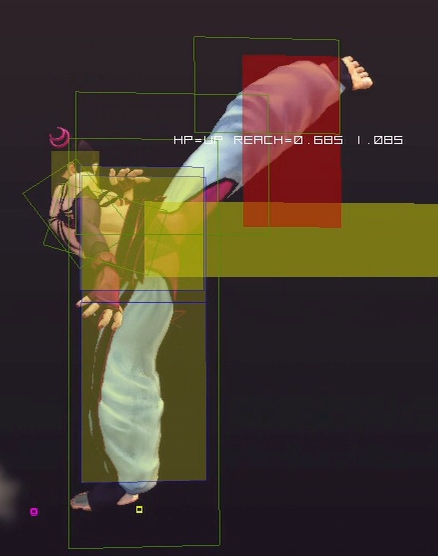
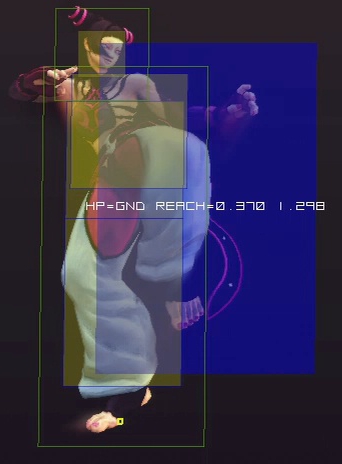
- Crouching (hitbox)
- moves vulnerable hitboxes low to the ground
- good low poke
- can go under fireballs at close range
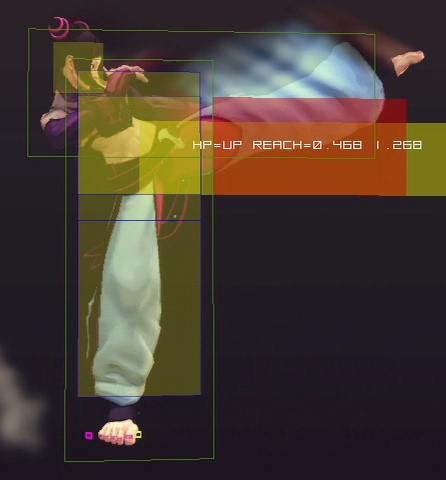
- Crouching (hitbox)
- moves vulnerable hitboxes low to the ground
- untechable knockdown
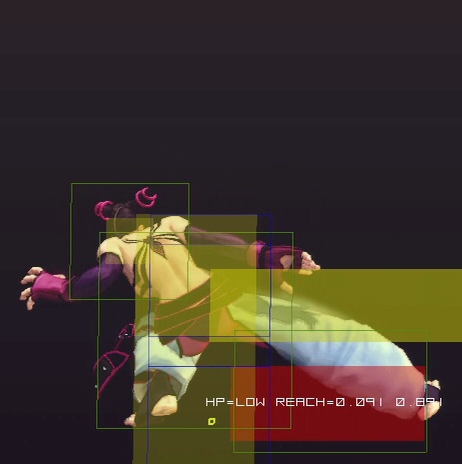
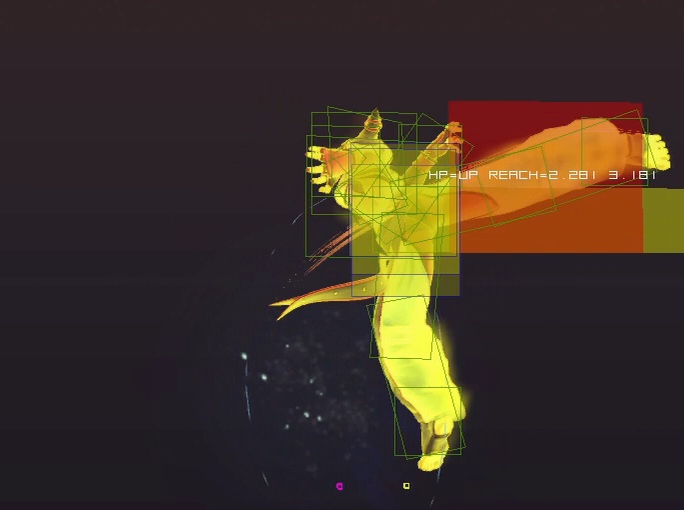
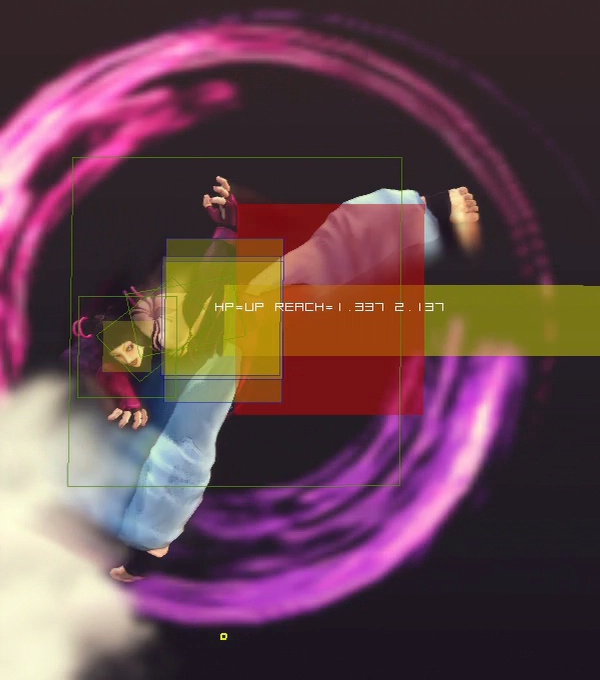
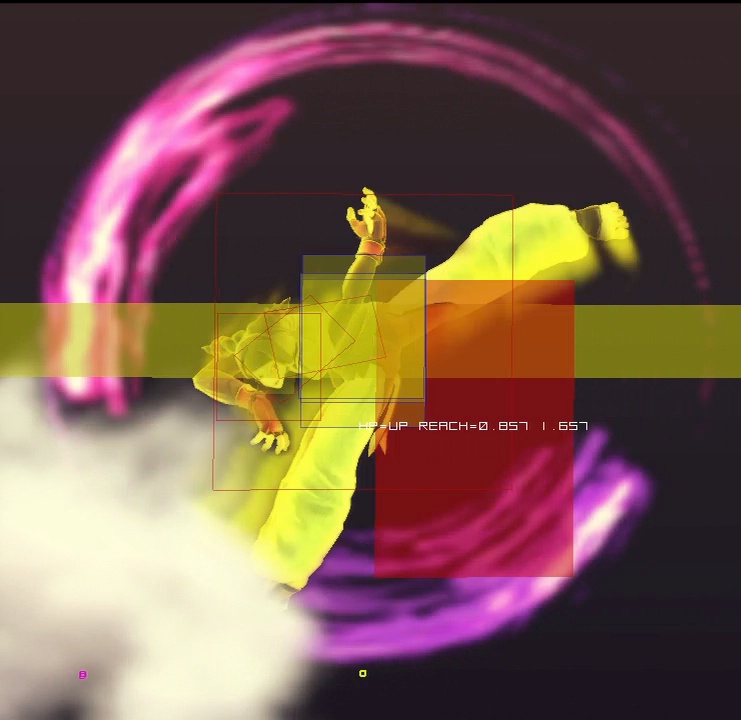
- Neutral Jump (hitbox)
- Neutral Jump (hitbox)
- Neutral Jump (hitbox)
- Neutral Jump (hitbox)
- good air-to-air
- Neutral Jump (hitbox)
- good air-to-air
- Neutral Jump (hitbox)
- good air-to-air
- can hit behind
- best normal to use after

 Kasatushi
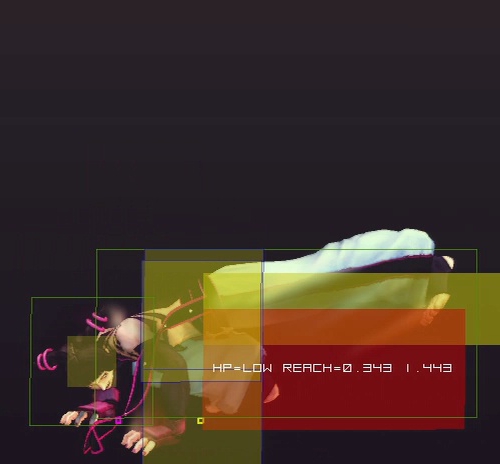
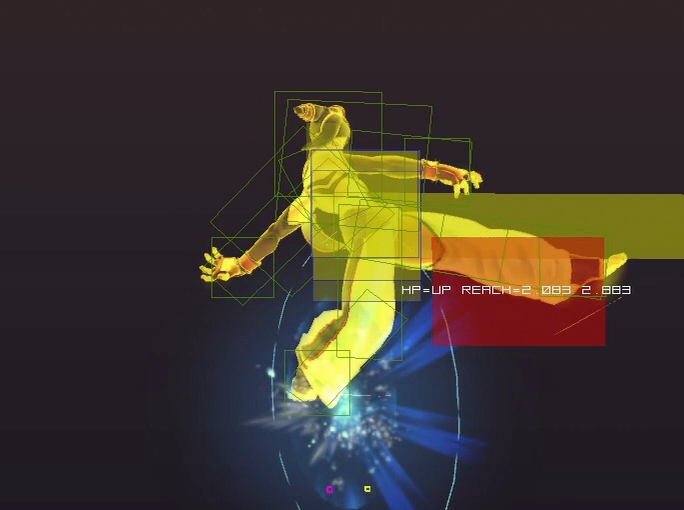
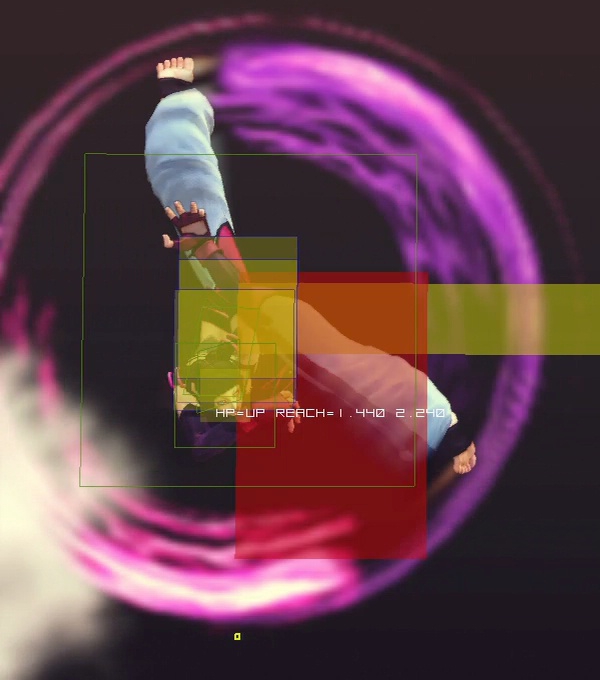
- Angled Jump (hitbox)
- Angled Jump (hitbox)
- free juggle state on air hit
- can be used very late in jump arc
- very good to fake corner cross-ups
- Angled Jump (hitbox)
- hard knockdown
- difficult to anti-air
- beats many wakeup reversals if positioned correctly
- can cross up if spaced perfectly
- Angled Jump (hitbox)
- can cross up outside of corner
- Angled Jump (hitbox)
- can cross up anywhere
- good air-to-air
- Angled Jump (hitbox)
- overall solid jumping attack
- does not cross up at the max range where would cross up
Unique Attacks
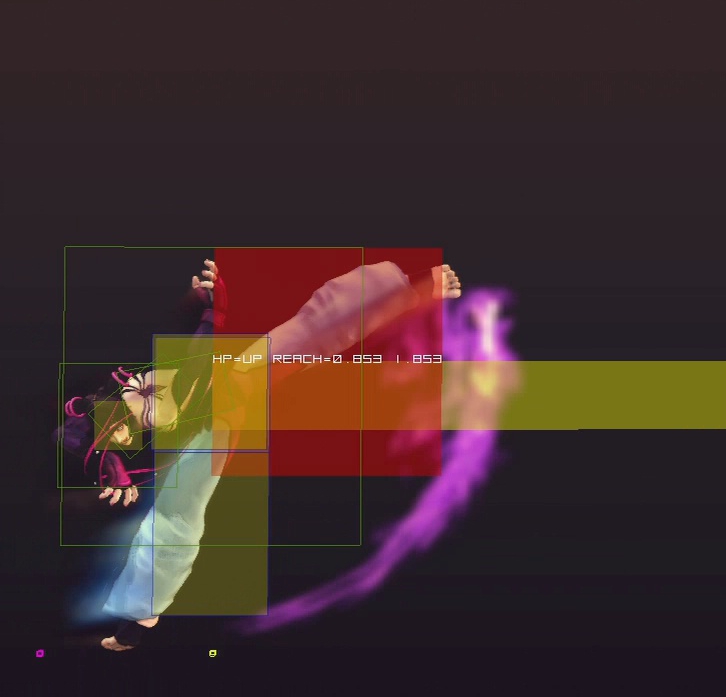
- Sekku (
 + ) (hitbox)
- overhead
- good range
Normal Throws
- (hitbox)
- Karen Kick (forward throw)
- excellent for moving opponents to the corner (use Shikusen to follow)
- long knockdown time; can easily store Fuhajins if already in the corner
- excellent for moving opponents to the corner (use
- Assatsu Kick (back throw)
- gives enough time for a safe jump
- Use kara throw to greatly extend throw range
Focus Attack
Special Moves
- Fuhajin
- Fuhajin store (hitbox)
- can be whiffed to build meter fairly quickly
- stored Fuhajins can be discarded by releasing the corresponding buttons during a jump or a different move, such as a whiffed standing or a different Fuhajin store
- good meaty attack; can stuff many reversals
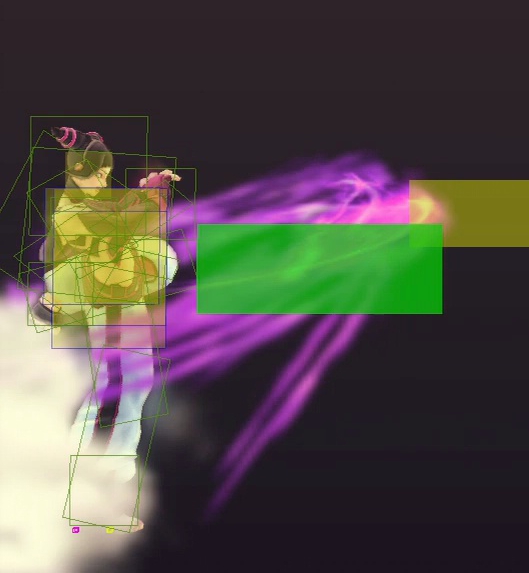
- release (hitbox 1a) (1b)
- goes under other projectiles
- can be used as a long-range poke
- can be used for easy hit-confirms
- works well for corner frame traps
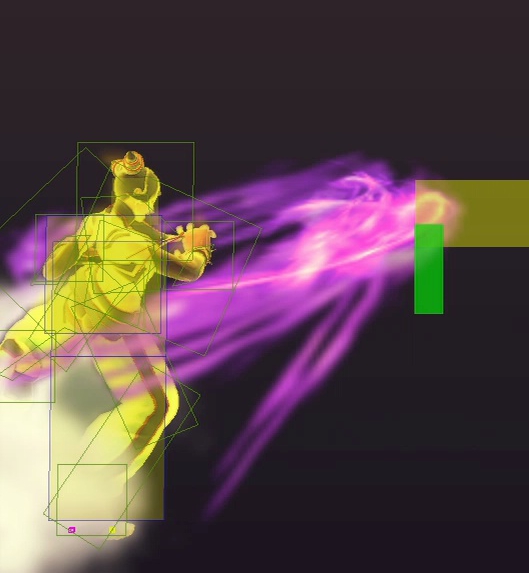
- release (hitbox 1a) (1b)
- collides with most other projectiles
- can be crouched under
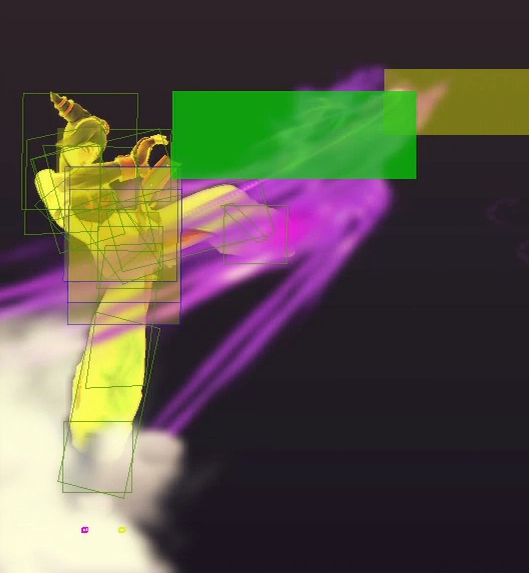
- release (hitbox 1a) (1b)
- can be used to anti-air or to prevent opponents from jumping
- can prevent large characters such as Zangief and T Hawk from advancing easily
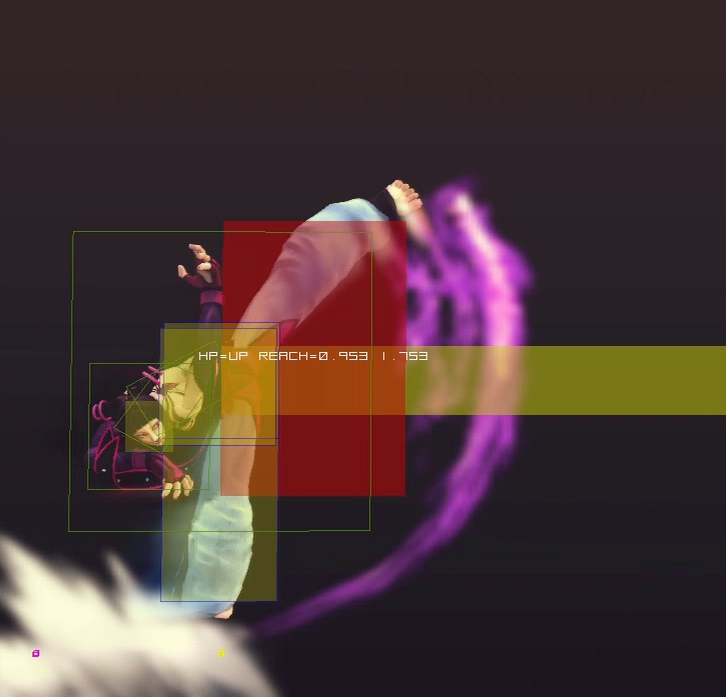
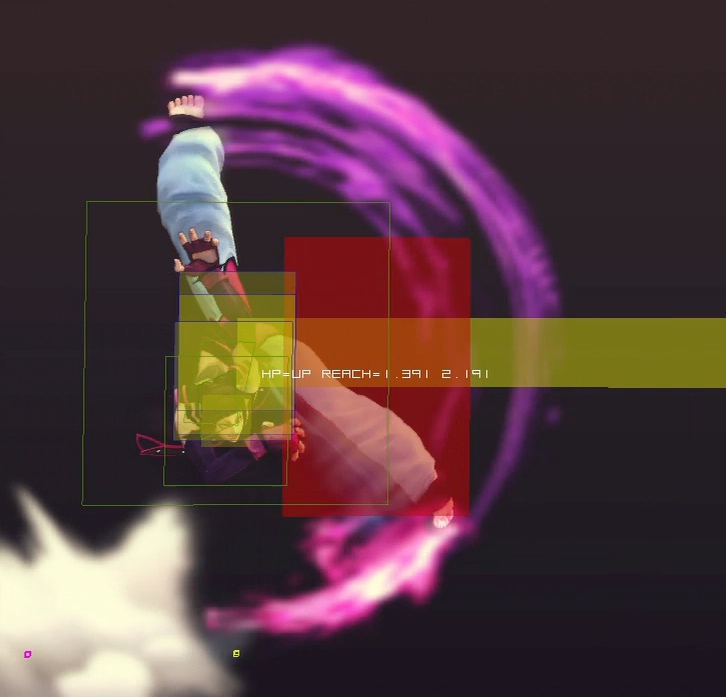
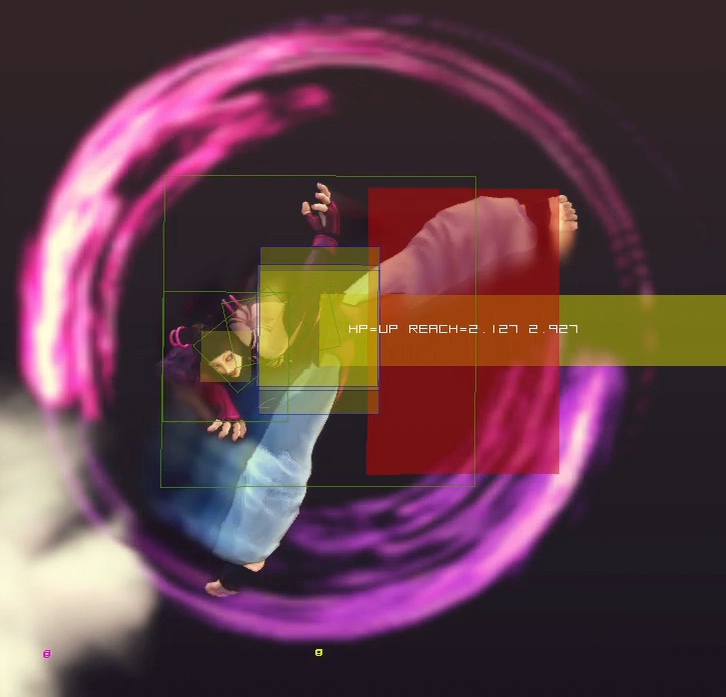
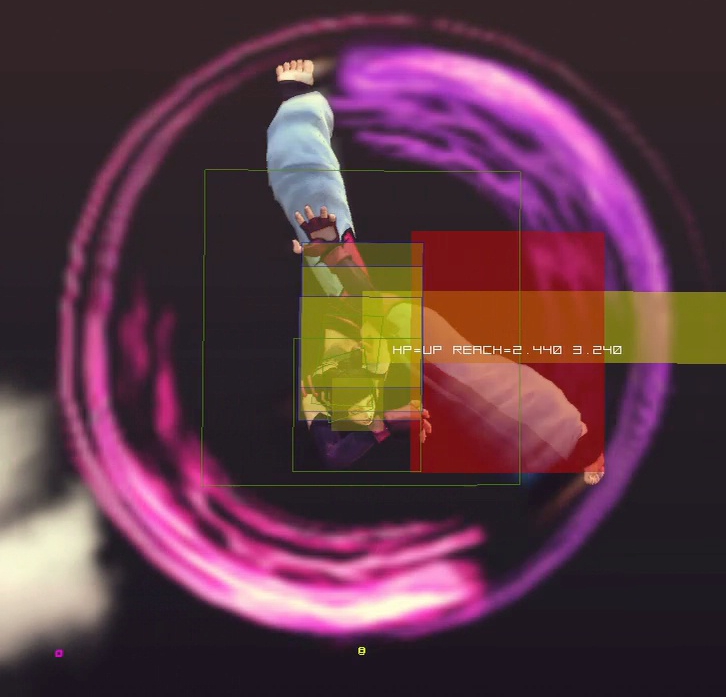
- ( + ) (hitbox 1a) (1b)
- can be used to poke like version but comes out slower
- works well for corner frame traps, like version
- can be used to poke like
- ( + ) (hitbox 1a) (1b)
- ( + ) (hitbox 1a) (1b)
- Fuhajin store (hitbox)
- Shikusen
- not normally safe on block; can be made safe if spaced correctly
- (hitbox)
- (hitbox)
- (hitbox)
- punishes fireballs well
- Second Impact (hitbox)
- use only if Shikusen is confirmed to hit
- Third Strike (hitbox)
- use if Second Impact is confirmed to hit
- (hitbox 1) (2) (3)
- usually only useful in punish situations
- Senpusha
- Kasatushi
Super Combos
- Fuharenjin
- easy to combo into
Ultra Combos
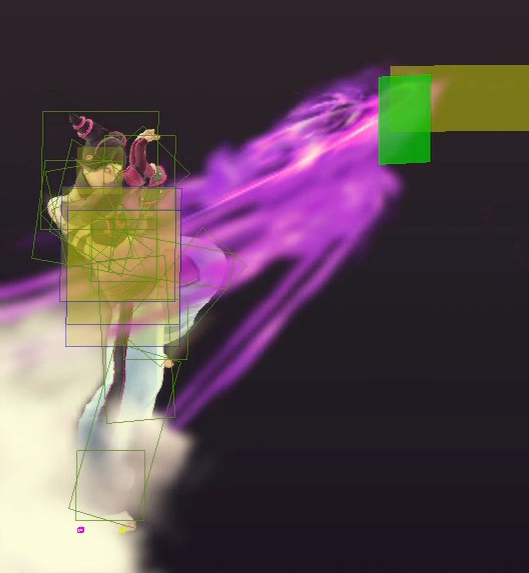
- Feng Shui Engine
- Main article: Feng Shui Engine
- Kaisen Dankairaku
- has several practical ways to be comboed into
- good for punishing certain moves
- not a good anti-air
The Basics
When playing as Juri, your primary strategy should be to get your opponent in the corner and keep them there as much as possible. She has several tools to accomplish this effectively, such as Karen Kick (forward throw), ![]() /
/![]() Senpusha, and Shikusen > Second Impact > Third Strike, all of which carry opponents very far across the stage. Try to land these attacks whenever possible; end blockstrings with throw attempts, end combos with Senpusha, and punish fireballs with Shikusen. Juri also has the ability to teleport by using Kasatushi, which she can use to reverse corner situations in her favor, particularly with the
Senpusha, and Shikusen > Second Impact > Third Strike, all of which carry opponents very far across the stage. Try to land these attacks whenever possible; end blockstrings with throw attempts, end combos with Senpusha, and punish fireballs with Shikusen. Juri also has the ability to teleport by using Kasatushi, which she can use to reverse corner situations in her favor, particularly with the ![]() and
and ![]() (
(![]() or
or ![]() ) versions.
) versions.
Once an opponent is cornered, take advantage of Juri's various tools to keep them trapped there as long as possible. ![]() Fuhajin is useful for easy hit-confirms and frame traps. Mid and high Fuhajins can be used for zoning. Neutral jump
Fuhajin is useful for easy hit-confirms and frame traps. Mid and high Fuhajins can be used for zoning. Neutral jump ![]() ,
, ![]() , and
, and ![]() are good for keeping opponents from escaping with moves such as Ryu's aerial Tatsumaki Senpukyaku. Juri also has a very good cross-up mix-up by jumping into the corner with jumping
are good for keeping opponents from escaping with moves such as Ryu's aerial Tatsumaki Senpukyaku. Juri also has a very good cross-up mix-up by jumping into the corner with jumping ![]() (which does cross up) or
(which does cross up) or ![]() (which does not cross up). Use this sparingly, as it may give the opponent an opportunity to escape, and doing the real cross-up will cause you to lose your positioning. Finally, Juri's Ultra I, Feng Shui Engine, is very strong in the corner, so activating it here could easily lead to a quick end to the round.
(which does not cross up). Use this sparingly, as it may give the opponent an opportunity to escape, and doing the real cross-up will cause you to lose your positioning. Finally, Juri's Ultra I, Feng Shui Engine, is very strong in the corner, so activating it here could easily lead to a quick end to the round.
Advanced Strategy
Wakeup Options
- Senpusha
- works well against proper meaties
- trades with delayed attacks
- loses to delayed throws
- anti-cross-up hitbox comes out very late, not usually useful
- very punishable on block/whiff
- Kasatushi
- first 2 frames vulnerable; useful only if opponent attacks late
- Kasatushi
- Juri's best wakeup reversal
- not vulnerable to any option-selects
- backdash
- evades meaty attacks
- vulnerable to certain option-selects
- dash
- 1f: vulnerable hitboxes lower to approximately shoulder-level
- 2~8f: vulnerable hitboxes lower to approximately waist-level
- useful for evading cross-ups
- evades El Fuerte's Tostada Press, Fajita Buster, and Propeller Tortilla
- crouching /crouching /close standing
- anti-airs if opponent does a late jump-in or dive kick
- crouching
- beats cross-up hurricane kicks
- evades C Viper's Burning Kick, M Bison's Psycho Crusher, Vega's Flying Barcelona Attack, and all hurricane kicks
- close standing
- beats throws (except invincible command throws)
- causes a reset if hit out of by most normals
- particularly useful if holding Fuhajin and unable to crouch tech
Fuzzy Guard
On taller characters, it is possible to set up instant overheads that would not normally be possible. The easiest way to use this is to put an opponent in standing blockstun with a jump-in ![]() ,
, ![]() , or deep
, or deep ![]() . Immediately after landing, jump again and use jumping
. Immediately after landing, jump again and use jumping ![]() or
or ![]() . The opponent will still have a standing hitbox even if they are crouching, which allows these moves to function as instant overheads. Another method is to take advantage of the hitboxes of characters as they are recovering from a knockdown. If timed correctly, jumping
. The opponent will still have a standing hitbox even if they are crouching, which allows these moves to function as instant overheads. Another method is to take advantage of the hitboxes of characters as they are recovering from a knockdown. If timed correctly, jumping ![]() or
or ![]() will function as an instant overhead, unless the opponent does a move on wakeup to force their vulnerable hitboxes to change.
will function as an instant overhead, unless the opponent does a move on wakeup to force their vulnerable hitboxes to change.
Empty Jump Mix-up
This is a mix-up that any character can do, but Juri can be particularly annoying with it. When jumping in on an opponent, jumping attacks can mixed up with empty jumps immediately followed by low attacks or throws. Due to the hitbox of Juri's jumping ![]() , she can do this move very low to the ground, making it difficult for opponents to defend against this mix-up correctly.
, she can do this move very low to the ground, making it difficult for opponents to defend against this mix-up correctly.
Combos
Bread and Butters
- close s.MK (1) xx Fuhajin (store) - 80 damage, 140 stun
- close s.HP xx EX Senpusha - 250 damage, 355 stun
- c.MK xx H/EX Senpusha - 200/240 damage, 255/285 stun
- EX Shikusen |> L/EX Senpusha - 200/290 damage, 180/295 stun
- EX Shikusen |> j.HP - 250 damage, 250 stun
- (air-to-air) j.MP |> j.MP |> c.HK - 172 damage, 180 stun
- (air-to-air) j.MP |> close s.HP xx L/EX Senpusha - 182/270 damage, 282/370 stun
Hit Confirm Combos
- c.LK, c.LK xx M Senpusha - 136 damage, 204 stun
- c.LK > s.LP, c.MP xx H Senpusha - 196 damage, 289 stun; whiffs on most crouchers
- c.LK > close s.LK, c.MP xx H Senpusha - 196 damage, 289 stun
- c.MK xx L Fuhajin (release), c.MK xx H Senpusha - 256 damage, 339 stun
- c.MK xx L Fuhajin (release), c.HK - 182 damage, 230 stun; untechable knockdown
Dizzy / Focus Crumple Combos
- c.HP xx H/EX Senpusha
- EX Shikusen |> L/EX Senpusha
FADC Combos
- c.MK xx L Fuhajin (release) xx EX Focus Cancel, c.HP xx H Senpusha - 288 damage, 419 stun
- c.MK xx L Senpusha xx EX Focus Cancel, s.LK, c.MP xx H Senpusha - 277 damage, 343 stun
Advanced Combos
- (air-to-air) j.MP |> EX Shikusen |> L/EX Senpusha - 242/330 damage, 222/314 stun; must be falling from jump when j.MP hits
- Shikusen |> EX Senpusha - 190 damage, 205 stun
Combos Into Supers
- close s.HP xx L/M Fuharenjin - 470 damage, 200 stun
- (air-to-air) j.MP |> close s.HP xx L/M Fuharenjin - 446 damage, 250 stun
- c.MK xx L Senpusha xx Fuharenjin - 416 damage, 140 stun
- c.MK xx L Fuhajin (release) xx Fuharenjin - 406 damage, 150 stun
- Shikusen |> Fuharenjin - 410 damage, 50 stun
- j.MP xx Shikusen |> Fuharenjin - 386 damage, 100 stun
Combos Into Ultras
- Feng Shui Engine
- Kaisen Dankairaku
- (air-to-air) j.MP |> Kaisen Dankairaku - 434 damage, 50 stun
- EX Shikusen |> Kaisen Dankairaku - 544 damage, 140 stun
- Shikusen |> Kaisen Dankairaku - 424 damage, 50 stun; corner-only on some characters
- c.MK xx L Fuhajin (release) xx EX Focus Attack (lv.2), Kaisen Dankairaku - 406 damage, 255 stun; must be close or in corner for focus attack to connect
- c.MK xx L Fuhajin (release) [xx EX Focus Cancel], Kaisen Dankairaku - 446 damage, 150 stun; EX Focus Cancel only needed mid-screen
- (anti-air) HK Fuhajin [xx EX Focus Cancel], Kaisen Dankairaku - 434 damage, 50 stun; EX Focus Cancel only needed mid-screen
- (trade) close s.HP, Kaisen Dankairaku - 460 damage, 200 stun
Matchups
- Vs. Abel
To Be Written (TBW)
- Vs. Adon
TBW
- Vs. Akuma
TBW
- Vs. Balrog
TBW
- Vs. Blanka
TBW
- Vs. C. Viper
TBW
- Vs. Cammy
TBW
- Vs. Chun Li
TBW
- Vs. Cody
TBW
- Vs. Dan
TBW
- Vs. Dee Jay
TBW
- Vs. Dhalsim
TBW
- Vs. Dudley
TBW
- Vs. E. Honda
TBW
- Vs. El Fuerte
TBW
- Vs. Fei Long
TBW
- Vs. Gen
TBW
- Vs. Gouken
TBW
- Vs. Guile
TBW
- Vs. Guy
TBW
- Vs. Hakan
TBW
- Vs. Ibuki
TBW
- Vs. Juri
TBW
- Vs. Ken
TBW
- Vs. M. Bison
TBW
- Vs. Makoto
TBW
- Vs. Rose
TBW
- Vs. Rufus
TBW
- Vs. Ryu
TBW
- Vs. Sagat
TBW
- Vs. Sakura
TBW
- Vs. Seth
TBW
- Vs. T. Hawk
TBW
- Vs. Vega
TBW
- Vs. Zangief
TBW