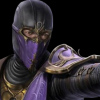
Rain
Shao Khan's conquest orphaned many children but one was only adopted by the powerful Edenian resistance. Under there tutelage he became a elite but arrogant fighter named Rain. He served his resistance well for many years, he was denied his own command. Infuriated, he betrayed his brethren and joined his mortal enemy Shao Khan. Ignoring loyalty, Rain is hellbent on his mission, obtain true power and destroy anything that gets in the way...
Moves
Basic Attacks
Command Normals
Throws
Kombo Attacks
Fast Tags
Tag Kombos
Tag Specials
Special Attacks
Enhanced Special Attacks
X-Ray Attack
Finishing Moves
Move Analysis
From TYM forums:
Basic Attacks
N/A
Command Normals
Kombo Attacks
Safe on block. FK is Rain's fastest normal.
Rain's fastest string to chain in specials, but not the Super Kick, the Super Kick will make it safe on block, but Lightning, Water bubble and Geyser kick will string as a combo. Mainly used as a punisher against fast specials, punishing Reptile's dash for example.
On knock back, it grants good advantage, only safe with on block if ended with Super Kick.
Safe string that ends with a low. Mixup this string with Waterfall string.
Mainly used as an end of juggle option, safe on block, the B + BK can be cancelled into any special, but made safe with Super Kick.
Mid launcher.
Special Attacks
Super Kick
Safe launcher. Can be charged by holding BK, dash forward or back to cancel. Whilst charging this move you can cancel into Geyser Kick, Waterport and Water Bubble without dashing.
Geyser Kick
Used as mainly an anti air and anti air wake up, this move makes it virtually impossible to cross jump up over Rain.
Water Bubble
Projectile move that allows you to move the opponent anywhere on the screen for a limited amount of time, does 0% damage. Safe from full screen, and if the opponent blocks the projectile from 3/4 screen, it will push the opponent back to full screen for another safe projectile. It is also great to fire a water bubble after an uppercut to check your opponents tech roll, after your opponents roll if they block, it will push them back to a safe distance. Characters with shielding on their wake up attacks will break through this, so don't waste your time doing this to Raiden for example.
Basic strat with this move is not to combo afterwards, because, not only does the bubble scale the damage in your juggle, but you are granted the option to drop the opponent in front of you, giving you a guaranteed block string op, or throw. The opponent can get out of a safe throw by crouching unblocked, but either way, he has to guess.
Lightning
Safe from full screen, and recommend to only be used naked at full screen as it can be punished if jump timed from half screen. Mainly used to ground check the opponent after uppercuts etc, rain's best zoning tool, as this should be a constant threat to punish blocked projectiles from full screen. Used in juggles and will auto correct the opponents position during the juggle. After catching the opponent with a lightning move, you can grab the opponent with a water bubble for the drop reset.
Aqua Splash
Mainly use as anti air, but not on a cross over jump. It acts like Reptiles acid stream.
H20 Boost
Grants you a damage boost for 3–4 seconds, but disables your blocking, you will be knocked out of this state as soon as you finish an attack or drop a juggle. Not worth it as far as going for extra damage, it is mainly used as a Mind Game and baiting tool, with the words "BLOCKING DISABLED" appearing on both you and your opponents screen (Online). With that dangled in front of the opponent, you will 99% of time bait an advance of any sort out of the opponent. Use this smartly and with a breaker at hand. You will get a free Boost Opportunity after a successful Lightning, as your opponent hits the ground, try jump crossing over your opponent into the Waterfall overhead mid string.
Waterport
A fast Teleport that can be performed from the air and after a Jump in Punch or Kick, can be cancelled into from a charged Super Kick without dashing, leaves you slightly air born as your appear on the other side.
Enhanced Special Attacks
Power Kick
It has armour on start up and it will beat every wake up move in the game. This will launch the opponent, so it is excellently used as an anti air counter.
Thunder Storm
Mainly used to extend combos. If you connect with the lightning from anywhere on the screen, you can get a teleport in time for a juggle. Does 6% chip damage at full screen.
H20 Boost
Longer lasting boost. Last during some long combos for more damage. Remember that you cannot block during boost.
Hydro Bubble
Drains opponents meter. Only use during combos to prevent a breaker.
X-Ray Attack
Can be combo'd after the kick part.
Basic Strategy
N/A
Advanced Strategy
Combos
Bread and Butters
9-Hits - ![]() ,
, ![]() ,
, ![]() +
+ ![]()
![]()
![]() ,
, ![]() ,
, ![]() +
+ ![]()
![]()
![]() ,
, ![]() ,
, ![]() +
+ ![]() = 25%
= 25%
30%: ![]() ,
, ![]()
![]() Lightning
Lightning ![]()
![]() ,
, ![]()
![]() Bubble
Bubble ![]() Geyser Kick
Geyser Kick
35%: ![]() ,
, ![]() ,
, ![]() +
+ ![]()
![]() Dash
Dash ![]()
![]() ,
, ![]()
![]() Bubble
Bubble ![]()
![]() ,
, ![]() , Lightning
, Lightning ![]()
![]() ,
, ![]()
![]() Aqua Splash
Aqua Splash
37%: ![]() +
+ ![]() ,
, ![]() +
+ ![]()
![]()
![]() ,
, ![]() , Super Kick
, Super Kick ![]()
![]() ,
, ![]() , Bubble
, Bubble ![]()
![]() ,
, ![]()
![]() Lightning
Lightning ![]()
![]() , Aqua Splash
, Aqua Splash
Jump-in Combos
- N/A
Combos With Enhanced Specials
Combos With X-Ray Attacks
![]() +
+ ![]() ,
, ![]() +
+ ![]()
![]() Dash
Dash ![]()
![]() +
+ ![]() ,
, ![]() +
+ ![]()
![]() Dash
Dash ![]()
![]() ,
, ![]()
![]() Cancel into Bubble
Cancel into Bubble ![]() drop high and right next to you into
drop high and right next to you into ![]()
![]() ,
, ![]()
![]() Cancel into Lightning
Cancel into Lightning ![]() X-Ray
X-Ray
Corner-Only Combos
41%: ![]() ,
, ![]() ,
, ![]() +
+ ![]()
![]() [
[ ![]() ,
, ![]() , Geyser Kick x3 ]
, Geyser Kick x3 ]
Style
- Teleports and traps
Matchups
N/A

